1. Koniec produktuview
The Fantech FB 6 In-line Filter Box is designed to enhance indoor air quality by providing additional filtration within your HVAC ductwork. It is typically installed after an HRV (Heat Recovery Ventilator) or an inline fan to filter incoming air. This unit includes a MERV 13 filter for efficient particle removal.

Rysunek 1: Zewnętrzny view of the Fantech FB 6 In-line Filter Box, showing the duct connection on the left and the access knob on the right.
2. Informacje dotyczące bezpieczeństwa
Please read all instructions carefully before installation and operation. Failure to follow these instructions may result in property damage, injury, or death.
- Ensure power to the HVAC system is disconnected before installation or maintenance.
- Podczas instalacji i konserwacji należy nosić odpowiedni sprzęt ochrony osobistej (PPE).
- Consult a qualified HVAC professional for complex installations or if you are unsure about any steps.
- Nie używaj urządzenia, jeśli jakakolwiek część jest uszkodzona lub jej brakuje.
- Stare filtry należy utylizować zgodnie z lokalnymi przepisami.
3. Zawartość opakowania
Przed rozpoczęciem instalacji sprawdź, czy wszystkie komponenty są obecne.
- Fantech FB 6 In-line Filter Box
- MERV 13 Filter (pre-installed or separate)
- Instrukcja instalacji (niniejsza instrukcja)
4. Instalacja i konfiguracja
4.1 Lista kontrolna przed instalacją
- Confirm duct size compatibility (6-inch duct).
- Ensure adequate space for installation and future filter replacement.
- Gather necessary tools (e.g., duct cutters, sealant, screwdriver).
4.2 Kroki instalacji
- Wybierz lokalizację: Install the filter box in the ductwork after your HRV or inline fan, ensuring it is accessible for maintenance.
- Przygotuj kanały wentylacyjne: Cut a section of the existing 6-inch ductwork to accommodate the filter box. Ensure clean, straight cuts.
- Connect to Ductwork: Slide the filter box onto the prepared duct ends. Secure connections using appropriate duct clamps or screws and seal with HVAC-approved tape or mastic to prevent air leaks.
- Sprawdź instalację filtra: Open the access panel (refer to Figure 2) and ensure the MERV 13 filter is correctly seated.
- Bezpieczny panel dostępu: Close and secure the access panel using the provided knobs/screws.
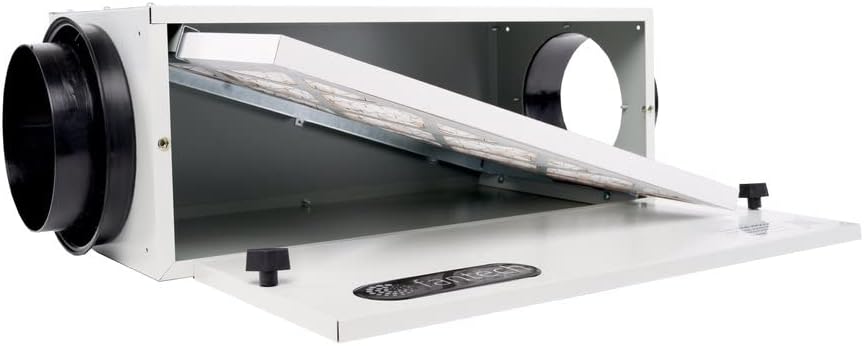
Rysunek 2: Wnętrze view of the Fantech FB 6 In-line Filter Box with the access panel open, revealing the MERV 13 filter angled inside.
5. Działanie
The Fantech FB 6 In-line Filter Box operates passively as part of your ventilation system. Once installed, it continuously filters the air passing through it. No user interaction is required for its daily operation.
6. Konserwacja
6.1 Wymiana filtra
Regular filter replacement is crucial for maintaining optimal air quality and system performance. The frequency of replacement depends on usage and environmental conditions, but it is generally recommended every 3-6 months.
- Odłącz zasilanie: Ensure the HVAC system connected to the filter box is powered off at the circuit breaker.
- Open Access Panel: Loosen the knobs/screws on the access panel and carefully open it.
- Usuń stary filtr: Gently slide out the old MERV 13 filter. Note its orientation for correct installation of the new filter.
- Wstaw nowy filtr: Slide a new MERV 13 filter into the filter box, ensuring it is properly seated and oriented.
- Zamknij Panel dostępu: Close the access panel and tighten the knobs/screws securely.
- Przywróć zasilanie: Turn the power back on to the HVAC system.
7. Rozwiązywanie Problemów
| Problem | Możliwa przyczyna | Rozwiązanie |
|---|---|---|
| Condensation/Sweating on unit (in cold climates) | Insufficient insulation around the unit, especially when used for fresh air intake. | Apply additional insulation around the exterior of the filter box to prevent condensation. Ensure proper sealing. |
| Access panel screws spin freely / do not tighten | Internal riveted nut may have come loose or stripped. | Carefully inspect the internal nut. If loose, attempt to secure it. If stripped, consider using a different fastening method or contacting Fantech support. |
| Filter does not fit perfectly or seal properly | Screw heads or internal components obstructing filter path; incorrect filter size. | Ensure you are using the correct filter size (e.g., 20x20x1 if adapting). Carefully position the filter to avoid obstructions. |
8. Specyfikacje
| Funkcja | Szczegół |
|---|---|
| Numer modelu | FB 6 (CECOMINOD072653) |
| Producent | Fantech |
| Zgodność rozmiarów kanałów | 6 cali |
| Filter Type Included | MERV-13 |
| Waga przedmiotu | 10 funtów (4.54 kg) |
| Wymiary opakowania | 26.9 x 15.1 x 13.1 cala (68.3 x 38.4 x 33.3 cm) |
| Tworzywo | 22-gauge galvanized steel with baked powder coat finish |
| UPC | 650737403041 |
9. Gwarancja i wsparcie
For warranty information and technical support, please refer to the official Fantech webwitryny lub skontaktuj się z obsługą klienta.
You can visit the official Fantech store on Amazon for more products and information: FANTECH Store.


