Wstęp
This manual provides detailed instructions for the installation, operation, and maintenance of your OSD Audio SVC205 In-Wall Volume Control. Please read this manual thoroughly before installation and use to ensure proper function and safety.
The OSD Audio SVC205 is a high-quality in-wall volume control designed to manage audio levels for a pair of speakers in a multi-room audio system. It features a 12-step linear rotary knob for precise volume adjustment and an integrated on/off switch for complete audio control.
Informacje dotyczące bezpieczeństwa
- Przed instalacją lub serwisowaniem należy zawsze odłączyć zasilanie.
- Upewnij się, że wszystkie połączenia przewodów są solidne i zgodne z lokalnymi przepisami elektrycznymi.
- Do not exceed the maximum power rating of 100 Watts per channel.
- Urządzenie jest przeznaczone wyłącznie do użytku wewnątrz pomieszczeń.
- Jeśli nie jesteś pewien co do któregokolwiek etapu instalacji, skonsultuj się z wykwalifikowanym elektrykiem.
Cechy produktu
- Obsługa mocy: Rated at 100 Watts per channel with minimal bass roll-off.
- Regulacja głośności: 12-step linear rotary-style knob for precise volume adjustment.
- Przełącznik włączania/wyłączania: Integrated switch for completely turning off audio.
- Impedance Protection: Assists in stabilizing the ohm load to prevent amplifier damage when multiple speakers are connected.
- Adjustable Jumpers: Front-mounted adjustable jumpers for easy impedance adjustment.
- Projekt: Décor plates designed for easy installation into a standard single gang box (2.9” depth).
- Okablowanie: Accepts up to 14 gauge wiring.
Zawartość opakowania
- OSD Audio SVC205 In-Wall Volume Control Unit
- Matching Wall Plate
- Śruby montażowe
Konfiguracja i instalacja
Proper installation is crucial for optimal performance and safety. If you are not comfortable with electrical wiring, please consult a professional installer.
Wymagane narzędzia:
- Śrubokręt (krzyżakowy i płaski)
- Ściągacze izolacji
- Taśma izolacyjna (opcjonalnie)
- Tomtage Tester (recommended)
Schemat okablowania i połączeń:
The SVC205 features screw terminals for secure wire connections. Ensure proper polarity (positive to positive, negative to negative) for all connections.
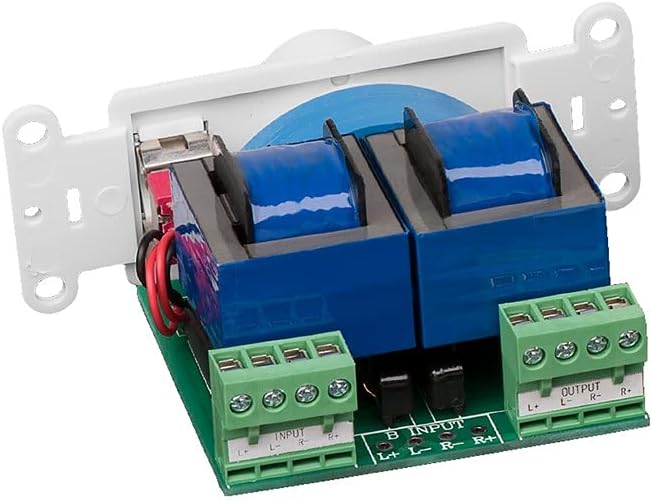
Obraz: Tył view of the SVC205 showing the input and output screw terminals for speaker wire connections. The green terminal blocks are clearly labeled for Left and Right channels, and positive (+) and negative (-) connections.

Image: A visual representation of speaker wire (red and black) being connected to the input terminals of the SVC205 volume control. This illustrates the type of wiring accepted by the unit.
- Wyłącz zasilanie: Before beginning any wiring, ensure that the power to the audio system and the circuit where you are installing the volume control is completely turned off at the main breaker.
- Przygotuj przewody: Strip approximately 1/2 inch of insulation from the ends of your speaker wires. The SVC205 accepts up to 14 gauge wiring.
- Podłącz przewody wejściowe: Podłącz przewody głośnikowe ze swojego amplifier or receiver to the "INPUT" terminals on the SVC205. Match the positive (+) and negative (-) terminals for both Left (L) and Right (R) channels.
- Podłącz przewody wyjściowe: Connect the speaker wires leading to your speakers to the "OUTPUT" terminals on the SVC205. Again, ensure correct polarity for Left (L) and Right (R) channels.
- Adjust Impedance Jumpers (if applicable): The SVC205 includes front-mounted adjustable jumpers for impedance matching. Refer to the diagram below for typical settings. Adjust these jumpers based on the total impedance of your connected speakers to prevent overheating and damage to your ampliyfikator.
- Montowanie: Carefully push the wired SVC205 unit into a standard single gang electrical box. The unit requires a minimum depth of 2.9 inches. Secure the unit to the electrical box using the provided mounting screws.
- Zainstaluj płytę ścienną: Attach the matching wall plate over the installed volume control unit.
- Przywróć zasilanie: Once all connections are secure and the unit is mounted, restore power to the circuit.

Image: A close-up diagram illustrating the location and configuration of the impedance protection jumpers on the SVC205 circuit board. These jumpers allow for adjustment to match the impedance of connected speakers.
Instrukcja obsługi
The OSD Audio SVC205 is simple to operate:

Obraz: Przód view of the OSD Audio SVC205 In-Wall Volume Control, showing the prominent rotary volume knob and the smaller on/off toggle switch located below it.
- Włączanie/wyłączanie: Use the small toggle switch located below the rotary knob to turn the audio on or off. Flipping the switch will completely mute or unmute the sound.
- Regulacja głośności: Rotate the large knob clockwise to increase the volume and counter-clockwise to decrease it. The 12-step linear design provides precise control over the audio level.

Image: A graphic illustrating the 12-step linear rotary action of the volume knob, indicating the range of precise volume control available.
Konserwacja
The OSD Audio SVC205 requires minimal maintenance.
- Czyszczenie: Use a soft, dry cloth to clean the surface of the wall plate and knob. Do not use abrasive cleaners or solvents.
- Kontrola: Periodically check the wall plate for any signs of damage or loose connections. If any issues are found, disconnect power and address them promptly.
- Brak części nadających się do samodzielnej naprawy przez użytkownika: The internal components of the SVC205 are not user-serviceable. Do not attempt to open or repair the unit.
Rozwiązywanie problemów
| Problem | Możliwa przyczyna | Rozwiązanie |
|---|---|---|
| Brak dźwięku z głośników. |
|
|
| Distorted or low-quality sound. |
|
|
| Unit does not fit in electrical box. |
|
|
Specyfikacje
| Nazwa modelu | SVC205 |
| Obsługa mocy | 100 Watts per channel (300 Watts total) |
| Volume Control Type | 12-step linear rotary |
| Impedance Protection | Yes, with adjustable jumpers |
| Kompatybilność okablowania | Up to 14 gauge |
| Typ montażu | In-Wall (fits standard single gang box) |
| Minimalna głębokość pudełka | 2.9 cali |
| Kolor | Biały |
| Wymiary (produkt) | 6 x 3 x 3 cale (w przybliżeniu) |
| Waga przedmiotu | 0.01 uncji |
| Zastosowanie wewnątrz/na zewnątrz | Wnętrz |
Gwarancja i wsparcie
OSD Audio products are designed for reliability and performance. For warranty information and technical support, please visit the official OSD Audio webstronie lub skontaktuj się z działem obsługi klienta.
Producent: Dźwięk OSD
Webstrona: www.osdaudio.com
For further assistance, refer to the contact information provided on the manufacturer's webstrona.


