1. Wprowadzenie
This manual provides essential information for the proper installation, operation, and maintenance of the Robertshaw A12-701 Thermostat. The A12-701 is a genuine OEM replacement part designed for specific applications requiring precise temperature control. Please read this manual thoroughly before attempting any installation or operation.
2. Informacje dotyczące bezpieczeństwa
OSTRZEŻENIE: Failure to follow these safety instructions could result in property damage, personal injury, or death.
- Always disconnect power to the appliance or system before installing, servicing, or removing the thermostat.
- Installation should only be performed by a qualified technician or licensed professional.
- Upewnij się, że wszystkie połączenia przewodów są solidne i zgodne z lokalnymi przepisami elektrycznymi.
- Nie należy używać termostatu, jeśli wydaje się uszkodzony.
- Trzymaj dzieci z dala od urządzeń elektrycznych.
3. Zawartość opakowania
Przed przystąpieniem do instalacji sprawdź, czy wszystkie komponenty są obecne i nieuszkodzone.
- Robertshaw A12-701 Thermostat Unit (with capillary tube)
- Pokrętło sterujące
- Protective Cover/Housing
- Śruby montażowe (zwykle 2)
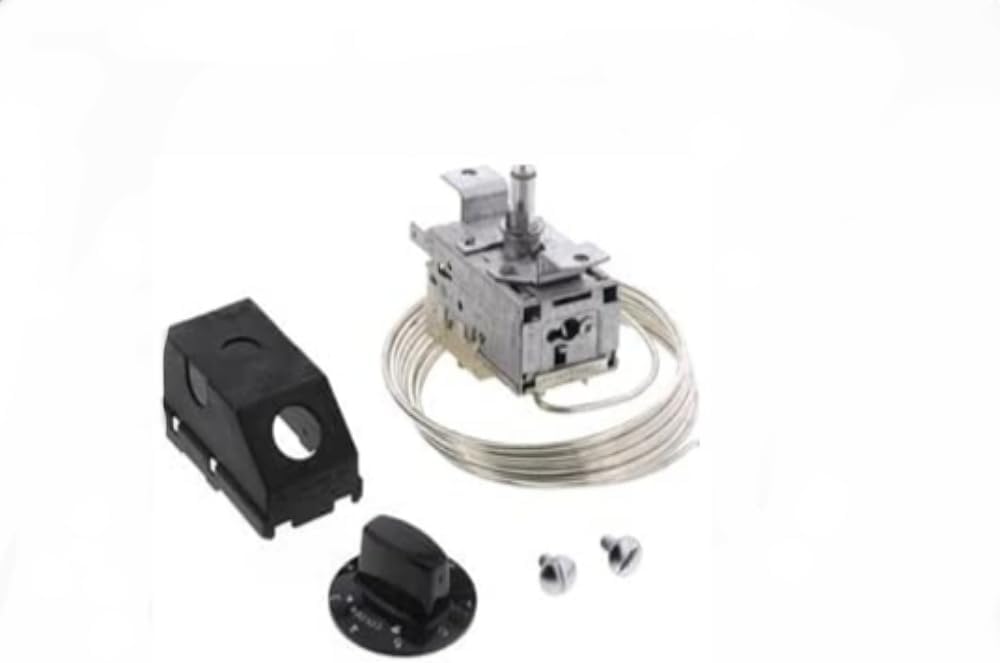
Rysunek 1: Eksplodowany view of the Robertshaw A12-701 Thermostat components, showing the main thermostat unit with its coiled capillary tube, a separate black control knob, a black protective housing, and two small mounting screws.
4. Konfiguracja i instalacja
Installation of the Robertshaw A12-701 Thermostat typically involves replacing an existing thermostat. Due to the nature of electrical and refrigeration components, professional installation is highly recommended.
4.1 Czynności przed instalacją
- Odłącz zasilanie: Ensure the power supply to the appliance or system is completely disconnected at the circuit breaker or fuse box.
- Dostęp do starego termostatu: Carefully remove the access panel or cover to expose the existing thermostat.
- Okablowanie dokumentów: Before disconnecting any wires, take clear photographs or draw a diagram of the existing wiring connections. Note the color and terminal location of each wire.
- Usuń stary termostat: Disconnect the wires and unmount the old thermostat.
4.2 Kroki instalacji
- Zamontuj nowy termostat: Position the new Robertshaw A12-701 thermostat unit in the designated mounting location. Secure it using the provided mounting screws.
- Podłącz okablowanie: Refer to your documented wiring diagram and connect the wires to the appropriate terminals on the new thermostat. Ensure all connections are tight and secure.
- Pozycja rurki kapilarnej: Carefully route the capillary tube to the sensing area as per the appliance manufacturer's specifications. Avoid kinking or sharply bending the tube. The end of the capillary tube is the temperature sensing element.
- Zamontuj osłonę ochronną: Place the protective cover/housing over the thermostat unit if applicable, ensuring it fits securely.
- Attach Control Knob: Push the control knob onto the thermostat shaft. Ensure it aligns correctly with any indexing marks.
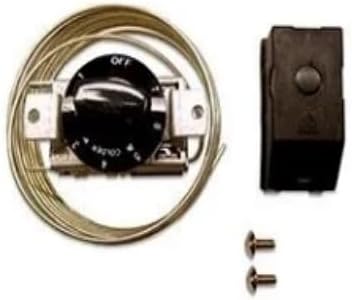
Rysunek 2: Zmontowany view of the Robertshaw A12-701 Thermostat, showing the main unit with its coiled capillary tube, the black control knob attached, and the black protective housing. Two mounting screws are also visible. The knob has markings for "OFF" and "COLDER".
4.3 Kontrola po instalacji
- Przywróć zasilanie: Once all connections are secure and the thermostat is properly mounted, restore power to the appliance or system.
- Operacja testowa: Turn the control knob to a desired setting and observe if the appliance responds as expected.
5. Instrukcja obsługi
The Robertshaw A12-701 Thermostat is operated via a rotary control knob. The knob typically features markings such as "OFF" and a range indicating colder settings.
- Włączanie/wyłączanie: Rotate the knob to the "OFF" position to disable the cooling function. Rotate it away from "OFF" to activate the thermostat.
- Regulacja temperatury: Rotate the knob towards the "COLDER" indication to decrease the target temperature, or away from it to increase the target temperature. The specific temperature range will depend on the appliance it is installed in.
- Ustawienie początkowe: For initial use, set the thermostat to a mid-range setting and allow the appliance to stabilize for several hours before making further adjustments.
6. Konserwacja
The Robertshaw A12-701 Thermostat is designed for reliable operation with minimal maintenance. However, periodic checks can help ensure optimal performance.
- Czyszczenie: If necessary, gently wipe the exterior of the thermostat and control knob with a soft, dry cloth. Do not use abrasive cleaners or solvents.
- Capillary Tube Inspection: Periodically inspect the capillary tube for any signs of damage, kinks, or dislodgement from its sensing position. Ensure it remains securely in place.
- Połączenia elektryczne: With power disconnected, occasionally check electrical connections for tightness.
7. Rozwiązywanie Problemów
If the appliance or system controlled by the thermostat is not functioning correctly, consider the following troubleshooting steps:
- Brak zasilania:
- Sprawdź wyłącznik automatyczny lub bezpiecznik urządzenia.
- Ensure the thermostat control knob is not in the "OFF" position.
- Nieprawidłowa temperatura:
- Verify the thermostat setting.
- Sprawdź, czy rurka kapilarna jest prawidłowo umieszczona i nie jest uszkodzona.
- Allow sufficient time for the appliance to reach the set temperature.
- Appliance Runs Continuously or Not at All:
- This may indicate a faulty thermostat or other component. Professional diagnosis is recommended.
Jeżeli wykonanie czynności rozwiązywania problemów nie pomoże, skontaktuj się z wykwalifikowanym technikiem serwisowym.
8. Specyfikacje
| Funkcja | Szczegół |
|---|---|
| Producent | Robertshaw |
| Numer części | A12-701 |
| Numer modelu przedmiotu | A12-701 |
| Waga przedmiotu | 1 funt |
| Wymiary opakowania | 1 x 1 x 1 cala |
| Ilość w opakowaniu przedmiotu | 1 |
| Czy potrzebne są baterie? | NIE |
9. Informacje o gwarancji
The Robertshaw A12-701 Thermostat is a genuine OEM replacement part. For specific warranty terms and conditions, please refer to the original appliance manufacturer's documentation or contact Robertshaw directly. Typically, OEM parts carry a limited warranty against manufacturing defects.
10. Wsparcie
For technical assistance, replacement parts, or further inquiries regarding the Robertshaw A12-701 Thermostat, please contact Robertshaw customer support or visit their official website. When contacting support, have your product model number (A12-701) and any relevant appliance information ready.
Note: Robertshaw is a registered trademark.


