1. Wprowadzenie i koniecview
The Sealey MIGHTYMIG150 is a professional-grade compact MIG welder designed for both gas and gasless operation, offering excellent performance for a variety of welding tasks. This unit is versatile and can be easily switched between gasless and gas modes by a simple change of polarity and the addition of a Gas Conversion Kit (Model No. 120.802032, sold separately).
This manual provides essential information for the safe and efficient use of your MIGHTYMIG150 welder. Please read it thoroughly before operation.
2. Informacje dotyczące bezpieczeństwa
WARNING: Welding can be dangerous. Always follow safety precautions to prevent injury or damage.
- Środki ochrony osobistej (PPE): Always wear appropriate PPE, including a welding helmet with proper shade, flame-resistant clothing, welding gloves, and safety shoes. Protect bystanders with welding screens.
- Wentylacja: Ensure adequate ventilation to remove welding fumes, which can be hazardous. Work in a well-ventilated area or use fume extraction equipment.
- Bezpieczeństwo elektryczne: Ensure the power supply is correctly rated for the welder (230V). Do not operate in damp conditions. Inspect cables and connections for damage before each use.
- Zapobieganie pożarom: Keep flammable materials away from the welding area. Have a fire extinguisher readily available. Hot metal and sparks can cause fires.
- Promienie łuku: Arc rays can cause eye and skin burns. Never look at the welding arc without proper eye protection.
- Dymy i gazy: Avoid breathing welding fumes and gases. They can be harmful to your health.
- Obszar roboczy: Utrzymuj miejsce pracy w czystości i bez bałaganu. Zapewnij stabilne podparcie.
3. Zawartość opakowania
Po rozpakowaniu sprawdź, czy w przesyłce znajdują się wszystkie poniższe elementy:
- Sealey MIGHTYMIG150 Welder Unit
- Comfort Grip Non-Live Torch (2.1 mtr)
- Earth Cable (1.8 mtr)
- Gas Hose (1 mtr)
- Flux Cored Wire (0.45 kg)
- Końcówka kontaktowa 1 mm
Note: A power plug is not supplied and must be fitted by a qualified person according to local regulations.
4. Instrukcje konfiguracji
4.1. Konfiguracja początkowa
- Unpack the welder and place it on a stable, level surface.
- Upewnij się, że wyłącznik zasilania jest w pozycji „WYŁ”.
- Podłącz przewód uziemiającyamp to the designated terminal on the front panel.
- Connect the welding torch cable to the 'TORCH' connection point.
- Install the wire spool (0.9kg gasless or 0.7kg mild steel wire reels only) into the wire feed mechanism, ensuring it feeds smoothly through the guide tube and into the torch liner.
- Fit the appropriate contact tip to the torch.
4.2. Gasless Mode Setup
The unit is set up ready for gasless mode. For gasless welding, ensure the polarity is set correctly. The flux-cored wire typically requires DC electrode negative (DCEN) polarity. Refer to the polarity diagram inside the wire feed compartment if unsure.

Rycina 1: Przód view of the Sealey MIGHTYMIG150 Welder, showing controls and connections. The power switch, wire speed dial, and torch connection are visible.
4.3. Gas Mode Setup (Optional)
To switch to gas mode, a Gas Conversion Kit (Model No. 120.802032) is required. Follow these steps:
- Change the polarity to DC electrode positive (DCEP) for solid wire and shielding gas. Consult the polarity diagram.
- Connect the supplied gas hose to the welder's gas inlet and to your gas regulator (not supplied) on the gas cylinder (CO2, Argon, or CO2/Argon Mix).
- Sprawdź, czy wszystkie połączenia gazowe są solidne i szczelne.
- Use appropriate solid welding wire for gas welding.

Rysunek 2: Strona view of the Sealey MIGHTYMIG150 Welder, highlighting its compact design and integrated wheels for portability.
5. Instrukcja obsługi
5.1. Włączanie
- Upewnij się, że wszystkie połączenia są solidne i miejsce pracy jest bezpieczne.
- Connect the welder to a suitable 230V power supply.
- Turn the 'POWER' switch to the 'ON' position. The 'POWER ON' indicator light should illuminate.
5.2. Ustawianie parametrów spawania
- Ustawienia zasilania: The MIGHTYMIG150 has multiple power settings (MIN/MAX, 1/2). Select the appropriate setting based on the thickness of the material being welded. Start with lower settings for thinner materials and increase for thicker materials.
- Prędkość drutu: Adjust the 'WIRE SPEED' dial (1-10) to control the rate at which the welding wire feeds. A good starting point is to match the wire speed to the power setting to achieve a smooth, consistent arc.
5.3. Procedura spawania
- Securely attach the earth clamp do przedmiotu obrabianego, zapewniając dobry kontakt elektryczny.
- Position the torch nozzle approximately 10-15mm from the workpiece.
- Naciśnij spust palnika, aby zainicjować łuk i podać drut.
- Maintain a consistent travel speed and torch angle for a uniform weld bead.
- Zwolnij spust, aby zatrzymać spawanie.
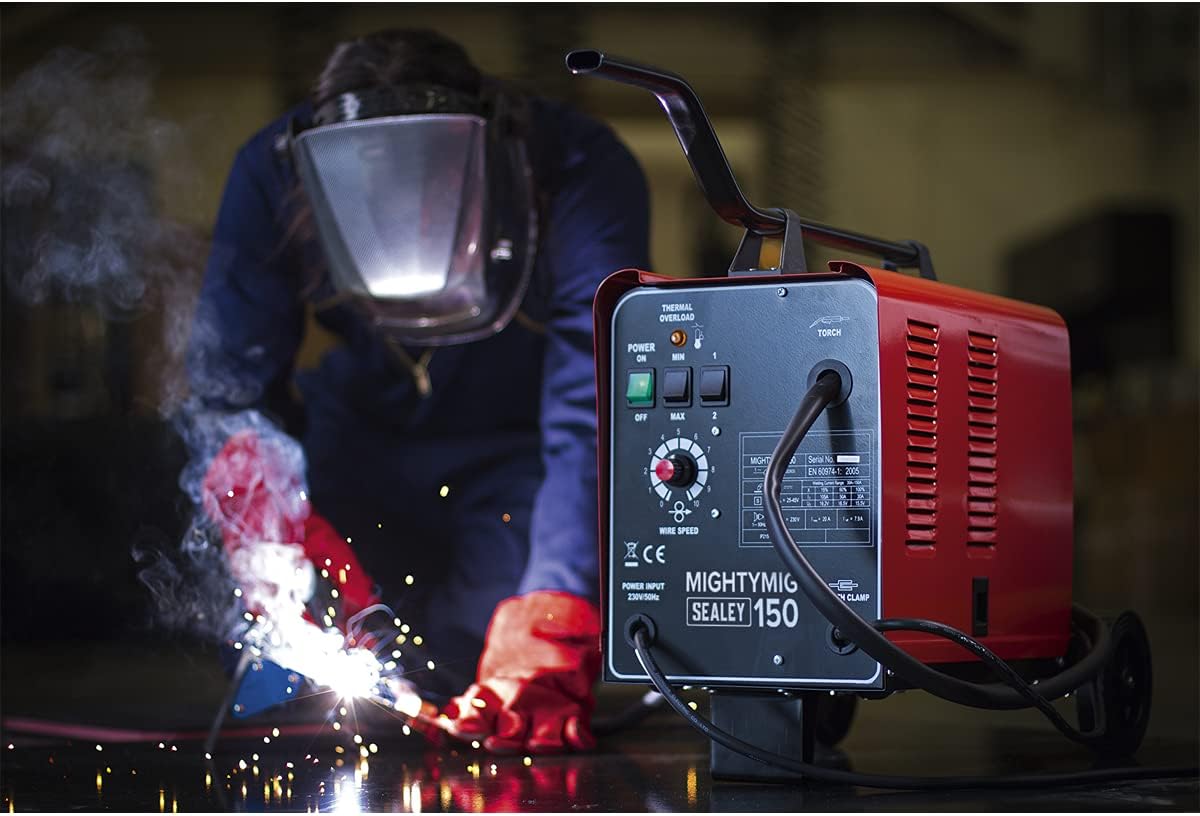
Figure 3: The Sealey MIGHTYMIG150 Welder in operation, demonstrating the welding process with sparks and a user wearing appropriate safety gear.

Rysunek 4: Bliższe spojrzenie view of the Sealey MIGHTYMIG150 Welder during use, showing the intense light of the welding arc and the material being joined.
6. Konserwacja
Regularna konserwacja gwarantuje długowieczność i bezpieczną pracę spawarki.
- Czyszczenie: Regularly clean the welder, especially the wire feed mechanism, to remove dust and debris. Use compressed air to clear ventilation slots.
- Wskazówka kontaktowa: Inspect and replace the contact tip regularly as it wears out. A worn tip can lead to poor arc stability and wire feeding issues.
- Wkładka palnika: Periodically check the torch liner for blockages or wear. A damaged liner can cause wire feeding problems.
- Ziemia Clamp: Upewnij się, że uziemienieamp is clean and makes good contact with the workpiece.
- Kable: Inspect all cables for cuts, abrasions, or damage. Replace damaged cables immediately.
- Składowanie: Przechowuj spawarkę w suchym i czystym miejscu, gdy nie jest używana.
7. Rozwiązywanie Problemów
If you encounter issues with your MIGHTYMIG150 welder, refer to the following common troubleshooting tips:
| Problem | Możliwa przyczyna | Rozwiązanie |
|---|---|---|
| Brak zasilania urządzenia | Power cable disconnected, circuit breaker tripped, faulty power switch. | Check power cable connection, reset circuit breaker, contact qualified technician if switch is faulty. |
| Drut nie podaje | Wire spool tangled, contact tip blocked, torch liner clogged, wire feed motor issue. | Untangle wire, clean/replace contact tip, clear/replace torch liner, check wire feed motor connection. |
| Poor weld quality / Inconsistent arc | Incorrect power/wire speed settings, poor earth connection, wrong polarity, contaminated workpiece. | Adjust settings, clean earth clamp contact, verify polarity, clean workpiece thoroughly. |
| Zapalona kontrolka przeciążenia termicznego | Exceeded duty cycle, insufficient cooling. | Allow the unit to cool down. Ensure ventilation is not obstructed. |
If problems persist after attempting these solutions, please contact Sealey customer support or a qualified service technician.
8. Specyfikacje
| Specyfikacja | Wartość |
|---|---|
| Numer modelu | POTĘŻNY 150 |
| Prąd spawania | 30-150A |
| Pojemność drutu | 0.9kg (Gasless), 0.7kg (Mild Steel) |
| Cykl pracy | 100% przy 30 A, 15% przy 105 A |
| Układ chłodzenia | Wymuszony obieg powietrza |
| Typ gazu | CO2, Argon, Mieszanka CO2/Argon |
| Latarka | 2.1mtr Non-Live |
| Objętość dostawtage | 230 V |
| Pochłonięta moc | 4.5kW |
| Rozmiar obudowy | Kompaktowy |
| Waga | 26 kg (ok. 57.3 funta) |
| Wymiary produktu (dł. x szer. x wys.) | 325 x 645 x 425 mm (około 12.8 x 25.4 x 16.7 cala) |
| Kolor | Czerwony |
9. Gwarancja i wsparcie
For information regarding warranty coverage, terms, and conditions, please refer to the warranty card included with your product or visit the official Sealey webZachowaj dowód zakupu na wypadek roszczeń gwarancyjnych.
For technical support, spare parts, or service inquiries, please contact Sealey customer service through their official website or the contact details provided in your product packaging. When contacting support, please have your model number (MIGHTYMIG150) and serial number ready.
Oficjalny Sealey Webstrona: www.sealey.pl


