1. Wprowadzenie
This instruction manual provides essential information for the proper installation, operation, and maintenance of your Moen 1933 Legend Escutcheon. The Moen Legend series is designed to offer dependable products with an ageless yet fashion-forward presence, seamlessly integrating with various home styles. This escutcheon features a chrome finish, providing a highly reflective, mirror-like look that complements any decorating style.
2. Informacje dotyczące bezpieczeństwa
Always observe the following safety precautions during installation and maintenance:
- Ensure the main water supply is turned off before beginning any plumbing work.
- Nosić odpowiedni sprzęt ochrony osobistej, taki jak okulary i rękawice ochronne.
- Jeśli masz jakiekolwiek wątpliwości, skonsultuj się z wykwalifikowanym hydraulikiem.
- Trzymaj małe części poza zasięgiem dzieci.
3. Lista części
Przed rozpoczęciem instalacji sprawdź, czy wszystkie komponenty są obecne:
- Moen 1933 Legend Escutcheon: A circular metal plate, chrome-finished, designed to cover the faucet opening on the sink or countertop.
- Uszczelka: A black rubber ring used to create a watertight seal between the escutcheon and the mounting surface.
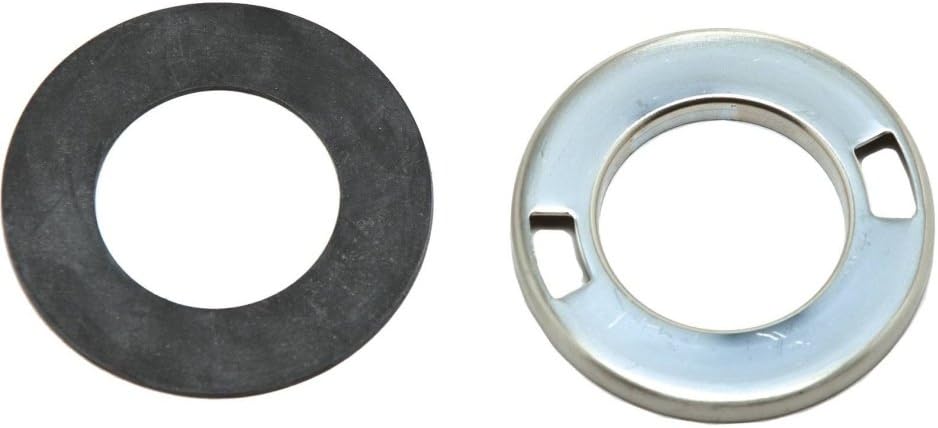
Figure 1: Moen 1933 Legend Escutcheon and Gasket. This image displays the Moen 1933 Legend Escutcheon, a chrome-finished circular metal plate, alongside its accompanying black rubber gasket. The escutcheon features two cutouts for faucet components, while the gasket provides a seal.
4. Konfiguracja i instalacja
4.1. Przygotowanie
- Turn off the water supply to the faucet at the main shut-off valve.
- Clear the work area around the faucet.
- Gather necessary tools, which may include a wrench, screwdriver, and plumber's putty (if required by your specific faucet model).
4.2. Kroki instalacji
- Ensure the mounting surface (sink or countertop) is clean and dry.
- Place the rubber gasket (provided) over the faucet holes on the mounting surface. This gasket helps create a watertight seal and protects the surface.
- Position the Moen 1933 Legend Escutcheon over the gasket, aligning any necessary openings with the faucet components.
- Secure the escutcheon in place according to your specific Moen Legend faucet's installation instructions. This typically involves tightening nuts or screws from underneath the sink to hold the faucet body and escutcheon firmly.
- Once the faucet assembly is secure, slowly turn the water supply back on and check for any leaks.
5. Instrukcja obsługi
The Moen 1933 Legend Escutcheon is a static component designed to provide a finished look and seal for your faucet installation. It does not have moving parts or operational controls. Its primary function is aesthetic and protective, covering the faucet mounting holes and providing a base for the faucet.
6. Konserwacja
Proper care will help maintain the appearance and longevity of your escutcheon:
- Czyszczenie: Regularnie czyść chromowaną powierzchnię miękką,amp Ściereczką i łagodnym mydłem. Dokładnie spłukać czystą wodą i osuszyć miękką ściereczką, aby zapobiec powstawaniu plam wodnych.
- Unikaj materiałów ściernych: Nie należy używać środków czyszczących o działaniu ściernym, silnych środków chemicznych ani gąbek ściernych, gdyż mogą one uszkodzić chromowaną powłokę.
- Kontrola: Periodically check the escutcheon and its surrounding area for any signs of wear, corrosion, or loose connections.
7. Rozwiązywanie Problemów
If you encounter issues related to the escutcheon, consider the following:
- Water Leaks Around Base: If water is leaking from under the escutcheon, the gasket may not be properly seated or could be damaged. Turn off the water supply, disassemble the faucet, inspect the gasket, and re-install ensuring a tight, even seal.
- Loose Escutcheon: If the escutcheon feels loose, the mounting nuts or screws securing the faucet assembly may need to be tightened. Access these from underneath the sink and carefully tighten them.
- Finish Discoloration/Damage: If the chrome finish shows signs of discoloration or damage, it may be due to harsh cleaning agents. Refer to the maintenance section for proper cleaning procedures. If damage persists, consider contacting Moen customer support.
8. Specyfikacje
| Specyfikacja | Szczegół |
|---|---|
| Marka | Moen |
| Numer modelu | 1933 |
| Numer części | 1933 |
| Waga przedmiotu | 2.4 uncji |
| Wymiary produktu | 8.75 x 5.25 x 0.12 cala |
| Kolor | Chrom |
| Ilość w opakowaniu przedmiotu | 1 |
| Zawarte komponenty | Bath Faucets And Accessories, Bathroom Sink Faucet Replacement Parts |
9. Informacje o gwarancji
Moen products are manufactured to the highest standards of quality and workmanship. For detailed information regarding the warranty coverage for your Moen 1933 Legend Escutcheon, please refer to the official Moen website or contact Moen customer service directly. Retain your proof of purchase for warranty claims.
10. Wsparcie
Aby uzyskać dalszą pomoc, wsparcie techniczne lub zapytać o części zamienne, prosimy o kontakt z obsługą klienta Moen. Dane kontaktowe można znaleźć na oficjalnej stronie Moen. webstrona.
Video: Moen Brand Overview. Ten film przedstawia ponadview of Moen's commitment to water experiences, showcasing various Moen faucet and shower products in different home settings, highlighting their design and functionality.
Odwiedź oficjalną stronę Moen website for more product information and support: Sklep Moen


