1. Wprowadzenie
Dziękujemy za zakupasing the AIWA BBTC-550 Portable Radio Cassette Player. This versatile device combines classic audio formats with modern connectivity, allowing you to enjoy your music from various sources. Please read this manual carefully before using the unit to ensure proper operation and to maximize your listening experience. Keep this manual for future reference.
Główne cechy:
- Portable Radio Cassette with CD reader, USB, and Bluetooth 5.0 connection.
- Cassette player and recorder with Auto-Stop function.
- Port USB umożliwiający odtwarzanie muzyki w formacie MP3.
- AUX IN input (3.5mm) for connecting external audio devices.
- Headphone socket (3.5mm).
- Compatible with CD/CD-R/MP3 discs with 20 programmable memories.
- FM PLL Radio with 40 programmable station presets.
- Digital clock with 24-hour display.
- High-frequency range dynamic speakers with super bass and amplified treble.
- Panoramic LCD screen with soft tonality backlight.
2. Koniec produktuview
The AIWA BBTC-550 is designed for ease of use and portability. Below are images illustrating the device's main components and features.

Rycina 2.1: Przód view of the AIWA BBTC-550, showing the display, control buttons, and speakers.

Rysunek 2.2: Widok z góry na dół view of the AIWA BBTC-550 with the CD compartment lid open.

Rysunek 2.3: Strona view of the AIWA BBTC-550 with the cassette compartment door open and the telescopic antenna extended.

Figure 2.4: Close-up of the side panel showing the 3.5mm headphone jack, 3.5mm AUX IN port, and USB/MP3 port.
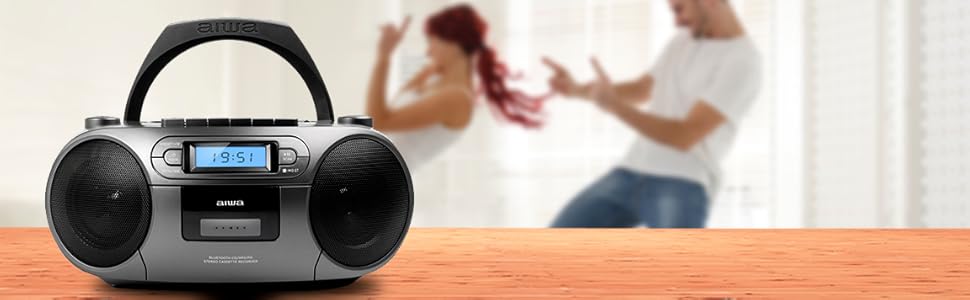
Figure 2.5: Promotional image highlighting the multi-functionality of the AIWA BBTC-550.
3. Konfiguracja
3.1 Zasilanie
The AIWA BBTC-550 can be powered by either AC mains electricity or batteries for portable use.
- Zasilanie prądem zmiennym: Connect the provided AC power cord to the AC IN socket on the unit and then to a standard 230V/50Hz wall outlet.
- Moc baterii: For portable use, insert 6 x 1.5V LR14/UM2/C batteries into the battery compartment located on the bottom of the unit. Ensure correct polarity (+/-) when inserting batteries.
3.2 Regulacja anteny
For optimal FM radio reception, fully extend the telescopic antenna. Adjust its position and angle to achieve the clearest signal.
4. Instrukcja obsługi
4.1 Sterowanie ogólne
- Przycisk zasilania: Naciśnij, aby włączyć lub wyłączyć urządzenie.
- Przycisk MODE: Press to switch between CD, USB, Bluetooth, Radio, and Cassette modes.
- Pokrętło VOLUME: Rotate to adjust the sound level.
- Wyświetlacz LCD: Shows current mode, track number, frequency, and time.
4.2 Odtwarzanie płyt CD
- Naciśnij TRYB przycisk, aby wybrać tryb CD.
- Open the CD compartment lid and place a CD (CD/CD-R/MP3 compatible) with the label side facing up. Close the lid securely.
- The unit will read the disc, and the total number of tracks will appear on the display.
- Naciśnij ODTWÓRZ/PAUZA (►/❚❚) przycisk, aby rozpocząć odtwarzanie.
- Naciskać ODTWÓRZ/PAUZA (►/❚❚) again to pause, and press once more to resume.
- Naciśnij POMIŃ (►►| / |◄◄) przyciski, aby przejść do następnego lub poprzedniego utworu.
- Naciśnij STOP (■) aby zatrzymać odtwarzanie.
- Odtwarzanie programu: W trybie zatrzymania naciśnij PROG/CZAS przycisk. Użyj POMINĄĆ przyciski, aby wybrać utwór, a następnie naciśnij PROG/CZAS ponownie, aby dodać go do listy programów. Powtórz dla maksymalnie 20 utworów. Naciśnij GRAĆ Aby rozpocząć odtwarzanie zaprogramowane.
4.3 Obsługa kasety
- Naciśnij TRYB przycisk, aby wybrać tryb kasety.
- Otwórz klapkę komory kasety i włóż kasetę. Zamknij klapkę.
- Odtwarzanie nagranego dźwięku: Naciśnij GRAJ (►) przycisk, aby rozpocząć odtwarzanie taśmy.
- Szybkie przewijanie do przodu/do tyłu: Naciśnij FF (►►) or REW (◄◄) guziki. Naciskać STOP (■) to stop winding.
- Zatrzymać: Naciśnij STOP (■) button to stop playback or winding. The unit features an Auto-Stop function at the end of the tape.
- Nagranie: Insert a blank cassette. Select the desired audio source (CD, USB, Bluetooth, Radio, or AUX IN). Press the NAGRAJ (●) button on the cassette deck. The unit will start recording from the selected source. Press STOP (■) aby zakończyć nagrywanie.
4.4 Odtwarzanie USB
- Naciśnij TRYB przycisk, aby wybrać tryb USB.
- Włóż dysk flash USB zawierający dźwięk w formacie MP3 files do portu USB.
- The unit will automatically detect and start playing the MP3 files.
- Użyj ODTWÓRZ/PAUZA (►/❚❚) I POMIŃ (►►| / |◄◄) buttons for control, similar to CD playback.
4.5 Połączenie Bluetooth
- Naciśnij TRYB button to select Bluetooth mode. The display will show 'BT' and start flashing, indicating it's in pairing mode.
- Na urządzeniu z włączoną funkcją Bluetooth (smartfonie, tablecie itp.) włącz Bluetooth i wyszukaj dostępne urządzenia.
- Select 'AIWA BBTC-550' from the list of devices.
- Once paired, the unit will emit a confirmation sound, and 'BT' on the display will stop flashing.
- You can now play audio from your connected device through the AIWA BBTC-550. Use your device or the unit's controls for playback.
4.6 Radio FM
- Naciśnij TRYB przycisk, aby wybrać tryb radia FM.
- Aby uzyskać lepszy odbiór, wysuń antenę teleskopową.
- Automatyczne skanowanie: Naciśnij i przytrzymaj SKANDOWAĆ button to automatically scan and save available FM stations. The unit can store up to 40 presets.
- Strojenie ręczne: Naciśnij krótko SKANDOWAĆ button to manually tune up or down the frequency.
- Wybierz ustawienia wstępne: Użyj PRESET (+10) przycisk umożliwiający przeglądanie zapisanych stacji.
4.7 WEJŚCIE POMOCNICZE
- Naciśnij TRYB aby wybrać tryb AUX IN.
- Connect an external audio device (e.g., MP3 player, smartphone) to the 3.5mm AUX IN port using a 3.5mm audio cable (not included).
- Play audio from your external device. The sound will be output through the AIWA BBTC-550 speakers.
- Adjust the volume using the unit's VOLUME knob and/or your external device's volume control.
4.8 Korzystanie ze słuchawek
To listen privately, plug 3.5mm stereo headphones into the HEADPHONES socket. The speakers will automatically mute when headphones are connected.
4.9 Ustawianie zegara
The unit features a digital clock with a 24-hour display.
- W trybie gotowości naciśnij i przytrzymaj PROG/CZAS przycisk.
- Użyj POMIŃ (►►| / |◄◄) Przyciski do ustawienia godziny. Naciśnij PROG/CZAS aby potwierdzić.
- Użyj POMIŃ (►►| / |◄◄) przyciski do ustawienia minut. Naciśnij PROG/CZAS to confirm and exit clock setting mode.
5. Specyfikacje
| Funkcja | Specyfikacja |
|---|---|
| Nazwa marki | AIWA |
| Numer modelu | BBTC-550 |
| Typ | AM / FM Radio Cassette Player |
| Styl | Stołowy / przenośny |
| Materiał korpusu | Plastikowy |
| Wymiary (szer. x wys. x gł.) | Wymiary 38 x 38 x 26 cm |
| Waga (produktu) | Około 2.04 kg |
| Bluetooth | Tak (wersja 5.0) |
| Wi-Fi | NIE |
| Ekran | Yes (Panoramic LCD with backlight) |
| Kompatybilność z płytami CD | CD/CD-R/MP3 |
| Odtwarzanie USB | MP3 files |
| AUX IN | Gniazdo 3.5 mm |
| Wyjście słuchawkowe | Gniazdo 3.5 mm |
| Ustawienia radia | 40 (FM PLL) |
| Zasilanie (prąd zmienny) | 230 V/50 Hz |
| Zasilacz (prąd stały) | 6 x 1.5V LR14/UM2/C batteries |
| Orzecznictwo | CE, RoHS |
| Pochodzenie | Chiny |
| Wymiary opakowania | Wymiary 36.7 x 29 x 17.7 cm |
| Waga paczki | 2.5 kilogramów |
6. Konserwacja
6.1 Czyszczenie urządzenia
- Przed czyszczeniem należy zawsze odłączyć urządzenie od źródła zasilania.
- Do czyszczenia powierzchni zewnętrznych należy używać miękkiej, suchej ściereczki.
- W przypadku uporczywych plam delikatnieampNamocz szmatkę w wodzie z dodatkiem łagodnego detergentu, a następnie natychmiast wytrzyj do sucha.
- Nie należy używać środków czyszczących o działaniu ściernym, wosków ani rozpuszczalników, gdyż mogą one uszkodzić powłokę.
6.2 Pielęgnacja soczewek CD
- Never touch the CD lens.
- If the CD lens gets dirty, use a commercially available CD lens cleaner to clean it.
6.3 Cassette Deck Care
- Regularly clean the tape heads, capstan, and pinch roller with a cotton swab lightly moistened with tape head cleaner or isopropyl alcohol.
- Demagnetize the tape heads periodically to prevent sound degradation.
6.4 Wymiana baterii
- When the unit's performance diminishes or the display dims, it's time to replace the batteries.
- Open the battery compartment, remove old batteries, and insert new ones, ensuring correct polarity.
- Stare baterie należy utylizować w sposób odpowiedzialny, zgodnie z lokalnymi przepisami.
- Aby zapobiec wyciekowi baterii, wyjmij je, jeśli urządzenie nie będzie używane przez dłuższy czas.
7. Rozwiązywanie Problemów
If you encounter any issues with your AIWA BBTC-550, please refer to the following common problems and solutions:
| Problem | Możliwa przyczyna | Rozwiązanie |
|---|---|---|
| Brak zasilania | AC cord not properly connected; Batteries depleted or incorrectly inserted. | Sprawdź połączenie przewodu zasilającego; wymień baterie, zwracając uwagę na prawidłową biegunowość. |
| Brak dźwięku | Zbyt niski poziom głośności; podłączone słuchawki; wybrany niewłaściwy tryb. | Increase volume; Disconnect headphones; Select the correct mode (CD, USB, BT, Radio, AUX). |
| Płyta CD przeskakuje lub nie odtwarza się | Płyta CD jest brudna lub porysowana; płyta CD została włożona nieprawidłowo; soczewka jest brudna. | Clean or replace CD; Insert CD with label side up; Clean CD lens. |
| Kaseta nie odtwarza/nie nagrywa | Tape heads/capstan dirty; Cassette damaged; Incorrect mode. | Clean tape heads/capstan; Try a different cassette; Ensure Cassette mode is selected. |
| Bluetooth nie łączy się | Unit not in pairing mode; Bluetooth disabled on external device; Device too far. | Ensure unit is in Bluetooth pairing mode; Enable Bluetooth on your device; Move device closer (within 10m). |
| Słaby odbiór radia FM | Antena nie jest rozłożona/wyregulowana; obszar o słabym sygnale. | Całkowicie rozłóż i wyreguluj antenę teleskopową. Spróbuj przenieść urządzenie w inne miejsce. |
| USB nie rozpoznane | USB drive formatted incorrectly; Files not MP3; USB drive damaged. | Sprawdź, czy nośnik USB ma format FAT32. filesą w formacie MP3; Spróbuj użyć innego dysku USB. |
8. Gwarancja i wsparcie
The AIWA BBTC-550 comes with a standard manufacturer's warranty. Please refer to the warranty card included in your product packaging for specific terms and conditions, including the warranty period and coverage details.
Obsługa klienta:
If you experience any problems with your unit that are not covered in the troubleshooting section, or if you require further assistance, please contact your retailer or the AIWA customer support service in your region. Keep your purchase receipt as proof of purchase for warranty claims.
For the latest information and support, you may also visit the official AIWA webstrona.


