
1. Wprowadzenie
The UNITY MAS830L Digital Multimeter is a portable, battery-powered instrument designed for accurate electrical measurements. It is suitable for a wide range of applications, including testing AC/DC voltage, DC current, resistance, diode, and transistor hFE. Its backlit LCD display ensures clear readings in various lighting conditions, making it a versatile tool for professionals and hobbyists alike.
2. Informacje dotyczące bezpieczeństwa
To ensure safe operation and to avoid damage to the meter, please read and follow all safety instructions carefully. Failure to observe these warnings can result in electric shock, injury, or damage to the meter or equipment under test.
- Always ensure the meter is in good working condition before use. Do not use if the meter or test leads appear damaged.
- Nie stosować w ilości większej niż zalecana objętość.tage, zgodnie z oznaczeniem na liczniku, między zaciskami lub między dowolnym zaciskiem a uziemieniem. Maksymalna objętość roboczatage wynosi 600V.
- Zachowaj szczególną ostrożność podczas pracy z objtagpowyżej 60 V DC lub 30 V AC RMS. Te wartościtagStwarzają ryzyko porażenia prądem.
- Przed zmianą funkcji lub zakresów należy zawsze odłączyć przewody pomiarowe od obwodu.
- Be careful when making measurements on circuits with high current. Ensure the correct input jack and range are selected.
- Aby zapewnić dokładne odczyty, wymień baterię, gdy pojawi się wskaźnik niskiego poziomu naładowania.
- Nie należy używać miernika w środowiskach, w których występuje zagrożenie wybuchem gazów, oparów lub pyłów.
- Podczas pomiarów należy trzymać palce za osłonami sond pomiarowych.
3. Zawartość opakowania
Sprawdź, czy w przesyłce znajdują się wszystkie wymienione poniżej elementy:
- UNITY MAS830L Digital Multimeter
- Czerwony przewód pomiarowy
- Czarny przewód pomiarowy

Image: The UNITY MAS830L Digital Multimeter shown with its included red and black test leads, as received in the package.
4. Koniec produktuview
The MAS830L features a compact design with a clear backlit LCD display and an intuitive rotary dial for function selection. Key components include:
- Wyświetlacz LCD: Pokazuje odczyty pomiarów, jednostki i wskaźniki.
- Przełącznik obrotowy funkcji: Służy do wyboru żądanej funkcji pomiarowej i zakresu.
- "H" (Hold) Button: Zamraża aktualny odczyt na wyświetlaczu.
- Przycisk podświetlenia: Activates the display backlight for improved visibility.
- Gniazda wejściowe:
- "COM" Jack: Wspólny zacisk dla wszystkich pomiarów (podłączyć czarny przewód pomiarowy).
- Gniazdo „VΩmA”: Wejście dla voltage, resistance, diode, continuity, and current up to 200mA (connect red test lead).
- Gniazdo „10A”: Input for DC current measurements up to 10A (connect red test lead for high current).
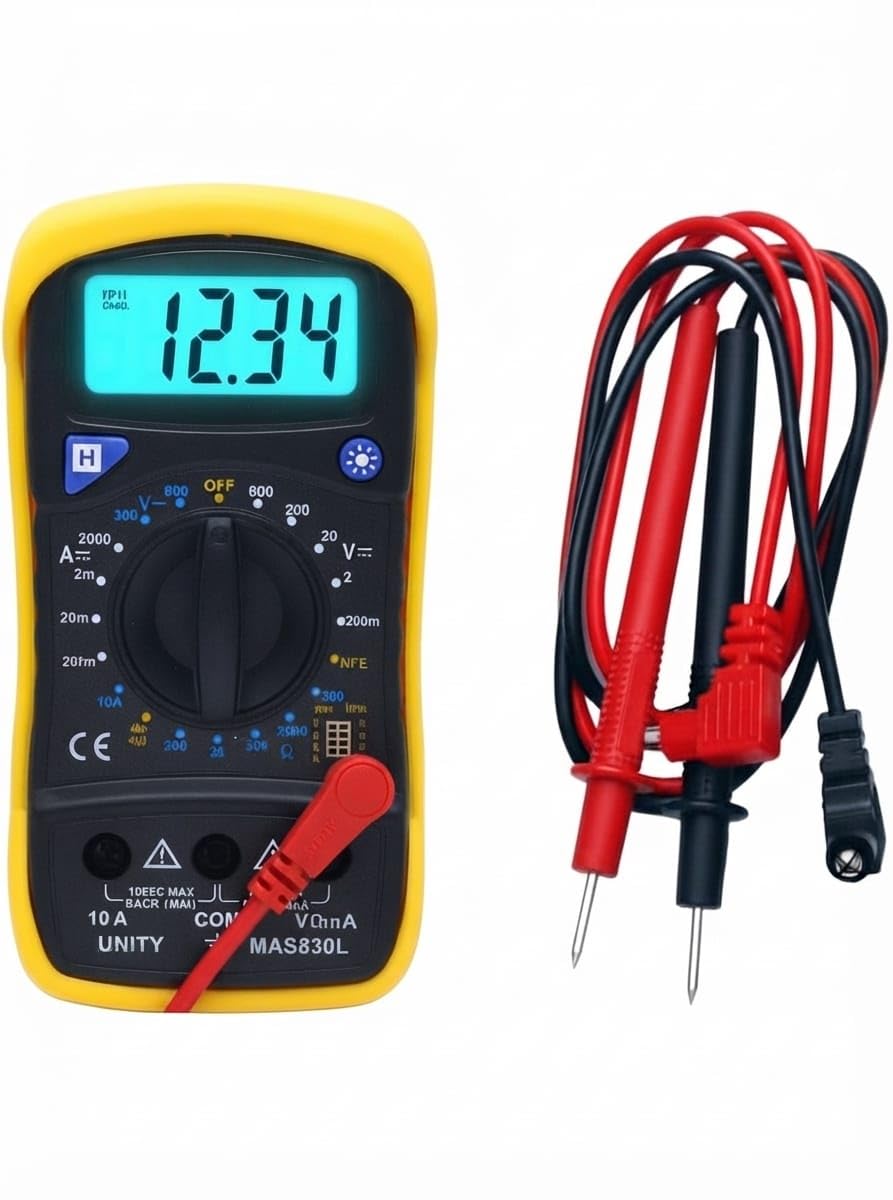
Obraz: Szczegółowy view of the MAS830L multimeter's front panel, highlighting the LCD, function dial, and input terminals.
5. Konfiguracja
5.1. Instalacja baterii
The MAS830L multimeter typically uses a 9V battery (not always included). To install or replace the battery:
- Upewnij się, że multimetr jest wyłączony i przewody pomiarowe są odłączone.
- Znajdź pokrywę komory baterii znajdującą się z tyłu miernika.
- Odkręć śrubę(y) mocującą(e) i zdejmij pokrywę.
- Podłącz nową baterię 9 V do zacisku baterii, zwracając uwagę na prawidłową biegunowość.
- Umieść baterię w komorze i załóż pokrywę, zabezpieczając ją śrubą(-ami).
5.2. Podłączanie przewodów pomiarowych
Always connect the black test lead to the "COM" (Common) input jack. Connect the red test lead to the appropriate input jack based on the measurement type:
- dla objtage, Resistance, Diode, Continuity, and current up to 200mA: Connect the red test lead to the VΩmA podnośnik.
- For DC Current measurements up to 10A: Connect the red test lead to the 10A podnośnik.
6. Instrukcja obsługi
Before taking any measurement, ensure the test leads are correctly connected and the function switch is set to the desired range.
6.1. Włączanie/wyłączanie i podświetlenie
- To turn the meter ON, rotate the function switch from "OFF" to any desired measurement range.
- To turn the meter OFF, rotate the function switch to the "OFF" position.
- Press the backlight button (often marked with a light bulb icon) to illuminate the LCD display. Press again to turn it off.
6.2. Objętość DCtagPomiar (V=)
- Podłącz czarny przewód pomiarowy do gniazda „COM”, a czerwony przewód pomiarowy do gniazda „VΩmA”.
- Set the function switch to the desired DC Voltage range (e.g., 20V, 200V, 600V). If the voltagJeśli wartość e jest nieznana, zacznij od najwyższego zakresu i zmniejszaj go w razie potrzeby.
- Podłącz sondy pomiarowe do mierzonego elementu lub obwodu, zwracając uwagę na biegunowość.
- Przeczytaj tomtage wartość na wyświetlaczu LCD.
6.3. Objętość ACtagPomiar (V~)
- Podłącz czarny przewód pomiarowy do gniazda „COM”, a czerwony przewód pomiarowy do gniazda „VΩmA”.
- Set the function switch to the desired AC Voltagzakres (np. 200 V, 600 V).
- Podłącz sondy pomiarowe do obwodu prądu przemiennegotagŹródło.
- Przeczytaj tomtage wartość na wyświetlaczu LCD.
6.4. Pomiar prądu stałego (A=)
Ostrożność: Never connect the meter in parallel with a voltagPodczas pomiaru prądu należy unikać źródła prądu, gdyż może to spowodować przepalenie bezpiecznika lub uszkodzenie miernika.
- Determine the expected current. For currents up to 200mA, connect the red test lead to the "VΩmA" jack. For currents up to 10A, connect the red test lead to the "10A" jack. Always connect the black test lead to "COM".
- Set the function switch to the appropriate DC Current range (e.g., 200mA, 10A).
- Otwórz obwód, w którym będziesz mierzyć prąd i podłącz miernik szeregowo z obciążeniem.
- Odczytaj aktualną wartość na wyświetlaczu LCD.
6.5. Pomiar rezystancji (Ω)
Ostrożność: Ensure the circuit under test is completely de-energized before measuring resistance. Disconnect power and discharge all capacitors.
- Podłącz czarny przewód pomiarowy do gniazda „COM”, a czerwony przewód pomiarowy do gniazda „VΩmA”.
- Set the function switch to the desired Resistance range (e.g., 200Ω, 2kΩ, 20kΩ, 200kΩ, 2MΩ).
- Podłącz sondy pomiarowe do rezystora lub elementu.
- Odczytaj wartość rezystancji na wyświetlaczu LCD.
6.6. Test diody (→|)
- Podłącz czarny przewód pomiarowy do gniazda „COM”, a czerwony przewód pomiarowy do gniazda „VΩmA”.
- Set the function switch to the Diode Test position.
- Podłącz czerwoną sondę do anody, a czarną do katody diody. Na wyświetlaczu pojawi się napięcie przewodzenia.tagspadek napięcia (zwykle 0.5 V do 0.8 V dla diod krzemowych).
- Reverse the probes. The display should show "OL" (Open Loop) for a good diode. A reading in both directions or "0" indicates a shorted diode.
6.7. Test ciągłości ())))
- Podłącz czarny przewód pomiarowy do gniazda „COM”, a czerwony przewód pomiarowy do gniazda „VΩmA”.
- Set the function switch to the Continuity Test position.
- Podłącz sondy pomiarowe do obwodu lub elementu.
- Jeśli rezystancja spadnie poniżej określonego progu (zwykle <50Ω), rozlegnie się sygnał dźwiękowy, sygnalizujący ciągłość. Na wyświetlaczu pojawi się również wartość rezystancji.
6.8. Test hFE tranzystora
The MAS830L includes a socket for testing the DC current gain (hFE) of NPN and PNP transistors.
- Set the function switch to the "hFE" position.
- Identify the Emitter (E), Base (B), and Collector (C) leads of the transistor.
- Insert the transistor leads into the corresponding holes in the hFE test socket, ensuring correct NPN or PNP type selection.
- Odczytaj wartość hFE na wyświetlaczu LCD.

Image: The MAS830L multimeter in operation, showing a DC voltage reading on its backlit display while connected to a breadboard circuit.
7. Konserwacja
7.1. Czyszczenie
Wytrzyj licznik reklamąamp Ściereczką i łagodnym detergentem. Nie używaj środków ściernych ani rozpuszczalników. Przed użyciem upewnij się, że miernik jest całkowicie suchy.
7.2. Wymiana baterii
When the low battery indicator appears on the display, replace the 9V battery as described in Section 5.1. Remove the battery if the meter is not used for an extended period to prevent leakage.
7.3. Przechowywanie
Store the multimeter in a cool, dry place, away from direct sunlight and extreme temperatures. Disconnect test leads and remove the battery if storing for a long duration.
8. Rozwiązywanie Problemów
| Problem | Możliwa przyczyna | Rozwiązanie |
|---|---|---|
| Brak wyświetlacza lub wyświetlacz jest przyciemniony | Rozładowana lub słaba bateria; Nieprawidłowa instalacja baterii | Replace battery; Check battery polarity |
| Wyświetlany jest komunikat „OL” (Przeciążenie) | Pomiar przekracza wybrany zakres; obwód otwarty (ciągłość/rezystancja) | Select a higher range; Check for breaks in the circuit or component |
| Błędne odczyty | Incorrect function/range selected; Poor test lead connection; Damaged test leads; Low battery | Verify function and range; Ensure firm connections; Inspect/replace test leads; Replace battery |
| Brak sygnału dźwiękowego ciągłości | Obwód otwarty; rezystancja zbyt wysoka | Check circuit for breaks; Ensure resistance is below threshold for beep |
9. Specyfikacje
| Funkcja | Specyfikacja |
|---|---|
| Marka | Generic (UNITY) |
| Numer modelu | MAS830L |
| Źródło zasilania | Battery Powered (9V, not always included) |
| Objętość DCtage Zakres | Do 600V |
| AC Objętośćtage Zakres | Do 600V |
| Zakres prądu stałego | Do 10A |
| Zakres oporu | Do 2MΩ |
| Typy pomiarów | AC Objętośćtage, prąd stały, objtage, Diode Test, Resistance, Transistor hFE, Continuity |
| Wyświetlacz | Podświetlany wyświetlacz LCD |
| Wstrzymanie danych | Tak |
| Waga przedmiotu | 200 gram |
| Wymiary przedmiotu | 17 x 7.5 x 3.5 centymetrów |
| Temperatura pracy | Do 40 stopni Celsjusza |
| Norma bezpieczeństwa | CE |
10. Gwarancja i wsparcie
For warranty information and technical support, please refer to the documentation provided with your purchase or contact the retailer/manufacturer directly. Keep your purchase receipt as proof of purchase for any warranty claims.