
1. Wprowadzenie
Thank you for choosing the KJK Trail Camera Model 201-T. This camera is designed for wildlife monitoring, outdoor security, and various surveillance applications. It features 2.7K video recording, 36-megapixel still image capture, a rapid 0.1-second trigger speed, and a 130-degree passive infrared (PIR) motion sensor. Its IP66 waterproof and dustproof rating ensures reliable performance in diverse outdoor conditions. The camera operates on AA batteries and includes low-glow infrared night vision for clear recordings in complete darkness.
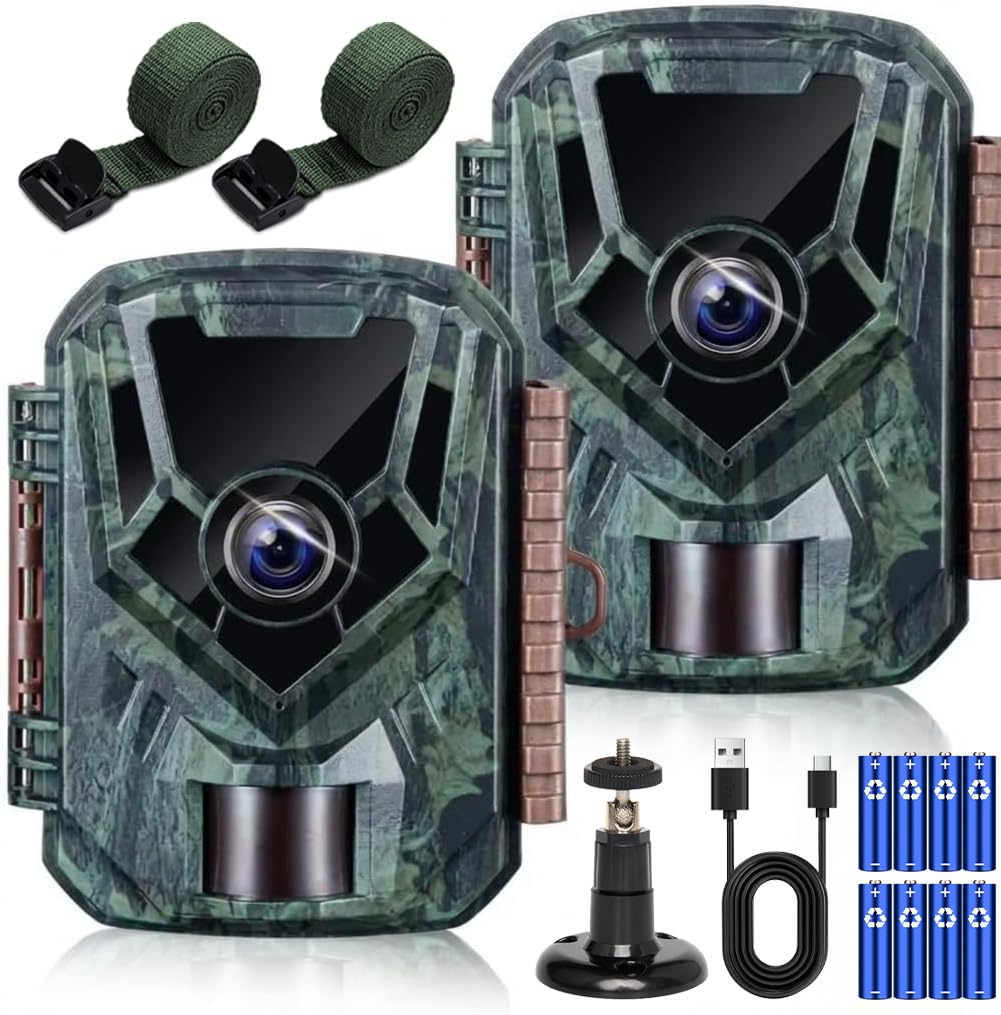
Image 1.1: KJK Trail Camera 201-T showing its compact design and key specifications like 2.7K video, 36MP photos, 0.1s trigger speed, 130° human sensor, 22m infrared range, IP66 waterproof rating, and built-in microphone.
2. Zawartość opakowania
Sprawdź, czy w przesyłce znajdują się wszystkie elementy:
- KJK Trail Camera Model 201-T
- Pasek montażowy
- Kabel USB
- Instrukcja obsługi (ten dokument)
- 8 baterie AA
Note: A memory card is not included and must be purchased separately. The camera supports SD cards up to 32GB.
3. Konfiguracja
3.1 Instalacja baterii
- Otwórz zatrzask obudowy kamery.
- Zlokalizuj komorę baterii.
- Włóż 8 baterie AA, zwracając uwagę na prawidłową polaryzację (+/-).
- Dokładnie zamknij pokrywę komory baterii.
3.2 Instalacja karty pamięci
- Po otwarciu obudowy kamery znajdź gniazdo karty SD.
- Insert a formatted SD card (up to 32GB) into the slot until it clicks into place.
- Aby wyjąć kartę, wciśnij ją ponownie, aż wysunie się.
3.3 Montaż kamery
Kamera oferuje elastyczne opcje montażu:
- Mocowanie paska: Use the provided strap to secure the camera to a tree or pole.
- Montaż śrubowy: Utilize the screw mount on the back of the camera to attach it to a wall or other flat surface.
- Wolnostojące: The camera can be placed on a flat surface for temporary monitoring.

Image 3.1: Illustration of the camera being mounted with a strap on a tree, placed freestanding, and fixed with screws on a wall.
3.4 Pierwsze włączenie i ustawienia
- After installing batteries and memory card, switch the camera to the 'SETUP' mode.
- The internal LCD screen will activate, allowing you to adjust settings such as date, time, recording mode, video resolution, photo resolution, and PIR sensitivity.
- Once settings are configured, switch the camera to 'ON' mode for automatic operation. The LCD screen will turn off after a few seconds, and the camera will enter monitoring mode.
4. Instrukcja obsługi
4.1 Tryby nagrywania
The KJK Trail Camera 201-T offers three primary recording modes:
- Tryb wideo: Nagrywa klipy wideo po wykryciu ruchu.
- Tryb zdjęć: Rejestruje nieruchome obrazy po wykryciu ruchu.
- Video + Photo Mode: Records both a video clip and a series of still images when motion is detected.

Image 4.1: Visual representation of the three available recording modes: Video, Photo, and a combination of both. An example shows a squirrel captured in both video (2.7K, 3 min) and photo (5 continuous shots) modes.
4.2 Motion Detection (PIR Sensor)
The camera is equipped with a highly sensitive PIR motion sensor with a 130-degree detection angle and a range of up to 22 meters. It triggers recording in as fast as 0.1 seconds upon detecting movement.

Image 4.2: A diagram showing the KJK Trail Camera with its high-sensitivity PIR sensor, highlighting a 130-degree detection angle and a 22-meter detection distance.
Important: The PIR sensor cannot detect motion through glass or other transparent barriers. Ensure a clear line of sight for optimal performance.

Image 4.3: Illustrations demonstrating optimal camera placement for PIR detection (clear path) versus incorrect placement (obstructed path or too high/low).
4.3 Widzenie nocne
The camera features low-glow infrared LEDs that automatically activate in low-light conditions, allowing for clear black-and-white recordings up to 22 meters at night without disturbing wildlife. The camera automatically switches between day (color) and night (monochrome) modes.

Image 4.4: A split image showing a deer in a forest during the day (color) and the same scene at night (monochrome infrared), demonstrating the camera's automatic day/night switching capability.
4.4 ViewNagrania
Możesz ponownieview captured photos and videos using several methods:
- On-Camera LCD: Switch the camera to 'SETUP' mode to view recordings directly on the internal screen.
- Kabel USB: Connect the camera to a computer using the provided USB cable. The camera will appear as a removable disk, allowing you to access files.
- Czytnik kart SD: Remove the SD card from the camera and insert it into a card reader connected to a computer or compatible device.

Image 4.5: Illustrations showing three ways to play back recorded media: via USB cable to a PC, directly on the camera's internal screen, and using an SD card reader with a PC.
5. Konserwacja
- Czyszczenie: Do czyszczenia obiektywu i obudowy aparatu używaj miękkiej, suchej ściereczki. Unikaj środków czyszczących o właściwościach ściernych i rozpuszczalników.
- Wymiana baterii: Replace all 8 AA batteries when the low battery indicator appears on the screen. Do not mix old and new batteries or different battery types.
- Zarządzanie kartami pamięci: Regularly check the memory card capacity. Format the SD card periodically to ensure optimal performance and prevent data corruption. Back up important recordings before formatting.
- Składowanie: When not in use for extended periods, remove batteries and the memory card, and store the camera in a cool, dry place.
6. Rozwiązywanie Problemów
| Problem | Możliwa przyczyna | Rozwiązanie |
|---|---|---|
| Kamera nie włącza się | Niski poziom baterii lub jej rozładowanie; nieprawidłowa polaryzacja baterii. | Replace all batteries with new ones; ensure correct +/- orientation. |
| Brak zapisanych nagrań | No SD card; full SD card; unformatted SD card; PIR sensor blocked or sensitivity too low. | Insert SD card; replace or format SD card; increase PIR sensitivity; ensure clear line of sight for PIR sensor. |
| Słaba jakość widzenia w nocy | IR LEDs obstructed; object too far; low batteries. | Clear obstructions; ensure target is within 22m; replace batteries. |
| PIR sensor not detecting through glass | PIR sensors detect heat signatures, which are blocked by glass. | Relocate the camera to an outdoor position with a clear view. |
7. Specyfikacje
- Model: 201-T
- Rozdzielczość wideo: 2.7K FullHD
- Rozdzielczość nieruchomego obrazu: 36 megapiksela
- Prędkość wyzwalania: 0.1 sekund
- Kąt wykrywania PIR: 130 stopnia
- Odległość wykrywania PIR: Do 22 metrów (72 stóp)
- Widzenie nocne: Low-glow Infrared LEDs, up to 22 meters (72 feet) range
- Stopień wodoodporności: IP66
- Źródło zasilania: 8 x baterie AA (w zestawie)
- Składowanie: Karta SD (do 32 GB, nie jest dołączona)
- Temperatura pracy: -22°F do +158°F (-30°C do +70°C)
- Wbudowane funkcje: Mikrofon do nagrywania dźwięku
8. Gwarancja i wsparcie
The KJK Trail Camera Model 201-T comes with a 12-miesięczna gwarancja from the date of purchase. This warranty covers manufacturing defects and ensures the product is free from material and workmanship flaws under normal use.
If you encounter any issues or have questions regarding your camera, please contact our customer support team. For assistance, refer to the contact information provided with your purchase or visit the official KJK webstrona.
Please have your product model number (201-T) and purchase details ready when contacting support.