
1. Wprowadzenie
Dziękujemy za zakupasing the AIWA MSBTU-900DAB HiFi System. This all-in-one audio system delivers powerful stereo sound with 100W RMS output, featuring a Class D amplifier. It offers a wide range of audio sources including Internet Radio, DAB+, FM RDS, Bluetooth 5.2, CD MP3, and USB playback. Multiple connectivity options such as HDMI ARC, Phono input, Optical, RCA, and AUX ensure compatibility with various devices. This manual provides detailed instructions for setup, operation, and maintenance to help you get the most out of your new system.
2. Informacje dotyczące bezpieczeństwa
Please read all safety instructions carefully before operating the unit and retain them for future reference. Failure to follow these instructions may result in electric shock, fire, or damage to the unit.
- Źródło zasilania: Podłączaj urządzenie wyłącznie do gniazdka sieciowego prądu przemiennego o określonej mocy.tage. Ensure the power plug is fully inserted.
- Wentylacja: Nie blokuj żadnych otworów wentylacyjnych. Pozostaw wystarczająco dużo miejsca wokół urządzenia, aby zapewnić prawidłowy przepływ powietrza i zapobiec przegrzaniu.
- Woda i wilgoć: Nie wystawiaj urządzenia na działanie deszczu, wilgoci, kapania ani zachlapania. Nie stawiaj na urządzeniu przedmiotów wypełnionych płynami, takich jak wazony.
- Ciepło: Trzymaj urządzenie z dala od źródeł ciepła, takich jak grzejniki, kratki wentylacyjne, piece lub inne urządzenia (w tym amp(lifiers) wytwarzające ciepło.
- Czyszczenie: Przed czyszczeniem odłącz urządzenie od gniazdka ściennego. Używaj wyłącznie miękkiej, suchej ściereczki. Nie używaj środków czyszczących w płynie ani w aerozolu.
- Serwisowanie: Nie próbuj samodzielnie naprawiać tego produktu. Wszelkie czynności serwisowe należy powierzyć wykwalifikowanemu personelowi serwisowemu.
- Umieszczenie: Umieść urządzenie na stabilnej, płaskiej powierzchni. Unikaj umieszczania go w bezpośrednim świetle słonecznym lub w pobliżu silnych pól magnetycznych.
3. Zawartość opakowania
Sprawdź, czy w opakowaniu znajdują się wszystkie elementy:
- Main Unit (AIWA MSBTU-900DAB)
- Dwa głośniki
- Zdalne sterowanie
- Kabel zasilający
- Instrukcja obsługi (ten dokument)
- Antena FM
4. Koniec produktuview
4.1 Panel przedni

Obraz: Przód view of the AIWA MSBTU-900DAB main unit.
The front panel features the main display, a large multifunction controller for navigation and volume, and various control buttons:
- CZEKAJ: Włączanie/wyłączanie urządzenia.
- ŹRÓDŁO: Select input source (CD, USB, Bluetooth, Internet Radio, DAB+, FM, HDMI ARC, Phono, AUX).
- PARA BT: Initiate Bluetooth pairing mode.
- WSTĘPNE: Access preset stations.
- BACK/PLAY/PAUSE/NEXT/STOP/EJECT: CD/USB playback controls.
- MENU: Dostęp do menu systemowych.
- BASY/WYSOPY: Dostosuj poziom basów i sopranów.
- Kontroler wielofunkcyjny: Rotate to adjust volume or navigate menus; press to confirm.
- TELEFONY: Wyjście słuchawkowe 3.5 mm.
- HORMON: Wejście pomocnicze 3.5 mm.
- USB MP3: Port USB do odtwarzania plików MP3.
4.2 Panel tylny
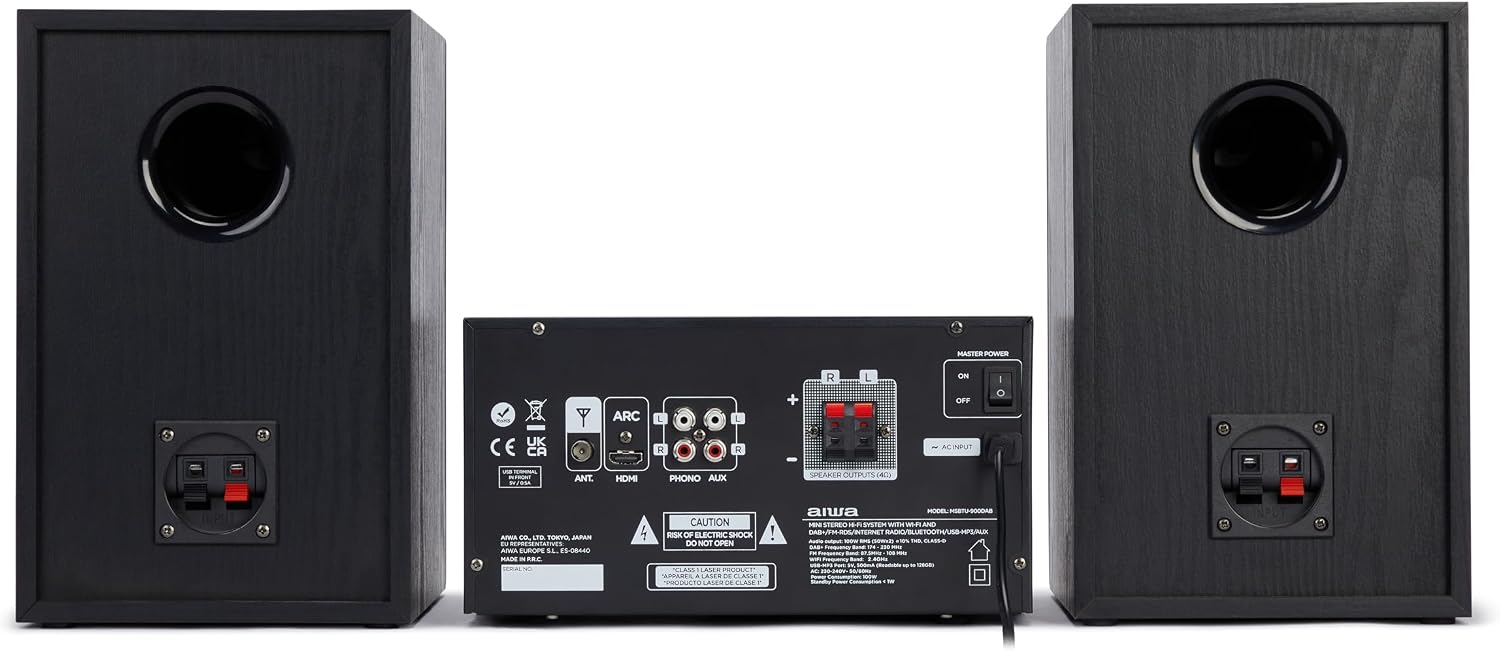
Obraz: Tył view of the AIWA MSBTU-900DAB main unit.
Na tylnym panelu znajdują się różne porty połączeniowe:
- MRÓWKA: FM/DAB+ antenna input.
- Łuk HDMI: HDMI Audio Return Channel for TV connection.
- OPTYCZNY: Optyczne cyfrowe wejście audio.
- PHONO (L/R): RCA input for turntable with RIAA equalizer.
- AUX (L/R): RCA auxiliary input.
- SPEAKER OUTPUTS (L/R): Terminals for connecting passive speakers.
- WEJŚCIE AC: Podłączenie kabla zasilającego.
- MOC MISTRZA: Główny wyłącznik zasilania.
4.3 Pilot zdalnego sterowania

Image: AIWA MSBTU-900DAB remote control.
The remote control provides convenient access to all functions:
- MOC: Włącz/wyłącz urządzenie.
- Sposób użycia: Switch between different playback modes/sources.
- STOP/SHUFFLE/PROG/PRESET/EJECT/REPEAT: CD/USB playback and radio functions.
- MENU/INFORMACJE: Dostęp do menu i wyświetlanie informacji.
- Przyciski nawigacyjne (góra/dół/lewo/prawo/OK): Navigate menus and control playback.
- ODTWÓRZ/PAUZA: Odtwórz lub wstrzymaj multimedia.
- EQ: Wybierz ustawienia wstępne korektora.
- BASY/WYSOPY: Adjust bass and treble.
- NIEMY: Wycisz/włącz dźwięk.
- GŁOŚNOŚĆ +/-: Dostosuj głośność.
- Przyciski numeryczne (0-9): Direct input for radio stations or tracks.
- ALARM/SLEEP/SNOOZE: Timer functions.
5. Konfiguracja
5.1 Rozpakowanie
Carefully remove all components from the packaging. Keep the packaging materials for future transport or storage.
5.2 Podłączenie głośników

Image: AIWA MSBTU-900DAB HiFi System with main unit and speakers.
Connect the speaker cables from the speaker units to the corresponding SPEAKER OUTPUTS (L/R) terminals on the rear of the main unit. Ensure correct polarity (+ to + and - to -) for optimal sound quality.
5.3 Podłączenie anteny
Connect the supplied FM antenna to the ANT terminal on the rear panel. Extend the antenna fully for best FM/DAB+ reception.
5.4 Połączenie zasilania
Plug the power cable into the AC INPUT on the rear panel of the main unit, then plug the other end into a suitable wall power outlet.
5.5 Pierwsze włączenie zasilania
Flip the MASTER POWER switch on the rear panel to the 'ON' position. Press the STANDBY button on the front panel or remote control to turn on the unit.
5.6 Network Setup (WLAN)
For Internet Radio and app compatibility, connect the system to your Wi-Fi network:
- Naciśnij przycisk MENU.
- Navigate to 'Network' or 'System Settings' and select 'Network Wizard' or 'Wi-Fi Setup'.
- System przeskanuje dostępne sieci Wi-Fi. Wybierz sieć z listy.
- Enter your Wi-Fi password using the multifunction controller or remote control.
- Potwierdź połączenie. Po nawiązaniu połączenia na wyświetlaczu pojawi się ikona Wi-Fi.
6. Instrukcja obsługi
6.1 Wybór źródła
Press the SOURCE button on the front panel or remote control repeatedly to cycle through available input sources: Internet Radio, DAB+, FM, CD, USB, Bluetooth, HDMI ARC, Phono, AUX.
6.2 Radio internetowe
Once connected to Wi-Fi:
- Wybierz „Radio internetowe” jako źródło.
- Use the multifunction controller or navigation buttons to browse stations by location, genre, or search.
- Wybierz stację, aby rozpocząć odtwarzanie.
- Aby zapisać stację jako ustawienie wstępne, zapoznaj się z sekcją „Ustawienia wstępne” w pełnej wersji instrukcji.
Radio 6.3 DAB+
Ensure the FM/DAB+ antenna is connected.
- Select 'DAB+' as the source.
- The system will automatically scan for available DAB+ stations upon first use.
- Use the navigation buttons to select a station from the list.
Radio 6.4 FM RDS
Ensure the FM/DAB+ antenna is connected.
- Wybierz 'FM' jako źródło.
- Press and hold the NEXT/PREVIOUS buttons to auto-scan for stations.
- Press briefly to fine-tune. RDS information (station name, program type) will be displayed if available.
6.5 Obsługa Bluetooth
Parowanie urządzenia Bluetooth:
- Select 'Bluetooth' as the source. The display will show 'BT Pairing' or similar.
- On your smartphone, tablet, or computer, enable Bluetooth and search for devices.
- Select 'AIWA MSBTU-900DAB' from the list of found devices.
- Once paired, you can stream audio from your device to the HiFi system.
6.6 Odtwarzanie płyt CD

Image: AIWA MSBTU-900DAB with CD tray open.
The system supports CD, CD-R, CD-RW, and CD-MP3 discs.
- Wybierz „CD” jako źródło.
- Press the EJECT button to open the motorized CD tray.
- Place a disc gently into the tray with the label side facing up.
- Press EJECT again to close the tray. Playback will start automatically or can be initiated with the PLAY/PAUSE button.
6.7 Odtwarzanie USB
The USB port supports MP3 playback from USB drives up to 128GB.
- Insert a USB drive into the USB MP3 port on the front panel.
- Wybierz „USB” jako źródło.
- Use the navigation buttons to browse folders and files. Press PLAY/PAUSE to start playback.
6.8 HDMI ARC
Connect your TV's HDMI ARC output to the HDMI ARC input on the rear panel of the HiFi system. Select 'HDMI ARC' as the source to output TV audio through the system's speakers. Ensure ARC is enabled on your TV settings.
6.9 Wejście gramofonowe
Connect a turntable to the PHONO (L/R) RCA inputs on the rear panel. Select 'Phono' as the source. The built-in RIAA equalizer will process the audio signal.
6.10 Wejście AUX
Connect external audio devices (e.g., MP3 player, smartphone) to the front 3.5mm AUX-IN port or the rear RCA AUX (L/R) inputs. Select 'AUX' as the source.
6.11 Regulacja dźwięku
Use the BASS and TREBLE buttons on the front panel or remote control to adjust the sound characteristics. The remote also offers an EQ button for preset equalizer modes.
7. Konserwacja
7.1 Czyszczenie urządzenia
Always unplug the unit from the power outlet before cleaning. Use a soft, dry, lint-free cloth to wipe the surfaces. Do not use abrasive cleaners, waxes, or solvents as they may damage the finish.
7.2 Czyszczenie soczewek CD
Jeśli odtwarzanie płyty CD staje się nieregularne, soczewka CD może być zabrudzona. Do czyszczenia soczewki użyj dostępnego w sprzedaży krążka czyszczącego do soczewek CD. Nie próbuj czyścić soczewki ręcznie.
8. Rozwiązywanie Problemów
If you encounter problems with your HiFi system, please refer to the following common issues and solutions before contacting support.
| Problem | Możliwa przyczyna | Rozwiązanie |
|---|---|---|
| Brak zasilania | Power cable not connected; Master Power switch off | Ensure power cable is securely connected. Turn Master Power switch ON. Press STANDBY button. |
| Brak dźwięku | Volume too low; Mute activated; Incorrect source selected; Speakers not connected | Increase volume. Deactivate Mute. Select correct input source. Check speaker connections. |
| Słaby odbiór radia | Antenna not extended or poorly positioned | Extend and reposition the FM/DAB+ antenna for better signal. |
| Problemy z połączeniem Bluetooth | Device not in pairing mode; Out of range; Interference | Ensure unit is in Bluetooth pairing mode. Move device closer. Avoid obstacles. Try re-pairing. |
| Płyta CD nie odtwarza się | Płyta włożona nieprawidłowo; Płyta brudna/porysowana; Nieobsługiwany format płyty | Insert disc correctly (label side up). Clean disc. Use supported CD formats. |
9. Specyfikacje
- Model: MSBTU-900DAB
- Moc wyjściowa: 100 W RMS (2 x 50 W RMS)
- Amplifier Typ: Klasa D
- Wersja Bluetooth: 5.2
- Połączenie bezprzewodowe: WLAN (WiFi)
- Tunery radiowe: Internet Radio, DAB+, FM RDS (40 preset stations)
- Kompatybilność z płytami CD: CD, CD-R, CD-RW, CD-MP3 (with ID3 tag wyświetlacz)
- Odtwarzanie z USB: MP3 (supports up to 128 GB)
- Wejścia: HDMI ARC, Optical, Phono (RIAA equalizer), RCA AUX (rear), 3.5mm AUX-IN (front), USB
- Wyjścia: Słuchawki 3.5mm
- Typ głośnika: Stereofoniczny
- Kolor: Czarny
- Wymiary (opakowanie): Wymiary 75.59 x 37.29 x 35.5 cm
- Waga (opakowanie): 10.92 kilogramów
- Źródło zasilania: Elektryczny z kablem
10. Gwarancja i wsparcie
10.1 Informacje o gwarancji
This AIWA MSBTU-900DAB HiFi System comes with a 2-letnia gwarancja producenta from the date of purchase. This warranty covers manufacturing defects and faulty materials under normal use. Please retain your proof of purchase for warranty claims.
Gwarancja nie obejmuje:
- Damage caused by accident, misuse, abuse, neglect, or unauthorized modification.
- Normalne zużycie.
- Damage caused by power surges or improper voltage połączenie.
- Damage caused by failure to follow the instructions in this manual.
10.2 Obsługa klienta
For technical assistance, warranty service, or general inquiries, please contact your local AIWA dealer or visit the official AIWA webwitryna zawierająca informacje kontaktowe pomocy technicznej.