
Wstęp
This manual provides detailed instructions for the safe and proper installation, operation, and maintenance of your PERLESMITH PSAT3B Tilting TV Wall Mount. Please read this manual thoroughly before beginning installation and retain it for future reference. This wall mount is designed for televisions ranging from 42 to 100 inches and supports a maximum weight of 160 lbs.
Informacje dotyczące bezpieczeństwa
OSTRZEŻENIE: Improper installation may result in serious personal injury and property damage. If you do not understand these instructions or have doubts about the safety of the installation, please contact a qualified installer.
- This product is intended for installation on wood studs (16"-24" spacing), solid concrete, or brick walls only. Do not install on drywall alone.
- Upewnij się, że powierzchnia montażu może bezpiecznie utrzymać łączny ciężar uchwytu i telewizora.
- Nie przekraczać maksymalnego udźwigu wynoszącego 72.5 kg (160 funtów).
- Verify your TV's VESA pattern (mounting hole spacing) is compatible with the mount (200x200mm to 600x600mm).
- Aby dokładnie zlokalizować drewniane kołki, zawsze używaj wykrywacza belek.
- Podczas instalacji należy nosić odpowiedni sprzęt ochronny, w tym okulary ochronne.
- Podczas instalacji należy trzymać dzieci i zwierzęta domowe z dala od miejsca pracy.

The PERLESMITH PSAT3B Tilting TV Wall Mount provides a secure and flexible viewing solution for large televisions.
Zawartość opakowania
Please check to ensure all components are present and undamaged before installation. Refer to the included hardware bags for specific screw sizes and quantities.
- Montaż płyty ściennej
- Uchwyty TV (2)
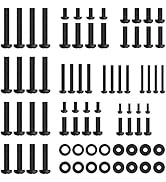
- Zestaw elementów montażowych (różne śruby, podkładki, dystanse, kotwy)
- Poziom
- Instrukcja obsługi
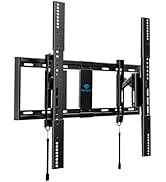
Nadview of the PERLESMITH PSAT3B wall mount components and included hardware.
Specyfikacje
| Funkcja | Specyfikacja |
|---|---|
| Numer modelu | PSAT3B |
| Typ montażu | Montaż ścienny |
| Typ ruchu | Obrót, Pochylenie |
| Tworzywo | Stal stopowa |
| Kolor | Czarny |
| Kompatybilne urządzenia | Telewizja |
| Maximum Supported Screen Size | 100 cali |
| Minimum Supported Screen Size | 42 cali |
| Maksymalna ładowność | 160 funta (72.5 kg) |
| Zgodność ze standardem VESA | 200x200mm do 600x600mm |
| Kąt nachylenia | +5°/-15° |
| Kąt obrotu | ±5° |
| Przedłużenie od ściany | 3" (po zsunięciu) do 6.5" (po rozłożeniu) |

This diagram illustrates the available VESA patterns and compatible wall types for the mount. Do not install on drywall alone.
Konfiguracja i instalacja
Follow these steps carefully to ensure a secure installation. It is recommended to have two people for TV mounting.
Krok 1: Kontrola przed instalacją
- Verify Wall Type: Ensure your wall is suitable for mounting (16"-24" wood studs, concrete, or brick).
- Check TV Size: Confirm your TV is between 42-100 inches.
- Verify VESA Pattern: Measure the horizontal and vertical distance between the mounting holes on the back of your TV. This must be between 200x200mm and 600x600mm.
Always perform these checks before beginning the installation process.
Krok 2: Zamontuj uchwyty z tyłu telewizora
- Ostrożnie połóż telewizor ekranem do dołu na miękkiej i czystej powierzchni, aby zapobiec uszkodzeniu ekranu.
- Dopasuj uchwyty telewizora do otworów montażowych znajdujących się z tyłu telewizora.
- Wybierz odpowiednie śruby, podkładki i podkładki z zestawu montażowego, które pasują do otworów VESA w Twoim telewizorze.
- Securely fasten the brackets to the TV using a screwdriver, ensuring they are centered and tight. Do not overtighten.
Krok 3: Zainstaluj płytę ścienną
- Determine the desired height for your TV. Use a pencil to mark the center of the desired location on the wall.
- Use a stud finder to locate the center of two adjacent wood studs (for wood stud installation) or mark drill points for concrete/brick.
- Hold the wall plate against the wall, aligning the center with your mark and ensuring it is level using the included bubble level. Mark the drill holes.
- Drill pilot holes at the marked locations. For wood studs, drill 7/32" (5.5mm) holes. For concrete/brick, drill 3/8" (10mm) holes and insert concrete anchors.
- Attach the wall plate to the wall using the lag bolts and washers. Tighten securely.
Krok 4: Zawieś telewizor na uchwycie ściennym
- Korzystając z czyjejś pomocy, ostrożnie podnieś telewizor za pomocą przymocowanych uchwytów.
- Zaczep uchwyty telewizora o górną krawędź płytki ściennej.
- Delikatnie opuść telewizor, aż uchwyty całkowicie zazębią się z płytą ścienną.
- Engage the safety latches located at the bottom of the TV brackets to secure the TV to the wall plate. The magnetic pull tabs can be used to lock or release the TV.

Simplified three-step installation process for the PERLESMITH TV mount.

The mount extends 6.5 inches from the wall for easy cable access and retracts to 3 inches for a low-profile Patrzeć.
Video demonstrating the ease of installation and functionality of the PERLESMITH Tilting TV Wall Mount.
Instrukcja obsługi
Regulacja pochylenia
The PERLESMITH PSAT3B mount allows for a tilt range of +5° to -15°. To adjust the tilt, loosen the tilt knobs on the side of the TV brackets, adjust the TV to your desired angle, and then tighten the knobs securely. This helps reduce glare and optimize viewkąty.
Regulacja obrotu
The mount offers a ±5° swivel adjustment. This feature allows for minor horizontal adjustments to achieve a perfectly level screen after installation. Simply grasp the sides of the TV and gently rotate it to the desired position.
Regulacja poziomowania
After installation, you can fine-tune your TV's alignment with a ±2° leveling adjustment. This ensures your TV is perfectly horizontal, even if the wall plate was not installed perfectly level.

The mount offers a ±5° swivel for optimal viewelastyczność.

Achieve a perfectly level TV with the ±2° leveling adjustment feature.

The secure latch system with magnetic pull tabs allows for quick and tool-free locking and unlocking of the TV.
Pokaz wideoasing the tilting functionality of the PERLESMITH TV Wall Mount.
Konserwacja
Regularna konserwacja zapewnia długowieczność i bezpieczne działanie uchwytu ściennego do telewizora.
- Czyszczenie: Przetrzyj uchwyt miękką, suchą ściereczką. Unikaj środków czyszczących o działaniu ściernym i rozpuszczalników.
- Kontrole okresowe: Okresowo sprawdzaj wszystkie śruby i nakrętki, aby upewnić się, że są dobrze dokręcone. W razie potrzeby dokręć.
- Sprawdź, czy nie ma uszkodzeń: Regularnie sprawdzaj uchwyt pod kątem oznak zużycia, uszkodzeń lub korozji. W przypadku stwierdzenia jakichkolwiek problemów, zaprzestań użytkowania i skontaktuj się z obsługą klienta.
Rozwiązywanie problemów
Jeśli w trakcie lub po instalacji wystąpią problemy, zapoznaj się z poniższymi typowymi rozwiązaniami.
- Telewizor nie jest wypoziomowany: Use the ±2° leveling adjustment feature to fine-tune the TV's horizontal position. Ensure the wall plate was installed as level as possible.
- Trudność w przechylaniu: Ensure the tilt knobs on the TV brackets are sufficiently loosened before attempting to adjust the tilt. Tighten them firmly after adjustment.
- TV Feels Loose: Double-check that all mounting bolts to the wall and screws to the TV are securely tightened. Ensure the safety latches are engaged.
- Mounting Holes Don't Align: Verify your TV's VESA pattern against the mount's specifications. If incompatible, the mount cannot be used.
- Brakujące części: If any parts are missing from the package, contact PERLESMITH customer support immediately.
Re wideoview highlighting the features and installation process, which may assist with troubleshooting common issues.
Gwarancja i wsparcie
This PERLESMITH product comes with a 5-year warranty. For warranty claims or technical assistance, please contact PERLESMITH customer support. You can typically find contact information on the product packaging or the official PERLESMITH webstrona.
For additional support, you may visit the PERLESMITH store on Amazon: PERLESMITH Store