1. Wprowadzenie
Dziękujemy za zakupasing the DEWALT 16 Gallon STEALTHSONIC Poly Wet/Dry Vacuum. This manual provides essential information for the safe operation, assembly, maintenance, and troubleshooting of your vacuum. Please read this manual thoroughly before use and retain it for future reference.

Image 1.1: The DEWALT 16 Gallon STEALTHSONIC Wet/Dry Vacuum, showcasing its 16-gallon capacity, 6.5 peak HP motor, and 20-foot power cord.
2. Informacje dotyczące bezpieczeństwa
Always follow basic safety precautions when using electrical appliances to reduce the risk of fire, electric shock, or injury. This vacuum is designed for household and workshop use. Do not use it for commercial or industrial purposes unless specified.
Ogólne ostrzeżenia dotyczące bezpieczeństwa:
- Przed użyciem odkurzacza należy przeczytać wszystkie instrukcje.
- Nie pozostawiaj urządzenia bez nadzoru, gdy jest podłączone do prądu. Odłączaj je od gniazdka, gdy nie jest używane oraz przed serwisowaniem.
- Nie stosować na zewnątrz ani na mokrych powierzchniach.
- Nie należy używać jako zabawki. Należy zachować szczególną ostrożność, gdy jest używany przez dzieci lub w ich pobliżu.
- Używaj wyłącznie zgodnie z opisem w niniejszej instrukcji. Używaj wyłącznie zalecanych przez producenta akcesoriów.
- Nie ciągnij ani nie przenoś za kabel, nie używaj kabla jako uchwytu, nie zamykaj drzwi na kablu ani nie ciągnij kabla wokół ostrych krawędzi lub narożników. Nie przejeżdżaj urządzeniem po kablu. Trzymaj kabel z dala od rozgrzanych powierzchni.
- Nie odłączaj, ciągnąc za przewód. Aby odłączyć, chwyć za wtyczkę, nie za przewód.
- Nie dotykaj wtyczki ani urządzenia mokrymi rękami.
- Nie wkładać żadnych przedmiotów do otworów. Nie używać z zablokowanymi otworami; utrzymywać w czystości, bez kurzu, kłaczków, włosów i wszystkiego, co może ograniczyć przepływ powietrza.
- Trzymaj włosy, luźne ubrania, palce i inne części ciała z dala od otworów i ruchomych części.
- Nie zbieraj palących się lub dymiących przedmiotów, np. papierosów, zapałek lub gorącego popiołu.
- Nie używać urządzenia do zbierania cieczy łatwopalnych lub wybuchowych, takich jak benzyna, ani nie używać w miejscach, w których mogą one występować.
- Nie stosować bez założonych filtrów.
- Przed odłączeniem zasilania wyłącz wszystkie elementy sterujące.
- Zachowaj szczególną ostrożność podczas czyszczenia schodów.
- To urządzenie jest wyposażone w podwójną izolację. Używaj tylko identycznych części zamiennych.
3. Zawartość opakowania
Sprawdź, czy wszystkie elementy wymienione poniżej znajdują się w opakowaniu. Jeśli brakuje którejkolwiek części lub jest ona uszkodzona, skontaktuj się z działem obsługi klienta DEWALT.
- DEWALT Wet/Dry Vac (1)
- 2-1/2” Crush-resistant hose (1)
- Różdżki przedłużające (2)
- Ssawka podłogowa (1)
- Pędzel okrągły (1)
- Accessory bag (1)
- Jednorazowy worek przeciwkurzowy (1)
- Utility nozzle (1)
- Washable cartridge filter (1)
- Dysza szczelinowa (1)
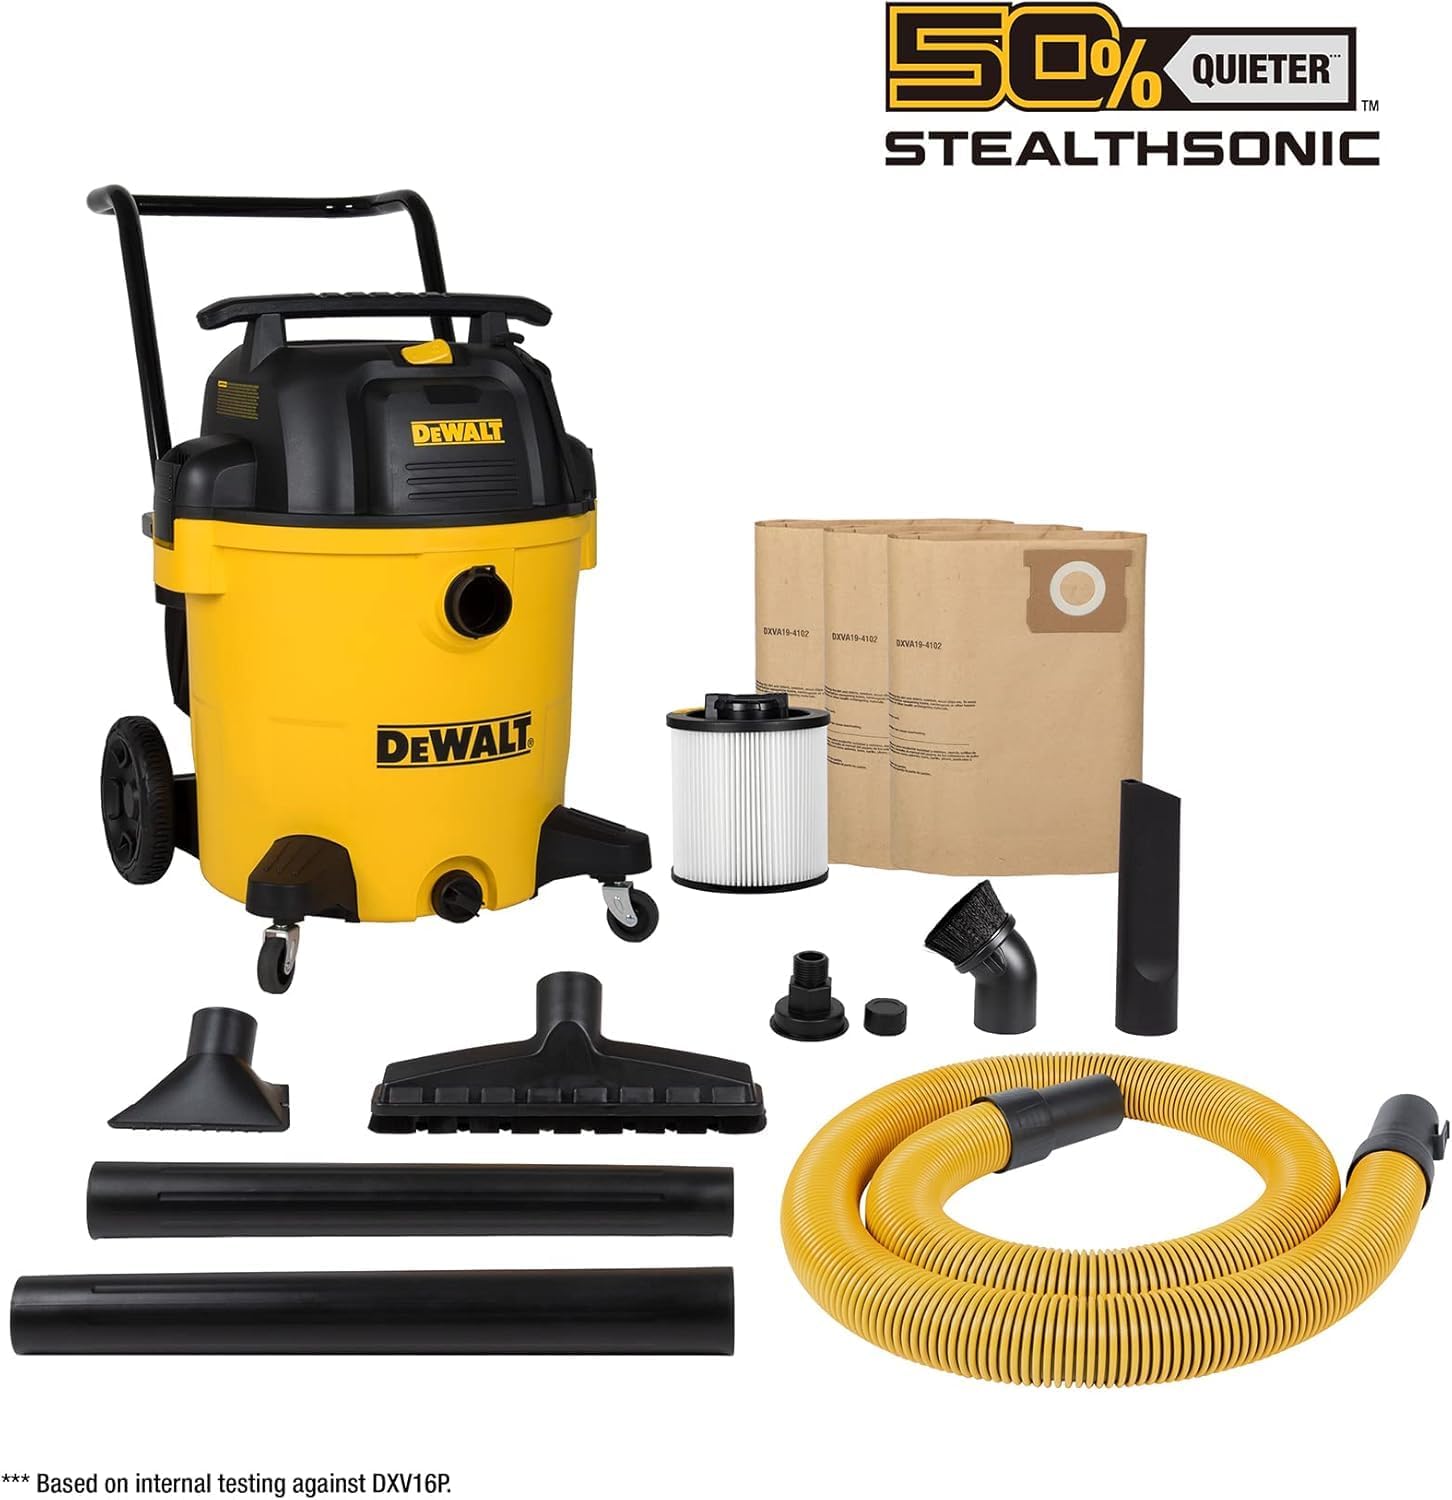
Image 3.1: All components included with the DEWALT 16 Gallon STEALTHSONIC Wet/Dry Vacuum, including various nozzles, hose, and filters.
4. Montaż i konfiguracja
Follow these steps to assemble your DEWALT Wet/Dry Vacuum before first use.
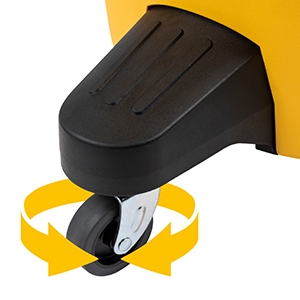
4.1 Attaching the Casters and Wheels
- Invert the vacuum drum.
- Insert the caster stems into the designated holes on the bottom of the drum. Push firmly until they click into place.
- Attach the larger rear wheels to the axle mounts, ensuring they are securely fastened.

Image 4.1: Detail of the heavy-duty rear wheels designed for easy movement, even with a full tank.
4.2 Instalacja filtra
The washable cartridge filter is essential for dry vacuuming. For wet vacuuming, remove the cartridge filter and install a foam filter (sold separately) if desired, or operate without a filter for large liquid spills.
- Remove the power head from the drum by unlatching the side clips.
- Place the cartridge filter over the filter cage, ensuring it fits snugly.
- Secure the filter with the filter nut or retainer provided, turning clockwise until tight.
- Replace the power head, ensuring the clips are securely latched.

Image 4.2: An exploded diagram illustrating the main components, including the washable cartridge filter and the motor assembly.
4.3 Connecting the Hose and Accessories
- Insert the large end of the crush-resistant hose into the inlet port on the vacuum drum. Twist to secure.
- Attach the desired accessory (e.g., floor nozzle, crevice nozzle, utility nozzle) to the other end of the hose or to the extension wands.
- For extended reach, connect the two extension wands together before attaching the nozzle.

Image 4.3: The vacuum with its hose neatly wrapped around the top handle and side wraps, demonstrating its compact design for storage.
5. Instrukcja obsługi
Your DEWALT STEALTHSONIC Wet/Dry Vacuum is designed for efficient cleaning of both wet and dry messes.
5.1 Odkurzanie na sucho
- Ensure the cartridge filter is clean and properly installed. For fine dust, consider using a disposable dust bag inside the drum for easier disposal and to protect the filter.
- Podłącz przewód zasilający do uziemionego gniazdka elektrycznego.
- Turn the vacuum ON using the power switch located on the power head.
- Begin vacuuming dry debris. The STEALTHSONIC technology ensures quieter operation.
- Po zakończeniu wyłącz odkurzacz i odłącz go od zasilania.

Obraz 5.1: Zbliżenie view of the power switch on the DEWALT STEALTHSONIC vacuum, highlighting its robust design.
5.2 Odkurzanie na mokro
- Remove the cartridge filter. For wet pickup, a foam filter (sold separately) can be installed, or the vacuum can be used without a filter for large liquid spills.
- Podłącz przewód zasilający do uziemionego gniazdka elektrycznego.
- Włącz odkurzacz.
- Vacuum liquids. The float mechanism will automatically shut off suction when the drum is full to prevent overflow.
- Po zakończeniu wyłącz odkurzacz i odłącz go od zasilania.
- Empty the drum by removing the power head and pouring out the liquid, or by using the drain port.
Rysunek 5.2: Szczegółowy view of the drain port located at the bottom of the vacuum drum, allowing for easy liquid disposal.
6. Konserwacja
Regularna konserwacja zapewnia optymalną wydajność i wydłuża żywotność odkurzacza.
6.1 Opróżnianie bębna
Empty the drum when it is full or after each use, especially after wet vacuuming.
- Odłącz odkurzacz od gniazdka elektrycznego.
- Unlatch the side clips and remove the power head.
- Carefully lift and empty the drum contents into a suitable receptacle. For liquids, use the drain port.
- Clean the inside of the drum if necessary and replace the power head.
6.2 Cleaning the Cartridge Filter
The cartridge filter should be cleaned regularly to maintain suction power. For optimal performance, replace the filter every 3-6 months depending on usage.
- Odłącz odkurzacz.
- Remove the power head and then remove the cartridge filter.
- Gently tap the filter against a hard surface to dislodge loose dirt.
- For a more thorough cleaning, rinse the filter under running water. Allow it to air dry completely before reinstallation. Do not use heat to dry.
- Reinstall the dry filter and replace the power head.
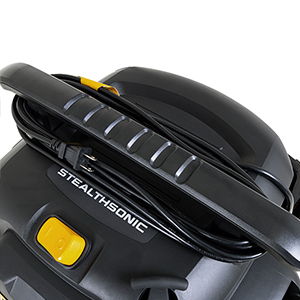
Image 6.1: The washable cartridge filter, suitable for both wet and dry debris collection.
6.3 Cord and Accessory Storage
Wrap the 20-foot power cord around the integrated cord wraps on the top handle and side of the vacuum. Store accessories in the provided accessory bag or on the onboard storage points.
7. Rozwiązywanie Problemów
Jeśli masz problemy z odkurzaczem, zapoznaj się z poniższymi, często spotykanymi problemami i ich rozwiązaniami.
| Problem | Możliwa przyczyna | Rozwiązanie |
|---|---|---|
| Odkurzacz się nie włącza | Brak zasilania w gniazdku; Przewód zasilający nie jest podłączony; Wadliwy przełącznik | Check power outlet; Ensure cord is fully plugged in; Contact service center if switch is faulty |
| Niska moc ssania | Clogged hose/nozzle; Full drum; Dirty filter; Air leak | Clear obstruction; Empty drum; Clean/replace filter; Check connections for leaks |
| Przelanie się cieczy podczas odkurzania na mokro | Drum is full; Float mechanism stuck | Empty drum; Check float for obstructions and ensure it moves freely |
| Nadmierny hałas | Obstruction in motor/fan; Loose components | Check for and remove obstructions; Ensure all parts are securely fastened |
8. Specyfikacje
- Model: DXV16P-QTA
- Pojemność: 16 galony
- Silnik: 6.5 Peak Horsepower
- Przepływ powietrza: 135 stopy sześcienne na minutę
- Źródło zasilania: Elektryczny przewodowy
- Długość przewodu zasilającego: 20 stóp
- Średnica węża: 2-1/2 cala
- Redukcja hałasu: STEALTHSONIC Technology (50% quieter than current model)
- Typ filtra: Zmywalny filtr kasetowy
- Zastosowanie wewnątrz/na zewnątrz: Wewnątrz, Na zewnątrz
9. Gwarancja i wsparcie
DEWALT products are manufactured to high-quality standards. For warranty information, please refer to the warranty card included with your product or visit the official DEWALT website. For technical support, replacement parts, or service inquiries, please contact DEWALT customer service.
Zachowaj paragon jako dowód zakupu na wypadek reklamacji.