1. Ważne instrukcje bezpieczeństwa
Przed użyciem urządzenia należy przeczytać i zrozumieć wszystkie instrukcje bezpieczeństwa. Nieprzestrzeganie tych instrukcji może spowodować porażenie prądem, pożar lub poważne obrażenia.
- Zawsze podłączaj urządzenie do uziemionego gniazdka.
- Nie zanurzaj jednostki głównej w wodzie ani innych płynach.
- Do not operate the cleaner without liquid in the tank.
- Przechowywać w miejscu niedostępnym dla dzieci.
- Do not touch the tank or cleaning solution during operation, especially when heated.
- Unplug the unit from the power source before cleaning or servicing.
- Use appropriate cleaning solutions for the items being cleaned. Avoid flammable or corrosive liquids.
- Ensure the lid is closed during operation to prevent splashing.
- Do not disassemble or modify the unit. Contact qualified service personnel for repairs.
2. Koniec produktuview
The CREWORKS 10L Ultrasonic Cleaner is an industrial-grade cleaning machine designed for thorough and efficient cleaning of various items using 33kHz ultrasonic waves, sweep function, and adjustable temperature control.
Główne cechy
- Pojemność 10L: Generous tank volume for various cleaning tasks.
- 33kHz Ultrasonic Frequency: Effective for removing tough residues, grime, and grease.
- Funkcja zamiatania: Varies cavitation bubble size and intensity to reach complex shapes and blind cavities for uniform cleaning.
- Tryb odgazowywania: Removes trapped air bubbles from the cleaning solution to enhance cavitation and cleaning efficiency.
- Regulowana moc: Customizable ultrasonic power settings for delicate instruments or heavy-duty parts.
- Regulowany timer: 0-30 minute timer for precise control over cleaning cycles.
- Kontrola temperatury: Heating range of 68-140°F (20-60°C) to optimize cleaning performance.
- Konstrukcja ze stali nierdzewnej 304: Durable and corrosion-resistant tank and housing.
- Integrated Drain Port: For convenient and mess-free fluid drainage.
Zawartość opakowania
Sprawdź, czy wszystkie przedmioty znajdują się na miejscu i są w dobrym stanie po rozpakowaniu.
- 1 x CREWORKS 10L Ultrasonic Cleaner Unit
- 1 x Przewód zasilający
- 1 x Mesh Basket
- 1 x wąż spustowy
- 1 x Instrukcja obsługi
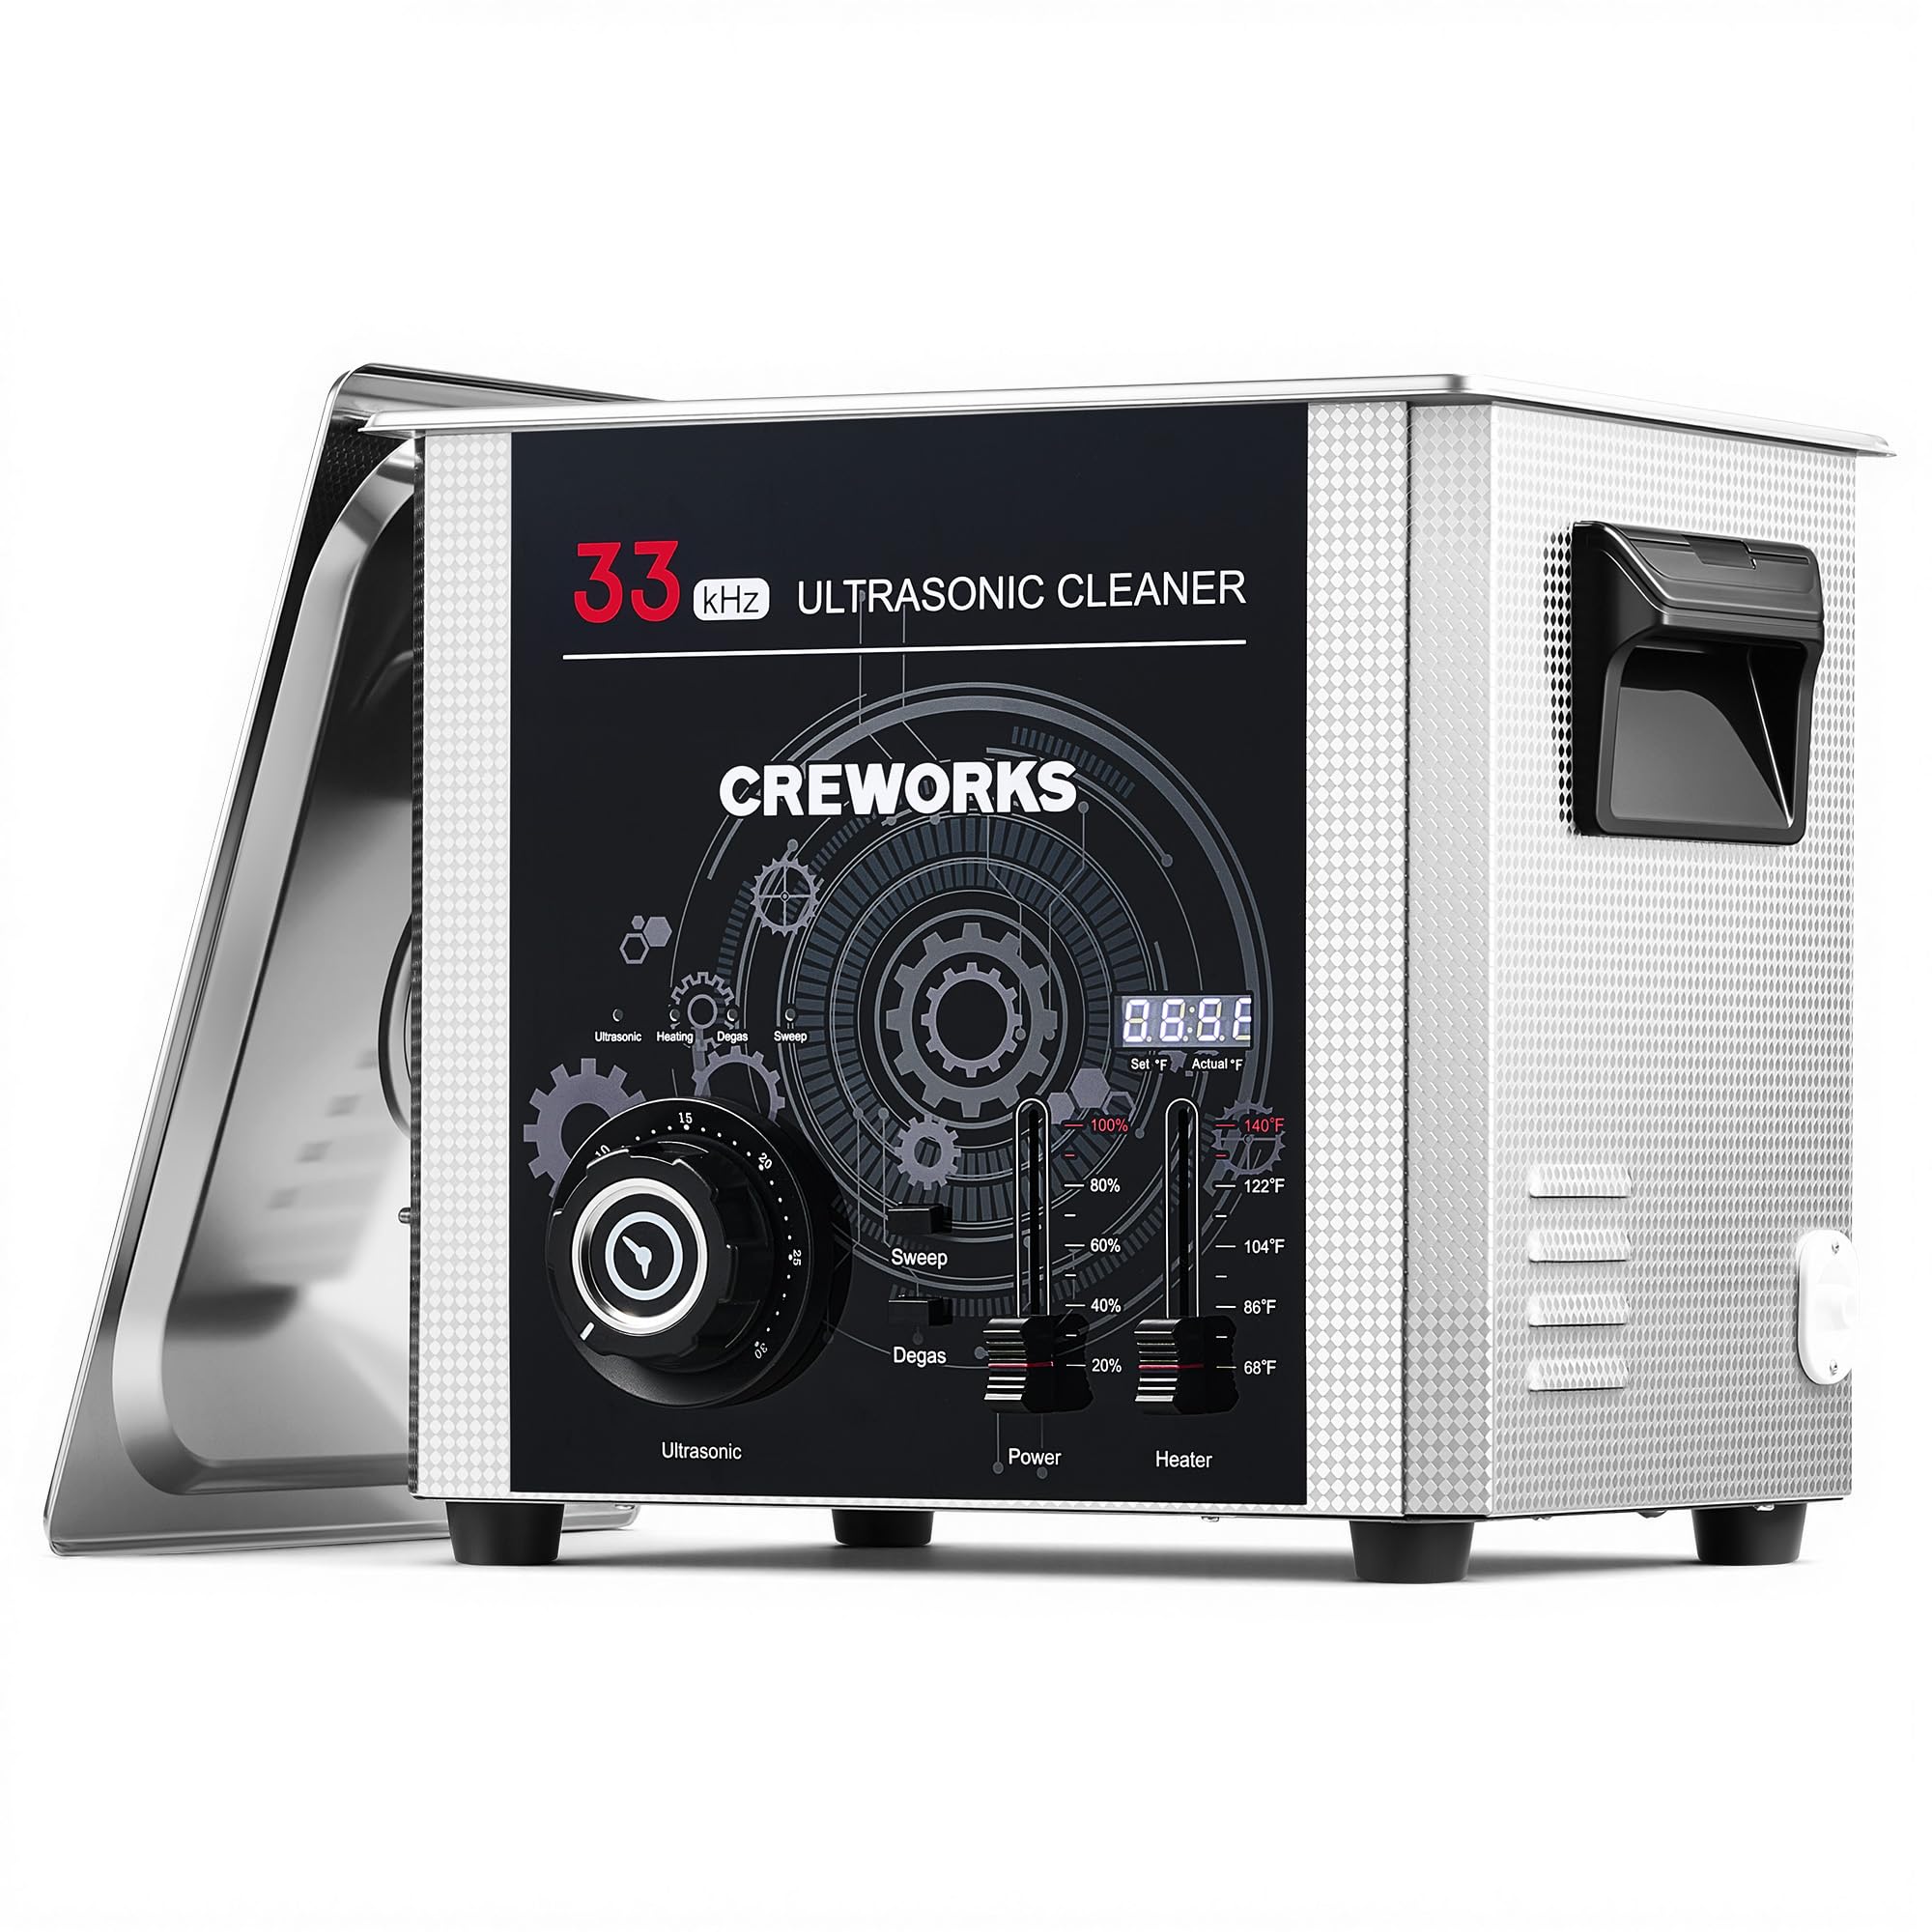
Image: The main CREWORKS 10L Ultrasonic Cleaner unit, showing its stainless steel construction and control panel.

Obraz: Ponadview of the CREWORKS 10L Ultrasonic Cleaner, highlighting its timer control, temperature control, ultrasonic power, and heating power.
3. Konfiguracja
- Rozpakowywanie: Carefully remove the ultrasonic cleaner and all accessories from the packaging. Retain packaging for future storage or transport.
- Umieszczenie: Place the unit on a stable, level, and dry surface. Ensure there is adequate ventilation around the unit. Avoid placing it near heat sources or in direct sunlight.
- Podłączenie zasilania: Ensure the power switch is in the "OFF" position. Connect the power cord to the unit and then to a grounded electrical outlet.
- Napełnij zbiornik: Open the lid and fill the stainless steel tank with an appropriate cleaning solution. Ensure the liquid level is between the "MIN" and "MAX" marks. Do not overfill or underfill.
- Włóż koszyk: If using, place the mesh basket into the tank. Place items to be cleaned into the basket, ensuring they are fully submerged but not touching the bottom of the tank.

Image: The ultrasonic cleaner with its mesh basket inserted, ready for items to be placed inside.
4. Działanie
Familiarize yourself with the control panel before beginning operation.
Panel sterowania nadview

Obraz: szczegółowy view of the control panel, showing the ultrasonic, degas, power, timer, and heater settings.
- Przycisk zasilania: Włącza/wyłącza urządzenie.
- Sterowanie czasowe: Adjusts the cleaning duration from 0 to 30 minutes.
- Kontrola temperatury: Sets the desired heating temperature from 68°F to 140°F (20°C to 60°C).
- Ultrasonic Power Control: Adjusts the intensity of the ultrasonic waves.
- Degas Button: Activates the degas function to remove air from the solution.
- Sweep Button: Activates the sweep function for enhanced cleaning uniformity.
Procedura czyszczenia
- Przygotuj elementy: Ensure items are suitable for ultrasonic cleaning. Remove any loose debris before placing them in the basket.
- Dodaj rozwiązanie: Fill the tank with the appropriate cleaning solution.
- Ustaw temperaturę (opcjonalnie): If heating is desired, set the temperature control to the desired value. Allow time for the solution to reach the set temperature.
- Activate Degas (Recommended): For optimal cleaning, press the Degas button for 1-2 minutes to remove dissolved gases from the fresh cleaning solution. This improves cavitation efficiency.
- Set Timer and Power: Set the timer to the desired cleaning duration (0-30 minutes) and adjust the ultrasonic power level according to the items being cleaned. Lower power for delicate items, higher for robust items.
- Zacznij sprzątać: Close the lid and turn on the unit. The ultrasonic cleaning process will begin.
- Monitoruj postęp: Observe the cleaning process. For heavily soiled items, multiple cycles or a change of solution may be necessary.
- Zakończenie czyszczenia: Once the timer expires or cleaning is complete, turn off the unit. Carefully remove the basket with the cleaned items.
- Płukanie i suszenie: Rinse the cleaned items thoroughly with clean water and dry them completely.

Image: Diagram illustrating the full-coverage sweep technology, showing varying cavitation bubbles reaching all surfaces for uniform cleaning.

Image: Visual representation of the degassing mode for enhanced cavitation and the customizable power setting dial.

Image: Comparison photos showing items before and after cleaning with the ultrasonic cleaner, demonstrating its effectiveness on various materials.
5. Konserwacja
Właściwa konserwacja gwarantuje długowieczność i optymalną wydajność myjki ultradźwiękowej.
- Opróżnianie zbiornika: After each use, especially with dirty solutions, drain the tank using the integrated drain port. Place a suitable container under the drain valve, open the valve, and allow the liquid to flow out.
- Czyszczenie zbiornika: Rinse the tank thoroughly with clean water after draining. Wipe the interior and exterior of the unit with a soft, damp ściereczką. Nie używaj środków czyszczących o właściwościach ściernych ani nie zanurzaj urządzenia w wodzie.
- Lid and Basket: Clean the lid and mesh basket with soap and water, then rinse and dry completely.
- Składowanie: Store the unit in a cool, dry place when not in use. Ensure the tank is empty and dry.
- Regularna kontrola: Okresowo sprawdzaj przewód zasilający pod kątem uszkodzeń. W przypadku uszkodzenia, zaprzestań użytkowania i skontaktuj się z obsługą klienta.

Image: Close-up of the integrated drain port, designed for easy and mess-free liquid removal from the tank.
6. Rozwiązywanie Problemów
Zapoznaj się z tą sekcją, aby poznać typowe problemy i ich rozwiązania. Jeśli problem będzie się powtarzał, skontaktuj się z obsługą klienta.
| Problem | Możliwa przyczyna | Rozwiązanie |
|---|---|---|
| Urządzenie nie włącza się. |
|
|
| Ultrasonic function not working. |
|
|
| Funkcja grzania nie działa. |
|
|
| Słabe efekty czyszczenia. |
|
|
7. Specyfikacje
| Funkcja | Szczegół |
|---|---|
| Model | 10L |
| Pojemność zbiornika | 10 litra (2.6 galona) |
| Częstotliwość ultradźwiękowa | 33kHz |
| Moc ultradźwiękowa | 240 W |
| Moc grzewcza | 300 W |
| Zakres temperatur | 68-140°F (20-60°C) |
| Ustawienia timera | 0-30 minut |
| Materiał zbiornika | Stal nierdzewna 304 |
| Wymiary całkowite | 16.73 x 14.96 x 13.19 cala (opakowanie) |
| Waga przedmiotu | 18.52 funta |
| Producent | ZAŁOGI |

Image: Diagram showing the external dimensions of the 10L ultrasonic cleaner and the internal dimensions of the cleaning basket.
8. Gwarancja i wsparcie
For warranty information, technical support, or service inquiries, please contact CREWORKS customer service. Refer to your purchase documentation for specific warranty terms.
You can visit the official CREWORKS store for more information and support: Sklep CREWORKS na Amazon