
Wstęp
Thank you for choosing Ollny S11 30FT Solar String Lights. This manual provides essential information for the safe and efficient use of your solar string lights. Please read it thoroughly before installation and operation.
These solar string lights are designed for outdoor use, featuring shatterproof Edison bulbs, remote control with timer functions, and multiple lighting modes. They are powered by solar energy with a USB charging backup, and are built to withstand various weather conditions.
Co jest w pudełku
- Solar String Lights (30FT length)
- Solar Panel with ground stake/mounting options
- Zdalne sterowanie
- Instrukcja obsługi (ten dokument)
- Zapasowe żarówki

Image: The package contents include the 30-foot string lights with 10+1 bulbs, a solar panel with a 5.8ft lead cable, and a USB port for charging. The diagram illustrates the 2.5ft spacing between bulbs.
Specyfikacje
| Funkcja | Szczegół |
|---|---|
| Numer modelu | NYD010A |
| Długość | 30 stóp (360 cali) |
| Typ żarówki | S11 Edison LED, Shatterproof |
| Kolor światła | Ciepła biel (2700 kelwinów) |
| Źródło zasilania | Solar Powered, USB Charging Backup |
| Pojemność baterii | 2000mAh |
| Czas ładowania (słoneczny) | 6 godzin (bezpośrednie światło słoneczne) |
| Czas ładowania (USB) | 4 godziny |
| Czas działania | Do 10 godzin (w pełni naładowany) |
| Odporność na wodę | IP65 (Solar Panel), IP45 (String Lights) |
| Metoda kontroli | Zdalne sterowanie |
| Cechy specjalne | Automatic On-Off, Dimmable, 3 Lighting Modes, Timer Function |

Image: Illustration of the dual charging capabilities, showing solar charging in 6 hours and USB charging in 4 hours, both providing up to 10 hours of illumination.
Konfiguracja i instalacja
- Rozpakuj komponenty: Carefully remove all items from the packaging. Ensure all parts listed in "What's in the Box" are present.
- Umiejscowienie panelu słonecznego:
Choose a location for the solar panel that receives direct sunlight for at least 6 hours daily. Avoid shaded areas. The solar panel can be installed using one of three methods:
- Stawka naziemna: Insert the stake into soft ground.
- Mocowanie ścienne: Use screws (not included) to attach the panel to a wall.
- Clamp: Attach the panel to a fence or board using the provided clamp.

Image: Demonstrates three ways to install the solar panel: inserting it into the ground, mounting it on a wall, or clamping it to a wooden structure.
- String Light Installation:
Hang the string lights in your desired location. Each bulb socket has a built-in hook for easy hanging. Ensure the bulbs are securely tightened into their sockets to prevent moisture ingress and ensure proper function.
Ciepła rada: If a bulb is not lighting up, gently tighten it into its socket. The bulbs are shatterproof, designed to resist impacts.
- Opłata początkowa: Before first use, allow the solar panel to charge in direct sunlight for at least 6 hours, or use the USB charging option for 4 hours, to ensure the battery is fully charged.
Instrukcja obsługi
Automatyczna obsługa
The string lights feature an intelligent photosensitivity sensor. They will automatically charge during the day when exposed to bright light and turn on automatically at dusk or in dark environments.

Image: Illustrates the automatic on/off function, with the solar panel absorbing sunlight during the day and the lights turning on automatically at night.
Funkcje pilota zdalnego sterowania
Use the provided remote control for manual operation and to access advanced features.
- WŁ./WYŁ.: Naciśnij przycisk „ON”, aby włączyć światła, lub „OFF”, aby je wyłączyć.
- Tryby oświetlenia: Cycle through 3 lighting modes:
- Stałe: Lights remain continuously lit.
- Błysk: Lights flash intermittently.
- Oddech: Światła powoli pojawiają się i znikają.
- Regulacja jasności: Use the brightness buttons (typically '+' and '-') to increase or decrease the light intensity (25% to 100%).
- Ustawienia timera: Select from 5 timer options to automatically turn off the lights after a set duration: 30 minutes, 2 hours, 4 hours, 6 hours, or 8 hours.
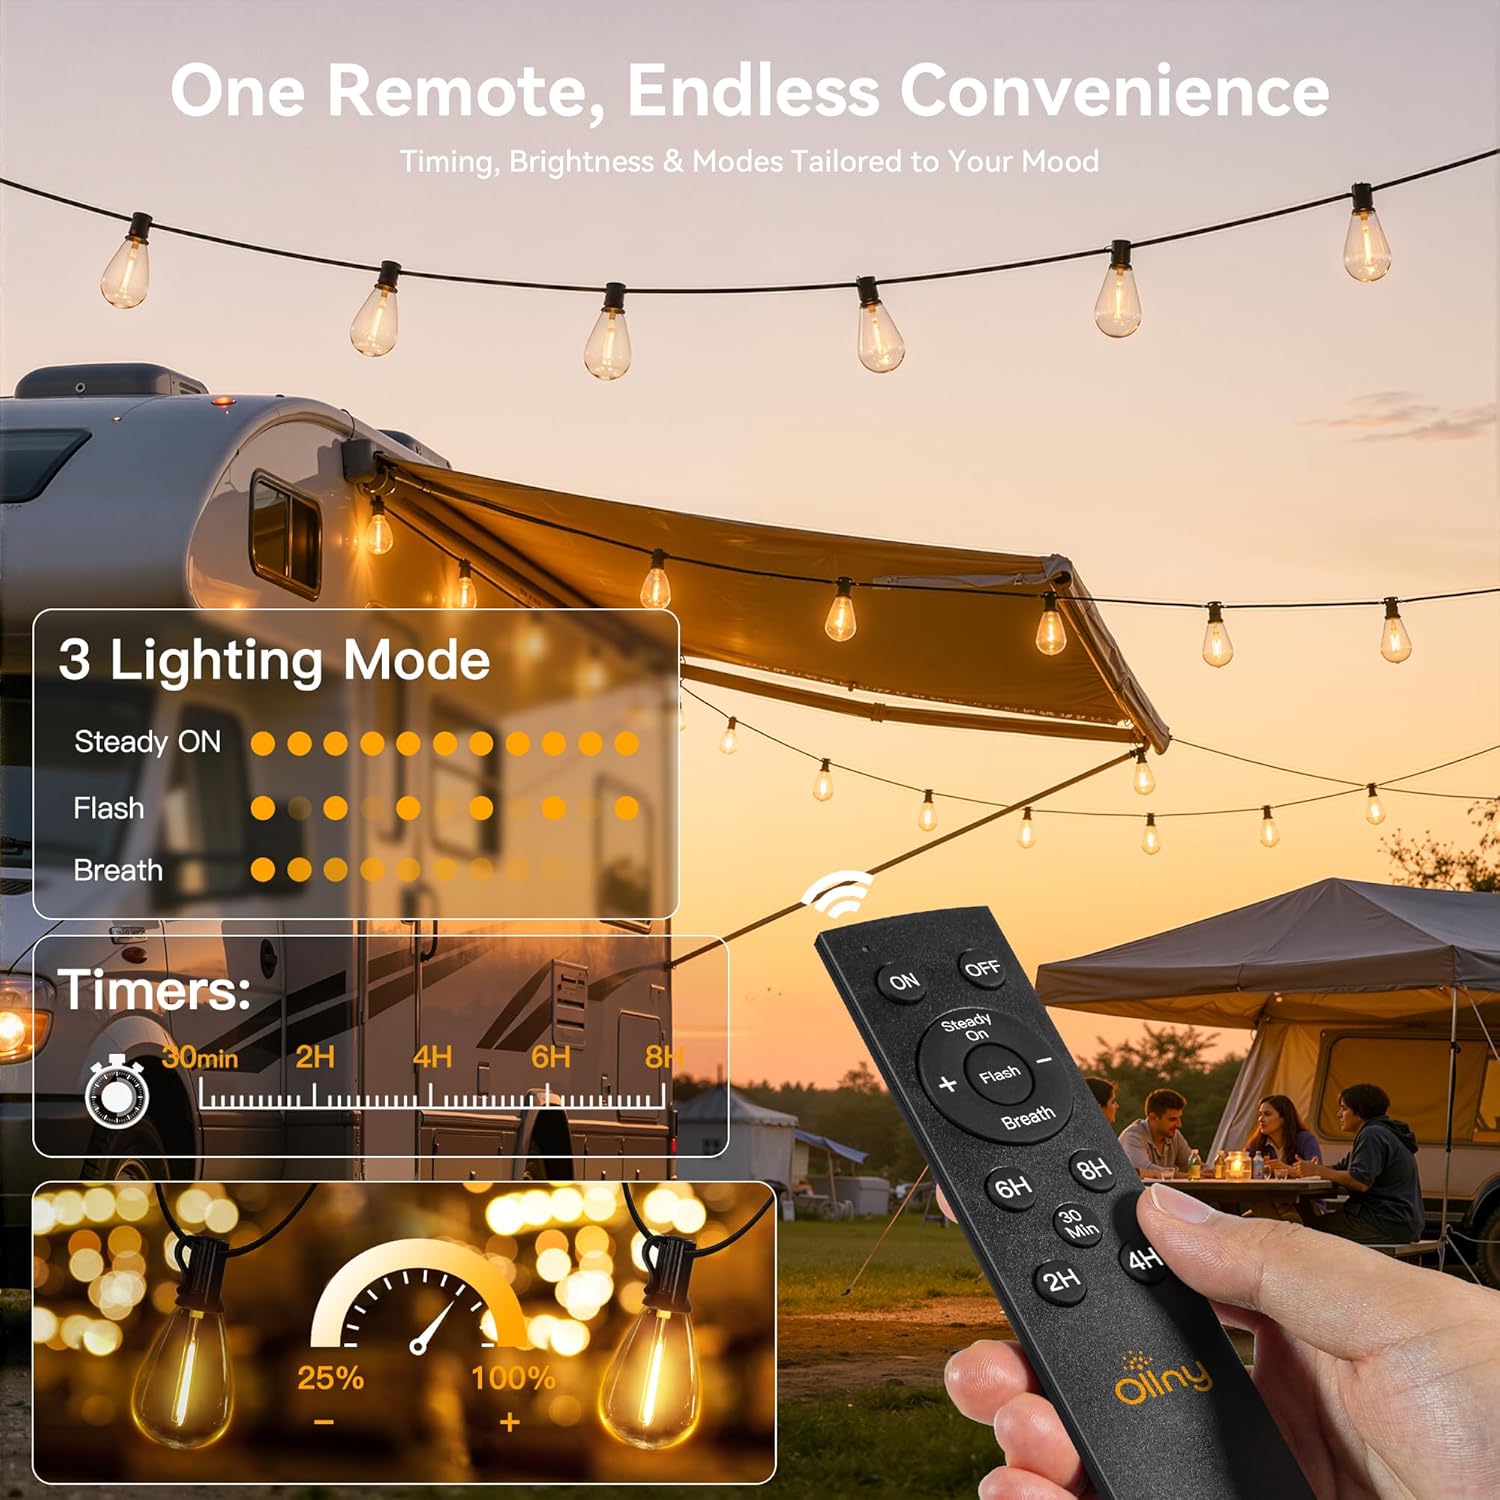
Image: The remote control displays options for turning the lights on/off, selecting between Steady On, Flash, and Breath modes, adjusting brightness, and setting timers for 30 minutes, 2, 4, 6, or 8 hours.
Video: This video demonstrates the features of the Ollny 30FT Solar Patio Lights, including their all-weather durability, 33 ft remote control distance, solar charging capabilities, and various lighting modes and timer functions.
Konserwacja
- Wyczyść panel słoneczny: Regularnie przecieraj panel słoneczny miękką, miękką szmatką.amp ściereczką, aby usunąć kurz, brud i zanieczyszczenia. Czysty panel zapewnia optymalną wydajność ładowania.
- Kontrola żarówki: Periodically check all bulbs to ensure they are securely tightened. If a bulb is not working, try tightening it before considering replacement.
- Składowanie: If storing the lights for an extended period, ensure the battery is fully charged. Store in a cool, dry place.
- Odporność na warunki atmosferyczne: The lights are designed to be weatherproof (IP65 for solar panel, IP45 for string lights), withstanding rain, snow, and wind. No special weather-related maintenance is typically required beyond ensuring the solar panel is clear.

Image: The string lights and solar panel are shown in a rainy outdoor setting, highlighting their sunproof, snowproof, rainproof, and windproof features for year-round use.
Rozwiązywanie problemów
| Problem | Możliwa przyczyna | Rozwiązanie |
|---|---|---|
| Światła nie włączają się w nocy. |
|
|
| Światła są słabe lub świecą się tylko przez krótki czas. |
|
|
| Pilot zdalnego sterowania nie działa. |
|
|
| Individual bulb not lighting up. |
|
|
Gwarancja i wsparcie
Ollny S11 Solar String Lights come with a 1-letnia gwarancja producenta od daty zakupu. Niniejsza gwarancja obejmuje wady materiałowe i wykonawcze przy normalnym użytkowaniu.
For warranty claims, technical support, or any questions regarding your product, please contact Ollny customer service through the retailer where the product was purchased or visit the official Ollny webwitryna do informacji kontaktowych.
Zachowaj dowód zakupu w celu potwierdzenia gwarancji.