
1. Koniec produktuview
The YWBL-WH Electric Rechargeable Cordless Screwdriver is a versatile tool designed for various fastening tasks. It features dual operation modes (electric and manual), adjustable torsion settings, and integrated LED illumination for enhanced visibility. This manual provides essential information for safe and effective use of your screwdriver.

Image 1.1: The YWBL-WH Electric Rechargeable Cordless Screwdriver, showcasing its ergonomic design and integrated bit holder.
2. Zawartość opakowania
Sprawdź, czy wszystkie wymienione poniżej elementy znajdują się w Twojej paczce. Jeśli brakuje któregokolwiek z nich lub jest on uszkodzony, skontaktuj się z obsługą klienta.
- Wkrętak elektryczny 1 x
- 12 x wkręcania
- 1 x Extension Adapter
- 1 x kabel USB (typ C)
- 1 x Instrukcja obsługi

Image 2.1: The electric screwdriver shown with its included bits and an extension adapter, alongside various screws.
3. Informacje dotyczące bezpieczeństwa
Przed użyciem tego produktu należy przeczytać i zrozumieć wszystkie ostrzeżenia i instrukcje dotyczące bezpieczeństwa. Nieprzestrzeganie ostrzeżeń i instrukcji może spowodować porażenie prądem, pożar i/lub poważne obrażenia.
- Utrzymuj miejsce pracy w czystości i zapewnij dobre oświetlenie. Zagracone i ciemne pomieszczenia są przyczyną wypadków.
- Nie używaj elektronarzędzi w atmosferach wybuchowych, np. w obecności łatwopalnych cieczy, gazów lub kurzu. Elektronarzędzia wytwarzają iskry, które mogą zapalić pył lub opary.
- Trzymaj dzieci i osoby postronne z dala podczas obsługi elektronarzędzia. Rozproszenie uwagi może spowodować utratę kontroli.
- Unikaj przypadkowego uruchomienia. Przed podłączeniem akumulatora, podniesieniem lub przenoszeniem narzędzia należy upewnić się, że wyłącznik jest w pozycji wyłączonej.
- Stosuj środki ochrony osobistej. Zawsze noś okulary ochronne. Sprzęt ochronny, taki jak maska przeciwpyłowa, antypoślizgowe obuwie robocze, kask lub ochrona słuchu, stosowany w odpowiednich warunkach, zmniejszy ryzyko obrażeń ciała.
- Nie przesadzaj. Zawsze utrzymuj odpowiednią postawę i równowagę. Umożliwia to lepszą kontrolę elektronarzędzia w nieoczekiwanych sytuacjach.
- Ubierz się odpowiednio. Nie nosić luźnej odzieży ani biżuterii. Trzymaj włosy i ubranie z dala od ruchomych części. Luźne ubrania, biżuteria lub długie włosy mogą zostać pochwycone przez ruchome części.
- Odłącz akumulator od elektronarzędzia przed dokonaniem jakichkolwiek regulacji, wymianą akcesoriów lub przechowywaniem elektronarzędzia.
- Przechowuj nieużywane elektronarzędzia poza zasięgiem dzieci i nie pozwalać na obsługę elektronarzędzia osobom niezaznajomionym z elektronarzędziem lub niniejszą instrukcją.
- Konserwacja elektronarzędzi i akcesoriów. Sprawdź, czy nie ma niewspółosiowości lub zakleszczenia ruchomych części, uszkodzeń części i innych stanów, które mogą mieć wpływ na działanie elektronarzędzia. W przypadku uszkodzenia, przed użyciem należy oddać elektronarzędzie do naprawy.
- Używaj elektronarzędzi, akcesoriów, końcówek narzędziowych itp. zgodnie z niniejszą instrukcją, biorąc pod uwagę warunki pracy i pracę, która ma być wykonana. Użycie elektronarzędzia do operacji innych niż zamierzone może spowodować niebezpieczną sytuację.
4. Konfiguracja
4.1. Ładowanie akumulatora
The screwdriver is powered by a built-in 1600mAh rechargeable lithium battery. Before first use, or when the battery is low, charge the device using the provided USB Type-C cable.
- Locate the Type-C charging port on the screwdriver.
- Connect the USB Type-C cable to the screwdriver's charging port.
- Podłącz drugi koniec kabla USB do kompatybilnego źródła zasilania USB (np. zasilacza sieciowego, portu USB komputera).
- The charging indicator light will illuminate during charging and turn off or change color when fully charged (refer to the product diagram for indicator location).
4.2. Montaż bitów wkrętakowych
To install or change screwdriver bits, follow these steps:
- Ensure the screwdriver is powered off.
- Insert the desired screwdriver bit into the magnetic bit holder at the front of the tool. The bit will snap into place.
- If using a short bit, first install the extension adapter into the bit holder, then insert the short bit into the extension adapter.
- Aby wyjąć bit, po prostu wyciągnij go z uchwytu bitów.

Obraz 4.1: Zbliżenie view demonstrating the insertion of a screwdriver bit into the tool's magnetic bit holder.
5. Instrukcja obsługi
5.1. Power On/Off and LED Light Control
The screwdriver features a power button that also controls the integrated LED lights.
- To Power On/Activate Light: Long press the power button (marked with a power symbol) to turn on the device and activate the top LED light, which illuminates the work area.
- To Adjust Torsion Gear: While the device is on, short press the power button to cycle through the three available torsion settings (2Nm, 2.5Nm, 3.5Nm).
- To Turn Off Light: After the top LED light is on, press the power button lightly to turn it off.
- Bottom LED Flashlight: The bottom LED can be used as a separate flashlight for general illumination. Refer to the product diagram for its activation method (usually a separate short press or specific button combination).
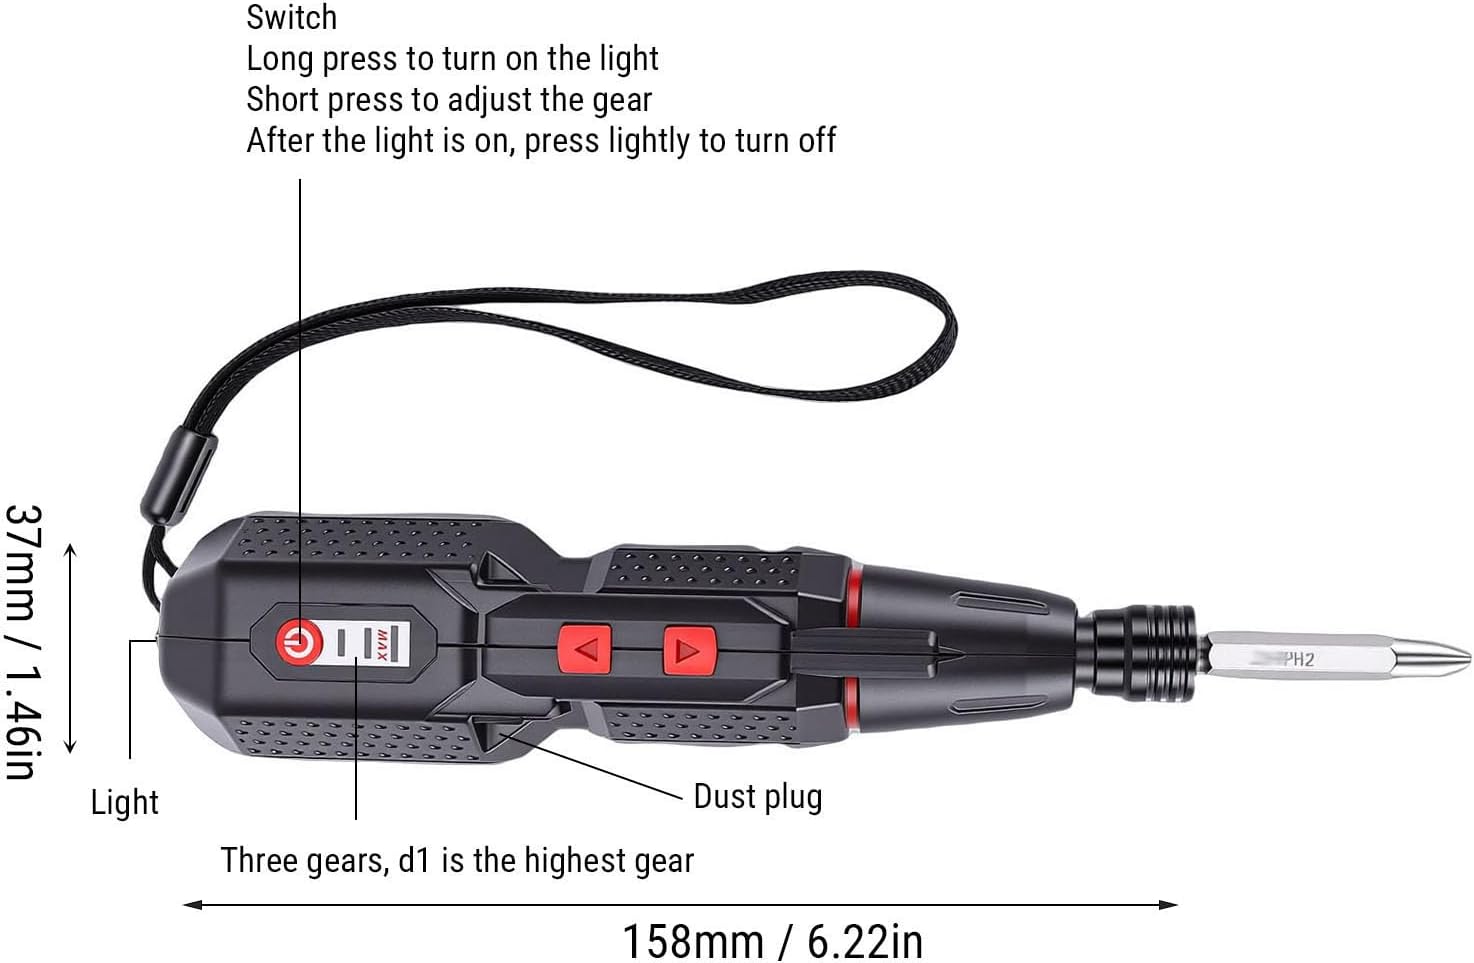
Image 5.1: A detailed diagram illustrating the screwdriver's components, including the power switch, LED light, dust plug, and torsion gear indicator, along with dimensions.
5.2. Adjusting Torsion Settings
The screwdriver offers three electric torsion settings to prevent over-tightening or damage to delicate materials.
- 2Nm: Suitable for light tasks and delicate materials.
- 2.5Nm: General purpose setting for most common applications.
- 3.5Nm: For tasks requiring higher torque, such as driving longer screws into harder materials.
To adjust the torsion, short press the power button while the screwdriver is active. The device will cycle through the settings, indicated by a visual cue or a change in motor resistance.
5.3. Dual Mode Operation (Electric and Manual)
This screwdriver provides flexibility with both electric and manual modes.
- Tryb elektryczny: Delivers a powerful 280rpm speed for quick and effortless screw tightening or loosening. Activate by pressing the forward or reverse buttons.
- Tryb ręczny: Provides precise control with up to 10Nm of torque. This mode is ideal for tasks requiring fine adjustments or when the electric motor is not needed. Simply use the screwdriver manually without engaging the electric motor.
5.4. Kontrola kierunku
Use the directional buttons to select between tightening (forward) and loosening (reverse) screws.
- Identify the forward (usually '▲') and reverse (usually '▼') buttons on the screwdriver body.
- Press the appropriate button to engage the electric motor in the desired direction.
- Zwolnij przycisk, aby zatrzymać silnik.

Obraz 5.2: Góra view of the screwdriver, highlighting the forward and reverse directional control buttons.
6. Konserwacja
Proper maintenance ensures the longevity and optimal performance of your YWBL-WH Electric Screwdriver.
- Czyszczenie: Regularly wipe the tool with a soft, dry cloth to remove dust and debris. Do not use harsh chemicals or abrasive cleaners.
- Składowanie: Store the screwdriver in a dry, cool place, away from direct sunlight and moisture. Keep it out of reach of children.
- Pielęgnacja baterii: To prolong battery life, avoid fully discharging the battery frequently. Charge the battery when the power is low, and if storing for extended periods, charge it to approximately 50% every few months.
- Konserwacja bitów: Keep screwdriver bits clean and free of rust. Replace worn or damaged bits to ensure effective fastening.
7. Rozwiązywanie Problemów
Jeśli masz problemy ze swoim wkrętakiem, zapoznaj się z poniższymi typowymi problemami i ich rozwiązaniami:
| Problem | Możliwa przyczyna | Rozwiązanie |
|---|---|---|
| Śrubokręt nie włącza się. | Akumulator jest rozładowany. | Naładuj baterię za pomocą dołączonego kabla USB typu C. |
| Motor runs but screw does not turn. | Bit is not properly seated or is worn. | Ensure the bit is fully inserted. Replace the bit if it is stripped or worn. |
| Śruby są zerwane lub uszkodzone. | Incorrect torsion setting or excessive force. | Select a lower torsion setting. Use manual mode for delicate tasks. Ensure the correct bit size is used. |
| Światło LED nie działa. | Battery is low or light function is not activated. | Charge the battery. Long press the power button to activate the top LED. Check manual for bottom LED activation. |
| Screwdriver stops unexpectedly. | Battery is depleted or tool is overheated. | Recharge the battery. Allow the tool to cool down if it feels hot. |
Jeśli po wypróbowaniu tych rozwiązań problem nadal występuje, skontaktuj się z obsługą klienta.
8. Specyfikacje
| Funkcja | Specyfikacja |
|---|---|
| Nazwa modelu | YWBL-WHzkt1du53lc |
| Typ baterii | 1 x 1600mAh Rechargeable Li Battery (Built-in) |
| Port ładowania | USB typu C |
| Electric Torsion Settings | 3 Gears (2Nm, 2.5Nm, 3.5Nm) |
| Ręczny moment obrotowy | Up to 10Nm |
| Prędkość elektryczna | 280 obr./min |
| Oświetlenie | Dual LED Lights (Top for work area, Bottom for flashlight) |
| Tworzywo | ABS, Alloy Steel |
| Wymiary (w przybliżeniu) | 158 mm (długość) x 37 mm (szerokość) / 6.22 cala x 1.46 cala |
9. Informacje o gwarancji
This product is covered by a standard manufacturer's warranty. Please refer to the warranty card included in your original packaging or contact the retailer for specific warranty terms and conditions. Keep your purchase receipt as proof of purchase for any warranty claims.
10. Obsługa klienta
For technical assistance, troubleshooting beyond this manual, or warranty inquiries, please contact YWBL-WH customer support through the retailer's platform or the official brand website. Please have your product model number (YWBL-WHzkt1du53lc) and purchase details ready when contacting support.