Welcome to the Windone RM7 Electric Dirt Bike user manual. This guide provides essential information for the safe and efficient operation, assembly, and maintenance of your new electric dirt bike. Please read this manual thoroughly before your first ride and keep it for future reference.
Ważne informacje dotyczące bezpieczeństwa
Your safety is paramount. Always wear appropriate safety gear, including a helmet, gloves, and protective clothing, when operating the Windone RM7 Electric Dirt Bike. Ensure you understand and comply with all local laws and regulations regarding electric bike usage, age restrictions, and licensing requirements.
Zalecany wiek: Designed for riders over 13 years old.
Kontrola przed jazdą: Always inspect the bike for proper assembly, brake function, tire pressure, and battery charge before each ride.
Konserwacja hamulców: Inspect brakes before use. If levers feel stiff or fluid is low, refill brake fluid immediately.
Narażenie na działanie wody: The bike is IPX6 waterproof for daily water wading, but avoid submerging it or riding in heavy rain for extended periods.
Przepisy lokalne: Review your local laws for any age or licensing requirements to ensure proper usage.
Co jest w pudełku
Po rozpakowaniu należy sprawdzić, czy wszystkie elementy są obecne:
Windone RM7 Electric Dirt Bike (partially assembled)
Rumak
Reflektor
Błotnik
Elementy zawieszenia
Zestaw narzędzi
Instrukcja obsługi
Video: Detailed installation guide for the Windone RM7 Electric Dirt Bike. This video covers step-by-step assembly from unboxing to final adjustments, including foot pegs, handlebars, and brake components.
Konfiguracja i montaż
The Windone RM7 comes partially assembled. Follow these steps to complete the assembly:
1. Install Foot Pegs
Remove the pre-installed bolts from the foot peg holes. Reinstall the foot pegs in place on both sides using the provided bolts and tighten securely.
Image: Close-up of the foot peg installation process, showing the bolts being secured.
2. Install Handlebars
Loosely install the handlebars into position. You will tighten them down later after adjusting to your preferred riding position.
3. Install Rear Shock Absorber
Remove the shipping bar from the rear shock mounting area. Reuse the hardware (bolts, washers, nuts) to install the rear shock absorber. Tighten all components securely.
Obraz: Szczegółowy view of the rear Nitrogen Gas Shock, highlighting its robust construction and placement for comfort.
4. Zamontuj przednie koło
Remove the pre-installed axle from the front forks. Note the spacers: the longer spacer goes on the brake side. Slide the front wheel into place, ensuring the brake disc aligns with the caliper. Reinsert and tighten the axle.
5. Install Front Brake Caliper
Remove the pad spacer used during shipping. Remove the bolts from the caliper mount. Install the caliper over the brake disc and reinstall the bolts, tightening them securely.
6. Secure Front Brake Line
Secure the front brake line to the front fork guard by fixing it into the designated bracket.
7. Install Front Fender
Remove the three bolts from the lower fork mount. Reinstall these bolts, securing the front fender in place.
8. Install Headlight and Number Plate Bracket
Install the headlight and the front number plate bracket. Ensure correct orientation. Route the brake line through the holders on the back of the number plate and secure with the bolt. Install the headlight and secure with the provided nuts and bolts.
Image: The Windone RM7 Electric Dirt Bike showcasing its 4-LED headlight and smart signal taillight, essential for visibility and safety.
9. Final Handlebar Adjustment
Set the handlebars to your desired comfortable position and tighten them down. Adjust brake levers to your preferred angle and secure them.
Instrukcja obsługi
1. Włącz zasilanie
Insert the key into the ignition and turn it to the ON position. The digital display will illuminate.
2. Engage Riding Mode
When powered on, the bike defaults to 'Park' mode (indicated by 'P' on the display). To switch to riding mode, squeeze the rear brake lever. The 'P' will disappear, and you can now use the throttle.
3. Tryby prędkości
The Windone RM7 features 3-speed modes. Use the '+' and '-' buttons on the display panel to toggle between these modes:
Tryb 1: Up to 15 MPH (for safe starts and controlled riding)
Tryb 2: Up to 22 MPH (for efficient cruising)
Tryb 3: Up to 37 MPH (for high-speed thrills)
Image: The digital dashboard of the Windone RM7, displaying current speed, battery level, odometer, trip distance, and selected gear mode.
4. Sterowanie
The left handlebar features controls for lights, turn signals, horn, and hazard lights. The right handlebar includes the throttle and front brake lever.
Wideo: Ponadview of the Windone RM7 Electric Dirt Bike's features, including its powerful motor, high-capacity battery, and various controls. This video demonstrates the bike's capabilities in different terrains.
Ładowanie akumulatora
The Windone RM7 is equipped with a 48V 22.5Ah (1080Wh) UL 2849 certified battery. To charge:
Upewnij się, że rower jest wyłączony.
Locate the charging port on the right side of the bike.
Podłącz kabel ładujący do portu.
Podłącz ładowarkę do standardowego gniazdka elektrycznego.
The charger's indicator light will be red while charging and turn green when fully charged.
A full charge takes approximately 6-7 hours, providing an impressive 37-45 miles of range (actual range may vary based on load, speed, terrain, and temperature).
Image: The Windone RM7 highlighting its 1080Wh high-capacity battery, emphasizing its UL 2849 certification and long range capabilities.
Konserwacja
Regular maintenance ensures the longevity and optimal performance of your Windone RM7 Electric Dirt Bike:
Hamulce: Regularly check brake fluid levels and the responsiveness of the hydraulic brakes. Refill brake fluid if levers feel stiff or fluid is low.
Opony: Maintain correct tire pressure for optimal performance and safety. Inspect tires for wear and damage.
Bateria: Store the battery in a cool, dry place. Avoid fully discharging the battery for extended periods.
Czyszczenie: Regularnie czyść rower za pomocąamp szmatką. Unikaj mycia elementów elektrycznych pod wysokim ciśnieniem.
Elementy złączne: Okresowo sprawdzaj wszystkie śruby i elementy mocujące, aby mieć pewność, że są dobrze dokręcone i bezpieczne.
Specyfikacje
Funkcja
Szczegół
Nazwa modelu
RM7-PB
Typ roweru
Elektryczny motocykl terenowy
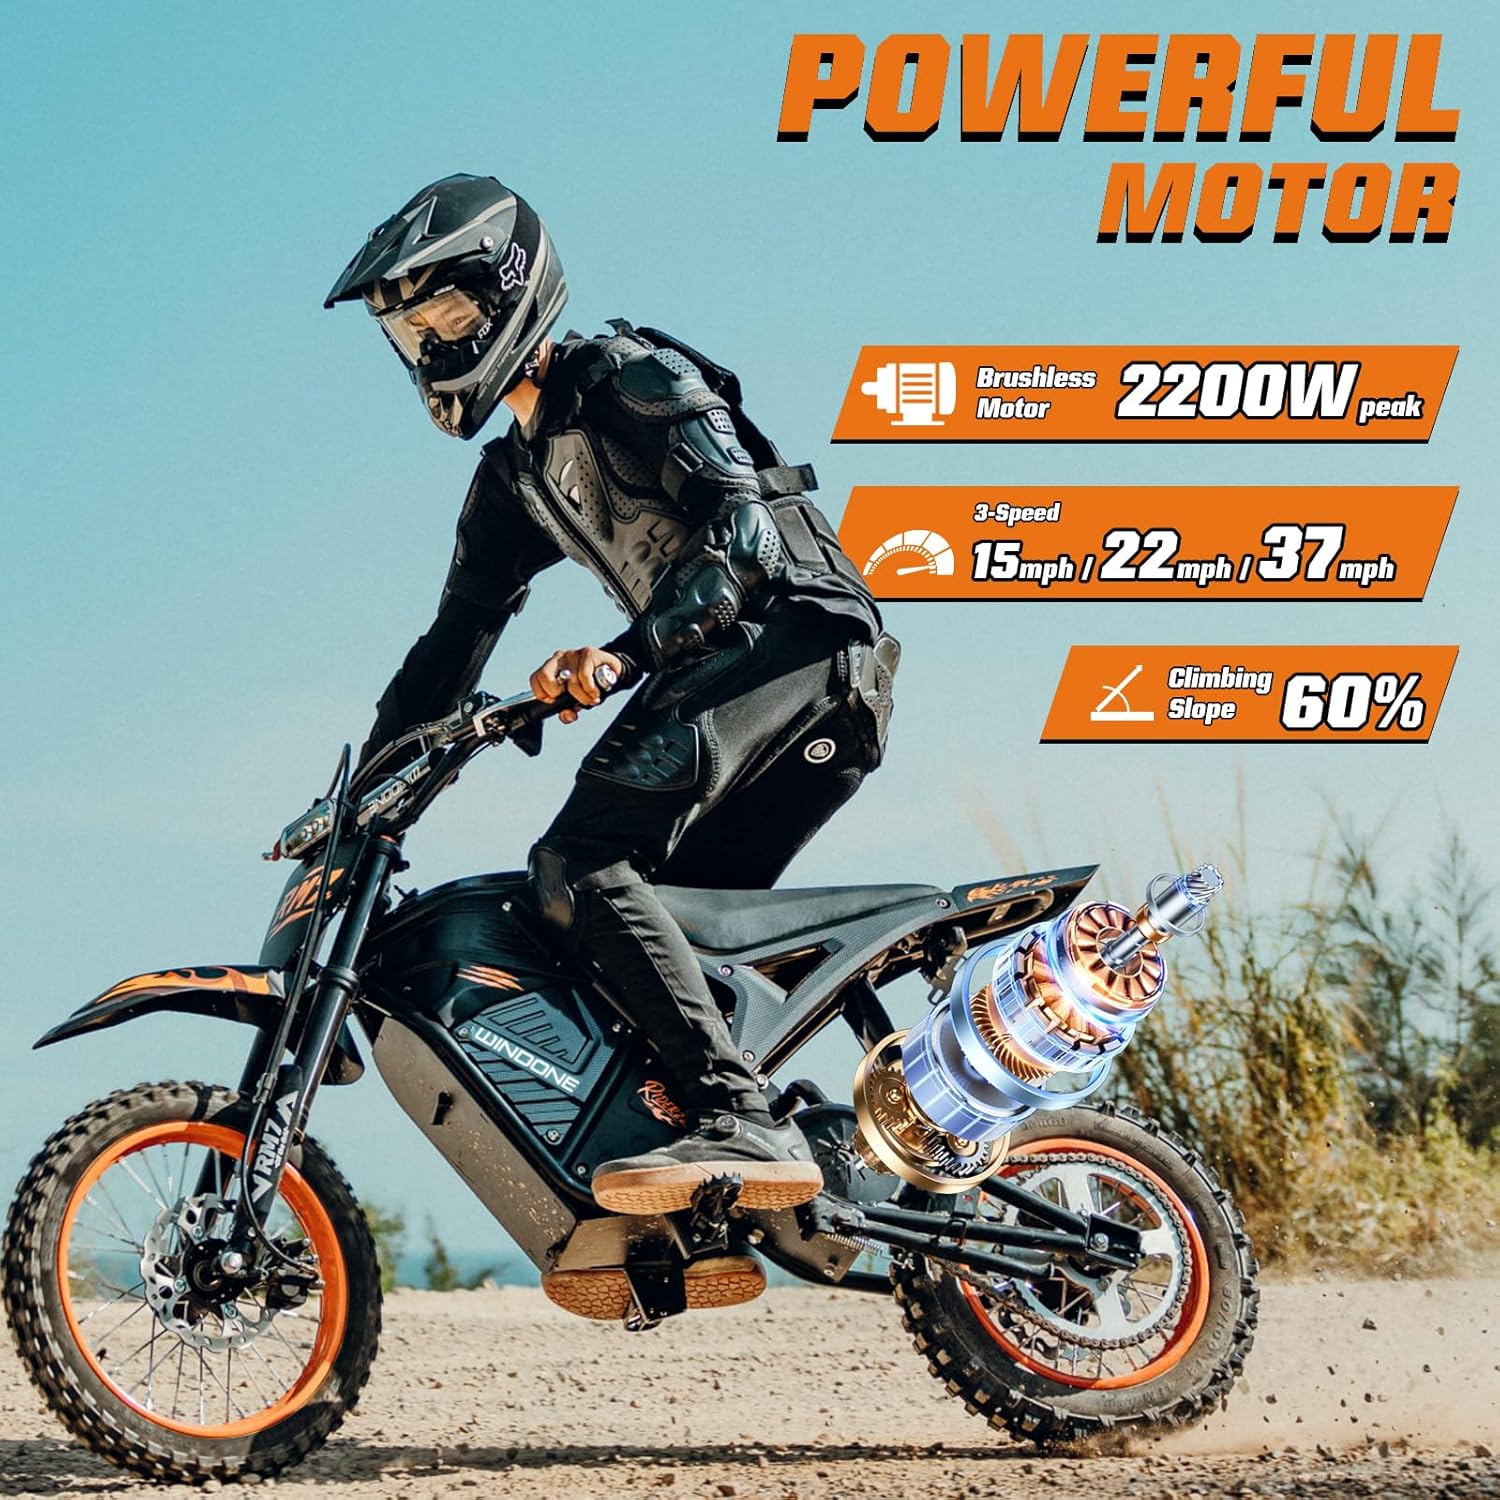
Moc silnika
2200 W szczytowe
Bateria
48V 22.5Ah (1080Wh) UL 2849 Certified
Maksymalna prędkość
Do 37 mil na godzinę
Zakres
37-45 Miles per charge
Czas ładowania
6-7 godziny
Tryby prędkości
3 (15 MPH, 22 MPH, 37 MPH)
Hamulce
Front and Rear Dual Hydraulic Disc Brakes
Zawieszenie
High-performance Dual Hydraulic Front Forks, Rear Nitrogen Gas Shock
Opony
14" Front / 12" Rear Off-Road Fat Tires
Stopień wodoodporności
IPX6
Maksymalna waga ładunku
265 funta (120 kg)
Waga przedmiotu
125 funta (56.6 kg)
Zalecany wzrost jeźdźca
4.3 FT to 6.0 FT (130cm-183cm)
Cechy specjalne
Digital Display, Odometer, Rechargeable, Waterproof, Headlight, Mudguard, Tool Kit
Image: An infographic detailing the key specifications and dimensions of the Windone RM7 Electric Dirt Bike, including recommended rider height and maximum load.
Rozwiązywanie problemów
If you encounter any issues with your Windone RM7 Electric Dirt Bike, please refer to the troubleshooting section in the full manual or contact customer support for assistance.
Gwarancja i obsługa klienta
The Windone RM7 Electric Dirt Bike comes with a 1-letnia gwarancja. Your satisfaction is our priority. If you have any questions or need assistance with your Windone ebike, our support team is here to help. Reach out anytime, and we’ll respond as soon as possible to ensure your ride is always smooth and worry-free.
MICROX Sähkömoottoripyörä Käyttöohje Kattava käyttöohje MICROX 1600W sähkömoottoripyörälle, sisältäen turvallisuusohjeet, käyttöön, huoltoon, kokoonpanoon ja vianmääritykseen liittyvät tiedot.
Ask about setup, troubleshooting, compatibility, parts, safety, or missing instructions. Manuals+ will review the question and use this page’s manual context to help answer it.