Wstęp
Thank you for choosing the Sainlogic SA6 Professional Weather Station. This manual provides detailed instructions for the setup, operation, and maintenance of your new weather station. The SA6 is designed to provide accurate and comprehensive weather data, including temperature, humidity, wind speed and direction, rainfall, and atmospheric pressure, all displayed on a clear 6.5-inch HD color LCD.
Co jest w pudełku
- Konsola (jednostka wyświetlająca)
- External Sensor Array
- Zasilacz
- Instrukcja obsługi (ten dokument)
- Mounting Hardware (screws, bolts, mounting pole support)
Organizować coś
1. Instalacja czujnika zewnętrznego
The external sensor array measures wind speed, wind direction, rainfall, temperature, and humidity. Proper placement is crucial for accurate readings.
- Wybierz lokalizację: Select an open area free from obstructions like trees or buildings that could interfere with wind or rain measurements. Ensure it is within 100 meters (330 feet) of the display console.
- Zainstaluj baterie: The external sensor requires 3 AA batteries (not included) for operation. Open the battery compartment, insert the batteries according to polarity, and secure the cover.
- Zamontuj czujnik: The sensor can be mounted on a fence, roof, or pole using the provided mounting hardware. Ensure the sensor is level using the integrated bubble level for accurate rain and wind measurements. The wind vane should point North for correct wind direction readings.

Figure 1: Outdoor Sensor Mounting Options

Figure 2: Outdoor Sensor Components
2. Konfiguracja konsoli wyświetlacza
- Zainstaluj baterie zapasowe: The display console requires 3 AAA batteries (not included) to retain settings and data during power outages. Open the battery compartment on the back, insert the batteries, and close the cover.
- Podłącz zasilacz: Plug the provided power adapter into the DC port on the back of the console and then into a standard wall outlet. The display will illuminate.
- Synchronizacja początkowa: Once powered on, the console will automatically begin searching for the outdoor sensor. This process may take a few minutes. Ensure both units are within range.
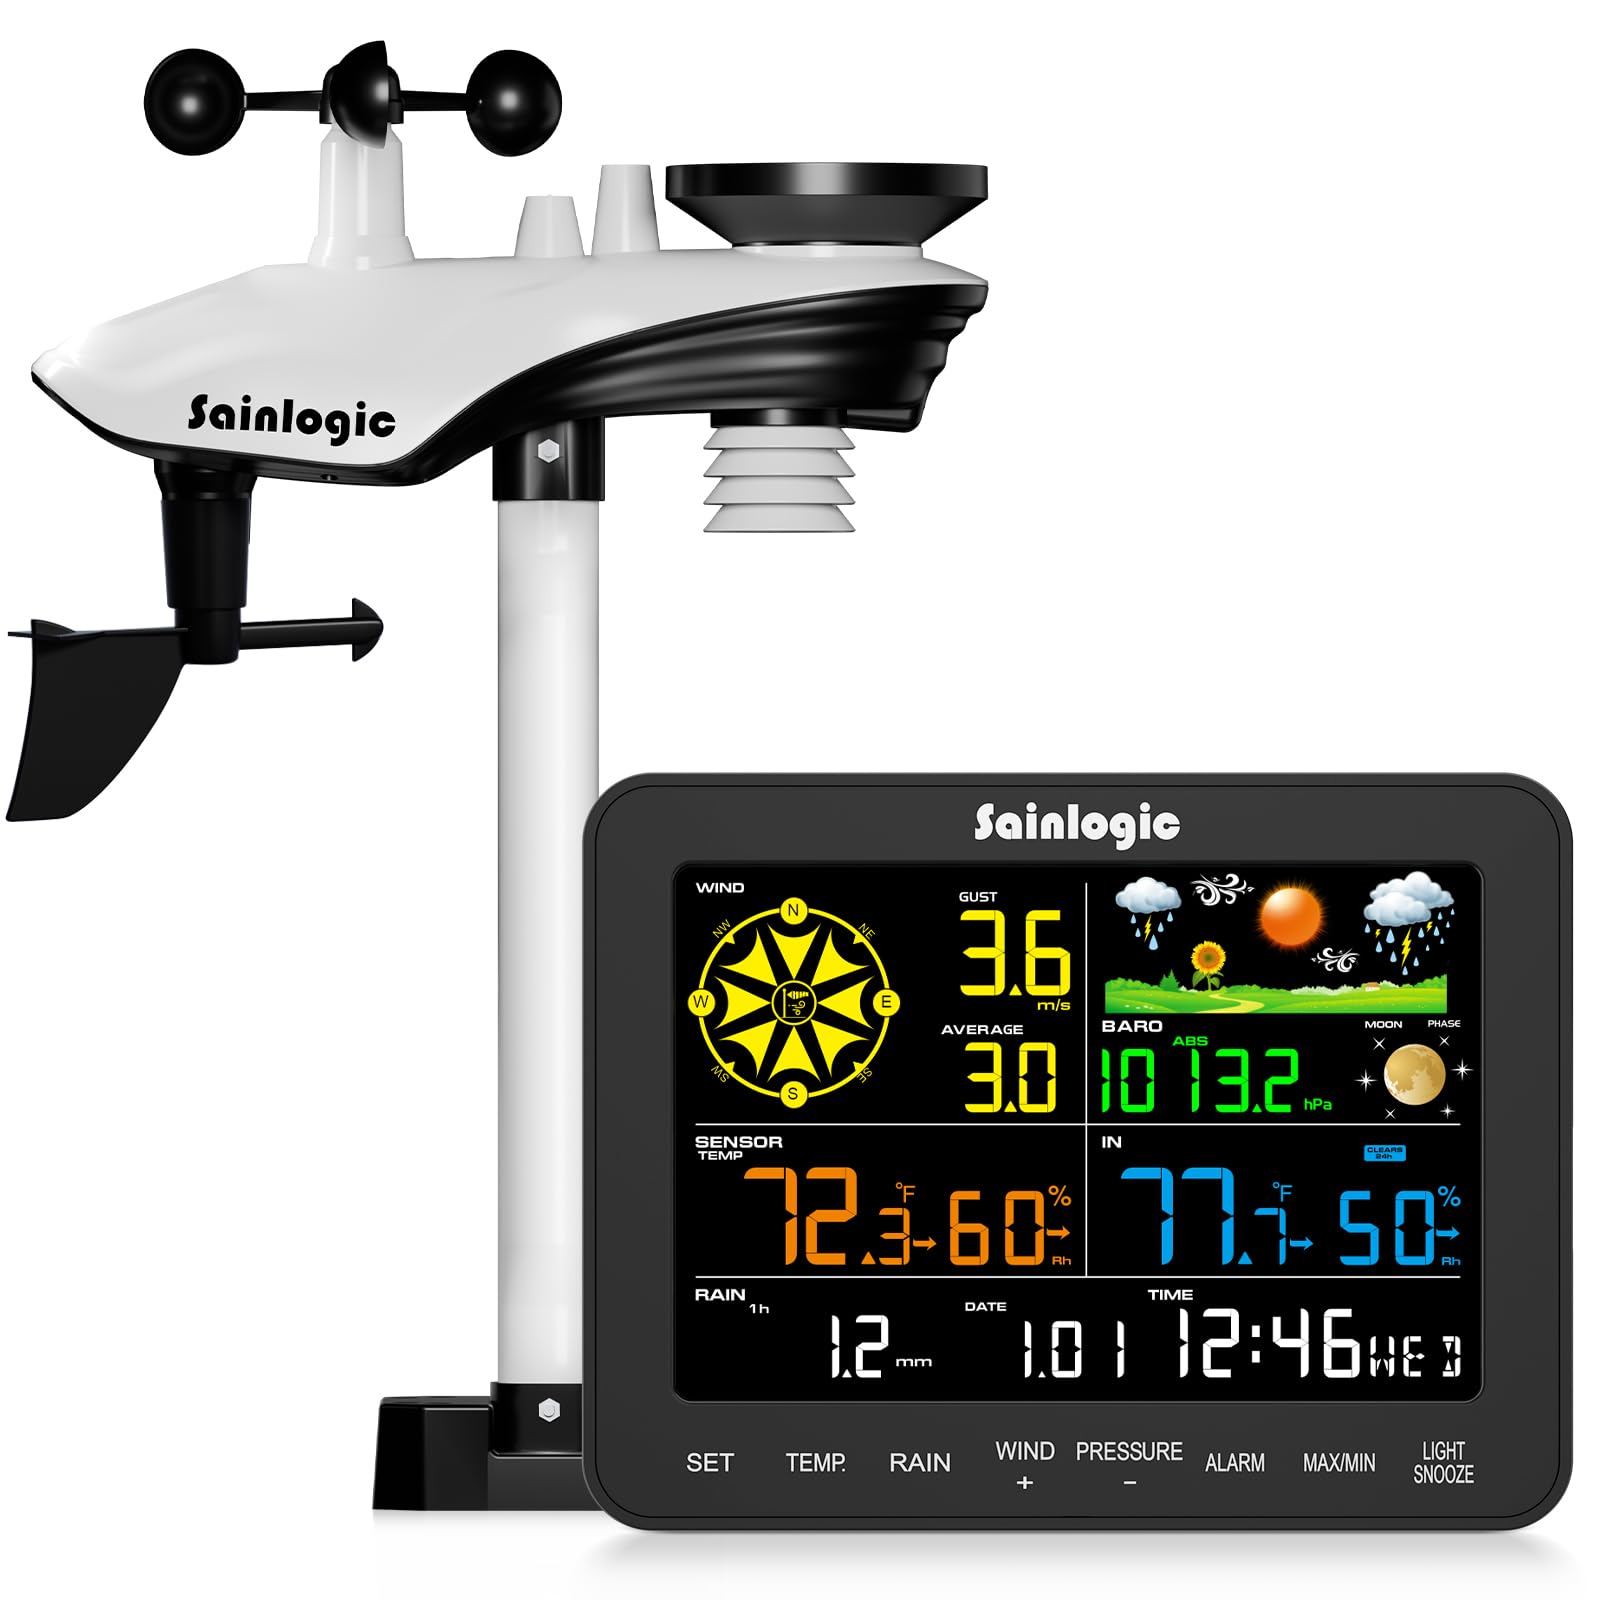
Rysunek 3: Konsola wyświetlacza
Instrukcja obsługi
1. Wyświetlanieview
The 6.5-inch HD color LCD provides a clear, at-a-glance view of all current weather conditions. The display is divided into several sections, each showing specific data points.

Figure 4: Display Layout and Data Points
- Wiatr: Displays current wind speed, gust, and average wind speed, along with wind direction.
- Dane zewnętrzne: Shows external temperature, humidity, dew point, and felt temperature.
- Dane wewnętrzne: Displays internal temperature and humidity.
- Opad deszczu: Tracks hourly, daily, weekly, monthly, and total rainfall.
- Ciśnienie: Indicates current atmospheric pressure.
- Prognoza: Provides a 12-hour weather forecast using intuitive icons.
- Data i godzina: Aktualna godzina, data i faza księżyca.
2. Funkcje przycisków
The console features several buttons for navigation and settings adjustment:
- ZESTAW: Enters setup mode or confirms selections.
- TEMPERATURA: Toggles temperature units (°C/°F) or cycles through temperature data.
- DESZCZ: Displays different rainfall periods (hourly, daily, weekly, monthly, total).
- WIND (+): Adjusts wind settings or increases values during setup.
- PRESSURE (-): Adjusts pressure settings or decreases values during setup.
- ALARM: Sets or activates alarms for various weather conditions.
- MAKS./MIN.: Views maximum and minimum recorded values.
- ŚWIATŁO/DRZEMKA: Adjusts backlight brightness or activates snooze for alarms.
3. Customizable Alerts
The weather station supports customizable alerts for specific weather conditions, such as high/low temperature, strong winds, or heavy rainfall. When an alert condition is met, the console will provide visual (flashing) and audible notifications.

Figure 5: Intelligent Weather Alerts
Konserwacja
1. Cleaning the Sensor Array
Periodically inspect and clean the outdoor sensor array to ensure accurate readings. Dust, debris, or insects can affect performance.
- Wskaźnik opadów: Clear any leaves or debris from the rain collector funnel.
- Anemometer Cups & Wind Vane: Ensure they spin freely. Gently remove any obstructions.
- Thermo-Hygrometer Radiation Shield: Keep the vents clear for proper air circulation.
2. Wymiana baterii
Replace batteries in both the outdoor sensor and display console as needed. Low battery indicators will appear on the display. Always use fresh, high-quality batteries of the specified type (3 AA for sensor, 3 AAA for console backup).
Rozwiązywanie problemów
| Problem | Możliwa przyczyna | Rozwiązanie |
|---|---|---|
| Brak danych zewnętrznych na wyświetlaczu | Czujnik poza zasięgiem, słabe baterie czujnika, zakłócenia. | Move sensor closer to console, replace sensor batteries, check for strong electronic interference. |
| Niedokładna temperatura/wilgotność | Sensor exposed to direct sunlight/heat source, blocked vents. | Relocate sensor to a shaded area, clear radiation shield vents. |
| Niedokładne odczyty wiatru | Obstructions near sensor, wind vane not pointing North. | Ensure clear path for wind, verify wind vane orientation. |
| Inaccurate rainfall | Rain collector blocked, sensor not level. | Clear debris from collector, ensure sensor is perfectly level. |
| Display console not powering on | Power adapter disconnected, faulty adapter, no backup batteries. | Check power connection, try a different outlet, ensure backup batteries are installed. |
Specyfikacje

Rysunek 6: Wymiary i specyfikacje produktu
- Numer modelu: SA6
- Wyświetlacz: 6.5-calowy kolorowy wyświetlacz LCD HD
- Outdoor Sensor Batteries: 3 x AA (brak w zestawie)
- Console Backup Batteries: 3 x AAA (brak w zestawie)
- Źródło zasilania: AC Adapter / Battery
- Tworzywo: Akrylonitryl-butadien-styren (ABS)
- Zasięg transmisji bezprzewodowej: Do 100 m (330 stóp)
- Zakres temperatury zewnętrznej: -40°F do 140°F (-40°C do 60°C)
- Zakres temperatur wewnętrznych: od 32°F do 140°F (od 0°C do 60°C)
- Zakres wilgotności: Wilgotność względna od 10% do 99%
- Zakres ciśnienia barometrycznego: 300 do 1100 hPa
- Dokładność opadów: ±1 mm (for <15 mm), ±7% (for 15-9999 mm)
- Cechy szczególne: Customizable alerts, adjustable brightness, portable, wireless, alarm clock.
- Wymiary produktu: Console: 2.5 x 17 x 13.2 cm; Sensor: 12.9 x 18.5 x 4.25 cm (approximate)
- Waga przedmiotu: 2.74 kilograma (całe opakowanie)
Gwarancja i wsparcie
The Sainlogic SA6 Professional Weather Station comes with a standard manufacturer's warranty. For specific warranty details, please refer to the documentation included with your purchase or contact Sainlogic customer support. If you encounter any issues or require assistance, please reach out to our support team via the contact information provided on our official webwitrynę lub platformę zakupową.