
Wstęp
Thank you for choosing the KAMRUI Hyper H2 Mini PC. This compact and powerful desktop computer is designed for a wide range of applications, from demanding office tasks and creative projects to home entertainment and light gaming. Equipped with an Intel Core i5-14450HX processor, 16GB DDR4 RAM, and a 512GB NVMe SSD, it offers robust performance and seamless multitasking capabilities. Its versatile connectivity options and triple 4K display support ensure a flexible and immersive user experience.
This manual provides essential information on setting up, operating, maintaining, and troubleshooting your KAMRUI Hyper H2 Mini PC. Please read it thoroughly to ensure optimal performance and longevity of your device.
Co jest w pudełku
Upon opening your KAMRUI Hyper H2 Mini PC package, please verify that all the following items are included:
- 1 x KAMRUI Hyper H2 Mini PC
- 1 x kabel HDMI
- 1 x mocowanie VESA ze śrubami
- 1 x zasilacz
- 1 x Instrukcja obsługi

Produkt ponadview
The KAMRUI Hyper H2 Mini PC is engineered for efficiency and connectivity. Its compact chassis houses a powerful Intel Core i5-14450HX processor, supported by a robust cooling system to ensure stable performance even under heavy workloads.
Porty na panelu przednim
- 1 x USB 3.2 Gen2 Type-C port (10Gbps data transfer, DisplayPort Alt Mode, 15W power delivery)
- 2 x USB 3.2 Gen2 Type-A ports (10Gbps)
- 1 x Audio Jack (3.5mm for headphones/microphone)
- 1 x przycisk zasilania
Porty na panelu tylnym
- 1 x port HDMI 2.0
- 1 x DisplayPort 1.4b
- 1 x RJ45 Gigabit Ethernet Port
- 4 x USB 3.2 Gen1 Type-A ports (5Gbps)
- 1 x wejście zasilania prądem stałym

Przewodnik po konfiguracji
Follow these steps for initial setup of your KAMRUI Hyper H2 Mini PC:
- Podłącz wyświetlacz: Connect your monitor(s) to the Mini PC using the HDMI, DisplayPort, or USB-C port. For triple display setup, utilize all three available video outputs.
- Podłącz urządzenia peryferyjne: Podłącz klawiaturę, mysz i inne urządzenia USB do dostępnych portów USB.
- Połącz z siecią: For wired internet, connect an Ethernet cable to the RJ45 Gigabit Ethernet port. For wireless, ensure your Wi-Fi 6 network is available after initial boot.
- Podłącz zasilanie: Plug the power adapter into the DC input port on the Mini PC, then connect the adapter to a power outlet.
- Włączanie: Press the power button on the front panel to turn on your Mini PC.
- Konfiguracja wstępna: Follow the on-screen instructions to complete the Windows 11 Pro setup, including language, network, and user account settings.
Instalacja uchwytu VESA
The included VESA mount allows you to attach the Mini PC to the back of a compatible monitor or TV, saving desk space and creating a clean setup.
- Przymocuj uchwyt VESA z tyłu monitora za pomocą dołączonych śrub.
- Slide the KAMRUI Hyper H2 Mini PC onto the mounted bracket until it clicks securely into place.
Instrukcja obsługi
Podstawowa obsługa
- Włączanie/wyłączanie: Press the power button once to turn the device on or off. For a forced shutdown, press and hold the power button for 5-7 seconds.
- Uruchom ponownie: Use the operating system's restart option for proper system reboots.
- Tryb uśpienia: The system will enter sleep mode after a period of inactivity or by selecting the sleep option in the OS.
Konfiguracja wielu wyświetlaczy
The KAMRUI Hyper H2 supports up to three 4K@60Hz displays simultaneously, enhancing productivity and entertainment. Connect your displays to the HDMI, DisplayPort, and full-featured USB-C ports. Once connected, configure your display settings within the operating system (e.g., Extend, Duplicate, or Second screen only).

Konserwacja i modernizacje
Układ chłodzenia
The KAMRUI Hyper H2 features a premium thermal design with a dual-fan cooling system, full copper heat pipes, and a dedicated aluminum SSD heatsink. This ensures the CPU and storage remain cool, even under sustained heavy workloads. To maintain optimal cooling performance:
- Aby zapewnić właściwy przepływ powietrza, udrażniaj otwory wentylacyjne.
- Regularnie czyść otwory wentylacyjne z kurzu przy użyciu sprężonego powietrza.

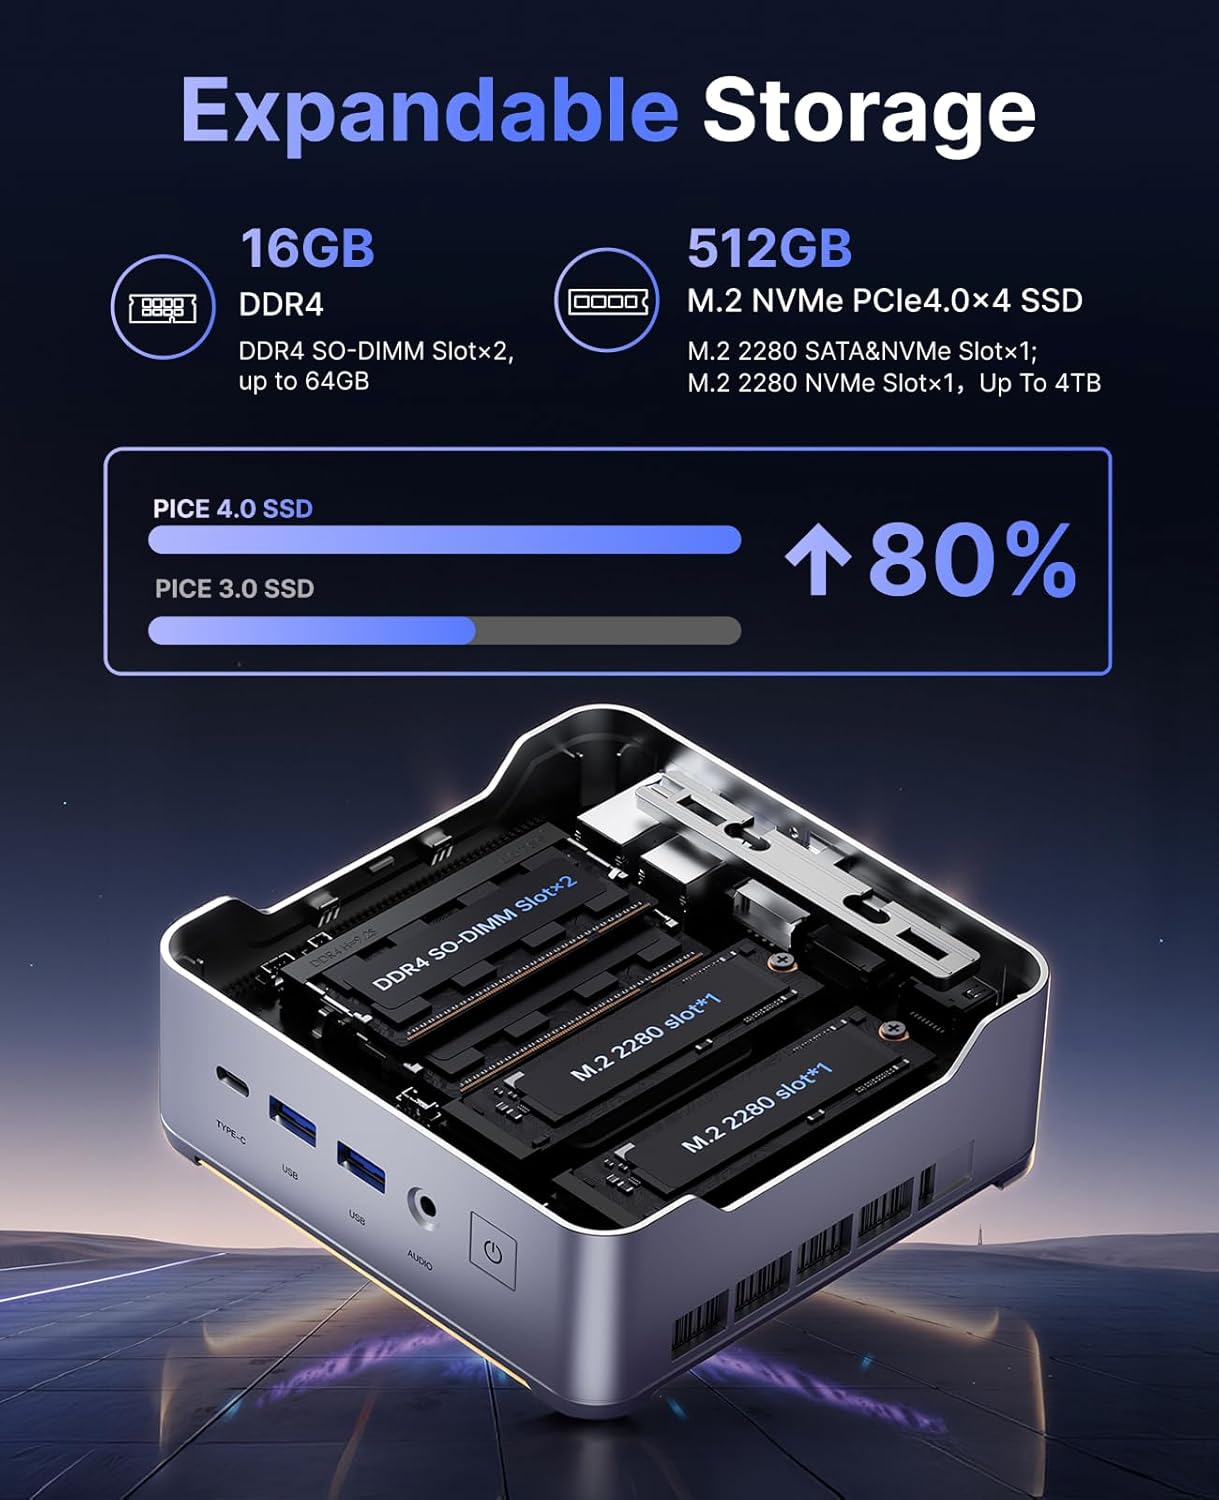
RAM and SSD Upgrades
The KAMRUI Hyper H2 is designed for easy upgrades, allowing you to expand its memory and storage capacity. The Mini PC supports:
- BARAN: Up to 2x 32GB DDR4 3200MHz/s SO-DIMM (total 64GB).
- Dysk SSD: Up to 2x 2TB NVMe SSD (M.2 2280 PCIe Gen4x4).
To access the RAM and SSD slots:
- Ensure the Mini PC is powered off and disconnected from all cables.
- Locate the small Phillips screw on the rear panel next to the lock/unlock switch. Remove this screw.
- Slide the lock switch to the unlock position. The top cover will lift slightly.
- Ostrożnie zdejmij górną pokrywę.
- Unscrew the four Phillips screws holding the metal plate/cover.
- Gently lift the metal plate to reveal the RAM and NVMe SSD slots.
- Install or replace your RAM modules or NVMe SSDs as needed.
- Reassemble the Mini PC by reversing these steps, ensuring all screws are tightened and the cover is securely locked.
Rozwiązywanie problemów
If you encounter any issues with your KAMRUI Hyper H2 Mini PC, please refer to the following common solutions:
- Brak zasilania:
- Upewnij się, że zasilacz jest prawidłowo podłączony do komputera Mini PC i do sprawnego gniazdka elektrycznego.
- Sprawdź, czy gniazdko elektryczne działa prawidłowo, podłączając do niego inne urządzenie.
- Brak wyświetlacza:
- Check all video cable connections (HDMI, DP, USB-C) between the Mini PC and your monitor(s).
- Ensure your monitor is powered on and set to the correct input source.
- Spróbuj podłączyć się do innego wyświetlacza lub użyć innego kabla wideo.
- Brak połączenia z internetem:
- For wired connection, ensure the Ethernet cable is properly connected and your router/modem is working.
- For Wi-Fi, check if Wi-Fi is enabled in Windows settings and ensure you are connected to the correct network with the right password.
- Uruchom ponownie router/modem i komputer Mini PC.
- Niska wydajność:
- Zamknij niepotrzebne aplikacje działające w tle.
- Upewnij się, że system operacyjny i sterowniki są aktualne.
- Sprawdź obecność złośliwego oprogramowania i wirusów przy użyciu sprawdzonego oprogramowania antywirusowego.
- Consider upgrading RAM or SSD if performance issues persist, especially with demanding tasks.
Specyfikacje
| Funkcja | Specyfikacja |
|---|---|
| Edytor | Intel Core i5-14450HX (10 Cores/16 Threads, up to 4.8GHz) |
| Grafika | Integrated UHD Graphics for 14th Gen Processors (max frequency 1.5GHz) |
| BARAN | 16GB DDR4 (Expandable up to 64GB, 2x SO-DIMM slots) |
| Składowanie | 512GB NVMe PCIe 4.0 SSD (Expandable up to 2x 2TB NVMe SSD) |
| Wyjście wideo | Triple 4K@60Hz (HDMI 2.0, DP 1.4b, USB-C with DisplayPort Alt Mode) |
| Łączność bezprzewodowa | Wi-Fi 6 (802.11ax), Bluetooth 5.2 |
| Łączność przewodowa | 1 x RJ45 Gigabit Ethernet Port |
| Porty USB | 1 x USB 3.2 Gen2 Type-C (10Gbps, DP Alt Mode, 15W PD) 2 x USB 3.2 Gen2 typu A (10 Gb/s) 4 x USB 3.2 Gen1 typu A (5 Gb/s) |
| Audio | 1 x gniazdo audio 3.5 mm |
| System operacyjny | OS PRO |
| Wymiary | 6.46 x 6.42 x 4.53 cala (opakowanie) |
| Waga przedmiotu | 2.99 funta |
Gwarancja i wsparcie
Your KAMRUI Hyper H2 Mini PC comes with a 12-miesięczna gwarancja from the date of purchase, covering manufacturing defects and hardware malfunctions under normal use. For any technical assistance, troubleshooting, or warranty claims, please contact KAMRUI customer support.
KAMRUI offers Obsługa klienta 24 godziny na dobę to assist you with any queries or issues you may encounter. Please refer to the contact information provided in your product packaging or visit the official KAMRUI webstronie, aby uzyskać szczegółowe informacje na temat pomocy technicznej.
Aby uzyskać dodatkowe zasoby i informacje o produkcie, odwiedź stronę KAMRUI Store on Amazon.


