Wstęp
Thank you for choosing the Klinsmann KRV306 Robotic Vacuum and Mop. This 2-in-1 intelligent cleaning robot is designed to provide efficient and convenient floor cleaning for your home. Please read this manual carefully before use to ensure proper operation, maintenance, and to maximize the lifespan of your device.
Instrukcje bezpieczeństwa
To reduce the risk of injury or damage, read and follow all safety precautions when setting up, using, and maintaining your robot. Keep this manual in a safe place for future reference.
- Z urządzenia mogą korzystać dzieci w wieku od 8 lat oraz osoby o ograniczonej sprawności fizycznej, sensorycznej lub umysłowej, a także osoby nieposiadające odpowiedniego doświadczenia lub wiedzy, jeśli znajdują się pod nadzorem lub zostały poinstruowane na temat bezpiecznego korzystania z urządzenia i rozumieją związane z tym zagrożenia.
- Dzieci powinny znajdować się pod nadzorem, aby mieć pewność, że nie bawią się urządzeniem.
- Dzieciom nie wolno czyścić ani konserwować urządzenia bez nadzoru.
- Należy używać wyłącznie oryginalnego zasilacza dostarczonego przez producenta.
- Nie używaj robota w miejscach, w których znajduje się otwarty ogień lub delikatne przedmioty.
- Przed rozpoczęciem pracy należy usunąć z podłogi wszystkie kable i małe przedmioty, aby zapobiec ich splątaniu.
- Nie zanurzaj robota ani jego stacji ładującej w wodzie.
- Nie używaj robota do zbierania dużych śmieci, płynów ani płonących przedmiotów.
Zawartość opakowania
Sprawdź, czy w opakowaniu znajdują się wszystkie komponenty:
- Klinsmann KRV306 Robotic Vacuum and Mop
- Adapter ładujący
- Szczotki boczne (2 pary)
- Pojemnik na śmieci
- Ściereczka do wycierania
- Instrukcja obsługi
Organizować coś
- Rozpakuj robota: Ostrożnie wyjmij robota i wszystkie akcesoria z opakowania.
- Montaż szczotek bocznych: Attach the side brushes to the designated slots on the bottom of the robot until they click into place.
- Naładuj robota:
- Connect the charging adapter to a power outlet and to the charging port on the robot.
- Ensure the robot is fully charged before its first use. A full charge takes approximately 3-4 hours. The indicator light will change to signal a full charge.
- Przygotuj obszar czyszczenia: Remove any obstacles, loose cables, or small items from the floor to prevent the robot from getting stuck or damaging items.
Instrukcja obsługi
Włączanie/wyłączanie zasilania
- Włączanie: Press and hold the power button on the robot until the indicator light illuminates.
- Aby wyłączyć: Naciśnij i przytrzymaj przycisk zasilania, aż kontrolka zgaśnie.
Tryby czyszczenia
The KRV306 offers three cleaning modes:
- Automatic (Zigzag) Mode: Press the power button once to start cleaning in an automatic zigzag pattern. This mode is suitable for general cleaning of open areas.
- Tryb czyszczenia punktowego: Place the robot in a specific dirty area and press the spot cleaning button (if available, or cycle through modes). The robot will clean in a spiral pattern to concentrate on that area.
- Tryb czyszczenia krawędzi: Activate this mode to have the robot clean along walls and furniture edges.
Funkcja mopowania
Aby skorzystać z funkcji mopowania:
- Fill the water tank (if separate) or attach the damp mopping cloth to the designated area on the robot.
- Rozpocznij cykl czyszczenia. Robot będzie odkurzał i mopował jednocześnie.
- Remove the mopping cloth and empty the water tank after each use.
Nawigacja i czujniki
The KRV306 is equipped with intelligent navigation features:
- Anti-drop Infrared Sensors: These sensors detect stairs and elevated surfaces, preventing the robot from falling.
- Mechanical Bumper: The bumper allows the robot to gently detect and navigate around obstacles like furniture without causing damage.
- Wspinaczka progowa: The robot can easily slide over thresholds up to 10mm high, ensuring continuous cleaning across different rooms.
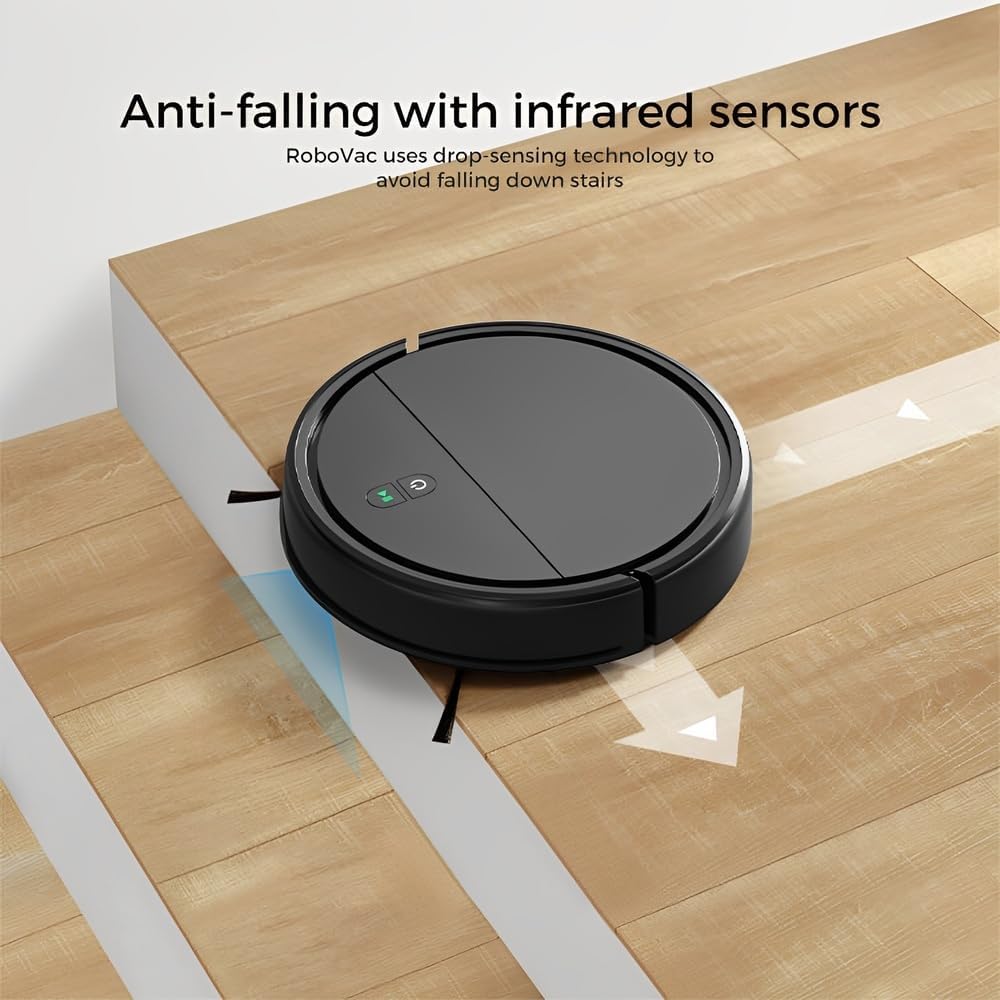
Image: Anti-falling infrared sensors prevent the robot from falling down stairs.

Image: The mechanical bumper allows the robot to navigate around furniture without damage.
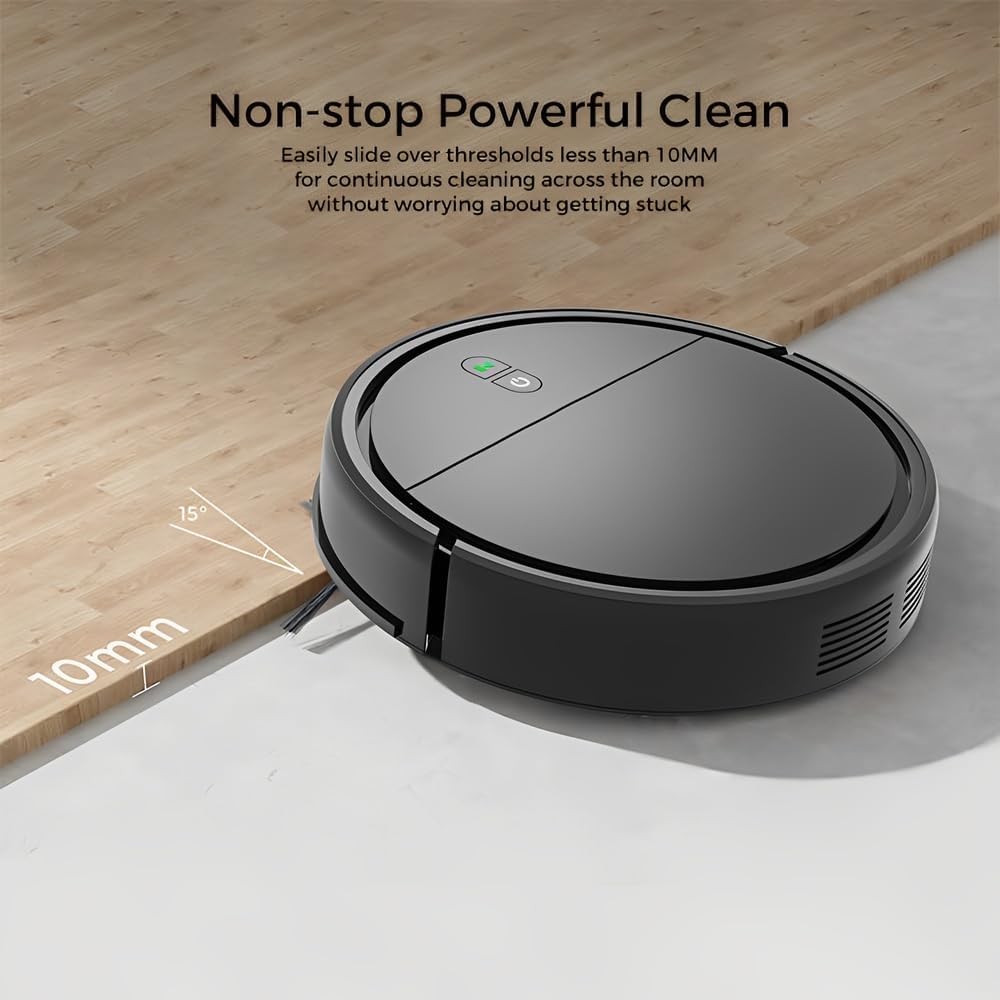
Image: The robot can easily overcome thresholds up to 10mm for continuous cleaning.
Konserwacja
Regular maintenance ensures optimal performance and extends the life of your robot.
Opróżnianie kosza na śmieci

Image: The large dustbin collects various types of debris, reducing the frequency of emptying.
- Naciśnij przycisk zwalniający pojemnik na kurz i wyciągnij pojemnik na kurz.
- Otwórz pokrywę kosza na śmieci i opróżnij jego zawartość do kosza.
- Clean the filter inside the dustbin with the provided cleaning tool or a soft brush. Replace the filter if necessary.
- Rinse the dustbin with water if needed, ensuring it is completely dry before reinserting.
Czyszczenie szczotek bocznych
- Regularnie sprawdzaj, czy w szczotkach bocznych nie ma splątanych włosów lub zanieczyszczeń.
- Carefully remove any tangled material. If brushes are worn, replace them with new ones.
Czyszczenie czujników
- Wipe the anti-drop sensors and charging contacts on the bottom of the robot with a clean, dry cloth.
- Ensure the bumper area is free of debris.
Cleaning Mopping Cloth
- Remove the mopping cloth after each use.
- Wash the cloth by hand or machine. Allow it to air dry completely before reattaching.
Rozwiązywanie problemów
| Problem | Możliwa przyczyna | Rozwiązanie |
|---|---|---|
| Robot nie włącza się. | Niski poziom naładowania baterii; przycisk zasilania nie został wciśnięty prawidłowo. | Naładuj robota; naciśnij i przytrzymaj przycisk zasilania przez kilka sekund. |
| Robot często się zacina. | Obstacles (cables, rugs, small items); Dirty sensors. | Clear the cleaning area; Clean the anti-drop and bumper sensors. |
| Słaba skuteczność czyszczenia. | Pełny kosz na śmieci; Zapchany filtr; Zużyte szczotki boczne. | Opróżnij kosz na śmieci; Wyczyść/wymień filtr; Wyczyść/wymień szczotki boczne. |
| Robot spada ze schodów. | Dirty anti-drop sensors; Sensors obstructed. | Clean the anti-drop sensors thoroughly. |
| Funkcja mopowania jest nieskuteczna. | Mopping cloth is dry or dirty. | Dampen the mopping cloth; Clean or replace the mopping cloth. |
Specyfikacje
| Model | KRV306 |
| Marka | Życie |
| Funkcje | Vacuuming, Mopping |
| Typ baterii | 1500 mAh litowo-jonowy |
| Czas wykonania | Do 80 minut |
| Czas ładowania | 3-4 godzin |
| Moc ssania | 400Pa |
| Poziom hałasu | Maks. 68 dB |
| Pojemność pojemnika na śmieci | Optimized (ample capacity) |
| Wymiary (średnica x wysokość) | Wymiary: 29cm x 7.2cm |
| Waga | 2.1 kilogramów |
| Threshold Climbing Ability | Do 10 mm |
| Cechy specjalne | Anti-drop Infrared Sensor, Mechanical Bumper, Low Noise, Compact, Rechargeable |
Informacje o gwarancji
The Klinsmann KRV306 Robotic Vacuum and Mop comes with a 90-dniowa gwarancja from the date of purchase, covering manufacturing defects. This warranty does not cover damage caused by misuse, accidents, unauthorized modifications, or normal wear and tear. Please retain your proof of purchase for warranty claims.
Obsługa klienta
If you encounter any issues or have questions regarding your Klinsmann KRV306, please refer to the troubleshooting section of this manual. For further assistance, contact the retailer or manufacturer's customer service department with your product model and purchase details.