
1. Wprowadzenie
This manual provides detailed instructions for the safe installation, operation, and maintenance of your Philips LED 4-Inch Slim Downlight. This product features a canless design, dimmable functionality, and offers five selectable color temperatures (CCTs) to suit various lighting needs. Please read this manual thoroughly before installation and retain it for future reference.

Figure 1: Philips LED 4-inch slim downlight showing its canless design, dimmable function, 5 CCT options, and suitability for damp lokalizacje.
2. Informacje dotyczące bezpieczeństwa
OSTRZEŻENIE: Ryzyko pożaru lub porażenia prądem.
- Przed przystąpieniem do instalacji lub serwisowania należy zawsze wyłączyć zasilanie wyłącznikiem automatycznym.
- Produkt ten musi zostać zainstalowany zgodnie z obowiązującymi przepisami instalacyjnymi. Montażu powinna dokonać osoba zaznajomiona z konstrukcją i działaniem produktu oraz związanymi z tym zagrożeniami.
- Upewnij się, że wszystkie połączenia elektryczne są bezpieczne i zgodne z lokalnymi przepisami i rozporządzeniami.
- Nie wolno zmieniać, przenosić ani usuwać okablowania.amp holders, or other electrical components.
- Nadaje się do damp locations. Do not use in areas with direct water exposure.
- Klasa IC do bezpośredniego kontaktu z izolacją.
3. Zawartość opakowania
Przed rozpoczęciem instalacji sprawdź, czy wszystkie komponenty są obecne:
- Philips LED 4-Inch Slim Downlight (quantity as per pack)
- Junction Box (one per downlight)
- Instrukcja obsługi (ten dokument)
4. Instrukcje instalacji
- Wyłącz zasilanie: Przed rozpoczęciem pracy należy upewnić się, że zasilanie w miejscu instalacji jest wyłączone za pomocą wyłącznika automatycznego.
- Prepare Ceiling Opening: Cut a circular hole in the ceiling at the desired location. Refer to the product specifications for the exact hole size (typically 4.25 inches or 108 mm for a 4-inch downlight). Ensure there are no obstructions behind the ceiling before cutting.
-
Wire the Junction Box: Open the junction box cover. Connect the household electrical wires (live, neutral, ground) to the corresponding wires inside the junction box using the provided screwless connectors. Ensure all connections are secure. Close the junction box cover.

Figure 2: Screwless junction box wiring for easy connection.
-
Wybierz temperaturę barwową (CCT): Before inserting the downlight into the ceiling, locate the CCT selection switch on the side of the junction box or the downlight itself. Choose your desired color temperature (2700K, 3000K, 3500K, 4000K, or 5000K) by sliding the switch to the appropriate setting.

Figure 3: CCT selection switch on the junction box.
- Podłącz oświetlenie do puszki przyłączeniowej: Plug the downlight's connector cable into the corresponding receptacle on the junction box. Ensure a firm connection.
-
Wstaw oświetlenie downlight: Gently push the spring clips on the downlight upwards and insert the downlight into the prepared ceiling opening. The clips will secure the fixture in place. Ensure the downlight is flush with the ceiling surface.
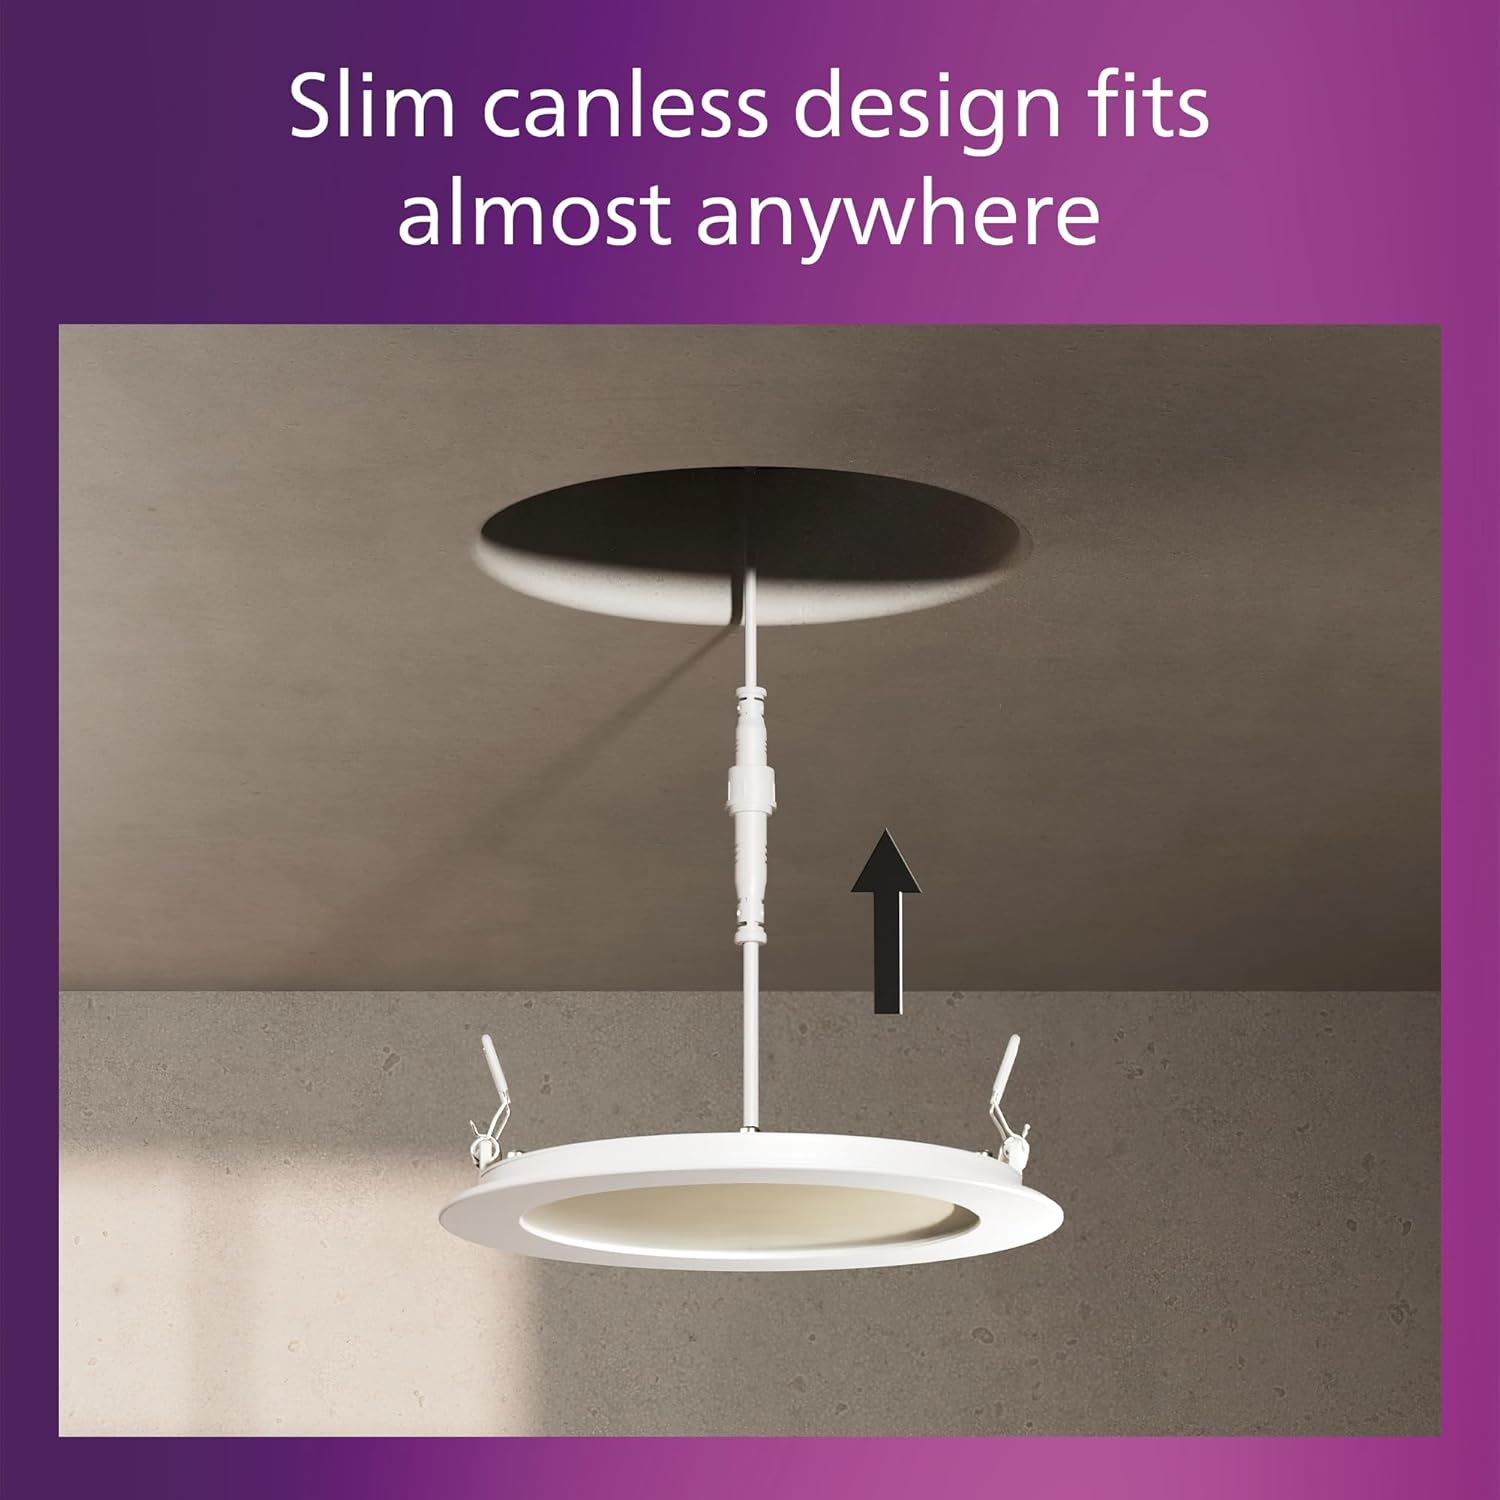
Figure 4: Installing the slim canless downlight into the ceiling.
- Przywróć zasilanie: Po zakończeniu instalacji należy przywrócić zasilanie poprzez wyłącznik obwodu.
The Philips LED Slim Downlight is IC rated, meaning it is suitable for direct contact with insulation, providing safe installation in various ceiling types.

Figure 5: IC rated for safe installation in insulated ceilings.
5. Instrukcja obsługi
The Philips LED Slim Downlight is designed for simple operation:
- Włączanie/wyłączanie: Use your standard wall switch to turn the downlight on or off.
-
Ściemnianie: This downlight is dimmable from 100% down to 5% brightness. Use a compatible dimmer switch (sold separately) to adjust the light output to your preferred level. Refer to the troubleshooting section for dimmer compatibility information.

Figure 6: Smooth dimming capability from 100% to 5% brightness.
- Temperatura barwowa: The color temperature is set during installation using the switch on the junction box. It cannot be changed during normal operation without accessing the junction box.
6. Konserwacja
The Philips LED Slim Downlight requires minimal maintenance:
- Przed czyszczeniem upewnij się, że zasilanie jest wyłączone.
- Wytrzyj urządzenie miękką, suchą lub lekko wilgotną szmatką.amp ściereczka. Nie należy używać środków czyszczących o właściwościach ściernych ani rozpuszczalników.
- No user-serviceable parts inside. Do not attempt to open or repair the fixture.
7. Rozwiązywanie Problemów
| Problem | Możliwa przyczyna | Rozwiązanie |
|---|---|---|
| Światło się nie włącza. |
|
|
| Światło migocze lub nieprawidłowo przyciemnia się. |
|
|
| Nieprawidłowa temperatura barwowa. |
|
|
Tabela kompatybilności ściemniaczy
For optimal dimming performance, use dimmers listed in the compatibility chart below. Performance may vary with other dimmer models.

Figure 7: Dimmer compatibility chart.
8. Specyfikacje
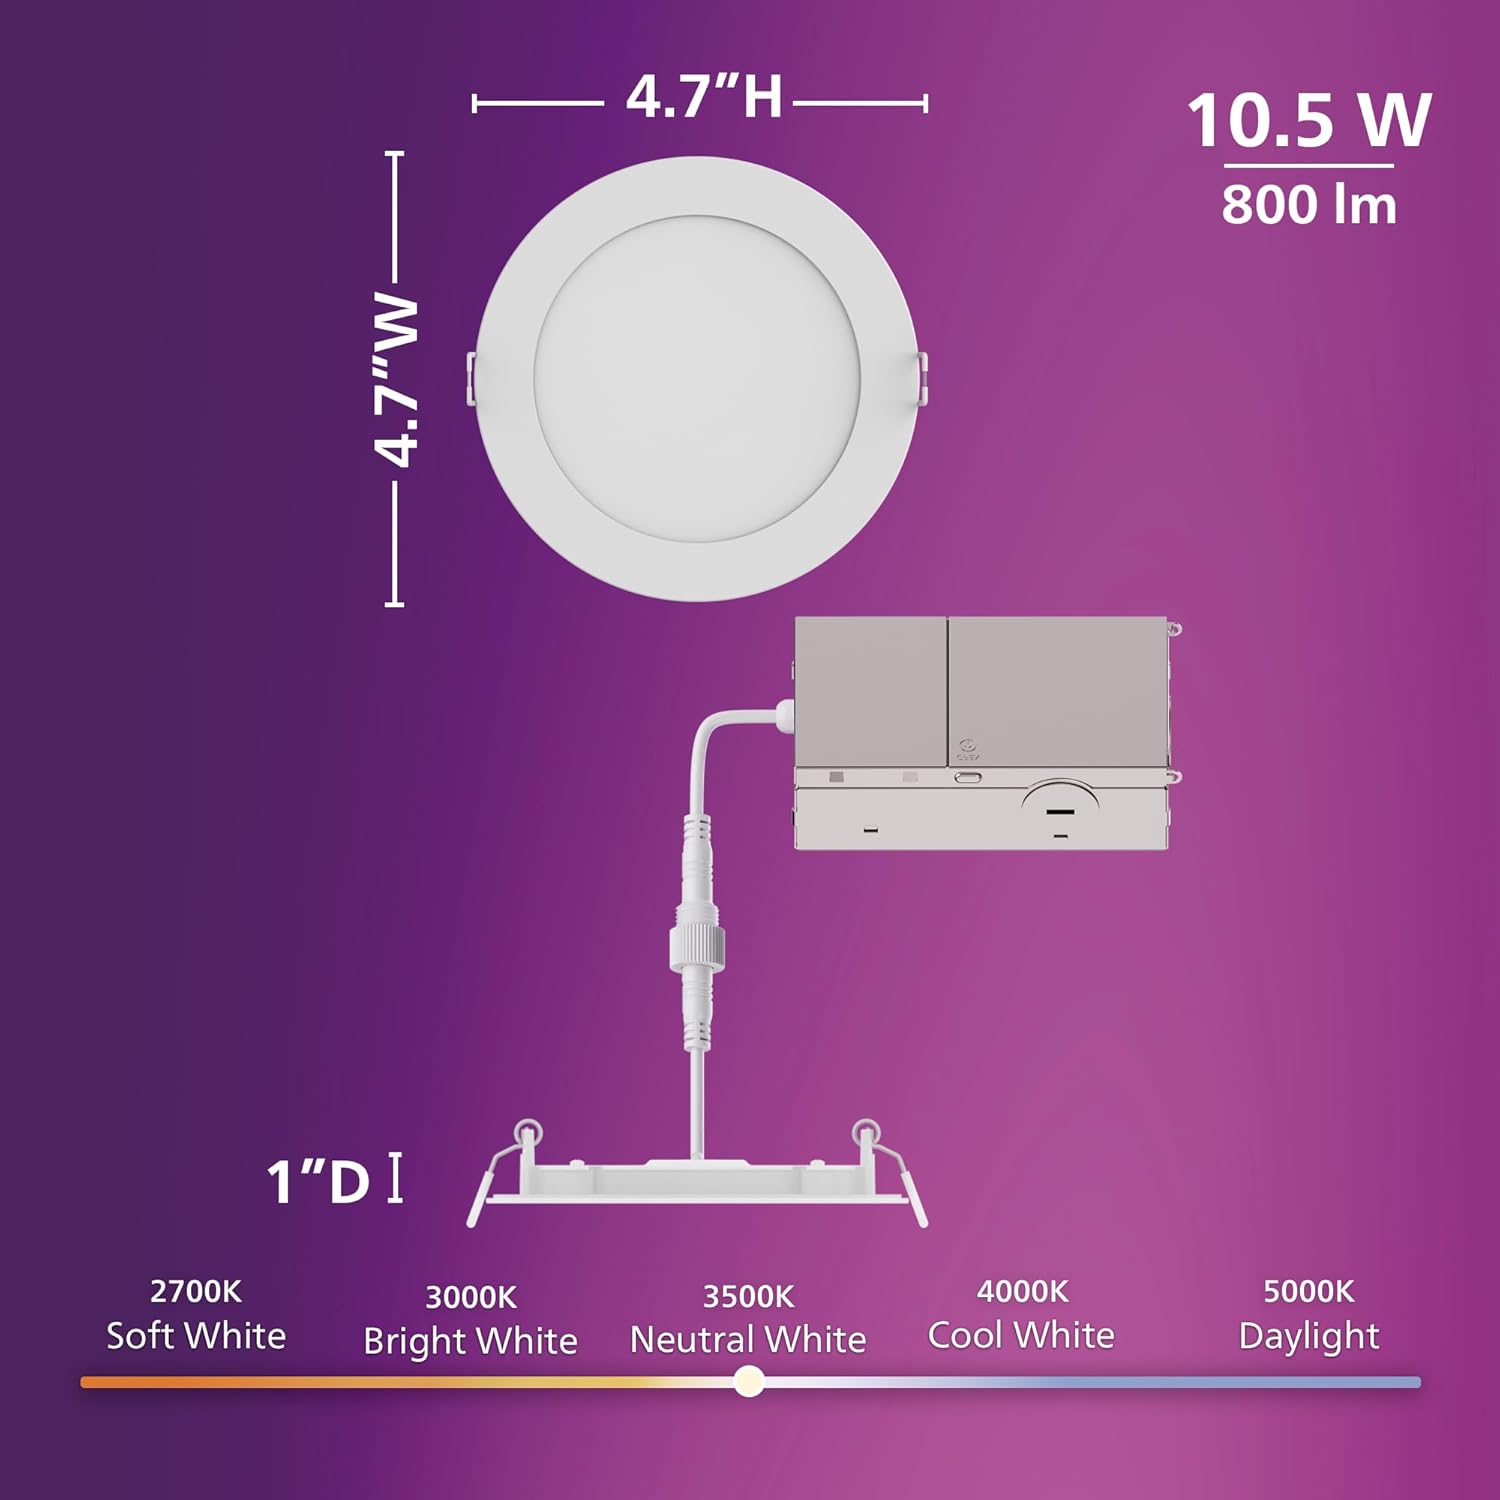
Figure 8: Product dimensions and CCT switch location.
| Funkcja | Szczegół |
|---|---|
| Numer modelu | 608869 |
| Marka | FILIPSY |
| Źródło światła | PROWADZONY |
| Cotage | 10.5 watów |
| Jasność | 800 lumenów |
| Tomtage | 120 woltów |
| Temperatura barwowa (CCT) | 2700K, 3000K, 3500K, 4000K, 5000K (selectable) |
| Możliwość ściemniania | Yes (down to 5%) |
| Godziny życia | 25,000 godziny |
| Typ instalacji | Flush Mount, Canless Design |
| Typ pokoju | Wnętrz |
| Tworzywo | Plastikowy |
| Wymiary produktu | 11.9L x 11.9W x 11.9H centimetres (approx. 4.7 x 4.7 x 4.7 inches) |
| Poziom wodoodporności | Water Resistant (Suitable for damp lokalizacje) |
| Certyfikaty | IC Rated, ETL, FCC certified |
9. Informacje o gwarancji
This Philips LED 4-Inch Slim Downlight is covered by a 2-letnia gwarancja producenta od daty zakupu. Niniejsza gwarancja obejmuje wady materiałowe i wykonawcze wynikające z normalnego użytkowania. Prosimy zachować dowód zakupu na wypadek roszczeń gwarancyjnych.
The warranty does not cover damage caused by improper installation, misuse, abuse, accidents, or unauthorized modifications.
10. Obsługa klienta
If you have any questions, require technical assistance, or need to make a warranty claim, please contact Philips customer support. Refer to the product packaging or the official Philips webna tej stronie znajdziesz najbardziej aktualne dane kontaktowe.
Więcej informacji znajdziesz na stronie: www.philips.pl