
1. Ważne instrukcje bezpieczeństwa
Please read all instructions before using this sewing machine. This machine is intended for household use only.
NIEBEZPIECZEŃSTWO – Aby zmniejszyć ryzyko porażenia prądem elektrycznym:
- Nigdy nie należy pozostawiać urządzenia podłączonego do gniazdka bez nadzoru.
- Zawsze odłącz urządzenie od gniazdka elektrycznego natychmiast po użyciu i przed czyszczeniem.
- Zawsze odłączaj przed ponownym lamping. Wymień żarówkę na tego samego typu o mocy znamionowej 15 W (obszar 110–120 V) lub 15 W (obszar 220–240 V).
OSTRZEŻENIE – Aby zmniejszyć ryzyko oparzeń, pożaru, porażenia prądem elektrycznym lub obrażeń ciała:
- Nie dopuszczać do używania jako zabawki. Należy zachować szczególną ostrożność, gdy urządzenie jest używane przez dzieci lub w ich pobliżu.
- Używaj tego urządzenia wyłącznie zgodnie z jego przeznaczeniem, zgodnie z opisem w niniejszej instrukcji. Używaj tylko akcesoriów zalecanych przez producenta, zawartych w niniejszej instrukcji.
- Nigdy nie używaj tego urządzenia, jeśli ma uszkodzony przewód lub wtyczkę, jeśli nie działa prawidłowo, jeśli zostało upuszczone lub uszkodzone lub wpadło do wody. Zwróć urządzenie do najbliższego autoryzowanego sprzedawcy lub centrum serwisowego w celu sprawdzenia, naprawy, regulacji elektrycznej lub mechanicznej.
- Nigdy nie używaj urządzenia z zablokowanymi otworami wentylacyjnymi. Utrzymuj otwory wentylacyjne maszyny do szycia i rozrusznika nożnego w czystości, aby nie gromadziły się kłaczki, kurz i luźna tkanina.
- Trzymaj palce z dala od wszystkich ruchomych części. Należy zachować szczególną ostrożność wokół igły maszyny do szycia.
- Zawsze używaj właściwej płytki igłowej. Niewłaściwa płytka może spowodować złamanie igły.
- Nie używaj wygiętych igieł.
- Nie ciągnij ani nie popychaj tkaniny podczas szycia. Może to spowodować odchylenie igły i jej złamanie.
- Always unplug sewing machine off ("O") when making any adjustments in the needle area, such as threading needle, changing needle, threading bobbin, or changing presser foot, and the like.
- Zawsze odłączaj maszynę do szycia z gniazdka elektrycznego podczas zdejmowania osłon, smarowania lub wykonywania jakichkolwiek innych czynności serwisowych, o których mowa w instrukcji obsługi.
- Nigdy nie wrzucaj i nie wkładaj żadnych przedmiotów do otworów.
- Nie stosować na zewnątrz.
- Nie używaj urządzenia w miejscach, w których używane są produkty w aerozolu lub w których podawany jest tlen.
- Aby odłączyć urządzenie, należy ustawić wszystkie regulatory w pozycji wyłączonej („O”), a następnie wyjąć wtyczkę z gniazdka.
- Nie odłączaj, ciągnąc za przewód. Aby odłączyć, chwyć za wtyczkę, nie za przewód.
- Poziom ciśnienia akustycznego w normalnych warunkach pracy wynosi 75 dB(A).
- Always turn off the machine or unplug when the machine is not operating properly.
- Nigdy nie kładź niczego na sterowniku nożnym.
- If the supply cord to the foot controller is damaged, it must be replaced by the manufacturer or its service agent or a similar qualified person in order to avoid a hazard.
- Urządzenie to nie jest przeznaczone do użytku przez osoby (w tym dzieci) o ograniczonej sprawności fizycznej, sensorycznej lub umysłowej, a także osoby nieposiadające odpowiedniego doświadczenia lub wiedzy, chyba że znajdują się one pod nadzorem osoby odpowiedzialnej za ich bezpieczeństwo lub otrzymały od niej instrukcje dotyczące korzystania z urządzenia.
- Dzieci powinny znajdować się pod nadzorem, aby mieć pewność, że nie bawią się urządzeniem.
ZAPISZ TE INSTRUKCJE
Image: Important Safety Instructions page from the Singer 2250 manual, detailing electrical and general safety warnings.
2. Konfiguracja
2.1 Akcesoria
The Singer 2250 sewing machine comes with a set of standard accessories and supports various optional accessories for different sewing tasks.
- Akcesoria standardowe: All purpose foot, Button sewing foot, Zipper foot, Screwdriver, Seam ripper/brush, Pack of needles, Bobbin (3), Darning plate, Spool holder.
- Optional Accessories (not supplied with machine, available from SINGER® retailers): Edge/quilting guide, Zipper foot, Straight stitch foot, Overcasting foot, Hemmer foot, Blind hem foot, Satin stitch foot, Cording/embroidery foot, Second spool pin, Spool pin felt.
2.2 Nawijanie szpulki
- Place thread and corresponding spool holder onto the spool pin.
- Snap the thread into the thread guide.
- Wind the thread counterclockwise around the bobbin winder tension disc.
- Thread the bobbin as illustrated and place it on the spindle.
- Push the bobbin spindle to the right.
- Hold the thread end.
- Step on the foot control pedal to begin winding.
- Cut the thread once the bobbin is full.
- Push the bobbin spindle to the left and remove the wound bobbin.
Uwaga: When the bobbin winder spindle is in the "bobbin winding" position, the machine will not sew and the hand wheel will not turn. To start sewing, push the bobbin winder spindle to the left (sewing position).

Image: Manual page illustrating standard and optional accessories, and a step-by-step guide for winding the bobbin.
2.3 Podłączanie do źródła zasilania
Ensure the machine's power switch is in the "O" (off) position. Insert the machine plug into the electrical outlet. Always use a grounded outlet.
2.4 Raising the Presser Foot Lifter
The presser foot lifter is located at the back of the needle bar area. Lift it to raise the presser foot for placing fabric, and lower it to hold the fabric in place for sewing.
3. Działanie
3.1 Choosing Your Pattern
The Singer 2250 features a Pattern Selector Dial to choose various stitch patterns.
- Stitches indicated in black on the diagram correspond to the Pattern Selector Dial.
- For patterns indicated with the "S" color, turn the Pattern Selector Dial to "S", then use the Stitch Length Dial to adjust the desired stitch length.
- The Pattern Selector Dial can be turned in either direction.
3.2 Stitch Length Dial
The Stitch Length Dial controls the length of straight stitches and the density of zig-zag stitches.
- For Straight Stitching: Turn the Pattern Selector Dial to the straight stitch symbol. The stitch length increases as the dial approaches "4". Use longer stitches for heavier fabrics and thicker needles, shorter stitches for lighter fabrics and finer needles.
- For Zig-Zag Stitching: Turn the Pattern Selector Dial to "~~~ ". The density of zig-zag stitches increases as the setting of the stitch length dial approaches "0". Dense zig-zag stitches are known as satin stitches.

Image: Manual page detailing how to choose stitch patterns and adjust stitch length for various sewing applications.
3.3 Nawlekanie maszyny
Proper threading is crucial for smooth sewing. Follow these general steps:
- Załóż szpulkę z nicią na trzpień szpulki.
- Przeprowadź nić przez górne prowadniki nici.
- Przeciągnij nić przez tarcze napinające.
- Przeciągnij nić przez dźwignię podnoszącą.
- Przeprowadź nić w dół przez prowadnik nici w igielnicy.
- Nawlecz igłę od przodu do tyłu.
- Raise the bobbin thread by turning the handwheel towards you, catching the bobbin thread with the needle thread.
- Pull both threads under the presser foot and towards the back.
3.4 Sewing on Buttons
To sew buttons using your Singer 2250:
- Zainstaluj płytkę do cerowania.
- Change the all-purpose foot to the button sewing tool.
- Position the fabric and button under the foot.
- Lower the button to the desired position and lower the foot.
- Set the Pattern Selector Dial on "---" and sew a few securing stitches.
- Select one of the two narrow zig-zag patterns (between 0.5 and 1.5) and sew through both holes of the button. Turn the handwheel to check needle clearance.
- Slowly sew the button with about 10 stitches.
- Select pattern "---" again and sew a few securing stitches.
- If a shank is required, place a darning needle on top of the button and sew.
- For buttons with 4 holes, sew through the front two holes first, then sew backwards and then sew through the back two holes.
3.5 Installing the Removable Extension Table
The removable extension table provides a larger work surface and also serves as an accessory box.
- Aby zainstalować: Hold the removable extension table horizontally and push it in the direction of the arrow until it clicks into place.
- Aby usunąć: Pull the extension table towards the left.
- The inside of the removable extension table can be used as an accessory box. To open, flip the cover down.
4. Konserwacja
4.1 Darning Plate
The darning plate is used for specific tasks like darning or free-hand embroidery.
- Instalacja: Install the darning plate as illustrated in the manual.
- Usuwanie: W przypadku normalnego szycia zdejmij płytkę do cerowania.
- For free-motion sewing, a darning/embroidery foot (optional accessory) is recommended.
4.2 Inserting & Changing Needles
Regularly change your needle, especially if sewing problems occur. Use SINGER® Brand Needles for best results.
- Turn the power switch to off ("O").
- Poluzuj igłę clamp wkręt.
- Insert the new needle with the flat side of the shaft facing the back, pushing it up as far as it will go.
- Dokręć igłęamp wkręt.
Uwaga: Needles must be in perfect condition. Problems can occur with bent needles, damaged points, or blunt needles.
4.3 Changing the Bulb
To change the light bulb, ensure the machine is unplugged. Replace the bulb with the same type rated 15 watts (110-120V area) or 15 watts (220-240V area).
4.4 Czyszczenie
Regularly clean the lint and dust from the bobbin case area and feed dogs using the provided brush. Ensure the machine is unplugged before cleaning.
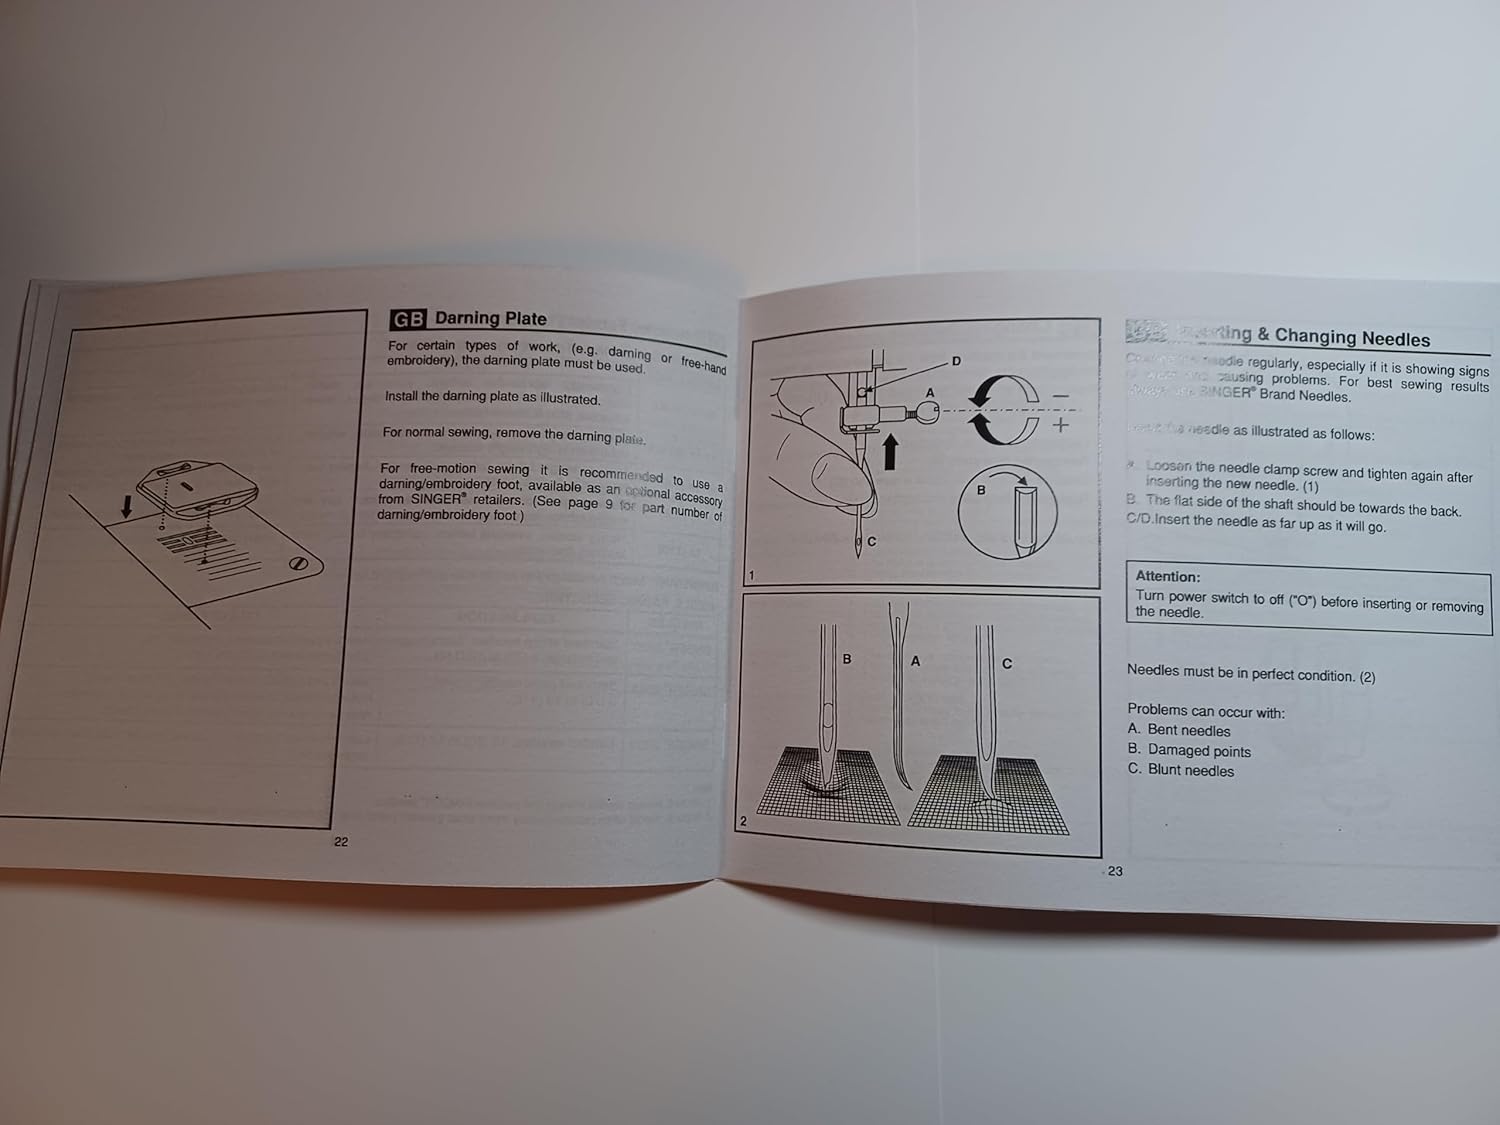
Image: Manual page illustrating procedures for sewing on buttons, installing the extension table, using the darning plate, and changing needles.
5. Rozwiązywanie Problemów
If you encounter issues with your Singer 2250, refer to the following common problems and solutions:
- Pominięte ściegi: Ensure the needle is inserted correctly, not bent, and is the appropriate size for the fabric and thread. Re-thread the machine.
- Zrywanie wątku: Check for correct threading, proper tension, a bent or blunt needle, or burrs on the needle plate or bobbin case.
- Marszczenie się tkaniny: Adjust tension settings, use the correct needle size, or ensure the presser foot pressure is appropriate for the fabric.
- Maszyna nie podaje materiału: Check if the feed dogs are raised. Ensure the presser foot is lowered.
- Głośna praca: Clean and lubricate the machine as per maintenance instructions. Check for loose parts or a bent needle.
For persistent problems, contact an authorized Singer service center.
6. Specyfikacje
| Wymiary produktu | 8.5 x 5.5 x 0.1 cala |
| Waga przedmiotu | 3 uncji |
| Numer modelu | SINGER 2250 Manual |
| Producent | TabSynth Design (for reproduction manual) |
| ASIN | B0G19M5M63 |
7. Gwarancja i wsparcie
This instruction manual is a reproduction for the Singer 2250 Sewing Machine. For warranty information regarding your Singer 2250 sewing machine, please refer to the original documentation provided with your machine or contact Singer customer support directly.
For support related to the operation or maintenance of your Singer 2250, please consult this manual. If further assistance is needed, contact an authorized Singer service center or your local Singer dealer.


