1. Wprowadzenie
The Ulanzi C10 RGB LED Video Light is a compact, versatile lighting solution designed for photographers and videographers. It offers adjustable color temperature, full RGB color control, and various scene effects to enhance your creative projects. Its portable design and long-lasting battery make it suitable for both indoor and outdoor use.

Image: Ulanzi C10 RGB LED Video Light highlighting its features and compact design.
2. Zawartość opakowania
Zaznacz pole, aby upewnić się, że wszystkie elementy są obecne:
- C10 LED Video Light Unit x 1
- Magnetic Diffuser x 1
- Cold Shoe Adapter x 1
- Smartphone Clip x 1
- Kabel zasilający typu C x 1
- Instrukcja obsługi x 1

Image: All included accessories for the Ulanzi C10 LED Video Light.
3. Funkcje produktu
3.1. Portability and Mounting
The C10 is designed to be compact and lightweight, easily fitting into pockets or small bags. It comes with a smartphone clip and a 1/4-inch cold shoe adapter, allowing for quick attachment to various devices such as smartphones, tablets, laptops, digital cameras, or tripods. This flexibility supports stable lighting for vlogging, food photography, and product shoots.

Image: Demonstrates the Ulanzi C10's versatility, showing it attached to a smartphone, laptop, camera, and tripod.
3.2. User-Focused Experience
Equipped with a 1.44-inch color screen, the C10 provides clear visibility of color temperature, brightness, and mode settings. Intuitive dials enable precise adjustments. The magnetic diffuser softens harsh light, creating natural skin tones and enhancing food appearance. A unique quick-release mount allows for flexible lighting angle adjustments without obstructing camera lenses.

Obraz: Szczegółowy view of the Ulanzi C10's display, magnetic diffuser, and quick-release mechanism.
3.3. High Brightness and Color Accuracy
The C10 delivers 10W of high output, achieving 1120 lux at 0.5m (at 9000K). Its high Color Rendering Index (CRI) of 93+ ensures faithful reproduction of natural colors, making it suitable for professional-grade lighting. The 120° beam angle provides even and three-dimensional illumination.

Image: Visual representation of the Ulanzi C10's high output and color accuracy specifications.
3.4. Lighting Modes and Effects
The light features three main modes: CCT, RGB, and Scene. CCT mode allows stepless adjustment of color temperature from 1800K to 9000K. RGB mode offers full color control (0° to 359° hue). The Scene mode includes 20 built-in effects such as police car, candlelight, lightning, and party modes, providing diverse creative options.

Image: Illustration of the CCT mode, showing adjustable color temperature from 1800K to 9000K and brightness from 0% to 100%.

Obraz: Wizualizacjaample of the RGB mode, showcasing hue adjustment from 0° to 359° and different color lighting effects.
Obraz: Ponadview of the 20 scene effects available on the Ulanzi C10, such as emergency lights, fireworks, and party lights.
3.5. Bateria i ładowanie
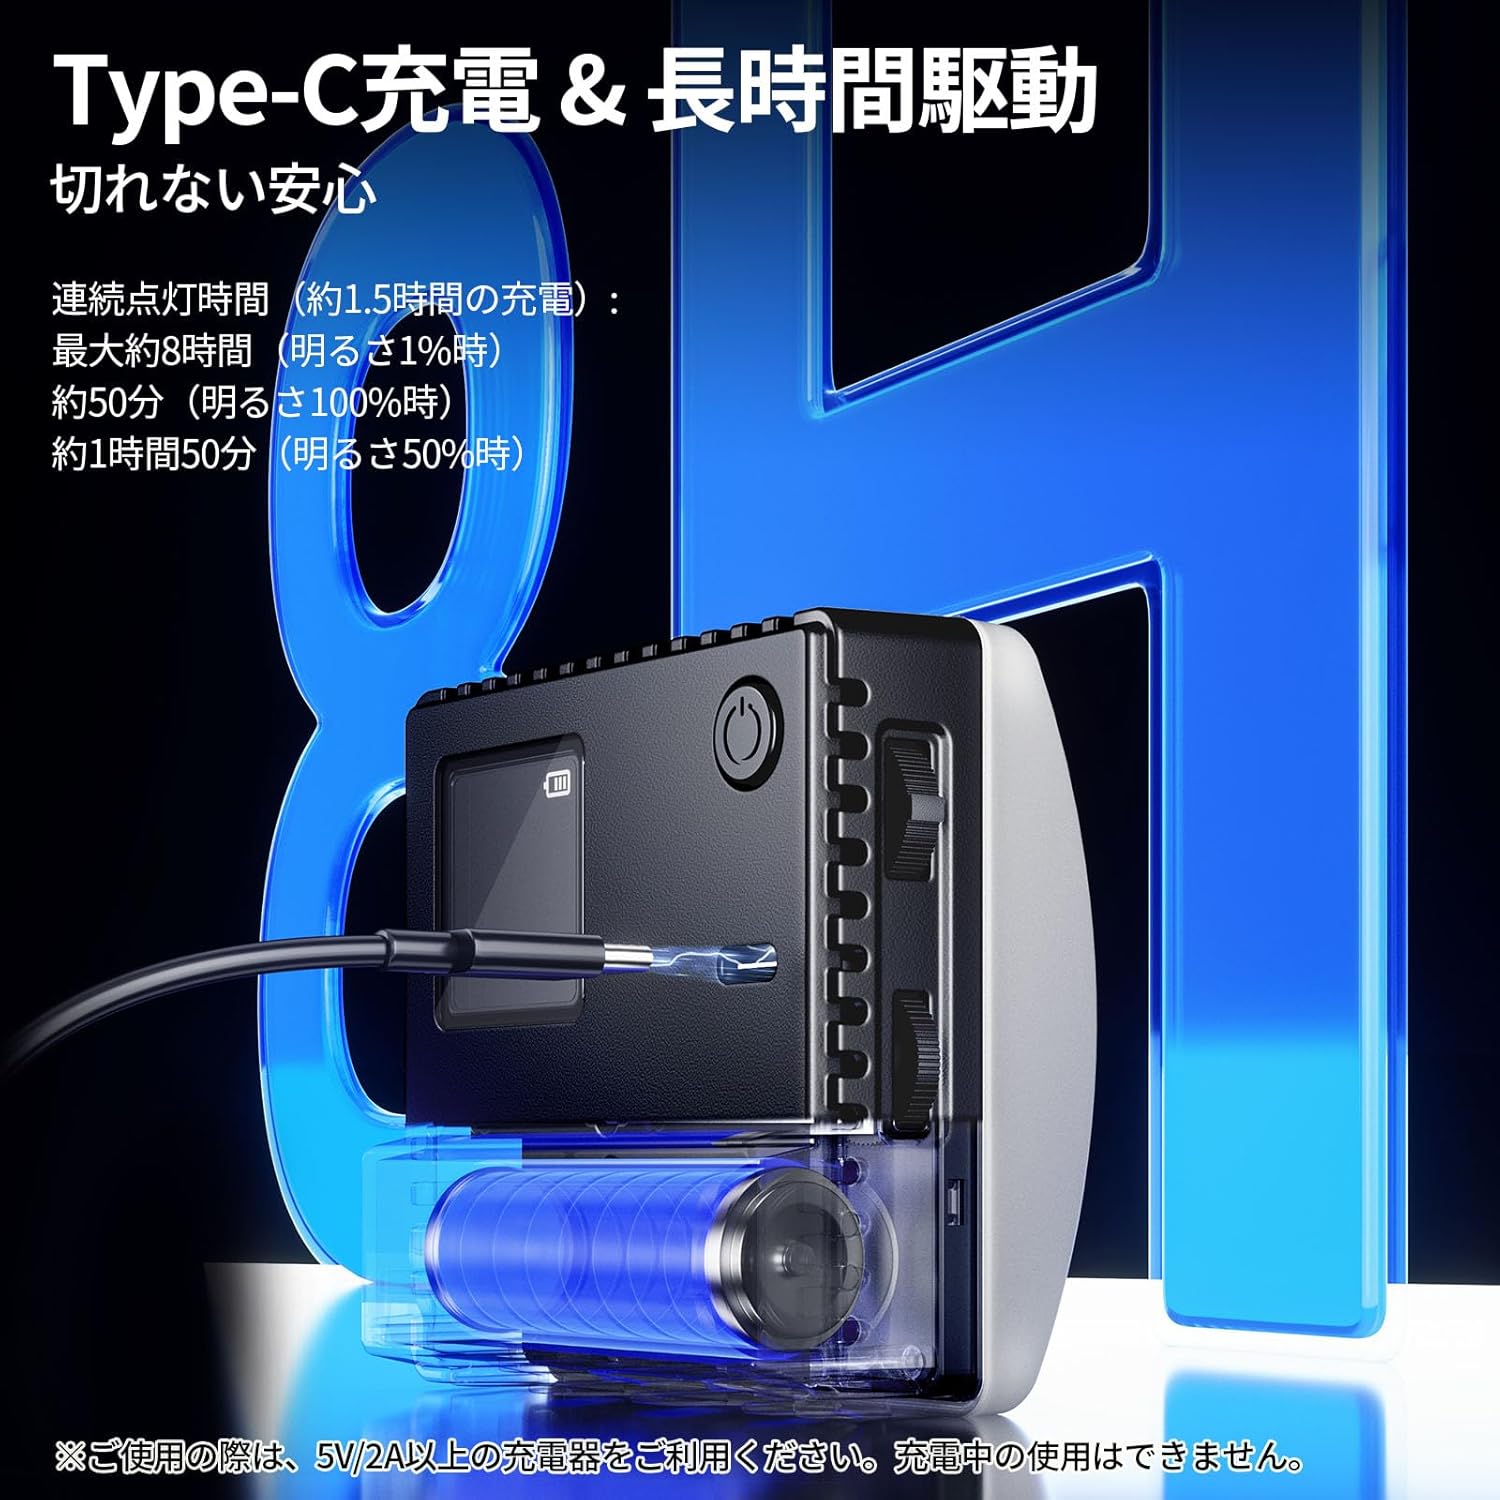
The C10 features a Type-C charging port and a 3300mAh large-capacity battery. A full charge takes approximately 1.5 hours (with a 5V/2A charger). It provides up to 8 hours of continuous use at 1% brightness, 50 minutes at 100% brightness, and 1 hour 50 minutes at 50% brightness. This ensures reliable power for extended shooting sessions.
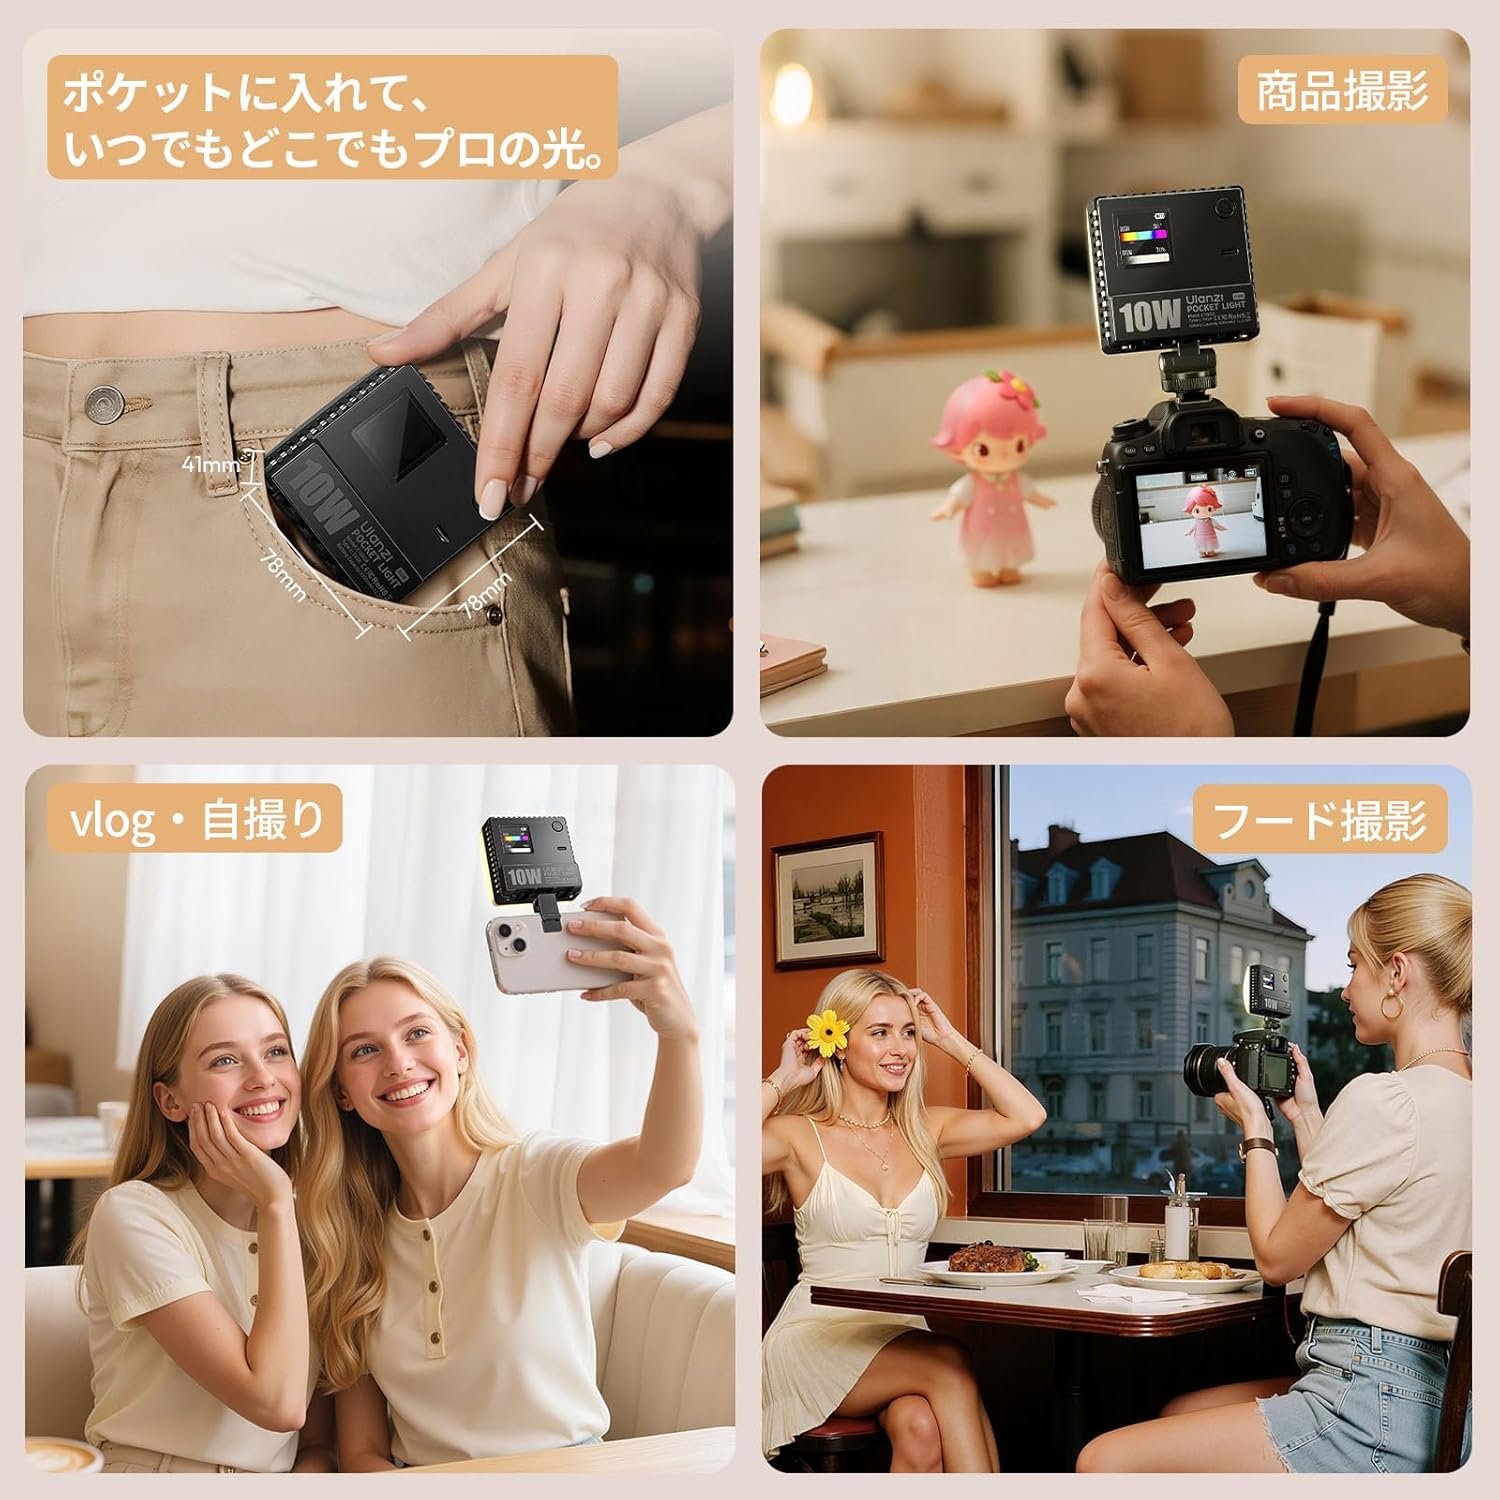
Image: Diagram illustrating the Type-C charging and estimated battery life at different brightness levels.
4. Konfiguracja
- Rozpakować: Ostrożnie wyjąć wszystkie elementy z opakowania.
- Opłata: Before first use, fully charge the device using the provided Type-C cable and a 5V/2A or higher charger. The indicator light will show charging status.
- Attach Diffuser (Optional): For softer light, attach the magnetic diffuser to the front of the light panel.
- Montowanie:
- Smartfon: Use the smartphone clip to attach the light to your phone.
- Camera/Tripod: Attach the cold shoe adapter to the 1/4-inch screw hole on the light, then mount it onto your camera's hot shoe or a tripod.
5. Instrukcja obsługi
The Ulanzi C10 features intuitive controls for easy operation.
5.1. Włączanie/wyłączanie zasilania
Press and hold the power button located on the side of the unit to turn the light on or off.
5.2. Wybór trybu
Short press the power button to cycle through the main lighting modes: CCT Mode, RGB Mode, and Scene Mode. The current mode will be displayed on the 1.44-inch LCD screen.
5.3. Dostosowywanie ustawień
Use the two control dials on the side of the unit to adjust parameters within each mode:
- Tryb CCT:
- Rotate one dial to adjust Temperatura barwowa (1800K-9000K).
- Rotate the other dial to adjust Jasność (0%-100%).
- Tryb RGB:
- Rotate one dial to adjust Odcień (0°-359°).
- Rotate the other dial to adjust Jasność (0%-100%).
- Tryb sceny:
- Rotate one dial to select from the 20 wbudowanych efektów scen.
- Rotate the other dial to adjust the Jasność or other specific parameters for the selected effect.
6. Konserwacja
- Przechowuj urządzenie w suchym miejscu. Nie wystawiaj go na działanie wilgoci ani deszczu.
- Clean the light panel and screen with a soft, dry cloth. Avoid using harsh chemicals or abrasive materials.
- Przechowywać urządzenie w chłodnym i suchym miejscu, z dala od bezpośredniego światła słonecznego i ekstremalnych temperatur.
- Unikaj upuszczania i narażania urządzenia na silne uderzenia.
7. Rozwiązywanie Problemów
| Problem | Możliwa przyczyna | Rozwiązanie |
|---|---|---|
| Światło się nie włącza. | Niski poziom naładowania baterii lub brak zasilania. | Charge the device using the Type-C cable. Ensure the charger is 5V/2A or higher. |
| Nie można zmienić ustawień. | Incorrect mode selected or controls are locked. | Ensure you are in the correct mode. Refer to Section 5.3 for specific mode adjustments. Try restarting the device. |
| Moc światła jest słaba. | Jasność jest ustawiona na niskim poziomie lub bateria jest słaba. | Increase brightness using the control dial. Recharge the battery if low. |
| Urządzenie się przegrzewa. | Prolonged use at high brightness. | Reduce brightness or turn off the device to allow it to cool down. Ensure proper ventilation. |
8. Specyfikacje
| Funkcja | Szczegół |
|---|---|
| Model | C10 RGB |
| Wymiary (jednostka świetlna) | Wymiary: 78 x 78 x 26 mm |
| Dimensions (with Diffuser) | Wymiary: 78 x 78 x 41 mm |
| Waga | Około 120 g |
| Wskaźnik oddawania barw (CRI) | ≥93 |
| Zakres temperatury barwowej | 1800K - 9000K |
| Regulacja odcienia | 0° - 359° |
| Natężenie oświetlenia | ≈1120 Lux @ 9000K, 0.5m |
| Regulacja jasności | 0% - 100% (bezstopniowo) |
| Continuous Lighting Time (Max Brightness) | Około 50 minut |
| Continuous Lighting Time (Min Brightness) | Około 480 minut |
| Kąt wiązki | 120° |
| Pobór mocy | 10 W |
| Objętość operacyjnatage | 3.7 V |
| Pojemność baterii | 3300mAh |
| Port ładowania | Typ C |
| Czas ładowania | Około 1.5 godzin (z ładowarką 5 V/2 A) |
| Wyświetlacz | Ekran LCD |
| Opcje montażu | 1/4-inch screw hole, Cold Shoe, Smartphone Clip |
9. Gwarancja i wsparcie
For warranty information and technical support, please refer to the official Ulanzi webOdwiedź witrynę lub skontaktuj się z lokalnym dystrybutorem. Zachowaj paragon zakupu na wypadek reklamacji.


