
1. Wprowadzenie
This instruction manual provides comprehensive guidance for the safe and effective use of your Elna eXplore 130 Mechanical Sewing Machine. Please read this manual thoroughly before operating the machine to ensure proper setup, operation, and maintenance. Retain this manual for future reference.
2. Ważne instrukcje bezpieczeństwa
Podczas korzystania z urządzeń elektrycznych należy zawsze przestrzegać podstawowych zasad bezpieczeństwa, w tym:
- Przeczytaj wszystkie instrukcje przed użyciem tej maszyny do szycia.
- Trzymaj palce z dala od wszystkich ruchomych części. Należy zachować szczególną ostrożność wokół igły maszyny do szycia.
- Zawsze używaj właściwej płytki igłowej. Niewłaściwa płytka może spowodować złamanie igły.
- Nie używaj wygiętych igieł.
- Wyłącz maszynę do szycia podczas dokonywania jakichkolwiek regulacji w okolicy igły, takich jak nawlekanie igły, wymiana igły, nawlekanie szpulki lub wymiana stopki dociskowej.
- Zawsze odłączaj maszynę od gniazdka elektrycznego podczas zdejmowania osłon, smarowania lub wykonywania innych czynności serwisowych opisanych w instrukcji obsługi.
- Nigdy nie wrzucaj i nie wkładaj żadnych przedmiotów do otworów.
- Nie stosować na zewnątrz.
- Nie należy pracować w miejscach, w których stosuje się produkty w formie aerozolu (sprayu) lub podaje się tlen.
- Aby rozłączyć, ustaw wszystkie regulatory w pozycji wyłączonej, a następnie wyjmij wtyczkę z gniazdka.
- Nie odłączaj, ciągnąc za przewód. Aby odłączyć, chwyć za wtyczkę, nie za przewód.
3. Koniec produktuview
The Elna eXplore 130 is a mechanical sewing machine designed for various sewing tasks, offering a selection of utility, stretch, and decorative stitches. It features a lightweight and portable design.
Główne cechy:
- 23 Built-in utility, stretch, and decorative stitches.
- One four-step buttonhole.
- Front Loading Vertical Oscillating Bobbin system.
- Free-arm sewing capability by removing the front accessory tray.
- Maximum stitch width: 5mm.
- Maximum stitch length: 4mm.
- Maximum sewing speed: 800 stitches per minute (SPM).
- LED lighting for improved visibility.
- Convenient dial system for stitch pattern, length, and width selection.
Zawartość zestawu:
The following accessories are included with your Elna eXplore 130 sewing machine:
- Presser Feet: Standard Foot A, Zipper Foot E, Blind Hem Foot G, Buttonhole Foot.
- Darning plate.
- Bobbins (x3).
- Seam Ripper.
- Needle Set.
- Śrubokręt.
- Felt.
- Foot Controller.
- Instrukcja obsługi (ten dokument).
Maszyna Views:


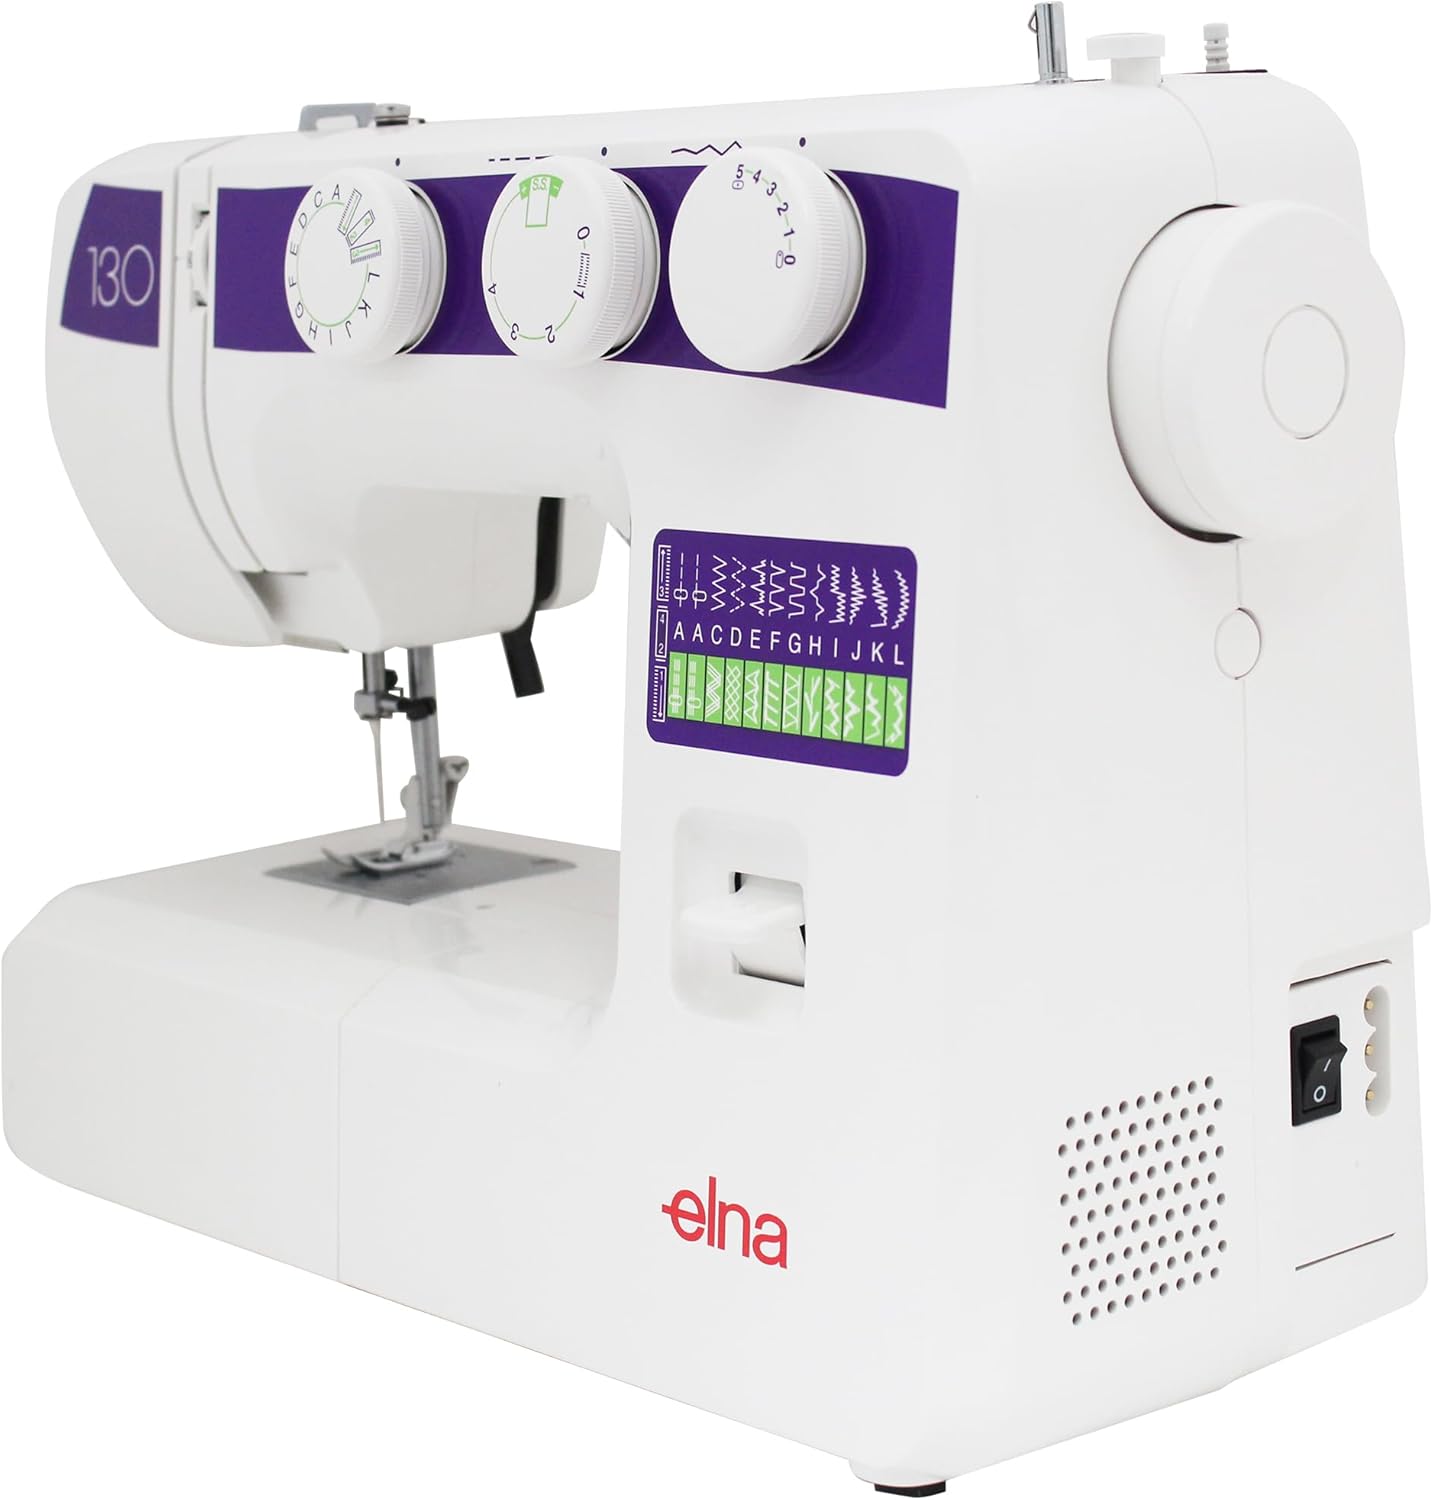


4. Konfiguracja
4.1 Rozpakowywanie i umieszczanie
- Ostrożnie wyjmij maszynę z opakowania.
- Umieść maszynę na stabilnej, płaskiej powierzchni.
- Zapewnij odpowiednie oświetlenie i przestrzeń dla komfortowej pracy.
4.2 Połączenie zasilania
- Connect the foot controller plug to the machine's power socket.
- Insert the power cord plug into a suitable electrical outlet.
- Ensure the power switch on the machine is in the "OFF" position before connecting.
4.3 Nawijanie szpulki
- Załóż pustą szpulkę na wrzeciono nawijacza szpulki.
- Guide the thread from the spool pin through the upper thread guide and around the bobbin winding tension disc.
- Owiń nić kilka razy wokół szpulki.
- Przesuń wrzeciono nawijacza szpulki dolnej w prawo.
- Gently press the foot controller to start winding. Stop when the bobbin is full.
- Odetnij nić i przesuń wrzeciono nawijacza szpulki w lewo.
4.4 Wkładanie szpulki
- Open the bobbin cover plate located on the free arm.
- Włóż nawiniętą szpulkę do bębenka, upewniając się, że nić odwija się we właściwym kierunku (zazwyczaj przeciwnie do ruchu wskazówek zegara).
- Przeciągnij nić przez sprężynę napinającą do szczeliny w bębenku.
- Zamknij pokrywę szpulki.
4.5 Nawlekanie górnej nici
- Podnieś dźwignię stopki dociskowej.
- Nawiń szpulkę nici na trzpień szpulki.
- Przeprowadź nić przez górny prowadnik nici.
- Podążaj za ponumerowaną ścieżką nawlekania w dół przez tarcze napinające i w górę aż do dźwigni podnoszącej.
- Przeciągnij dźwignię podnoszącą od prawej do lewej.
- Continue guiding the thread down through the remaining guides to the needle.
- Nawlecz igłę od przodu do tyłu.
- Przeciągnij około 6 cm nici przez ucho igły.
5. Instrukcja obsługi
5.1 Wybór ściegu
- Włącz Stitch Pattern Dial (leftmost dial) to select the desired stitch. Refer to the stitch pattern guide on the machine for available options.
- Dostosuj Pokrętło długości ściegu (middle dial) to set the desired stitch length (0-4mm). For stretch stitches, use the preset length indicated by the green mark.
- Dostosuj Pokrętło szerokości ściegu (rightmost dial) to set the desired stitch width (0-5mm).
5.2 Podstawowe szycie
- Umieść materiał pod stopką.
- Opuść stopkę dociskową.
- Turn the handwheel towards you to bring the needle down into the fabric, then up again, pulling the bobbin thread through the needle plate hole.
- Pull both upper and bobbin threads to the back under the presser foot.
- Delikatnie naciśnij pedał nożny, aby rozpocząć szycie. Płynnie prowadź tkaninę.
- To secure a seam, press the reverse lever for a few stitches at the beginning and end of your seam.
- When finished, raise the needle to its highest position, lift the presser foot, and pull the fabric away from the machine. Cut the threads using the thread cutter.
5.3 Korzystanie z wolnego ramienia
To use the free arm for sewing tubular items like sleeves, cuffs, or trouser hems, simply slide off the accessory storage tray located at the front of the machine. This exposes the narrow free arm.
5.4 Four-Step Buttonhole
The Elna eXplore 130 features a four-step buttonhole function.
- Attach the Buttonhole Foot.
- Mark the buttonhole position on your fabric.
- Set the Stitch Pattern Dial to the first buttonhole step (indicated by a square symbol).
- Zszyj pierwszą stronę dziurki.
- Adjust the Stitch Pattern Dial to the second step for the bar tack.
- Adjust to the third step for the second side, and the fourth step for the final bar tack.
- Carefully cut open the buttonhole using a seam ripper.
6. Konserwacja
Regularna konserwacja zapewnia długowieczność i optymalną wydajność Twojej maszyny do szycia.
6.1 Czyszczenie maszyny
- Zawsze odłączaj urządzenie przed czyszczeniem.
- Zdejmij igłę, stopkę dociskową i płytkę ściegową.
- Use the provided brush to remove lint and dust from the bobbin case area and feed dogs.
- Wipe the exterior of the machine with a soft, dry cloth. Do not use liquid cleaners.
6.2 Wymiana igły
- Podnieś igłę do najwyższej pozycji.
- Poluzuj igłę clamp wkręt.
- Wyjmij starą igłę.
- Włóż nową igłę płaską stroną do tyłu i wsuń ją tak daleko, jak to możliwe.
- Dokręć igłęamp dobrze przykręcić.
- Change needles regularly (after 8-10 hours of sewing) or if it becomes bent or dull.
7. Rozwiązywanie Problemów
W tej sekcji omówiono typowe problemy, które mogą wystąpić. W przypadku problemów, których tutaj nie wymieniono, prosimy o kontakt z obsługą klienta.
| Problem | Możliwa przyczyna | Rozwiązanie |
|---|---|---|
| Pominięte ściegi | Nieprawidłowy rozmiar/rodzaj igły, wygięta igła, nieprawidłowe nawleczenie. | Change needle, re-thread machine, ensure correct needle for fabric. |
| Thread Breaking (Upper) | Incorrect upper tension, improperly threaded, poor quality thread, bent needle. | Adjust tension, re-thread, use quality thread, change needle. |
| Thread Breaking (Bobbin) | Improperly wound bobbin, incorrect bobbin insertion, lint in bobbin case. | Rewind bobbin, re-insert bobbin correctly, clean bobbin case. |
| Tkanina nie jest podawana | Stopka dociskowa nie opuszczona, ząbki transportera opuszczone, kłaczki pod płytką ściegową. | Lower presser foot, raise feed dogs, clean under needle plate. |
| Maszyna nie uruchamia się | Power cord not connected, power switch off, foot controller issue. | Check power connections, turn on switch, inspect foot controller. |
8. Specyfikacje
| Funkcja | Szczegół |
|---|---|
| Marka | Elna |
| Numer modelu | EL130 |
| Typ | Mechaniczna maszyna do szycia |
| Liczba ściegów | 23 wbudowanych ściegów |
| Rodzaj dziurki | Czterokrokowy |
| Rodzaj szpulki | Front Loading Vertical Oscillating |
| Maksymalna szerokość ściegu | 5 mm |
| Maksymalna długość ściegu | 4 mm |
| Maksymalna prędkość szycia | 800 SPM |
| Oświetlenie | PROWADZONY |
| Źródło zasilania | Elektryczny |
| Wymiary produktu (Gł. x Szer. x Wys.) | 6" gł. x 15.3" szer. x 11.6" wys. |
| Waga przedmiotu | 13 funta |
| Tworzywo | Metal, Plastik |
| UPC | 732212411939 |
9. Gwarancja i wsparcie
For information regarding your product's warranty, please refer to the warranty card included with your purchase or visit the official Elna webstrona.
If you require technical assistance, have questions about operation, or need to order replacement parts, please contact Elna customer support.
- Elna Official Webstrona: www.elna.com
- Elna USA Store on Amazon: Visit the Elna Store