1. Wprowadzenie
This manual provides essential information for the proper setup, operation, and maintenance of your Pisichen 24 Inch Touchscreen Monitor (Model 24INSXT-1080P). Please read this manual thoroughly before using the product to ensure optimal performance and safety. Keep this manual for future reference.

Image 1.1: The Pisichen 24 inch touchscreen monitor, featuring a built-in webcam and a sleek design.
2. Zawartość opakowania
Verify that all items are present in the package. If any items are missing or damaged, contact your retailer for assistance.
- Pisichen 24 Inch Touchscreen Monitor
- Zasilacz (prąd stały)
- Kabel HDMI
- Kabel VGA
- Kabel USB-C
- Instrukcja obsługi
3. Instrukcje konfiguracji
3.1 Konfiguracja fizyczna
Mocowanie stojaka: Carefully place the monitor face down on a soft, clean surface. Align the stand base with the monitor's mounting points and secure it with the provided screws. Ensure the stand is firmly attached before proceeding.
Montaż VESA: This monitor supports VESA 100mm x 100mm mounting. If you plan to use a VESA-compatible arm or wall bracket, remove the stand and attach the monitor to your VESA mount according to the mount's instructions.

Image 3.1: The monitor's adjustable stand allows for height, tilt, swivel, and 90-degree pivot adjustments.
3.2 Podłączanie do urządzenia
The monitor offers multiple connectivity options. Ensure the monitor is powered off before making any connections.
- Podłączenie zasilania: Connect the DC power adapter to the monitor's DC Power Port and then plug it into a power outlet.
- Połączenie wideo: Wybierz jedną z poniższych opcji:
- HDMI: Connect one end of the HDMI cable to the monitor's HDMI Port and the other end to your computer's HDMI output.
- VGA: Connect one end of the VGA cable to the monitor's VGA Port and the other end to your computer's VGA output.
- USB typu C: Connect one end of the USB-C cable to the monitor's Type C Port and the other end to your computer's USB-C port. Ensure your computer's USB-C port supports DisplayPort Alternate Mode for video output. This connection also supports touch functionality and data transfer.
- Połączenie audio: If using HDMI or USB-C, audio will typically transmit automatically. For other setups or external speakers, use the Audio Port.

Rysunek 3.2: Szczegółowy view of the monitor's rear ports, including HDMI, VGA, Type C, DC Power, and Audio ports.
3.3 Touchscreen and WebKonfiguracja kamery
For touchscreen functionality and webcam operation, ensure the USB-C cable is connected between the monitor and your computer, or a separate USB-A to USB-B cable (not always included, check package contents) is connected from the monitor's upstream USB port to your computer. Most operating systems will automatically detect and install the necessary drivers.

Image 3.3: Compatibility chart for touchscreen functionality. Multi-touch is supported on laptops, smartphones, tablets, all-in-one PCs, and desktop hosts. Single-touch is supported on MacBooks. Touch functionality is not supported on iPhones, iPads, Nintendo Switch, Xbox, PlayStation consoles, Fire TV devices, and Steam Deck.
4. Instrukcja obsługi
4.1 Włączanie/wyłączanie zasilania
Naciśnij przycisk zasilania znajdujący się na monitorze, aby go włączyć lub wyłączyć. Kontrolka zasilania zaświeci się, gdy monitor jest aktywny.
4.2 Korzystanie z ekranu dotykowego
The monitor features a 10-point multi-touch screen for intuitive interaction. Use gestures such as tapping, swiping, pinching to zoom, and dragging, similar to a tablet or smartphone. Ensure your operating system is configured for touch input.

Image 4.1: Demonstrating precise and fluid interaction with the 10-point multi-touch screen.
4.3 Webcam and Microphone Usage
Wbudowany webcam and microphone are designed for video conferencing and online communication. Once connected via USB-C or a dedicated USB cable, they should be automatically recognized by your computer's operating system and video conferencing applications. Adjust privacy settings within your operating system or application as needed.

Image 4.2: The integrated webcam facilitates clear video calls and online meetings.
4.4 Regulacja wyświetlacza
The monitor's stand allows for various ergonomic adjustments:
- Regulacja wysokości: Podnieś lub opuść monitor do preferowanej pozycji viewwysokość.
- Przechylenie: Adjust the screen's vertical angle (forward or backward) for optimal viewing.
- Obracać: Rotate the monitor horizontally (left or right) on its base.
- Sworzeń: Rotate the screen 90 degrees to switch between landscape and portrait modes. This is useful for coding, document review, or specific creative tasks.
4.5 Menu ekranowe (OSD)
The OSD menu allows you to adjust various display settings such as brightness, contrast, color temperature, input source, and audio volume. Access the OSD menu using the buttons located on the monitor (refer to the physical layout for exact button locations).
5. Konserwacja
5.1 Czyszczenie monitora
Aby wyczyścić ekran monitora, delikatnie przetrzyj go miękką, niepozostawiającą włókien ściereczką. W przypadku uporczywych zabrudzeń delikatnie przetrzyj.ampen the cloth with water or a non-abrasive screen cleaner. Avoid using alcohol, ammonia, or abrasive cleaners, as these can damage the screen surface. For the monitor casing, należy używać miękkiej, suchej ściereczki.
5.2 Przechowywanie
When storing the monitor for an extended period, ensure it is powered off and disconnected from all cables. Store it in a cool, dry place, preferably in its original packaging, to protect it from dust and physical damage.
6. Rozwiązywanie Problemów
Jeśli masz problemy z monitorem, zapoznaj się z poniższymi typowymi problemami i ich rozwiązaniami:
| Problem | Możliwa przyczyna | Rozwiązanie |
|---|---|---|
| Brak obrazu na ekranie | Power cable loose; Video cable loose or incorrect input selected; Monitor is off. | Check power connections; Ensure video cable is securely connected and correct input source is selected via OSD; Press power button. |
| Ekran dotykowy nie reaguje | USB-C cable not connected or not supporting data; Drivers not installed; Device not compatible with touch. | Ensure USB-C cable is fully connected and supports data/touch; Check device compatibility (refer to Image 3.3); Restart computer. |
| Webkamera/mikrofon nie działa | USB-C cable not connected or not supporting data; Privacy settings blocking access; Drivers not installed. | Verify USB-C connection; Check privacy settings in your operating system and application; Restart computer. |
| Brak dźwięku z głośników monitora | Volume too low; Incorrect audio output selected on computer; Audio cable not connected (if applicable). | Adjust monitor volume via OSD; Select monitor as audio output in computer settings; Ensure audio cable is connected if using VGA. |
| Screen flickers or displays distorted image | Loose video cable; Incorrect resolution/refresh rate; Interference. | Check video cable connection; Adjust display settings on your computer to 1920x1080 at 60Hz; Move away from other electronic devices. |
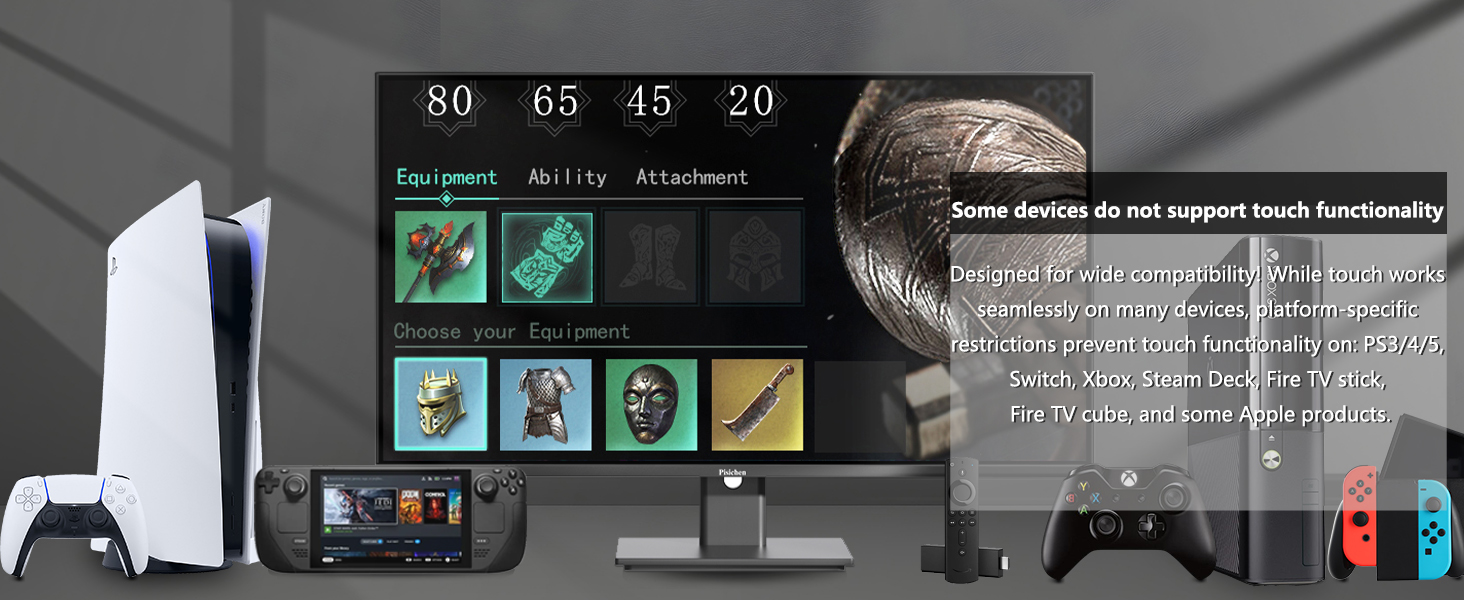
Image 6.1: Some devices, such as specific game consoles (PS3/4/5, Xbox, Steam Deck) and certain Apple products, do not support touch functionality with this monitor due to platform-specific restrictions.
7. Specyfikacje
| Funkcja | Specyfikacja |
|---|---|
| Numer modelu | 24INSXT-1080P |
| Rozmiar ekranu | 23.8 cali |
| Rezolucja | FHD 1920 x 1080p |
| Technologia wyświetlania | IPS LED |
| Częstotliwość odświeżania | 60 Hz |
| Jasność | 400 XNUMX kandeli |
| Współczynnik kontrastu | 3000:1 |
| Czas reakcji | 5 milisekund |
| Ekran dotykowy | 10-Point Multi-touch |
| Łączność | 1x HDMI, 1x VGA, 1x USB 3.1 Type C, Audio Port, DC Power Port |
| Dodatkowe funkcje | Built-In Speakers, Built-In Webcam, Swivel Adjustment, Tilt Adjustment, Height Adjustment, Pivot (90-degree rotation) |
| Zgodność ze standardem VESA | 100mm x 100mm |
| Wymiary (gł. x szer. x wys.) | 1.97"D x 21.26"W x 12.6"H (Monitor only, without stand) |

Image 7.1: Detailed product dimensions for the Pisichen 24 Inch Touchscreen Monitor.
8. Gwarancja i wsparcie
8.1 Informacje o gwarancji
This product comes with a limited warranty. Please refer to the warranty card included in your package or contact Pisichen customer support for detailed warranty terms and conditions. The warranty typically covers manufacturing defects for a specified period from the date of purchase.
8.2 Obsługa klienta
For technical assistance, troubleshooting not covered in this manual, or warranty claims, please contact Pisichen customer support. Contact information can usually be found on the product packaging, the official Pisichen webwitryny lub dokumentacji zakupu.