
1. Wprowadzenie
This manual provides essential information for the safe and efficient operation, assembly, and maintenance of your Geemax Electric Tricycle, model DDSLC002. Please read this manual thoroughly before using the tricycle to ensure proper function and to prevent injury or damage.
The Geemax Electric Tricycle is designed for adult use, featuring 20-inch by 4.0-inch fat tires, a 36V 350W motor, and a 13Ah lithium battery. It is suitable for various terrains including urban roads, beaches, and light snow.

Figure 1.1: Geemax Electric Tricycle DDSLC002
This image shows the Geemax Electric Tricycle, model DDSLC002, in white. It features large 20-inch fat tires, a comfortable seat with a backrest, and a spacious rear cargo basket. The design highlights its robust construction suitable for various terrains.

Figure 1.2: Versatile Terrain Capability
This image demonstrates the tricycle's adaptability to various environments, showcasing it on a paved road, a sandy beach, a snowy path, and a grassy field, emphasizing its fat tire design for multi-terrain use.
2. Informacje dotyczące bezpieczeństwa
Your safety is paramount. Adhere to all warnings and instructions in this manual.
- Podczas jazdy należy zawsze nosić kask i odpowiedni sprzęt ochronny.
- Przed każdą jazdą upewnij się, że wszystkie elementy są solidnie zamocowane.
- Nie należy prowadzić trójkołowca będąc pod wpływem alkoholu lub narkotyków.
- Należy przestrzegać wszystkich lokalnych przepisów i regulacji drogowych.
- Avoid riding in adverse weather conditions, such as heavy rain or ice, unless the tricycle is specifically designed and equipped for such conditions.
- The maximum load capacity for this tricycle is 350 lbs (158 kg). Do not exceed this limit.
- Podczas pracy należy trzymać ręce i stopy z dala od ruchomych części.
- Regularly inspect brakes, tires, and battery for wear and damage.
3. Zawartość opakowania
Upon unpacking, verify that all components are present and undamaged. If any parts are missing or damaged, contact customer support immediately.
- Geemax Electric Tricycle (partially assembled)
- Akumulator litowy 36 V 13 Ah
- Ładowarka baterii
- Tylny kosz do przechowywania
- Narzędzia montażowe
- Instrukcja obsługi
4. Identyfikacja komponentów
Familiarize yourself with the various parts of your Geemax Electric Tricycle using the diagram below.
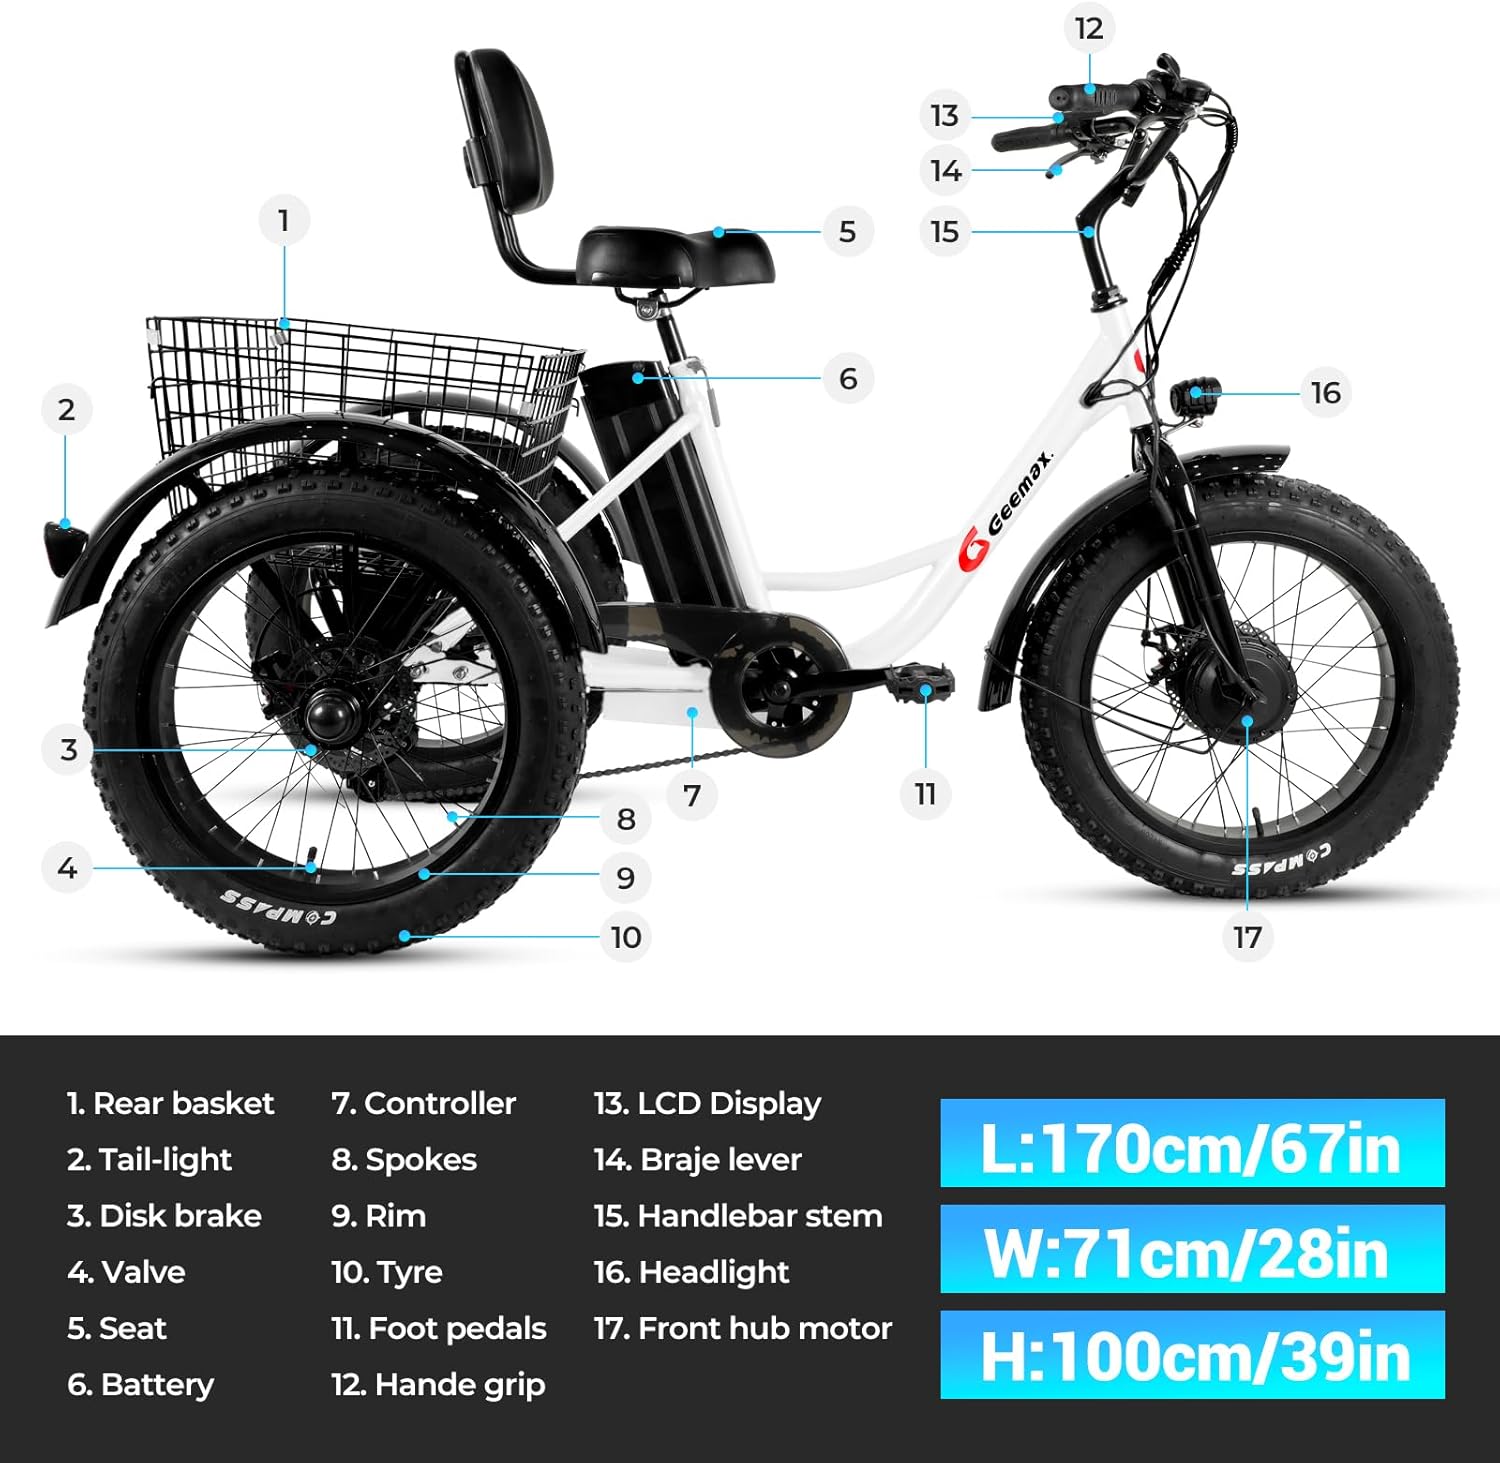
Figure 4.1: Tricycle Component Diagram
This image displays a detailed diagram of the Geemax Electric Tricycle, highlighting its key components with numbered labels for easy identification. The diagram includes the rear basket, tail-light, disk brake, valve, seat, battery, controller, spokes, rim, tire, foot pedals, handle grip, LCD display, brake lever, handlebar stem, headlight, and front hub motor. Dimensions are also provided: Length 170cm/67in, Width 71cm/28in, Height 100cm/39in.
- Tylny kosz
- Światła tylne
- Hamulec tarczowy
- Zawór
- Siedziba
- Bateria
- Kontroler
- Szprychy
- Obrzeże
- Opona
- Pedały nożne
- Uchwyt uchwytu
- Wyświetlacz LCD
- Dźwignia hamulca
- Wspornik kierownicy
- Reflektor
- Silnik w piaście przedniej
5. Instalacja i montaż
The Geemax Electric Tricycle arrives approximately 50% assembled. Follow these steps for final assembly.
5.1 Rozpakowanie
- Ostrożnie wyjąć wszystkie elementy z opakowania.
- Umieść wszystkie części na czystej, płaskiej powierzchni.
- Verify all parts are present against the package contents list.
5.2 Montaż kierownicy
- Odkręć śruby na mostku kierownicy.
- Insert the handlebar into the stem, ensuring it is centered and aligned.
- Mocno dokręć śruby.
5.3 Seat and Backrest Adjustment
Adjust the seat height and backrest for optimal comfort and riding posture.

Figure 5.1: Adjustable Seat and Backrest
This image illustrates the adjustable mechanism for the tricycle's seat and backrest, allowing riders to customize their seating position for comfort and ergonomics.
- Loosen the quick-release lever or bolt for the seat post.
- Adjust the seat to a comfortable height where your feet can touch the ground.
- Securely tighten the quick-release lever or bolt.
- Adjust the backrest angle for lumbar support.
5.4 Rear Basket Attachment
Attach the rear basket to the designated mounting points on the tricycle frame.

Figure 5.2: Rear Storage Basket
This image shows the spacious rear basket of the tricycle, demonstrating its capacity by being filled with various groceries, highlighting its utility for carrying items.
- Align the basket with the mounting holes on the rear frame.
- Use the provided bolts and nuts to secure the basket firmly.
- Ensure the basket is stable and does not wobble.
5.5 Headlight and Taillight Installation
Install the headlight and taillight for improved visibility and safety.

Figure 5.3: Front Headlight
This image focuses on the tricycle's bright LED headlight, demonstrating its illumination capability for nighttime riding or low-light conditions.
- Mount the headlight to the front of the tricycle, typically on the handlebars or front fork.
- Mount the taillight to the rear of the tricycle, usually on the rear fender or basket.
- Connect the lights to the tricycle's electrical system as per the wiring instructions (refer to detailed wiring diagram if provided separately).
5.6 Kontrole końcowe
- Sprawdź, czy wszystkie śruby i elementy mocujące są dokręcone.
- Sprawdź ciśnienie w oponach.
- Test brake functionality.
- Sprawdź, czy akumulator jest całkowicie naładowany i prawidłowo zainstalowany.
6. Informacje o baterii
The Geemax Electric Tricycle is powered by a 36V 13Ah Lithium Battery, UL Certified for safety.

Figure 6.1: 36V 13Ah Lithium Battery
This image displays the 36V 13Ah lithium battery pack, highlighting its internal cell structure and UL certification, indicating its safety and quality standards. The battery provides an electric range of 28-35 miles and an assist range of 35-45 miles.
6.1 Ładowanie akumulatora
- Podłącz ładowarkę do standardowego gniazdka ściennego.
- Podłącz wyjście ładowarki do portu ładowania akumulatora.
- Kontrolka na ładowarce pokazuje stan ładowania (np. czerwona oznacza ładowanie, zielona oznacza pełne naładowanie).
- Nie przeładowuj akumulatora. Odłącz ładowarkę po zakończeniu ładowania.
- Charging time typically ranges from 4-6 hours for a full charge.
6.2 Montaż i demontaż baterii
- To install: Slide the battery into its designated slot on the tricycle frame until it clicks securely into place. Ensure the battery is locked to prevent theft.
- To remove: Unlock the battery with the provided key, then slide it out of the frame.
7. Instrukcja obsługi
7.1 Włączanie/wyłączanie
- To power on: Press and hold the power button on the LCD display.
- To power off: Press and hold the power button again.
7.2 Funkcje wyświetlacza LCD
Wyświetlacz LCD na bieżąco dostarcza informacji o przebiegu jazdy.

Rysunek 7.1: Interfejs wyświetlacza LCD
This image shows the multi-function LCD display (S866 model) mounted on the handlebars. It clearly indicates current speed, battery level, distance covered, and the selected pedal assist level (0-5). The display also features power and mode buttons.
- Prędkość: Wyświetla aktualną prędkość jazdy.
- Poziom naładowania baterii: Wskazuje pozostały poziom naładowania baterii.
- Dystans: Pokazuje przebytą odległość lub całkowity stan licznika kilometrów.
- Poziom wspomagania pedałowania: Displays the current assist level (0-5).
7.3 Riding Modes and Speed Assist
Your tricycle offers three riding modes and five levels of pedal assist.

Figure 7.2: Speed Assist Controls
This close-up image shows the LCD display and the control buttons (+, -, power) on the handlebar, used to adjust the pedal assist level from 1 to 5, and to power the system on or off.
- Electric Tricycle Mode (e-trike): Provides full motor power without pedaling.
- Assisted Tricycle Mode: The motor provides assistance as you pedal. Use the '+' and '-' buttons on the display to adjust the assist level from 1 (minimal assistance) to 5 (maximum assistance).
- Normal Tricycle Mode: The motor is off, and you pedal manually like a traditional tricycle.
7.4 Układ hamulcowy
The tricycle is equipped with disc brakes for reliable stopping power.

Figure 7.3: Disc Brake System
Na tym zdjęciu widać zbliżenie view of the disc brake system on the tricycle's wheel, showing the rotor and caliper mechanism, which ensures effective and responsive braking.
- Squeeze the brake levers on the handlebars to engage the brakes.
- Apply both front and rear brakes simultaneously for balanced stopping.
- Unikaj nagłego, mocnego hamowania, zwłaszcza przy dużej prędkości lub na śliskich nawierzchniach.
8. Konserwacja
Regularna konserwacja gwarantuje długowieczność i bezpieczną eksploatację Twojego trójkołowca.
8.1 Czyszczenie
- Wytrzyj ramkę reklamąamp szmatką. Unikaj używania myjek wysokociśnieniowych bezpośrednio na elementach elektrycznych.
- Clean the chain and lubricate it regularly.
8.2 Pielęgnacja opon
- Maintain recommended tire pressure (refer to tire sidewall for specifications).
- Przed każdą jazdą sprawdź stan opon pod kątem zużycia, przebić lub uszkodzeń.
- The 4-inch wide fat tires provide excellent traction across various terrains.
8.3 Kontrola hamulców
- Sprawdź stan klocków hamulcowych i w razie potrzeby wymień je.
- Sprawdź, czy klamki hamulcowe reagują prawidłowo i czy linki nie są przetarte.
8.4 Pielęgnacja baterii
- Gdy nie używasz baterii, przechowuj ją w chłodnym i suchym miejscu.
- Charge the battery at least once every two months, even if not used, to maintain its health.
- Unikaj częstego całkowitego rozładowywania akumulatora.
9. Rozwiązywanie Problemów
| Problem | Możliwa przyczyna | Rozwiązanie |
|---|---|---|
| Trójkołowiec nie włącza się | Akumulator nie jest naładowany lub jest nieprawidłowo zainstalowany; luźne połączenie elektryczne. | Ensure battery is fully charged and securely seated. Check all visible connections. |
| Silnik nie wspomaga | Pedal assist level set to 0; brake levers engaged; motor or controller issue. | Increase pedal assist level on LCD. Release brake levers. If problem persists, contact support. |
| Hamulce są słabe | Zużyte klocki hamulcowe; luźne linki hamulcowe; powietrze w układzie hydraulicznym (jeśli dotyczy). | Sprawdź i wymień klocki hamulcowe. Wyreguluj naciąg linki hamulcowej. W przypadku problemów z hamulcami hydraulicznymi skonsultuj się ze specjalistą. |
| Nietypowe dźwięki podczas jazdy | Loose components; dry chain; tire rubbing. | Check all fasteners. Lubricate chain. Inspect for tire rubbing against frame or fenders. |
10. Specyfikacje
Detailed technical specifications for the Geemax Electric Tricycle DDSLC002.

Figure 10.1: Rider Height and Load Capacity
This image illustrates the recommended rider height range of 5'2" to 6'4" and the maximum load capacity of 350 lbs for the Geemax Electric Tricycle. It also shows the adjustable seat height from 30.5 inches to 38.5 inches.

Figure 10.2: Tricycle Dimensions
This image provides the overall dimensions of the tricycle: Length 170cm (67in), Height 100cm (39in), and Width 71cm (28in). It also reiterates the recommended rider height and maximum load capacity.
| Funkcja | Specyfikacja |
|---|---|
| Nazwa modelu | DDSLC002 |
| Typ roweru | Trójkołowiec elektryczny |
| Przedział wiekowy | Dorosły |
| Silnik | 36V 350W Brushless High-Speed Motor |
| Bateria | 36V 13Ah Lithium Battery (UL Certified) |
| Maksymalna prędkość | Do 20 mil na godzinę (32 km/h) |
| Range (Assist Mode) | Do 40 mil (64 km) |
| Zasięg (tryb elektryczny) | Do 28 mil (45 km) |
| Opony | 20" x 4.0" Puncture-Resistant Fat Tires |
| Materiał ramy | Stal węglowa / Stal stopowa |
| Styl hamulca | Hamulce tarczowe |
| Typ zawieszenia | Sztywny |
| Liczba prędkości | 20 (implied by product data, likely referring to gear combinations or assist levels) |
| Funkcja specjalna | Wyświetlacz LCD |
| Zawarte komponenty | Koszyk |
| Maksymalna ładowność | 350 funta (158 kg) |
| Zalecany wzrost jeźdźca | 163 cm - 203 cm |
| UPC | 760762256946 |
11. Gwarancja i wsparcie
11.1 Informacje o gwarancji
The Geemax Electric Tricycle DDSLC002 comes with a One Year Warranty from the date of purchase. This warranty covers manufacturing defects in materials and workmanship. It does not cover damage due to misuse, accidents, normal wear and tear, or unauthorized modifications.
11.2 Obsługa klienta
For technical assistance, warranty claims, or replacement parts, please contact Geemax customer support. Refer to your purchase documentation for specific contact details or visit the official Geemax webstrona.