Wstęp
This manual provides detailed instructions for the safe and efficient operation of your GRAUGEAR NVMe SSD Clone Station and SATA to NVMe M.2 Cloner Bundle. Please read this manual thoroughly before use and retain it for future reference.
Produkt ponadview
Zawartość opakowania
The GRAUGEAR SSD bundle includes a multi-format SSD/HDD docking station and a dual-bay NVMe SSD duplicator. The package typically contains:
- GRAUGEAR M.2 NVMe & SATA SSD/HDD Docking Station
- GRAUGEAR Dual-Bay NVMe SSD Cloner
- Kabel USB-C do USB-C
- Kabel USB-C do USB-A
- Power Adapter (for docking station)
- Power Adapter (for cloner)
Główne cechy
- Versatile Storage Management: Supports M.2 NVMe SSDs, SATA 2.5" and 3.5" SSDs/HDDs.
- Szybki transfer danych: Up to 10Gbps for the docking station (USB-C) and 20Gbps for the NVMe cloner (USB 3.2 Gen2x2).
- Klonowanie offline: Direct drive-to-drive cloning without a computer.
- Instalacja bez użycia narzędzi: Easy setup for drives.
- Zintegrowane chłodzenie: Built-in cooling fan to prevent overheating during operation.

Image: The GRAUGEAR NVMe SSD Clone Station and SATA Docking Station, shown with included USB-C cables and power adapters.

Image: The GRAUGEAR USB 3.2 Gen2x2 Clone Station designed for two M.2 NVMe SSDs, highlighting its 20Gbps speed and one-key offline clone feature.
Setup and Drive Installation
Docking Station (M.2 NVMe & SATA)
- Connect the provided power adapter to the DC 12V input port on the docking station and plug it into a power outlet.
- If connecting to a computer, use the USB-C cable to connect the docking station's USB-C port to your computer.
- W przypadku dysku SSD M.2 NVMe: Gently insert the M.2 NVMe SSD into the designated M.2 NVMe slot. Secure it with the provided SSD fastener if necessary.
- For SATA 2.5"/3.5" SSD/HDD: Insert the SATA drive into the 2.5"/3.5" SATA slot until it is firmly seated.
- Włącz zasilanie.
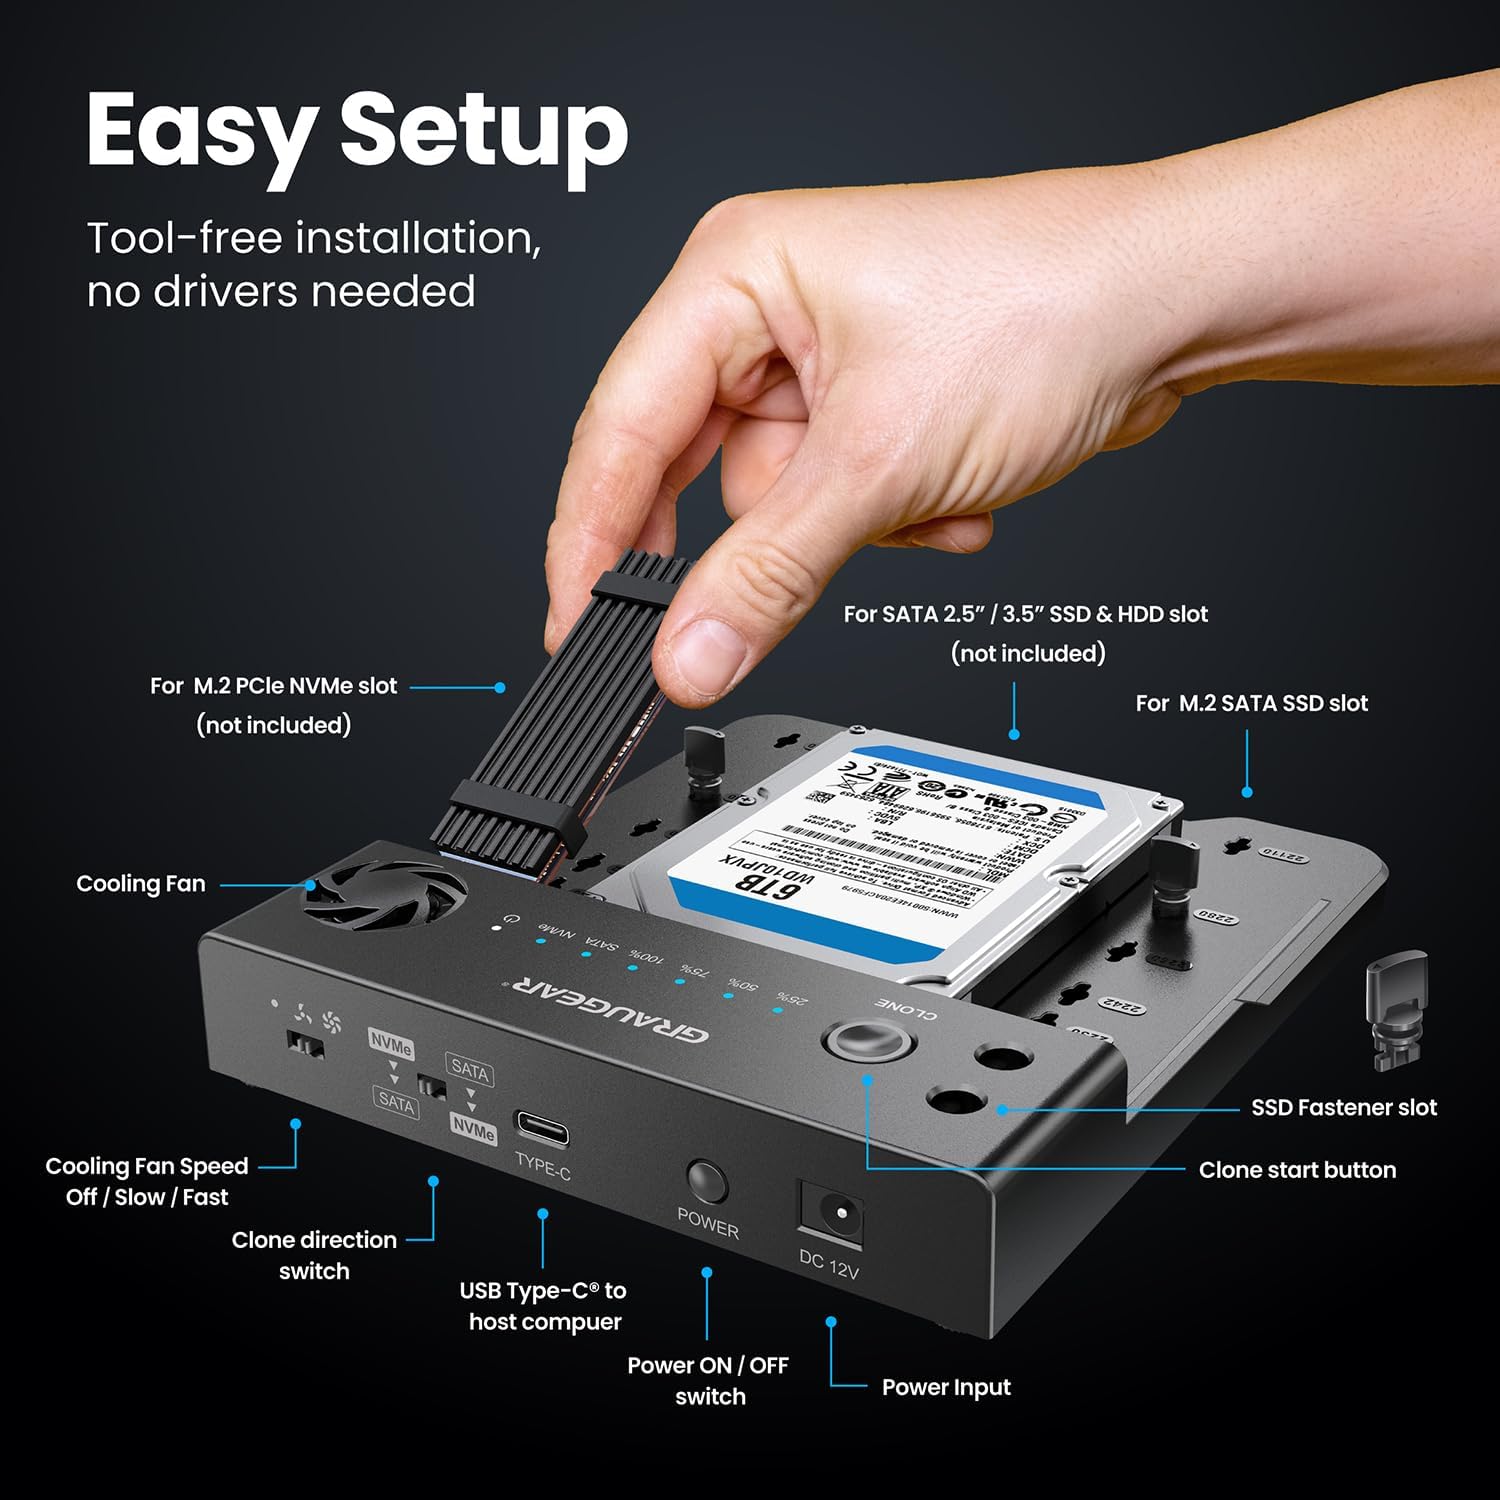
Image: A hand demonstrating the tool-free installation of an M.2 NVMe SSD and a 3.5-inch SATA HDD into the GRAUGEAR docking station.

Image: The GRAUGEAR docking station illustrating its versatility by connecting simultaneously with M.2 NVMe and M.2 SATA, M.2 NVMe and 2.5" HDD/SSD, or M.2 NVMe and 3.5" HDD.
NVMe Cloner (Dual-Bay M.2 NVMe)
- Connect the provided 5V/2A power adapter to the NVMe cloner and plug it into a power outlet.
- W przypadku dysków SSD M.2 NVMe: Insert the source M.2 NVMe SSD into the "SOURCE" slot and the target M.2 NVMe SSD into the "TARGET" slot. Ensure they are fully seated.

Image: The GRAUGEAR NVMe Cloner with two M.2 NVMe SSDs inserted into the source and target slots, ready for cloning.
Instrukcja obsługi
Connecting to a Computer (Docking Station Mode)
Once drives are installed and the docking station is powered on, connect it to your computer using the USB-C cable. The drives will appear as external storage devices. No drivers are typically required for Windows, macOS, or Linux operating systems.

Image: The GRAUGEAR docking station connected to a laptop, illustrating high-speed data transmission up to 10Gbps for NVMe and 6Gbps for SATA.
Offline Cloning (Docking Station)
The docking station supports offline cloning between M.2 NVMe and SATA drives. Ensure the docking station is NIE podłączony do komputera podczas klonowania offline.
- Insert the source drive (e.g., M.2 NVMe) into its respective slot and the target drive (e.g., SATA HDD/SSD) into its slot. The target drive must be equal to or larger in capacity than the source drive.
- Use the "Clone Direction Switch" to select the desired cloning direction (e.g., NVMe to SATA or SATA to NVMe).
- Press and hold the "Clone Start Button" for approximately 3-5 seconds until the cloning progress indicators light up.
- Release the button. Press it again briefly to confirm and start the cloning process.
- The progress indicators (25%, 50%, 75%, 100%) will illuminate sequentially as cloning progresses.
- Once all indicators are solid, the cloning process is complete.

Image: Diagram showing the clone direction switch on the GRAUGEAR docking station and various cloning scenarios between NVMe and SATA drives, including NVMe to 3.5" HDD, NVMe to 2.5" HDD/SSD, NVMe to M.2 SATA, and the reverse directions.
Offline Cloning (NVMe Cloner)
The NVMe cloner supports offline cloning between two M.2 NVMe SSDs. Ensure the cloner is NIE podłączony do komputera podczas klonowania offline.
- Insert the source M.2 NVMe SSD into the "SOURCE" slot and the target M.2 NVMe SSD into the "TARGET" slot. The target drive must be equal to or larger in capacity than the source drive.
- Press and hold the "Clone" button for approximately 3-5 seconds until the cloning progress indicators light up.
- Release the button. Press it again briefly to confirm and start the cloning process.
- The progress indicators (25%, 50%, 75%, 100%) will illuminate sequentially as cloning progresses.
- Once all indicators are solid, the cloning process is complete.

Image: The GRAUGEAR NVMe Cloner with source and target M.2 NVMe SSDs, illustrating the one-key offline cloning process, power adapter connection, and cloning speed up to 10Gbps.
Działanie wentylatora chłodzącego
Both the docking station and the NVMe cloner feature built-in cooling fans to maintain optimal operating temperatures for your SSDs.
- The docking station has a fan speed control switch (Off / Slow / Fast). Adjust as needed based on drive temperature and workload.
- The NVMe cloner's fan operates automatically to dissipate heat during cloning or data transfer.

Image: An illustration of the GRAUGEAR NVMe Cloner's built-in cooling fan, showing airflow and three-speed adjustment options (Power Off, Low Speed, High Speed) to prevent overheating.
Konserwacja
- Utrzymuj urządzenia w czystości i zapobiegaj ich zakurzaniu. Do czyszczenia używaj miękkiej, suchej ściereczki.
- Ensure proper ventilation around the devices, especially during prolonged operation or cloning tasks.
- Unikaj wystawiania urządzeń na działanie ekstremalnych temperatur, wilgoci lub bezpośredniego światła słonecznego.
- When not in use, store the devices in a cool, dry place.
Always handle SSDs and HDDs with care to prevent damage to the connectors or internal components.
Rozwiązywanie problemów
- Urządzenie nie jest rozpoznawane przez komputer:
- Ensure all cables are securely connected (USB-C and power).
- Wypróbuj inny port USB na swoim komputerze.
- Verify the drive is properly seated in its slot.
- Check if the drive is initialized and formatted in your computer's Disk Management (Windows) or Disk Utility (macOS).
- Klonowanie kończy się niepowodzeniem lub nie rozpoczyna się:
- Upewnij się, że pojemność dysku docelowego jest równa lub większa od pojemności dysku źródłowego.
- Verify both drives are properly seated.
- Upewnij się, że urządzenie jest NIE podłączony do komputera podczas klonowania offline.
- Press and hold the clone button for the specified duration (3-5 seconds) and then press again briefly to confirm.
- Sprawdź podłączenie zasilania.
- Niska prędkość transferu:
- Ensure you are using a USB 3.2 Gen2x2 compatible port and cable for the NVMe cloner to achieve 20Gbps speeds.
- For the docking station, ensure you are using a USB 3.1 Gen2 compatible port and cable for 10Gbps speeds.
- The actual speed may vary depending on the SSD model, device version, and SSD capacity.
- Przegrzanie:
- Ensure the cooling fan is operating (for docking station, check fan speed switch).
- Provide adequate ventilation around the device.
- Avoid placing the device on soft surfaces that might block airflow.
If issues persist, please contact GRAUGEAR customer support.
Specyfikacje
| Funkcja | Opis |
|---|---|
| Nazwa produktu | GRAUGEAR NVMe SSD Clone Station & SATA to NVMe M.2 Cloner Bundle |
| Model | (No specific model number provided, refers to the bundle) |
| Interface (Docking Station) | USB-C (USB 3.1 Gen2), 10Gbps |
| Interface (NVMe Cloner) | USB-C (USB 3.2 Gen2x2), 20Gbps |
| Drive Compatibility (Docking Station) | M.2 NVMe SSDs, SATA 2.5"/3.5" SSDs/HDDs |
| Drive Compatibility (NVMe Cloner) | M.2 NVMe SSDs |
| Funkcja klonowania | Offline One-Key Clone (NVMe to NVMe, SATA to NVMe, NVMe to SATA) |
| Chłodzenie | Built-in Cooling Fan with speed adjustment (docking station) |
| Zasilacz | External Power Adapter (12V for docking station, 5V/2A for cloner) |
| Zgodność z systemem operacyjnym | Windows, macOS, Linux, PlayStation, Xbox, Smart TV, Router (for data access) |
Uwaga: Dane techniczne mogą ulec zmianie bez wcześniejszego powiadomienia.
Gwarancja i wsparcie
GRAUGEAR products come with a standard manufacturer's warranty. For specific warranty terms and conditions, please refer to the warranty card included with your product or visit the official GRAUGEAR webstrona.
For technical support, troubleshooting assistance, or any inquiries regarding your GRAUGEAR NVMe SSD Clone Station & SATA to NVMe M.2 Cloner Bundle, please contact GRAUGEAR customer support through their official webstronę internetową lub dane kontaktowe znajdujące się na opakowaniu produktu.
GRAUGEAR Official Webstrona: www.graugear.de (or refer to regional webteren)


