
1. Wprowadzenie
The Skyking WORKZONE 36TRMS Digital Clamp Meter is a portable, stable, and versatile instrument designed for accurate electrical measurements. Featuring a 6000-count LCD display, auto-ranging capabilities, and overload protection, this meter is suitable for a wide range of applications, from home electrical needs to professional use. It can measure AC/DC Voltage, AC/DC Current, Resistance, Capacitance, Frequency, Duty Cycle, Temperature, and includes Non-Contact AC Voltage (NCV) detection, diode, and continuity test functions.
2. Informacje dotyczące bezpieczeństwa
Zawsze przestrzegaj zasad bezpieczeństwa podczas korzystania z urządzeń pomiarowych. Nieprzestrzeganie ich może spowodować porażenie prądem, obrażenia ciała lub uszkodzenie miernika lub testowanego urządzenia.
- Przed użyciem należy upewnić się, że miernik jest w dobrym stanie technicznym.
- Nie należy przekraczać maksymalnych wartości wejściowych w żadnym zakresie.
- Use appropriate personal protective equipment (PPE), such as safety glasses and insulated gloves.
- Disconnect power to the circuit before making resistance, capacitance, or continuity measurements.
- Be cautious when working with live circuits. Avoid contact with bare conductors.
- Nie używaj miernika, jeśli wygląda na uszkodzony lub jeśli pokrywa baterii nie jest prawidłowo zamknięta.
3. Zawartość opakowania
Sprawdź, czy w opakowaniu znajdują się wszystkie elementy:
- WORKZONE 36TRMS Digital Clamp Metr
- Przewody pomiarowe (czerwony i czarny)
- Sonda temperatury
- Baterie AAA (wstępnie zainstalowane lub osobno)
- Instrukcja obsługi (ten dokument)

This image displays the Skyking WORKZONE 36TRMS Digital Clamp Meter along with its included test leads (red and black) and a white temperature probe. The clamp meter itself is red and black, showing the rotary dial, LCD screen, and input jacks.
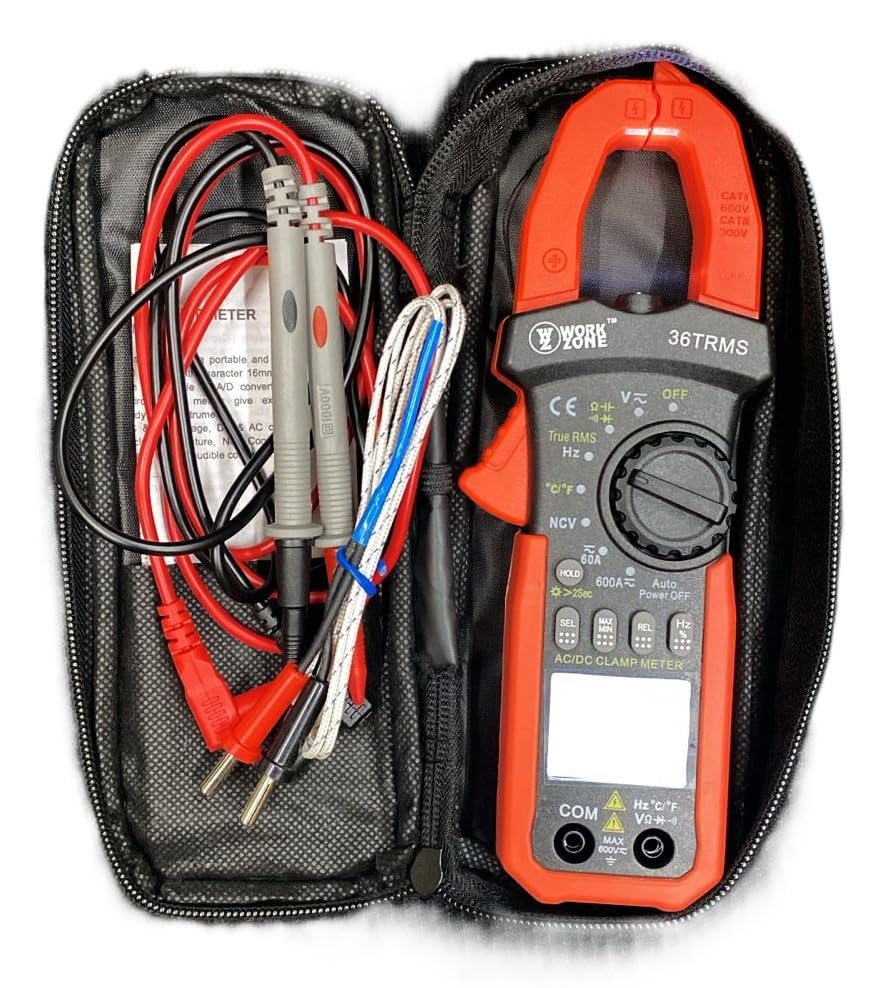
The Skyking WORKZONE 36TRMS Digital Clamp Meter, test leads, and temperature probe neatly organized within a black zippered carrying case. This illustrates how the product and its accessories are stored and transported.
4. Koniec produktuview
The WORKZONE 36TRMS Digital Clamp Meter offers a range of features for comprehensive electrical testing:
- 6000 counts digit LCD monitor with 16mm character height.
- Auto-range and auto power-off function (after 15 minutes of inactivity).
- Clamp opening size: 26mm for non-invasive current measurement.
- Pomiary DC Voltage (600mV~600V) and AC Voltage (6V~600V).
- Measures DC Current (60A~600A) and AC Current (True RMS) (60A~600A).
- Measures Resistance (600Ω~60MΩ) and Capacitance (6nF~60mF).
- Measures Frequency (9.999Hz~9.999MHz) and Duty Cycle (0.1%~99.9%).
- Temperature measurement: -20~1000°C / -4~1832°F.
- Bezkontaktowa objętość ACtage (NCV) detection for safety.
- Diode and audible continuity test functions.
- Funkcja zatrzymania danych umożliwiająca zamrożenie odczytów.
- Backlight for easy reading in dark environments.
- Relative measurement (REL) function for zeroing readings.

A detailed close-up of the Skyking WORKZONE 36TRMS Digital Clamp Meter. The image highlights the rotary switch with various measurement functions, the LCD display showing '0.000', function buttons (HOLD, SEL, MAX/MIN, REL, Hz), and the input jacks at the bottom.
5. Konfiguracja
5.1 Instalacja baterii
- The meter requires 2x 1.5V 'AAA' batteries.
- Znajdź pokrywę komory baterii znajdującą się z tyłu miernika.
- Open the cover, insert the batteries observing correct polarity (+ and - markings).
- Dokładnie zamknij pokrywę komory baterii.
5.2 Włączanie/wyłączanie zasilania
- To power on the meter, rotate the rotary switch from the 'OFF' position to any desired measurement function.
- To power off, rotate the switch back to the 'OFF' position.
- The meter features an auto power-off function after approximately 15 minutes of inactivity to conserve battery life.
5.3 Podłączenie przewodu pomiarowego
- Dla voltage, resistance, capacitance, frequency, duty cycle, diode, and continuity measurements, insert the red test lead into the 'VΩHz°C' input jack.
- Insert the black test lead into the 'COM' input jack.
- Ensure test leads are fully inserted and securely connected.
6. Instrukcja obsługi
6.1 DC/AC objtage Pomiar
- Rotate the rotary switch to 'V~' for AC Voltage or 'V-' for DC Voltage.
- Podłącz przewody pomiarowe równolegle do obwodu lub elementu poddawanego testowi.
- Przeczytaj tomtage wartość na wyświetlaczu LCD.
6.2 Pomiar prądu przemiennego/stałego (Clamp Szczęka)
- Rotate the rotary switch to '60A~' or '600A~' for AC Current, or '60A-' or '600A-' for DC Current.
- Naciśnij klawiszamp trigger to open the jaws and clamp around a single conductor. Ensure the conductor is centered within the jaws.
- Odczytaj aktualną wartość na wyświetlaczu LCD.
6.3 Pomiar rezystancji
- Rotate the rotary switch to 'Ω'.
- Przed pomiarem należy upewnić się, że obwód lub element jest odłączony od napięcia.
- Podłącz przewody pomiarowe do mierzonego elementu.
- Odczytaj wartość rezystancji na wyświetlaczu LCD.
6.4 Pomiar pojemności
- Rotate the rotary switch to 'F'.
- Aby zapobiec uszkodzeniu miernika, przed rozpoczęciem testu należy upewnić się, że kondensator jest całkowicie rozładowany.
- Podłącz przewody pomiarowe do zacisków kondensatora.
- Odczytaj wartość pojemności na wyświetlaczu LCD.
6.5 Pomiar częstotliwości/współczynnika wypełnienia
- Rotate the rotary switch to 'Hz'.
- Podłącz przewody pomiarowe do źródła sygnału.
- Press the 'Hz' button to toggle between Frequency (Hz) and Duty Cycle (%) display.
6.6 Pomiar temperatury
- Rotate the rotary switch to '°C/°F'.
- Connect the temperature probe to the input jacks.
- Place the probe tip on the object whose temperature is to be measured.
- Press the '°C/°F' button to switch between Celsius and Fahrenheit units.
6.7 Test diody
- Rotate the rotary switch to 'Diode/Continuity'.
- Podłącz czerwony przewód pomiarowy do anody, a czarny przewód pomiarowy do katody diody.
- Na wyświetlaczu pojawi się wartość głośności do przodutage drop. Reverse the leads; the display should show 'OL' for an open circuit.
6.8 Test ciągłości
- Rotate the rotary switch to 'Diode/Continuity'.
- Podłącz przewody pomiarowe do obwodu lub elementu.
- An audible buzzer will sound if continuity is detected (typically resistance below approximately 50Ω).
6.9 Bezdotykowy obj. ACtage (NCV) Wykrywanie
- Rotate the rotary switch to 'NCV'.
- Bring the NCV sensor (located at the top of the clamp meter) close to an AC voltagŹródło.
- The meter will emit an audible beep and the NCV indicator light will flash if AC voltage zostało wykryte.
6.10 Funkcja zatrzymania danych
- Press the 'HOLD' button to freeze the current reading on the display. Press again to release the hold.
- Long press the 'HOLD' button to activate the backlight for improved visibility in low-light conditions.
6.11 Relative Measurement (REL)
- In a measurement mode, press the 'REL' button to zero the current reading. Subsequent measurements will be displayed relative to this zero point.
- Press the 'REL' button again to exit relative mode.
7. Konserwacja
7.1 Czyszczenie
- Wytrzyj licznik casing z miękkim, damp płótno.
- Do not use abrasive cleaners, solvents, or harsh chemicals, as these may damage the casing lub wyświetlacz.
7.2 Wymiana baterii
- When the low battery indicator appears on the LCD, replace the batteries promptly to ensure accurate readings.
- Postępuj zgodnie z instrukcjami instalacji baterii podanymi w rozdziale 5.1.
- Zużyte baterie należy utylizować zgodnie z lokalnymi przepisami.
7.3 Przechowywanie
- Jeśli miernik nie będzie używany przez dłuższy czas, należy go przechowywać w chłodnym i suchym miejscu.
- Unikaj bezpośredniego światła słonecznego, ekstremalnych temperatur i wysokiej wilgotności.
- It is recommended to remove batteries if storing for a very long time to prevent leakage.
8. Rozwiązywanie Problemów
- Brak wyświetlacza lub wyświetlacz słabo widoczny: Check battery installation. If the low battery indicator is on, replace the batteries.
- Nieprawidłowe odczyty: Ensure the correct function is selected for the measurement. Verify test lead connections are secure and in the correct input jacks. For resistance or capacitance, ensure the circuit is de-energized. For current, ensure only a single conductor is clamped within the jaws.
- Wyświetlacz „OL”: This indicates an over-range condition or an open circuit. If measuring resistance, it means the resistance is too high or the circuit is open. If measuring voltage or current, the value exceeds the selected range; switch to a higher range if available.
- Brak sygnału dźwiękowego ciągłości: The resistance of the circuit or component is too high, or there is an open circuit.
9. Specyfikacje
| Parametr | Wartość |
|---|---|
| Marka | Skyking |
| Numer modelu | Workzone 36 TRMS |
| Typ pomiaru | Cyfrowy Clamp Metr |
| Wyświetlacz | 6000 counts digit LCD |
| Clamp Rozmiar otworu | 26mm |
| Objętość DCtage Zakres | 600 mV ~ 600 V |
| AC Objętośćtage Zakres | 6V ~ 600V |
| Zakres prądu stałego | 60A ~ 600A |
| AC Current Range (True RMS) | 60A ~ 600A |
| Zakres oporu | 600 Ω ~ 60 MΩ |
| Zakres pojemności | 6 nF ~ 60 mF |
| Zakres częstotliwości | 9.999 Hz ~ 9.999 MHz |
| Cykl pracy | 0.1% ~ 99.9% |
| Zakres temperatur | -20°C ~ 1000°C / -4°F ~ 1832°F |
| Wskazanie przekroczenia zakresu | "OL" |
| Wskaźnik ujemnej polaryzacji | Automatic "-" display |
| Wskaźnik niskiego poziomu naładowania baterii | Tak |
| Automatyczne wyłączanie zasilania | Około 15 minut |
| Zasilacz | 2 x 1.5V "AAA" batteries |
| Temperatura pracy | 0°C ~ 40°C (relative humidity <85%) |
| Temperatura przechowywania | -10°C ~ 50°C (relative humidity <85%) |
| Guaranteed Precision Temp. | 23±5°C (relative humidity <70%) |
| Wymiary (wys. x szer. x gł.) | Wymiary: 207 x 75 x 37 mm |
| Waga | Około. 280g (w tym bateria) |
| Ocena bezpieczeństwa | CAT II 600V or CAT III 300V |
10. Gwarancja i pomoc techniczna
For warranty information or technical support regarding your Skyking WORKZONE 36TRMS Digital Clamp Meter, please contact Skyking Instruments directly. Refer to your purchase documentation or the manufacturer's official website for specific warranty terms, conditions, and contact details.