1. Wprowadzenie
This manual provides essential instructions for the safe assembly, operation, and maintenance of your Generic 1200LBS Multi-Function Power Rack. Please read this manual thoroughly before assembly and use to ensure proper function and user safety. Retain this manual for future reference.
Ważne informacje dotyczące bezpieczeństwa
- Zawsze skonsultuj się z lekarzem przed rozpoczęciem nowego programu ćwiczeń.
- Przed każdym użyciem należy upewnić się, że wszystkie śruby i nakrętki są mocno dokręcone.
- Do not exceed the maximum weight capacities specified for the rack and its components.
- Use spotters when lifting heavy weights, especially during squats and bench presses.
- Podczas użytkowania trzymaj dzieci i zwierzęta z dala od urządzenia.
- Inspect the power rack for any signs of wear or damage before each workout. Do not use if damaged.
- Place the power rack on a flat, stable surface.
2. Koniec produktuview i komponenty
The Generic 1200LBS Multi-Function Power Rack is designed for a comprehensive home gym experience, supporting various strength training exercises. It features a robust alloy steel frame and adjustable components for versatile use.

Rysunek 2.1: Labeled diagram of the Power Rack components, including the wide & narrow pull-up bar, barbell rack, 1.8mm steel tube, safety bar, and non-slip base.
Główne cechy:
- Jakość komercyjna: Constructed from 1.8mm high-density alloy steel tubing with a 2"x2" square frame.
- Wysoka waga: Supports up to 1200 lbs for the main frame and 800 lbs for J-hooks.
- Wszechstronna adaptowalność: Features 14 clearly marked adjustable holes for J-hooks and safety bars.
- Zapewnienie bezpieczeństwa: Equipped with large non-slip bases, scratch-resistant J-hooks, and quick-positioning barbell supports.
- Konstrukcja oszczędzająca miejsce: Compact footprint of 14.0 square feet.
- Integrated Pull-Up Bar: Wide and narrow grip options for varied exercises.

Rysunek 2.2: Image highlighting the commercial-grade construction, 1200 lbs weight capacity, 800 lbs J-hook capacity, and 1.88mm thick steel pipe.

Rysunek 2.3: Szczegółowy view of the wide & narrow pull-up bar, high-quality J-hook, barbell protection frame, 14 adjustable holes, and non-slip base.
3. Instalacja i montaż
Carefully unpack all components and verify against the parts list (not provided in this manual, refer to packaging). Assembly typically requires two people. Ensure you have adequate space and the necessary tools (e.g., wrenches) before beginning.

Rysunek 3.1: Visual guide for the four main installation steps of the power rack.
Kroki montażu:
- Krok 1: Montaż ramy podstawy
Connect the two base frames using the horizontal support bars. Ensure all connections are finger-tightened initially. - Step 2: Upright Post Installation
Attach the four vertical upright posts to the assembled base frames. Ensure the posts are oriented correctly with the adjustment holes facing inwards. - Step 3: Top Frame and Pull-Up Bar Attachment
Secure the top frame to the upright posts. Install the wide and narrow pull-up bar onto the top frame. - Step 4: Final Tightening and Accessory Installation
Once the main structure is assembled, fully tighten all bolts and nuts. Install the J-hooks and safety bars into the desired positions.
After assembly, gently shake the rack to ensure stability. If any movement is detected, re-check all connections and tighten as necessary.
4. Instrukcja obsługi
The Power Rack is designed to facilitate a variety of exercises. Always ensure proper form and safety precautions during your workouts.
Adjusting J-Hooks and Safety Bars:
The power rack features 14 adjustable holes, allowing for precise positioning of J-hooks and safety bars. The barbell safety collars can be manually adjusted without tools.
- To adjust, simply lift the J-hook or safety bar, align it with the desired hole, and insert the pin securely.
- Ensure both J-hooks or safety bars are set at the same height to prevent uneven loading.
- For squats, position the J-hooks at a height that allows you to unrack the barbell comfortably. Set the safety bars just below your lowest squat depth.
- For bench press, position the J-hooks at a height that allows you to unrack the barbell with a slight elbow bend. Set the safety bars just above your chest at the bottom of the movement.

Rysunek 4.1: Illustration of the 14-speed adjustable holes for the barbell protection frame, allowing for flexible height adjustments.

Rysunek 4.2: Demonstrates the use of J-hooks for easy barbell placement and barbell protection racks for safety during squats.
Supported Exercises:
The power rack supports a variety of exercises, including but not limited to:
- Przysiady: Utilize the J-hooks and safety bars for barbell squats.
- Wyciskanie na ławce: Combine with a weight bench (not included) and use J-hooks and safety bars.
- Podciąganie: Use the integrated wide and narrow grip pull-up bar.
- Prasa górna: Perform standing overhead presses within the rack.
- Rack Pulls: Adjust safety bars to desired height for partial deadlifts.

Rysunek 4.3: Wykład wizualnyamples of exercises that can be performed with the power cage, including bench press, deep squats, and pull-ups.
5. Konserwacja
Regularna konserwacja gwarantuje długowieczność i bezpieczną pracę stojaka zasilającego.
- Codziennie: Wytrzyj ramę czystą, damp Po każdym użyciu przetrzyj ściereczką pot i kurz.
- Tygodnik: Inspect all bolts, nuts, and connection points. Tighten any that appear loose.
- Miesięczny: Perform a thorough inspection of the entire frame for any signs of rust, cracks, or structural damage. Pay close attention to welding points and areas of high stress.
- Czyszczenie: Use mild soap and water for cleaning. Avoid abrasive cleaners or solvents that could damage the finish.
- Składowanie: W przypadku dłuższego przechowywania upewnij się, że stojak jest czysty i suchy. Przechowuj w klimatyzowanym pomieszczeniu, aby zapobiec rdzewieniu.
6. Rozwiązywanie Problemów
| Problem | Możliwa przyczyna | Rozwiązanie |
|---|---|---|
| Stojak wydaje się niestabilny lub chwiejny. | Luźne śruby lub nierówna powierzchnia podłogi. | Upewnij się, że wszystkie śruby montażowe są całkowicie dokręcone. Przenieś stojak na płaską, równą powierzchnię. |
| Difficulty adjusting J-hooks/safety bars. | Pin not fully aligned or obstruction in the hole. | Ensure the pin is perfectly aligned with the hole. Check for any debris inside the adjustment holes. |
| Piszczące odgłosy podczas użytkowania. | Loose connections or metal-on-metal friction. | Tighten all bolts. Apply a small amount of silicone lubricant to contact points if necessary (avoiding areas that contact skin or clothing). |
7. Specyfikacje
| Funkcja | Szczegół |
|---|---|
| Model | 1200LBS Multi-Function Power Rack |
| Marka | Ogólny |
| Tworzywo | Alloy Steel (1.8mm thick, 2"x2" square frame) |
| Waga przedmiotu | 105 funtów |
| Max Weight Capacity (Rack) | 1200 funtów |
| Max Weight Capacity (J-Hooks) | 800 funtów |
| Adjustable Holes | 14-biegowa regulacja |
| Ślad stopy | Około 14.0 stóp kwadratowych |
| Kolor | Czarny |
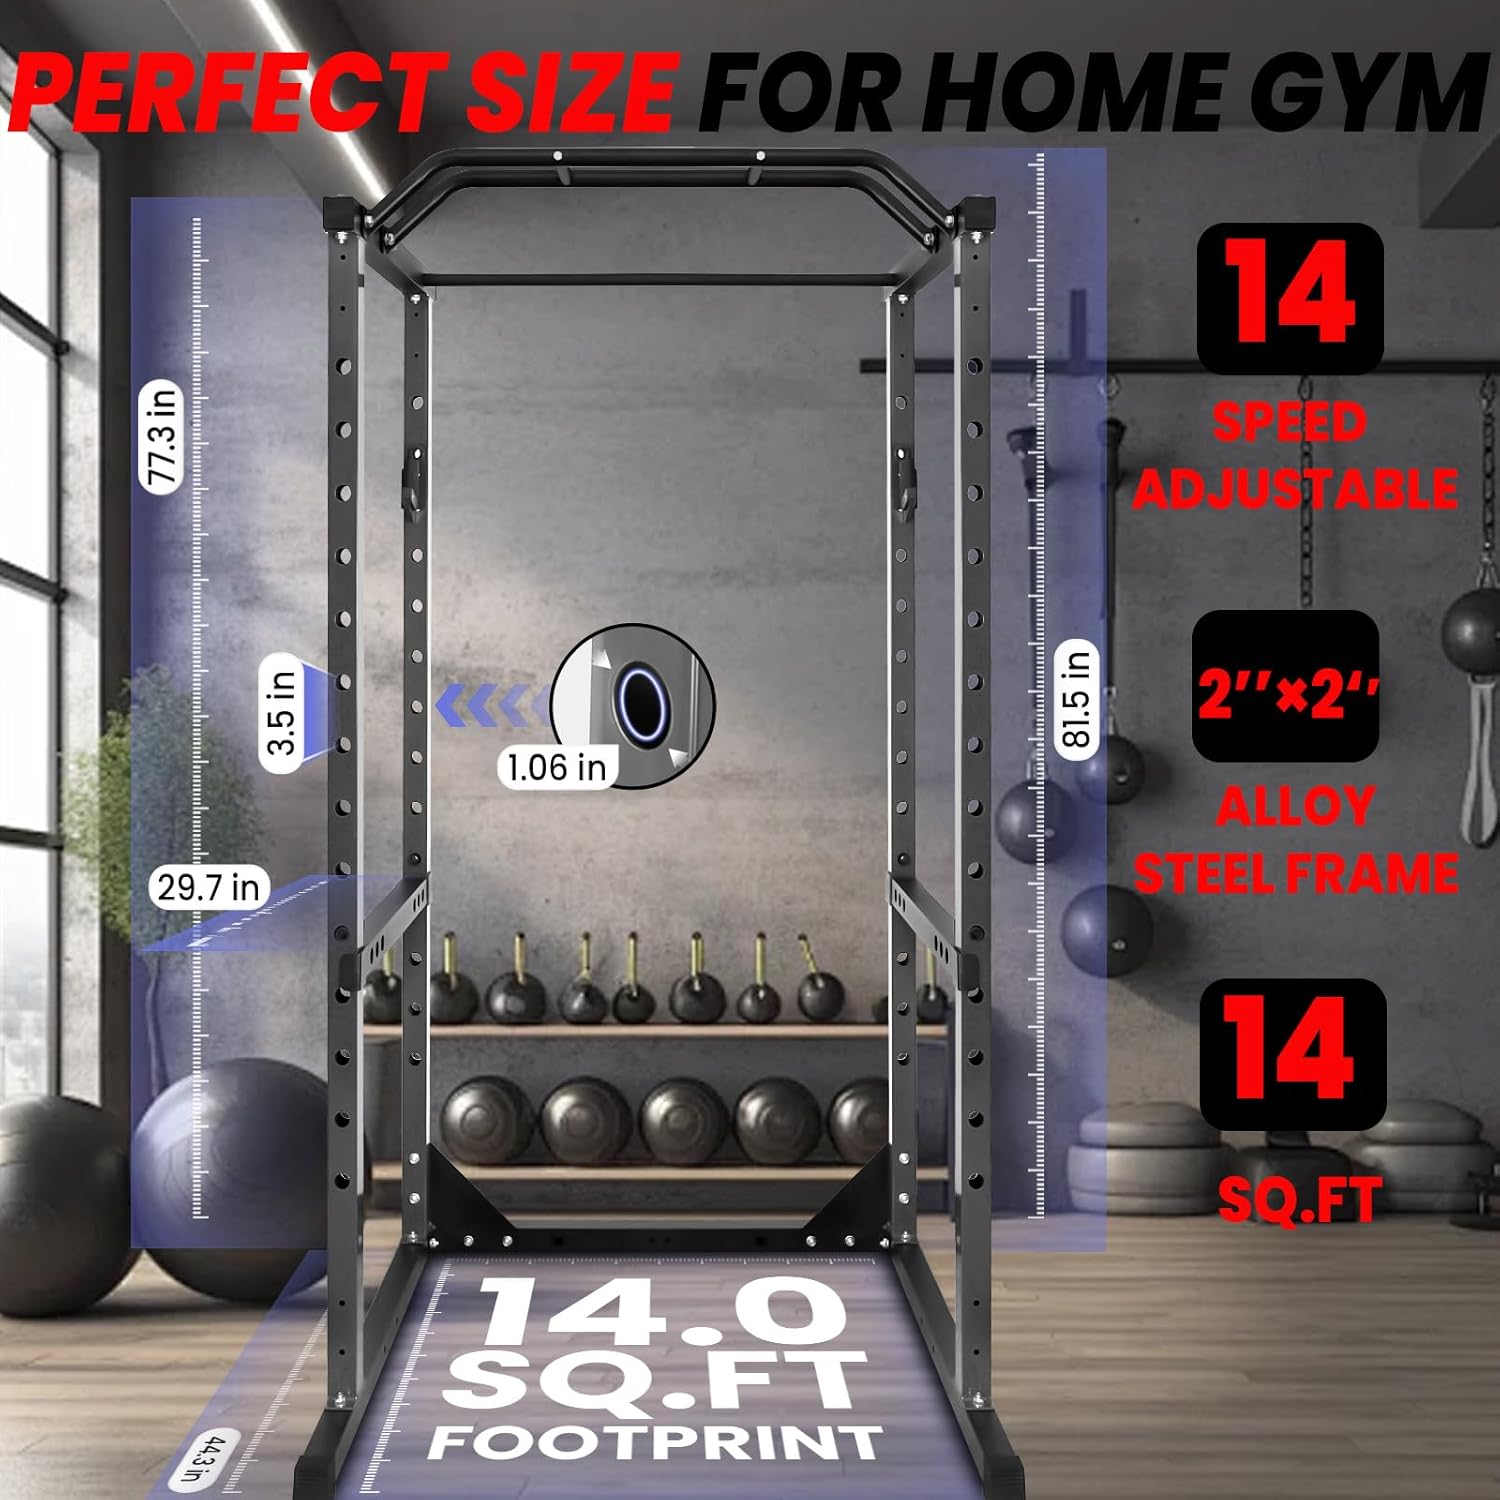
Rysunek 7.1: Diagram illustrating the dimensions and 14.0 sq. ft. footprint of the power rack, along with the 14-speed adjustability and 2"x2" alloy steel frame.
8. Gwarancja i wsparcie
Gwarancja: The manufacturer states that there is no warranty for this product. Please refer to your purchase documentation for any return or refund policies from the retailer.
Obsługa klienta: For any questions regarding assembly, operation, or missing parts, please contact the seller directly through the platform where the product was purchased. The manufacturer is HHJU.