1. Wprowadzenie
This manual provides detailed instructions for the safe and effective use of your GKTZ Kids Instant Print Camera P210. Designed for children aged 3-12, this digital camera allows for instant black and white photo printing and color digital storage. Please read this manual thoroughly before operating the camera and keep it for future reference.
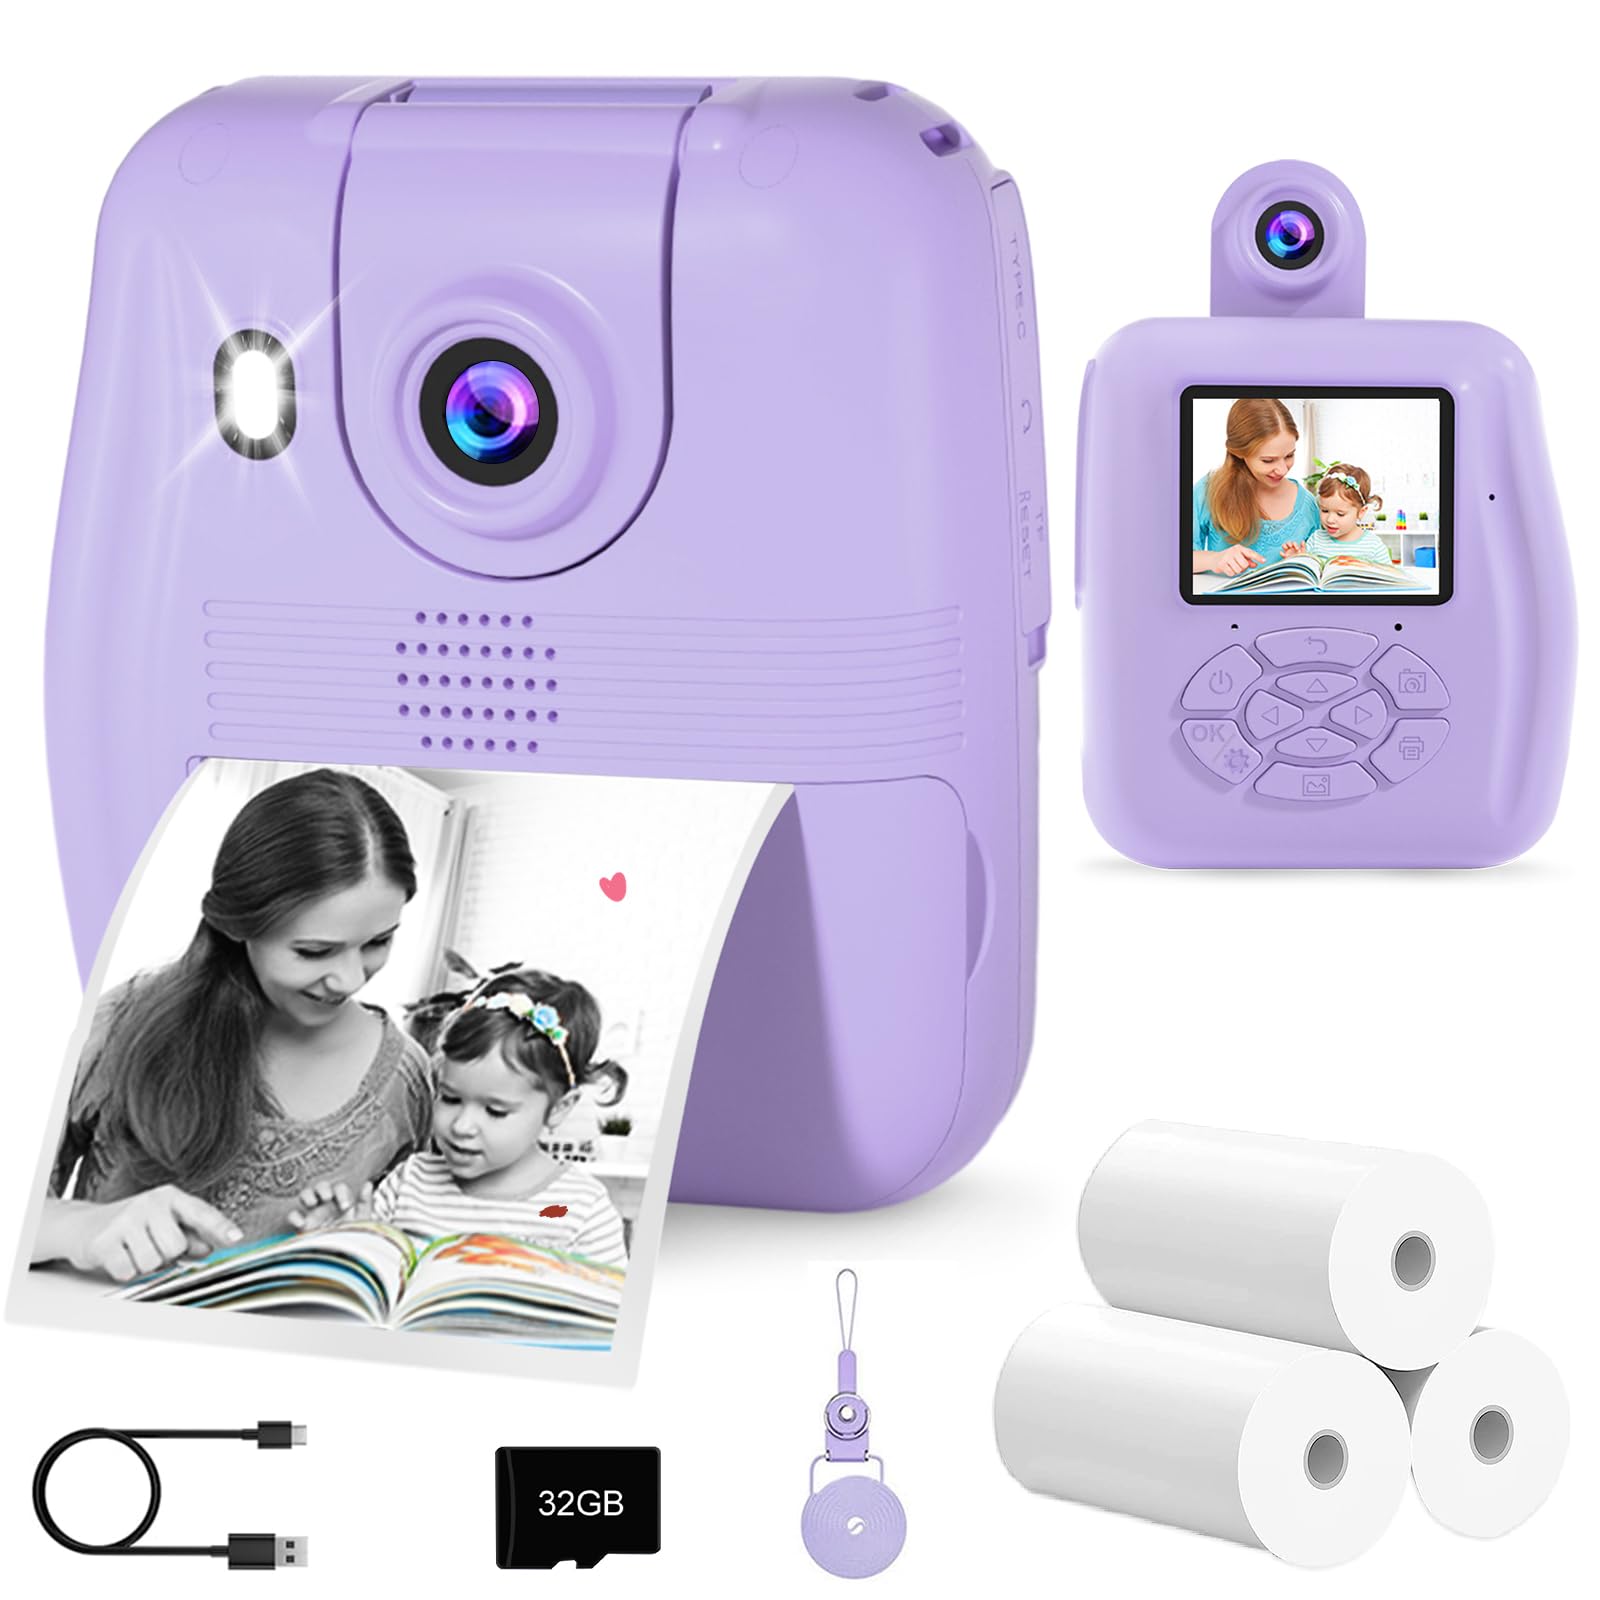
Image: The GKTZ Kids Instant Print Camera P210, a compact purple digital camera designed for children.
2. Zawartość opakowania
Sprawdź, czy w przesyłce znajdują się wszystkie elementy wymienione poniżej:
- 1 x GKTZ Kids Instant Print Camera P210
- 3 x Rolls of Photo Paper
- Karta SD 1 x 32GB
- 1 x kabel USB typu C
- 1 x Smycz
- 1 x Sticker Set
- 1 x Instrukcja obsługi (ten dokument)
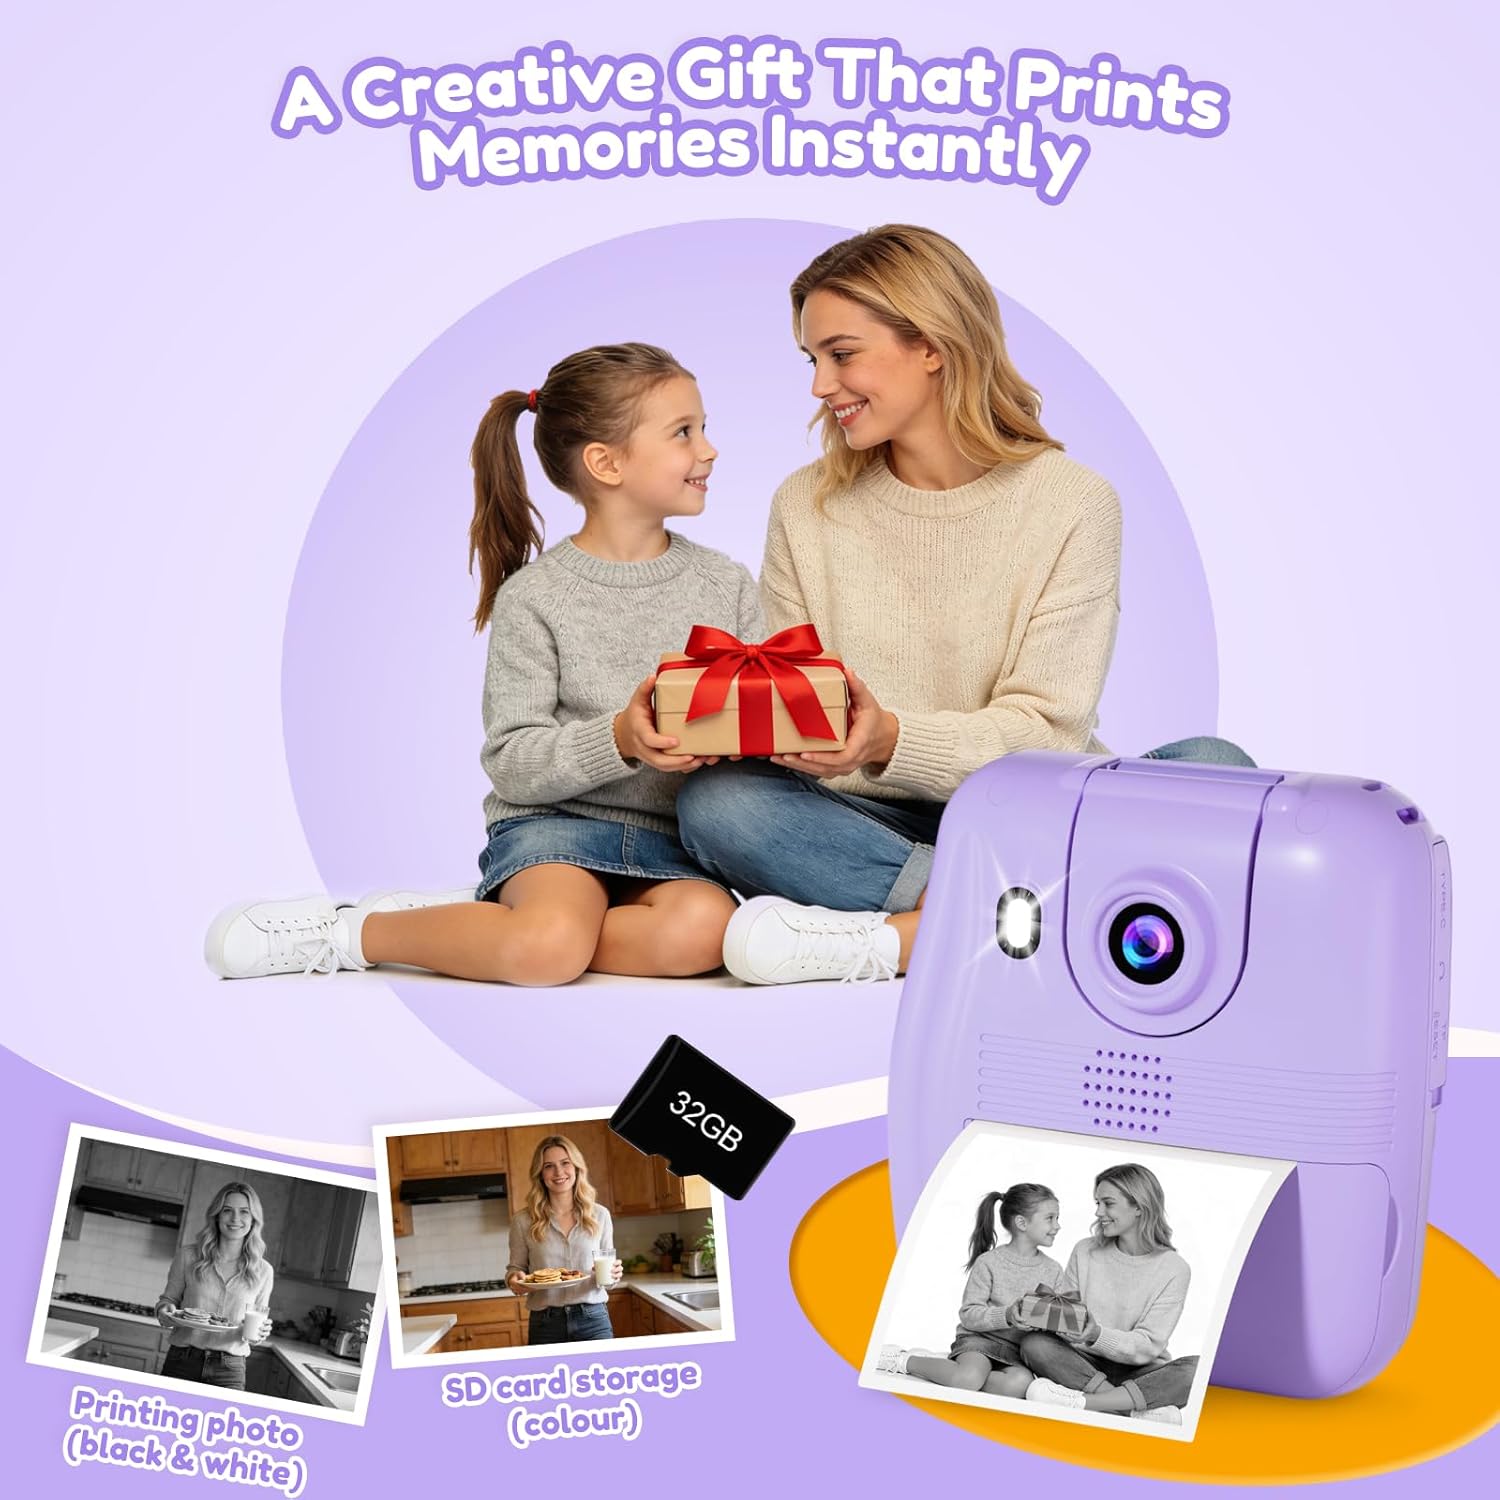
Image: All components included in the GKTZ Kids Instant Print Camera P210 package.
3. Koniec kameryview
Zapoznaj się z funkcjami fizycznymi i elementami sterowania aparatu.

Obraz: Przód view of the camera with icons indicating its various functions.
Główne cechy:
- 2.4-inch IPS Eye-Care Screen: Dla wygody viewing.
- Obrotowy obiektyw: Allows for easy switching between front and rear camera modes.
- Funkcja drukowania natychmiastowego: Prints black and white photos directly from the camera.
- Nagrywanie wideo w jakości HD 1080P: Nagrywa wideo w wysokiej rozdzielczości.
- Obsługa kart SD 32 GB: For storing color digital photos and videos.
- Creative Filters & Photo Frames: Enhance photos with fun effects.
- Zawody sportowe: Includes built-in puzzle games for entertainment.
- Ładowanie typu C: Nowoczesny i wygodny port ładowania.
- Lanyard Slot: For attaching the included safety strap.
4. Konfiguracja
4.1. Installing Photo Paper
- Locate the paper slot on the side of the camera.
- Gently open the paper slot cover.
- Insert a roll of thermal photo paper, ensuring it is correctly oriented with the printing side facing the print head.
- Wyciągnij z gniazda niewielki kawałek papieru.
- Zamknij dokładnie pokrywę gniazda papieru.
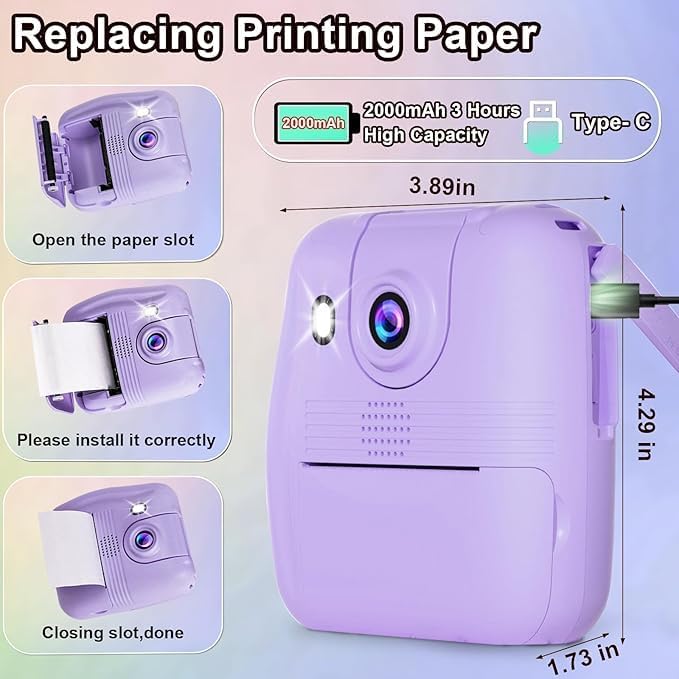
Image: Step-by-step guide for replacing the thermal printing paper roll.
4.2. Wkładanie karty SD
- Locate the SD card slot, typically on the side of the camera.
- Włóż dołączoną kartę SD o pojemności 32 GB do gniazda, aż zatrzaśnie się na miejscu. Upewnij się, że karta jest włożona prawidłowo.
- To remove, gently push the SD card inward until it springs out.
4.3. Ładowanie aparatu
- Connect the Type-C USB cable to the camera's charging port.
- Podłącz drugi koniec kabla USB do kompatybilnego zasilacza USB (nie ma go w zestawie) lub do portu USB komputera.
- Podczas ładowania kontrolka ładowania będzie się świecić, a po pełnym naładowaniu zgaśnie.
- Pełne naładowanie trwa zazwyczaj około 3 godzin.
5. Instrukcja obsługi
5.1. Włączanie/wyłączanie zasilania
- To power on, press and hold the power button for a few seconds until the screen illuminates.
- To power off, press and hold the power button again until the screen turns off. The camera also features an auto shut-off function to conserve battery.
5.2. Robienie zdjęć
- Włącz kamerę.
- Use the navigation buttons to select the photo mode.
- Frame your shot using the 2.4-inch IPS screen. You can rotate the lens to switch between front and rear views for selfies or regular photos.
- Naciśnij spust migawki, aby wykonać zdjęcie.
- If instant print mode is enabled, the photo will print automatically in black and white. A color digital copy will be saved to the SD card.
- The camera supports 16x digital zoom. Use the zoom buttons to adjust.
- Ciągłe strzelanie: Select this option in the menu to take multiple photos in quick succession.

Image: Continuous shooting feature, showing printed black and white output and digital color storage.
5.3. Nagrywanie filmów
- Włącz kamerę.
- Use the navigation buttons to select the video recording mode.
- Press the shutter button to start recording. A red "REC" indicator will appear on the screen.
- Naciśnij ponownie przycisk migawki, aby zatrzymać nagrywanie.
- Videos are saved in 1080P HD resolution to the SD card.

Image: Demonstrating 1080P HD video recording and 16x digital zoom.
Wideo: Ponadview of the GKTZ Kids Instant Print Camera's features and operation.
5.4. Using Filters and Photo Frames
- In photo mode, navigate through the menu to find the "Filters" or "Frames" options.
- Select from the available 6 creative filters and 18 photo frames to add fun effects to your pictures.
- Przedview efekt na ekranie przed zrobieniem zdjęcia.

Obraz: Byłyamples of creative filters and photo frames for enhancing pictures.
5.5. Tryb odtwarzania
- From the main menu, select "Playback" to view zapisane zdjęcia i filmy.
- Użyj przycisków nawigacyjnych, aby przewijać multimedia.
- You can choose to print previously taken photos from this mode if instant print was not enabled at the time of capture.
5.6. Gry
- The camera includes built-in puzzle games. Select the "Games" option from the main menu to access them.
- Użyj przycisków nawigacyjnych, aby sterować rozgrywką.
Video: Demonstration of the GKTZ Digital Instant Print Camera for Kids, showcasing its various functions.
6. Konserwacja
6.1. Czyszczenie aparatu
- Przed czyszczeniem upewnij się, że aparat jest wyłączony.
- Do czyszczenia korpusu aparatu należy używać miękkiej, suchej ściereczki.
- Do czyszczenia soczewek i ekranu należy używać ściereczki z mikrofibry przeznaczonej specjalnie do elementów optycznych. Nie należy używać środków czyszczących o właściwościach ściernych ani rozpuszczalników.
6.2. Wymiana papieru
- When the paper runs out, follow the instructions in section 4.1 to install a new roll.
- Only use compatible thermal paper rolls for optimal printing quality.
6.3. Zarządzanie kartą SD
- Regularly transfer photos and videos from the SD card to a computer or other storage device to prevent data loss and free up space.
- Format the SD card periodically within the camera's settings to maintain performance. (Note: Formatting will erase all data on the card. Back up important filejest pierwszy.)
7. Rozwiązywanie Problemów
| Problem | Możliwe rozwiązanie |
|---|---|
| Kamera się nie włącza. | Upewnij się, że bateria jest naładowana. Podłącz kamerę do źródła zasilania za pomocą kabla USB-C. |
| Zdjęcia nie drukują się. | Check if there is photo paper installed correctly. Ensure instant print mode is enabled in settings. |
| Niska jakość druku. | Ensure the thermal paper is correctly installed and is not old or damaged. Clean the print head if necessary (refer to maintenance section). |
| Nie można zapisać zdjęć/filmów. | Check if the SD card is inserted correctly and has sufficient free space. The SD card may need to be formatted. |
| Kamera zawiesza się lub przestaje reagować. | Press and hold the power button for 10-15 seconds to force a restart. If the issue persists, contact customer support. |
8. Specyfikacje
| Funkcja | Szczegół |
|---|---|
| Numer modelu | P210 |
| Wymiary produktu | 4.33 x 3.94 x 1.97 cala |
| Waga przedmiotu | 6.1 uncji (0.38 funta) |
| Rozmiar ekranu | 2.4-inch IPS Eye-Care Screen |
| Rozdzielczość wideo | Rozdzielczość 1080P HD |
| Brzęczenie | 16-krotny zoom cyfrowy |
| Składowanie | Karta SD 32 GB (w zestawie) |
| Bateria | 1 bateria litowo-jonowa (w zestawie), pojemność 2000 mAh |
| Port ładowania | USB Typ C |
| Typ wydruku | Thermal (Black and White) |
| Cechy specjalne | Auto Exposure, Rotating Lens, Time-lapse, MP3 Playback, Puzzle Games |
9. Gwarancja i wsparcie
For warranty information or technical support, please refer to the contact details provided with your purchase or visit the official GKTZ webZachowaj dowód zakupu na wypadek roszczeń gwarancyjnych.