GOEBLESON ZB01CF05
GOEBLESON 52 Inch Farmhouse Ceiling Fan with Lights and Remote
Model: ZB01CF05
Instrukcja obsługi
1. Wprowadzenie
This manual provides detailed instructions for the safe installation, operation, and maintenance of your GOEBLESON 52 Inch Farmhouse Ceiling Fan with Lights and Remote. Please read all instructions carefully before beginning installation and retain this manual for future reference.

Obraz: Ponadview of the GOEBLESON 52 Inch Farmhouse Ceiling Fan with Lights and Remote.
2. Informacje dotyczące bezpieczeństwa
- Przed przystąpieniem do instalacji lub serwisowania należy upewnić się, że zasilanie wyłącznika obwodu jest odłączone.
- Całe okablowanie musi być zgodne z krajowymi i lokalnymi przepisami elektrycznymi.
- Wentylator musi być zamontowany na belce stropowej lub konstrukcji wsporczej zdolnej utrzymać ciężar wentylatora.
- Nie zginaj uchwytów ostrzy podczas instalacji i czyszczenia.
- Trzymaj dzieci z dala od wentylatora podczas jego działania.
3. Zawartość opakowania
Sprawdź, czy wszystkie wymienione poniżej elementy znajdują się w opakowaniu. Jeśli brakuje którejkolwiek części lub jest ona uszkodzona, skontaktuj się z obsługą klienta.
- Zespół obudowy silnika
- Fan Blades (5, dual-finish)
- Pręty dolne (6-calowe i 10-calowe)
- Uchwyt montażowy
- Daszek
- Pilot zdalnego sterowania z uchwytem ściennym
- Pakiet osprzętu (śruby, nakrętki itp.)
- Instrukcja obsługi

Image: All components included in the GOEBLESON ceiling fan package.
4. Specyfikacje
| Funkcja | Specyfikacja |
|---|---|
| Marka | GOEBLESON |
| Nazwa modelu | ZB01CF05 |
| Wymiary produktu | 52" gł. x 52" szer. x 20" wys. |
| Długość ostrza | 52 cali |
| Liczba ostrzy | 5 |
| Typ silnika | Silnik prądu stałego odwracalny |
| Ustawienia prędkości | 6 prędkości |
| Poziom hałasu | Below 30 Decibels |
| Przepływ powietrza | 6700 CFM (maks.) |
| Cotage | 60 watów |
| Metoda kontroli | Zdalne sterowanie |
| Funkcje timera | 1H/2H/3H/4H/5H/8H |
| Długości prętów ściągających | 6" and 10" (Included) |
| Podstawa żarówki | 2*E26 (Bulbs not included) |
| Zastosowanie wewnątrz/na zewnątrz | Wnętrz |
5. Konfiguracja i instalacja
Follow these steps for proper installation. Professional installation is recommended if you are unfamiliar with electrical wiring.
5.1 Choose Mounting Location
Ensure the chosen location has a secure ceiling joist or outlet box capable of supporting the fan's weight (approximately 16 lbs). Maintain a minimum clearance of 7 feet from the floor to the fan blades.

Image: Ceiling fan dimensions and recommended ceiling heights for installation.
5.2 Zainstaluj wspornik montażowy
- Wyłącz zasilanie na wyłączniku obwodu.
- Attach the mounting bracket to the ceiling outlet box using the provided screws. Ensure it is securely fastened.
5.3 Assemble Fan Blades
Attach the five fan blades to the motor housing. The blades are dual-finish (walnut and black); choose your preferred side facing down.

Image: Details of the fan's construction, including blade attachment points and light holder.
5.4 Wiring and Hanging
- Feed the electrical wires from the ceiling through the chosen downrod and canopy.
- Secure the downrod to the motor housing.
- Ostrożnie podnieś zespół wentylatora i zawieś go na wsporniku montażowym.
- Connect the fan's wires to the household wiring according to the wiring diagram in the full manual. Use wire nuts to secure connections.
5.5 Install Light Kit and Canopy
- Attach the light kit to the bottom of the motor housing.
- Install two E26 base bulbs (not included) into the light sockets.
- Secure the canopy to the mounting bracket, covering the wiring connections.
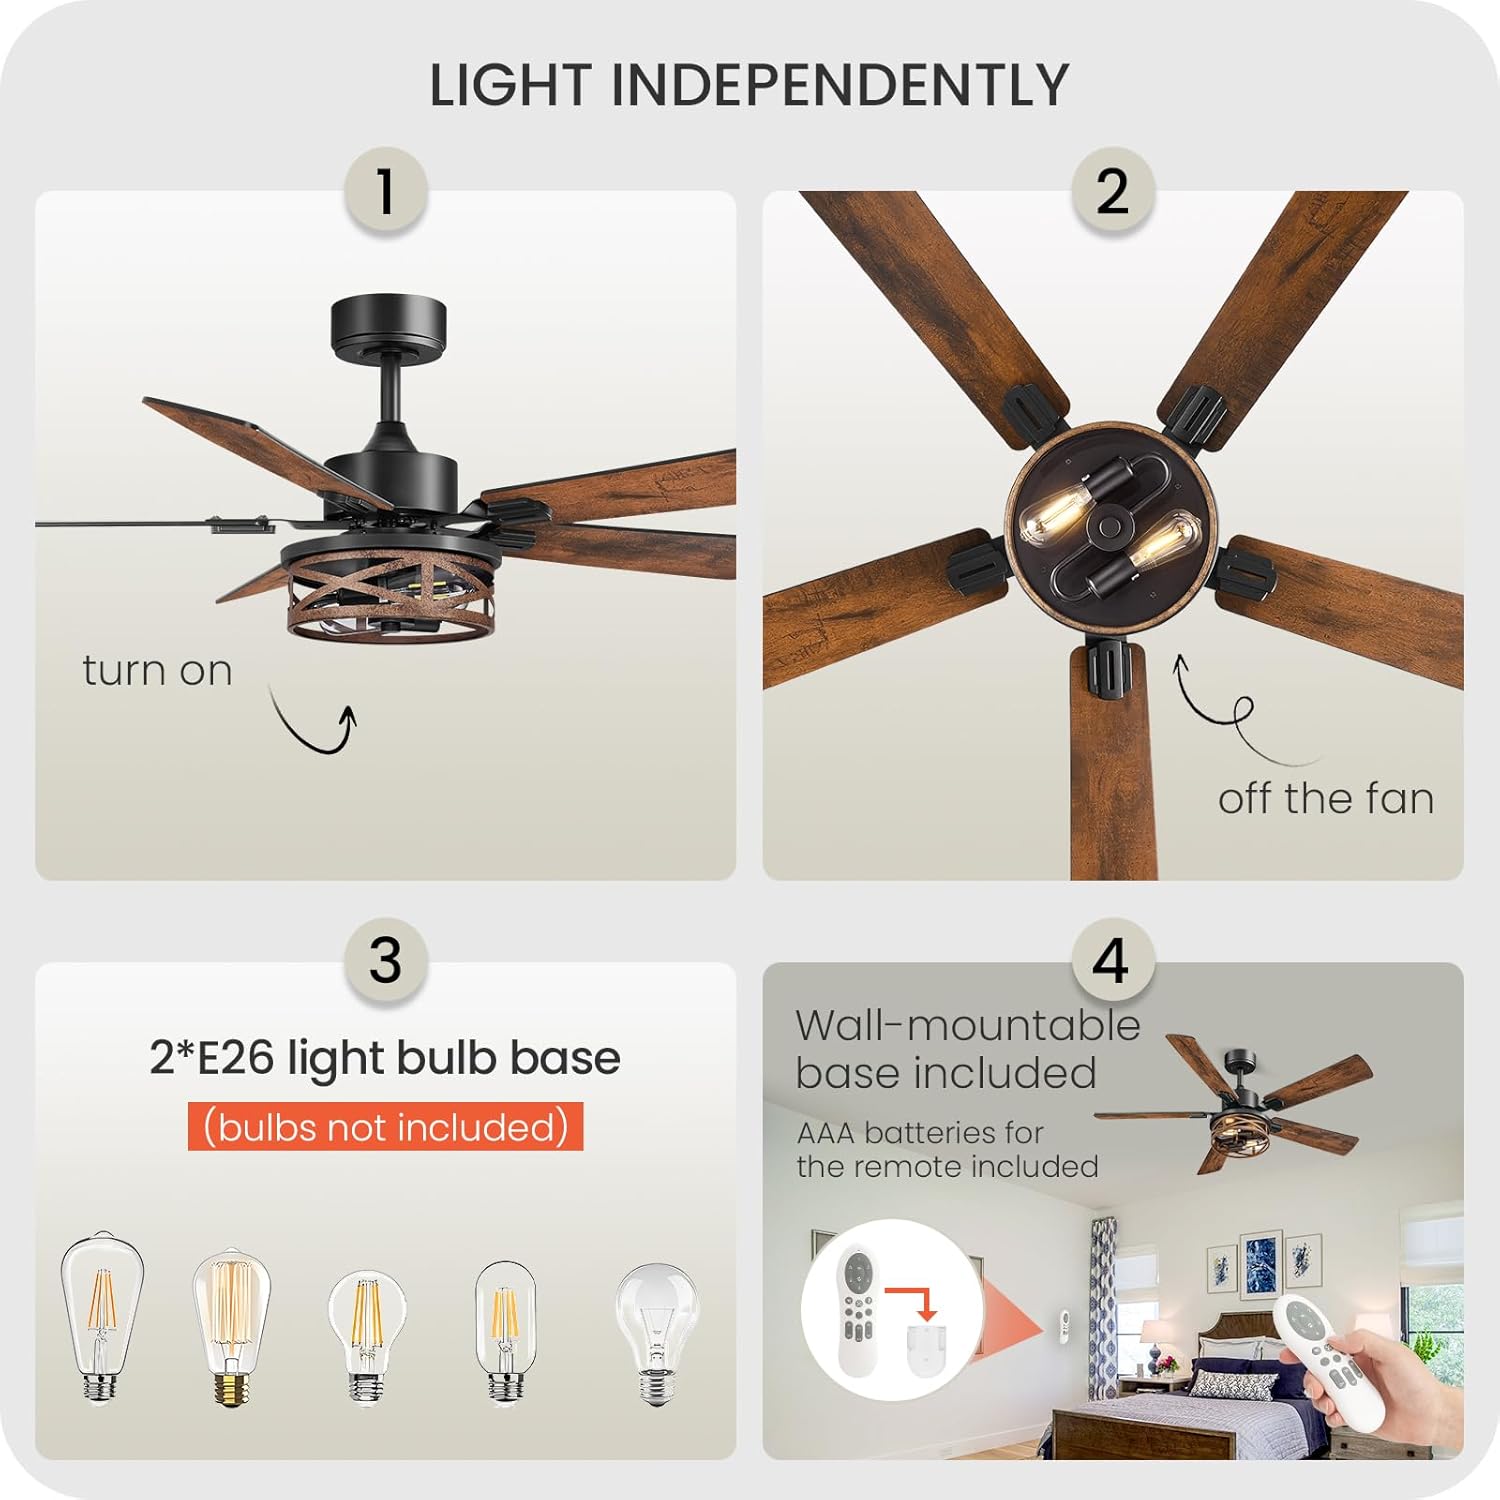
Image: Steps for light installation and remote control features.
6. Instrukcja obsługi
Your GOEBLESON ceiling fan is operated using the included remote control.
6.1 Funkcje zdalnego sterowania
- Włączanie/wyłączanie: Włącza i wyłącza wentylator.
- Prędkość wentylatora: Możliwość wyboru 6 ustawień prędkości.
- Włączanie/wyłączanie światła: Niezależne sterowanie światłem.
- Regulator czasowy: Sets the fan to turn off after 1H, 2H, 3H, 4H, 5H, or 8H.
- Wentylator do tyłu/do przodu: Zmienia kierunek obrotu ostrza.
- Naturalny wiatr: Simulates natural breeze patterns.
- Silent Mode Switch: Activates a quieter operation mode.

Image: Remote control functions and corresponding fan modes.
6.2 Silnik prądu stałego odwracalny
Wentylator wyposażony jest w odwracalny silnik prądu stałego, co zapewnia komfort przez cały rok.
- Forward Mode (Summer): Skierowany w dół strumień powietrza tworzy efekt chłodzenia.
- Reverse Mode (Winter): Upward airflow circulates warm air, balancing room temperature.

Image: Illustration of Forward (cooling) and Reverse (warming) modes.
7. Konserwacja
Regularna konserwacja zapewnia optymalną wydajność i wydłuża żywotność wentylatora.
- Czyszczenie: Użyj miękkiego, damp cloth to clean the fan. Do not use abrasive cleaners or solvents. Ensure power is off before cleaning.
- Kontrola ostrza: Okresowo sprawdzaj dokręcenie śrub mocujących ostrza. Luźne ostrza mogą powodować chybotanie i hałas.
- Żarówki: Replace E26 bulbs as needed. Ensure the power is off before changing bulbs.
8. Rozwiązywanie Problemów
Jeśli napotkasz problemy, zapoznaj się z poniższymi typowymi problemami i rozwiązaniami:
| Problem | Możliwa przyczyna | Rozwiązanie |
|---|---|---|
| Wentylator się nie uruchamia | Brak zasilania, luźne okablowanie, rozładowana bateria pilota | Check circuit breaker, verify wiring connections, replace remote batteries. |
| Wentylator się chwieje | Loose blades, improper mounting, unbalanced blades | Tighten blade screws, ensure mounting bracket is secure, use balancing kit if necessary. |
| Światło nie działa | Bulb faulty, loose wiring, light switch off | Replace bulb, check light kit wiring, ensure light function on remote is active. |
| Pilot nie działa | Rozładowane baterie, pilot nie jest sparowany | Replace batteries, refer to the full manual for remote pairing instructions. |
| Nadmierny hałas | Loose screws, motor issue, blades hitting obstruction | Check all screws, ensure no obstructions, contact support if motor noise persists. |

Image: The fan operates quietly, with noise levels below 30dB.
9. Gwarancja i wsparcie
Your GOEBLESON ceiling fan is covered by a manufacturer's warranty. Please refer to the warranty card included in your package for specific terms and conditions.
For technical assistance, missing parts, or warranty claims, please contact GOEBLESON customer support through the retailer's platform or the contact information provided in your product packaging.