1. Wprowadzenie
This manual provides detailed instructions for the assembly, operation, maintenance, and troubleshooting of your Benass 10x16 Heavy Duty Carport Canopy. Please read all instructions carefully before beginning assembly and retain this manual for future reference.
Wymiary produktu: 16'dł. x 10'szer. x 9.45'wys. (191"dł. x 120"szer. x 113.4"wys.)
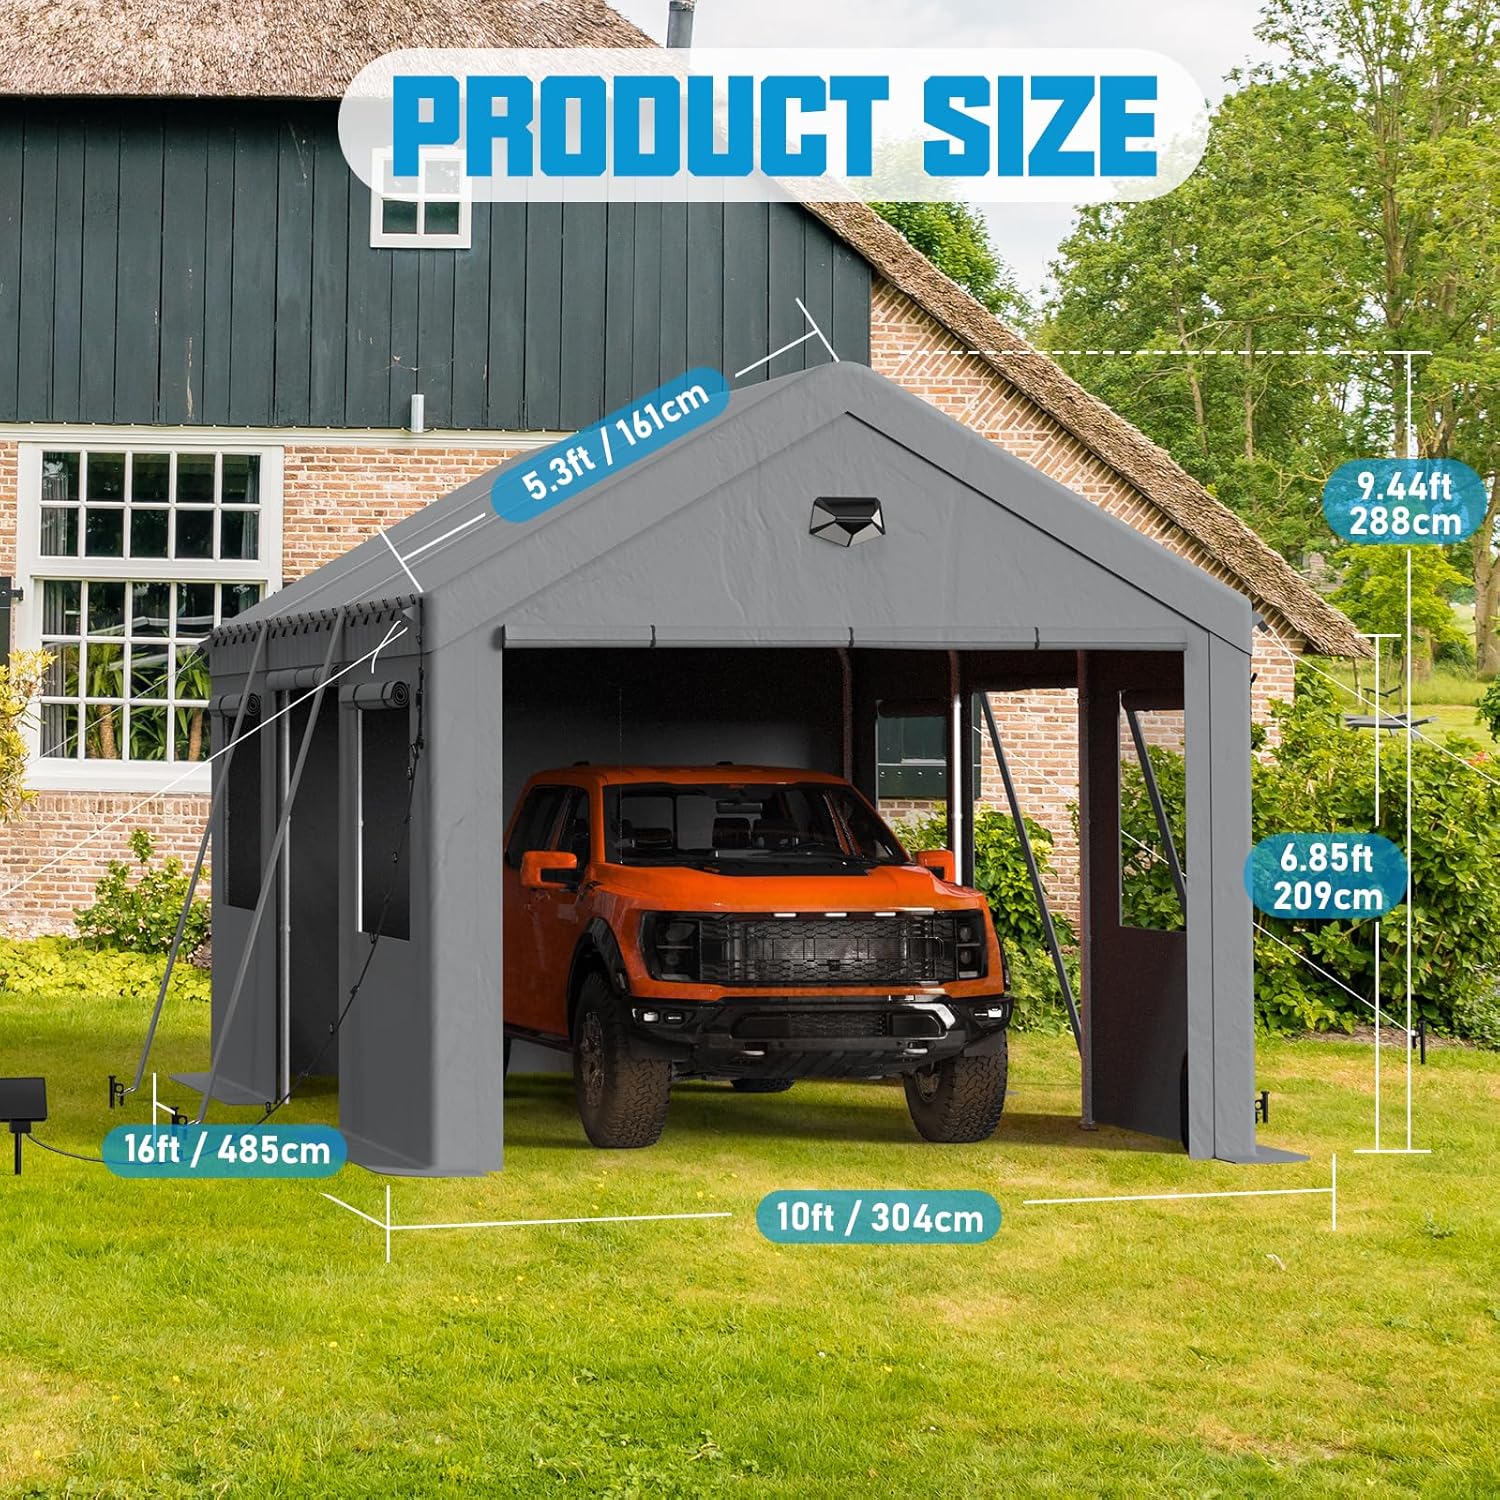
Image 1: Benass 10x16 Carport Canopy with key dimensions highlighted. The carport measures 16 feet long, 10 feet wide, and 9.45 feet high.
2. Informacje dotyczące bezpieczeństwa
- Przed montażem należy upewnić się, że wszystkie elementy są obecne i nieuszkodzone.
- Zmontuj na równej powierzchni.
- Do not assemble during strong winds or adverse weather conditions.
- Secure the carport properly using all provided anchoring accessories.
- Regularly inspect the structure for stability and wear.
- Trzymaj dzieci i zwierzęta domowe z dala od miejsca montażu.
3. Zawartość opakowania
Sprawdź, czy w pakiecie znajdują się wszystkie poniższe elementy:
- Galvanized Steel Frame Components (1.5" diameter)
- 170gms PE Canopy Top
- 2 lin wiatrowych
- 2 Binding Straps
- 4 worki z piaskiem
- 2 Sidewalls
- 1 Światło słoneczne
- 1 Jasny pasek
- Ground Nails and Screwed Base Nails
- Highly Extensible Buckles

Image 2: Key components for stability and assembly, including 6mm nylon rope, 3.75" PE binding, reinforced support bars, alloy ground nails, alloy screwed base nails, extensible buckles, and portable sandbags.
4. Instalacja i montaż
Assembly typically requires 2-3 people due to the size of the carport. Follow these steps for proper installation:
- Step 1: Assemble the Top Frame. Connect the horizontal and vertical pipes to form the roof structure.
- Step 2: Install Top Reinforced Steel Pipes. Add the reinforcing pipes to the top frame for enhanced stability.
- Step 3: Assemble Small Support Beams. Attach the smaller support beams to the main frame.
- Step 4: Install the Cover and Secure It. Drape the PE canopy top over the assembled frame and secure it temporarily.
- Step 5: Install Steel Pipes at Four Corners. Insert the vertical steel pipes at each corner of the structure.
- Step 6: Install Supporting Legs and Side Fabric. Attach the remaining supporting legs and the sidewalls.
- Step 7: Install Base and Fix with Nails. Secure the base of the carport to the ground using the provided ground nails and screwed base nails.
- Step 8: Secure the Perimeter and Fix the Carport. Use wind ropes, binding straps, and sandbags to fully anchor the carport.

Image 3: Visual representation of the 8-step assembly process for the Benass Carport Canopy, from frame construction to final anchoring.
Ważny: Ensure all connections are tight and the carport is firmly anchored to prevent movement in windy conditions.
5. Instrukcja obsługi
5.1. Roll-Up Zipper Door
The carport features a roll-up zipper door at the end for vehicle access. Unzip the door and roll it up to open. Secure it in the rolled-up position using the integrated fasteners to maintain an open entrance.

Image 4: The carport features a roll-up zipper door for easy access and ventilation.
5.2. Side Mesh Roll-Up Windows
Four side mesh roll-up windows are included to ensure air circulation. These can be rolled up and secured to allow airflow and light, or rolled down for privacy and protection from elements.

Image 5: The carport includes roll-up mesh windows on the sides for adjustable ventilation.
5.3. Solar Light and Light Strip
The included solar light and light strip provide illumination. Position the solar panel in an area that receives direct sunlight for optimal charging. The light strip can be installed along the interior or exterior frame for additional lighting.
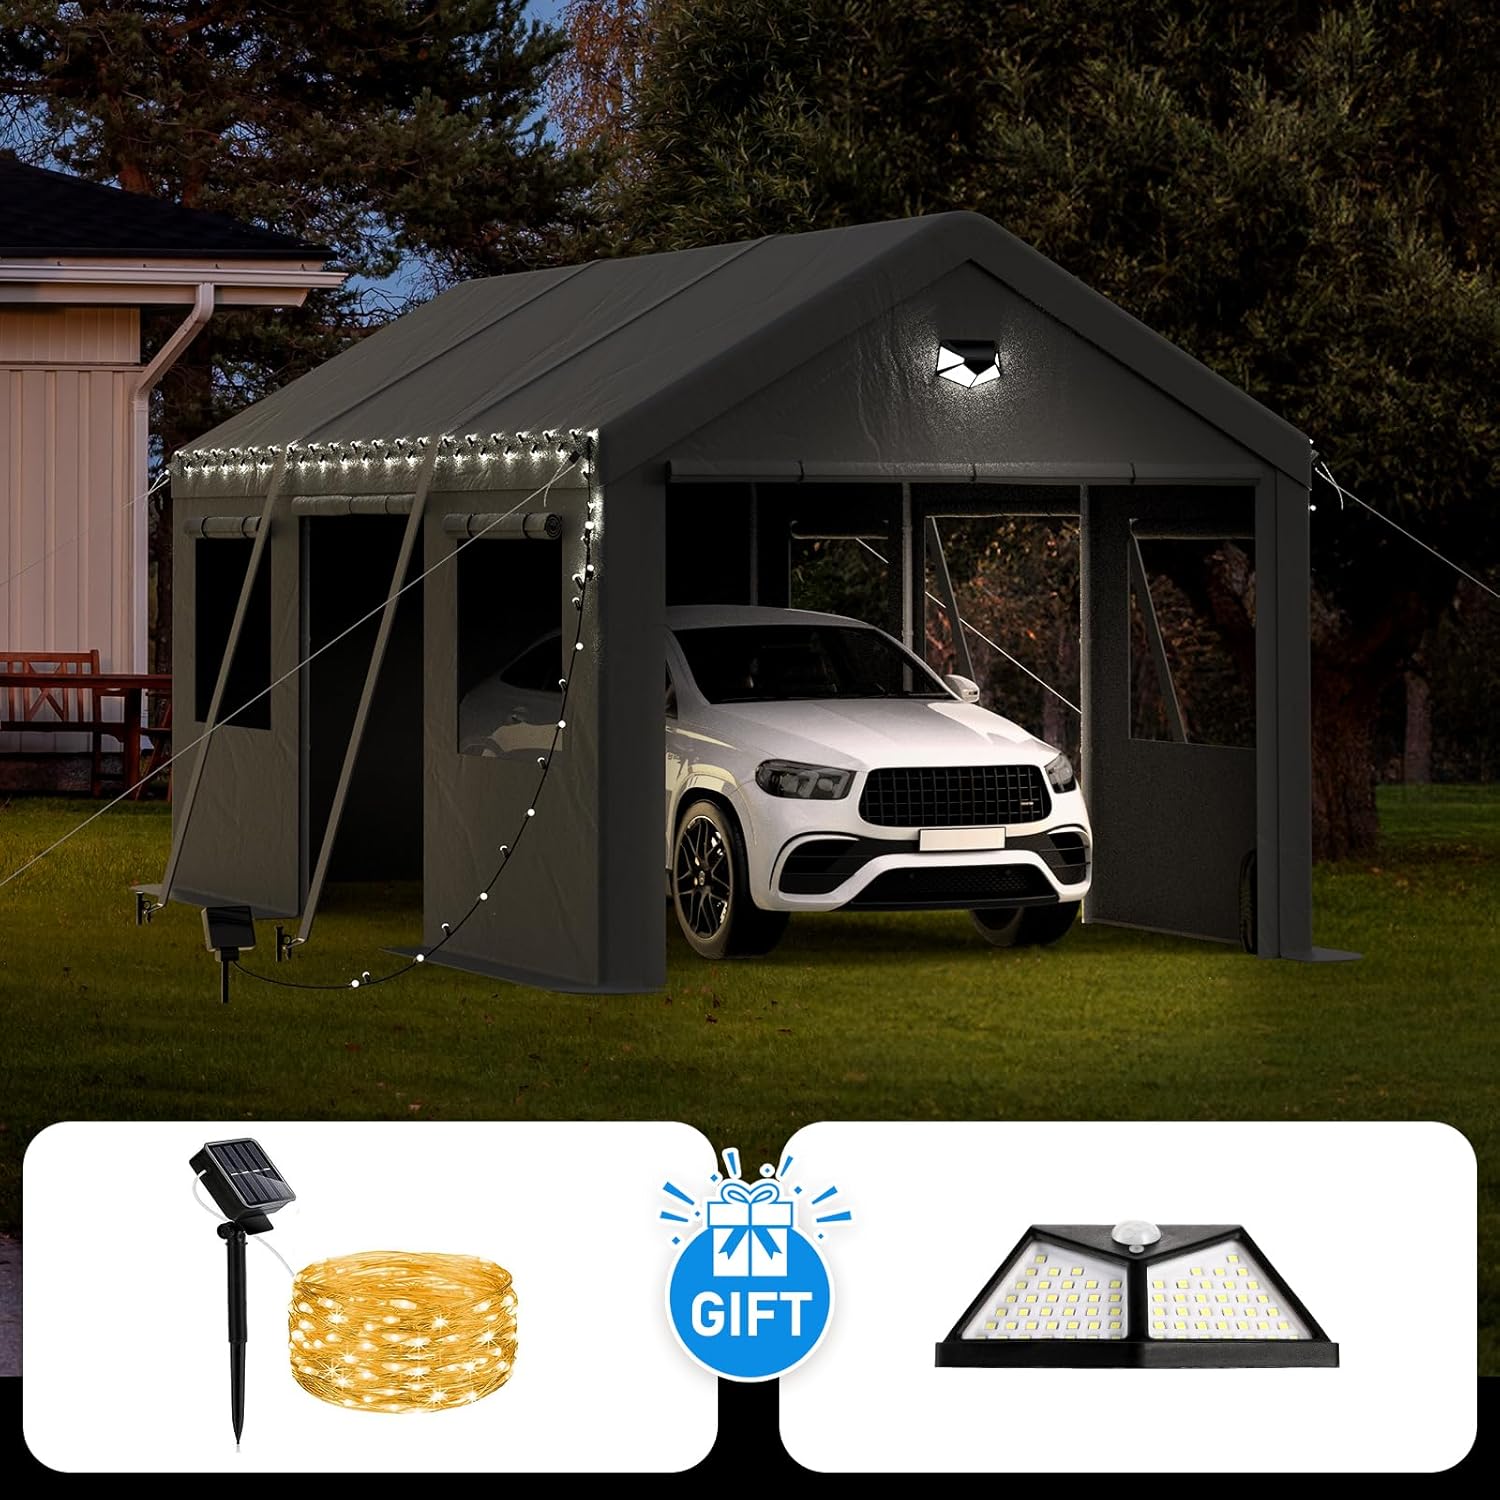
Image 6: The carport illuminated at night by the included solar light and light strip.
6. Konserwacja
- Czyszczenie: Clean the canopy and sidewalls periodically with mild soap and water. Avoid harsh chemicals or abrasive cleaners that could damage the PE material.
- Kontrola ramy: Regularly check all frame connections and bolts to ensure they remain tight. Tighten any loose connections.
- Canopy Condition: Inspect the canopy for any tears, punctures, or signs of wear. Small repairs can extend the lifespan of the cover.
- Kotwiczenie: Verify that all wind ropes, binding straps, sandbags, and ground anchors are securely in place, especially after strong winds or heavy rain.
- Odśnieżanie: In areas with heavy snowfall, regularly remove accumulated snow from the canopy to prevent structural damage due to excessive weight.
7. Rozwiązywanie Problemów
- Niestabilność wiaty:
- Ensure all frame connections are fully tightened.
- Verify that all ground anchors, wind ropes, and sandbags are correctly installed and secured.
- Check for level ground. Uneven surfaces can affect stability.
- Gromadzenie się wody w koronach drzew:
- Ensure the canopy is taut and properly stretched over the frame to prevent sagging.
- Check that the frame is assembled correctly, allowing for proper water runoff.
- Zipper or Window Malfunction:
- Inspect for obstructions in the zipper path.
- Ensure fabric is not caught in the zipper mechanism.
- Solar Light Not Working:
- Upewnij się, że panel słoneczny jest czysty i wystawiony na bezpośrednie działanie promieni słonecznych przez kilka godzin dziennie.
- Check that the light is switched "ON" (if applicable).
8. Specyfikacje
| Funkcja | Szczegół |
|---|---|
| Marka | Benass |
| Numer modelu | 10x16-CKM-GY-1 |
| Wymiary produktu | 191" dł. x 120" szer. x 113.4" wys. (16' dł. x 10' szer. x 9.45' wys.) |
| Powierzchnia podłogi | 160 stóp kwadratowych |
| Kolor | Szary |
| Materiał ramy | Alloy Steel (1.5" galvanized steel frame) |
| Materiał zadaszenia | 170gms PE (Polyethylene) |
| Poziom wodoodporności | Wodoodporny |
| Wymagany montaż | Tak |
9. Gwarancja i wsparcie
Benass offers a one-year warranty for this product. If you encounter any issues upon receiving the carport or during its use, please contact Benass customer service for assistance.
For support inquiries, please refer to the contact information provided with your purchase or visit the official Benass webstrona.


