Wstęp
This manual provides essential information for the setup, operation, maintenance, and troubleshooting of your AWOW Mini PC, Model BA7. Please read these instructions carefully before using the device.

Obraz: Ponadview of the AWOW BA7 Mini PC, highlighting its compact design and key features.
Zawartość opakowania
Sprawdź, czy w opakowaniu znajdują się wszystkie elementy:
- AWOW BA7 Mini PC
- Zasilacz
- Śruby montażowe
- Uchwyt montażowy VESA
- Kabel HDMI
- Instrukcja obsługi (ten dokument)

Image: Illustration of the AWOW BA7 Mini PC and its included accessories: power adapter, screws, VESA mount, HDMI cable, and user manual.
Instrukcje konfiguracji
- Podłącz urządzenia peryferyjne: Connect your keyboard, mouse, and monitor(s) to the appropriate ports on the Mini PC.
Obraz: Przód view of the Mini PC showing the Power Button, Type-C port, USB 3.2 ports, and 3.5mm Audio Jack.

Obraz: Tył view of the Mini PC showing the DC IN, DP1.2, HDMI2.0, USB 2.0 ports, and RJ45 LAN port.
- Podłączenie zasilania: Podłącz zasilacz do portu DC IN w komputerze Mini PC, a następnie podłącz zasilacz do gniazdka elektrycznego.
- Włączanie: Naciśnij przycisk zasilania znajdujący się z przodu minikomputera. System się uruchomi.
- Początkowe ustawienia: Follow the on-screen instructions to complete the Windows 11 Pro initial setup, including language, region, network connection, and user account creation.
- Połączenie internetowe:
- wired: Connect an Ethernet cable to the RJ45 LAN port for a stable wired connection.
- Bezprzewodowy: During Windows setup or via Windows settings, connect to your Wi-Fi network using the built-in WiFi 6.
Instrukcja obsługi
Podstawowa obsługa
- Włączanie/wyłączanie: Press the power button to turn on the PC. To shut down, use the Windows Start menu options (Shut down, Restart, Sleep). A short press on the power button can put the PC to sleep. A long press (approx. 5 seconds) will force a shutdown.
- Wyjście wyświetlacza: The Mini PC supports up to three 4K displays simultaneously via DP, HDMI, and USB-C. Connect your monitors and configure display settings in Windows.

Image: A user working with a triple monitor setup, demonstrating the Mini PC's multi-display capability.
- Łączność USB: Utilize the USB 2.0 and USB 3.0 ports for connecting external devices such as external hard drives, USB flash drives, printers, and other peripherals. The Type-C port also supports data transfer and display output.
- Audio: Podłącz słuchawki lub głośniki do gniazda audio 3.5 mm.
Zaawansowane użycie
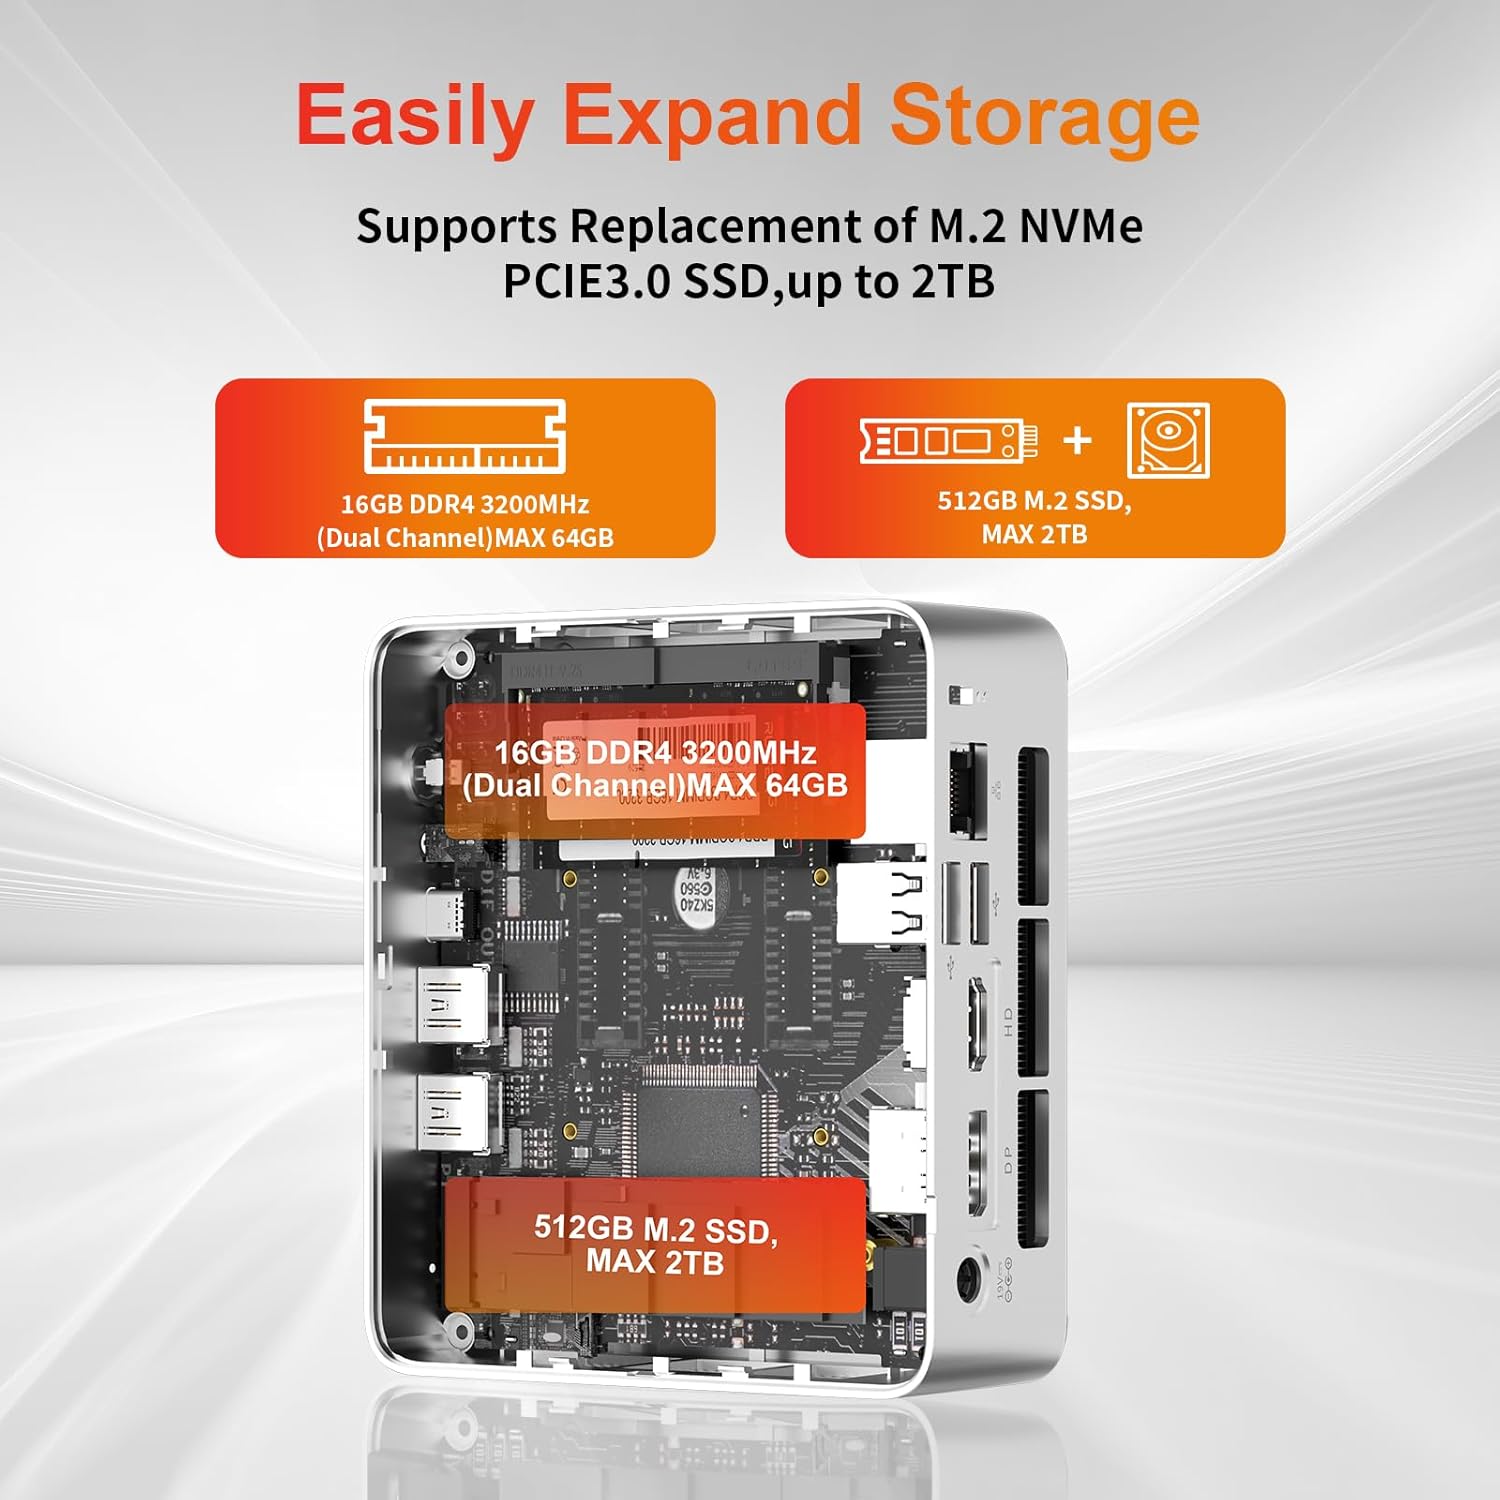
- Rozszerzenie pamięci: The Mini PC supports replacement of the M.2 NVMe PCIe 3.0 SSD up to 2TB. It also supports memory expansion up to 64GB DDR4.

Image: Diagram illustrating the internal components and options for expanding storage (M.2 SSD up to 2TB) and RAM (DDR4 up to 64GB).
- Montaż VESA: Use the included VESA mount bracket to attach the Mini PC to the back of a compatible monitor or to a wall mount, saving desk space.
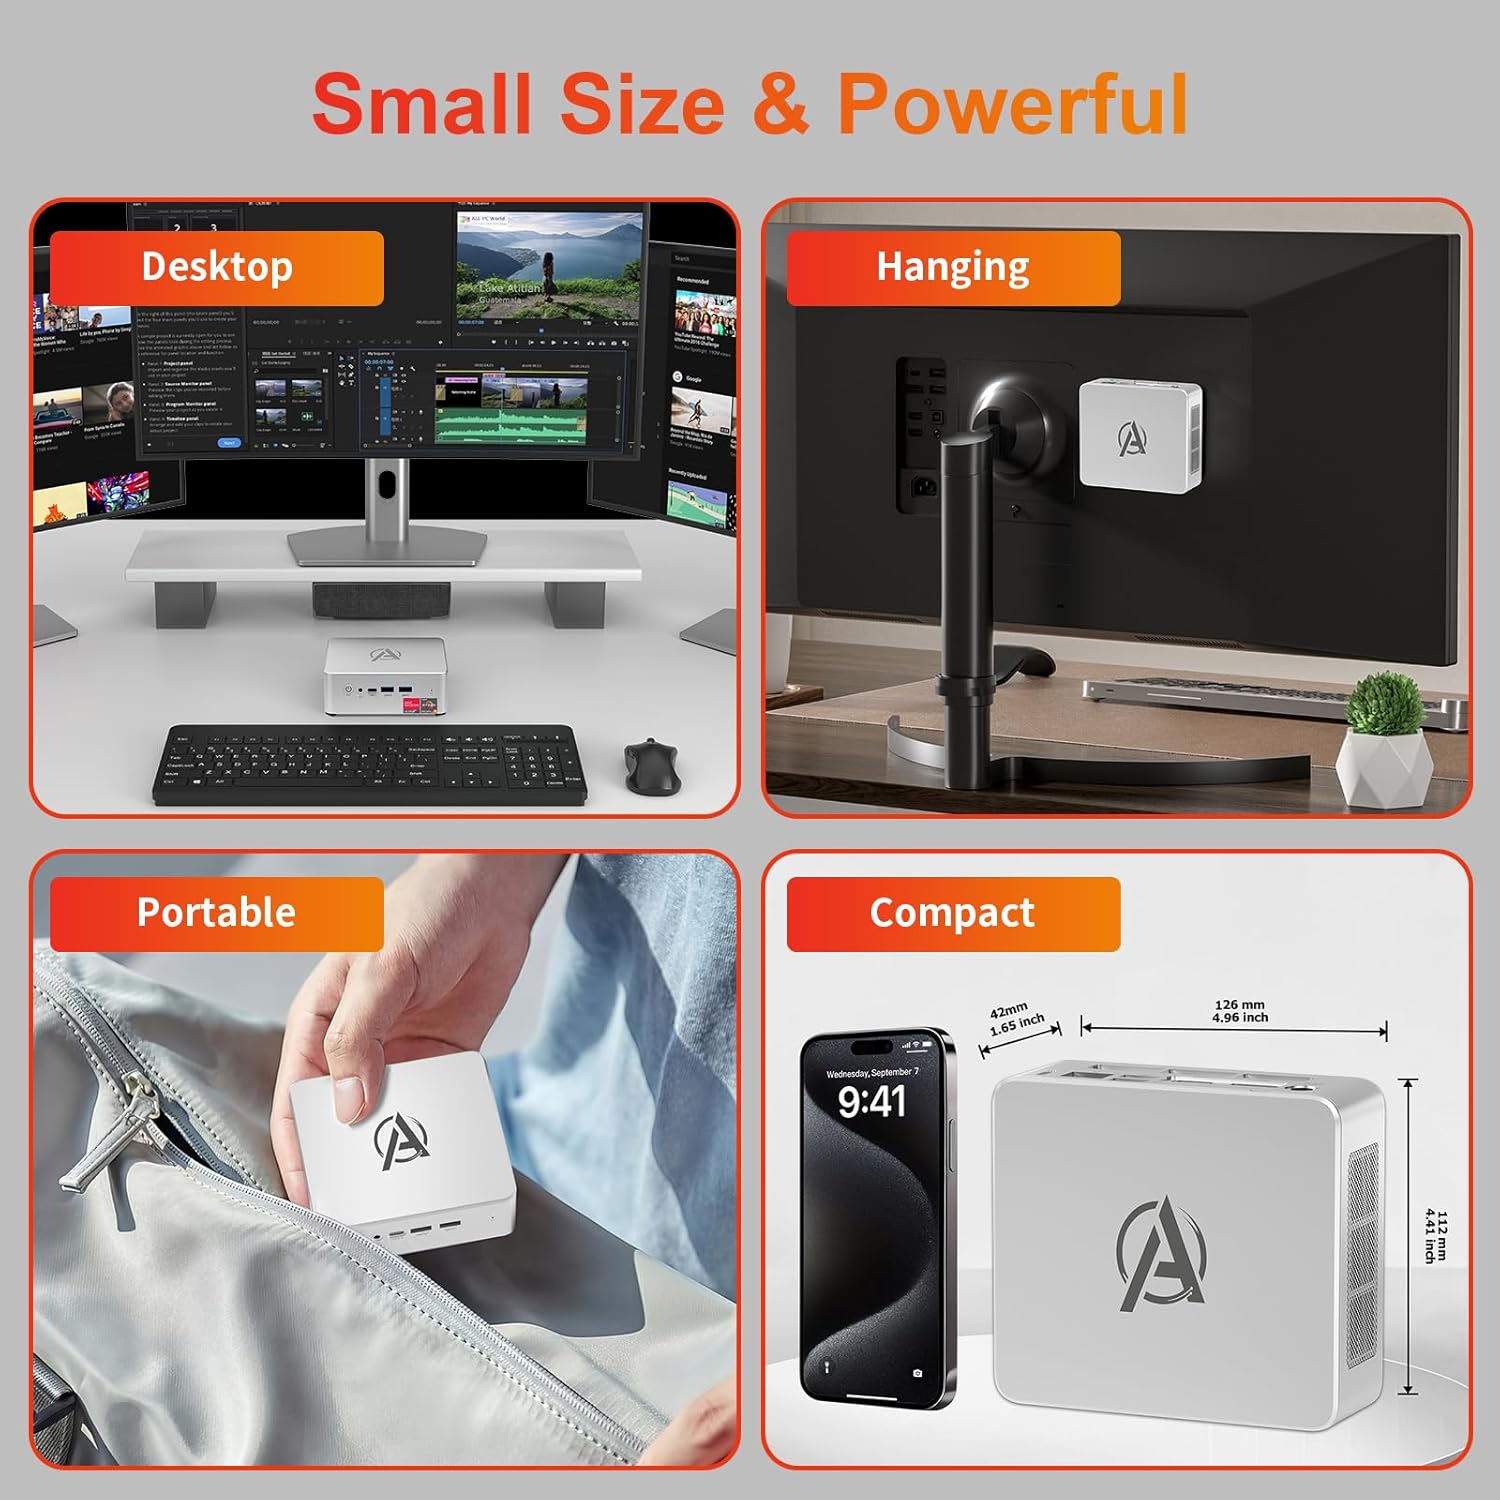
Image: Various usage scenarios for the Mini PC, including desktop, VESA-mounted behind a monitor, portable, and compact size comparison.
Konserwacja
- Czyszczenie: Use a soft, dry cloth to clean the exterior of the Mini PC. Do not use liquid cleaners or aerosols. Ensure ventilation openings are free from dust.
- Aktualizacje oprogramowania: Regularnie sprawdzaj dostępność aktualizacji systemu Windows i sterowników oraz instaluj je, aby zapewnić sobie optymalną wydajność i bezpieczeństwo.
- Zarządzanie ciepłem: Ensure the Mini PC is placed in a well-ventilated area. Avoid blocking the air vents. The intelligent cooling system is designed for low noise and efficient heat dissipation.

Image: Diagram illustrating the internal cooling fan and heat sink, showing airflow for efficient heat dissipation.
- Zarządzanie pamięcią masową: Okresowo czyść niepotrzebne files and applications to maintain system performance.
Rozwiązywanie problemów
- Brak zasilania:
- Sprawdź, czy zasilacz jest prawidłowo podłączony do komputera Mini PC i gniazdka elektrycznego.
- Sprawdź, czy gniazdko elektryczne jest sprawne.
- Spróbuj użyć innego gniazdka elektrycznego.
- Brak wyświetlacza:
- Verify that the HDMI/DP/USB-C cable is securely connected to both the Mini PC and the monitor.
- Sprawdź, czy monitor jest włączony i ustawiony na prawidłowe źródło sygnału wejściowego.
- Jeśli to możliwe, wypróbuj inny kabel wyświetlacza lub monitor.
- Niska wydajność:
- Zamknij niepotrzebne aplikacje działające w tle.
- Sprawdź i zainstaluj wszelkie oczekujące aktualizacje systemu Windows lub sterowniki.
- Sprawdź, czy na dysku SSD jest wystarczająca ilość wolnego miejsca.
- Monitoruj użycie procesora i pamięci RAM w Menedżerze zadań, aby identyfikować procesy intensywnie wykorzystujące zasoby.
- Problemy z łącznością sieciową:
- W przypadku połączeń przewodowych należy upewnić się, że kabel Ethernet jest prawidłowo podłączony i router działa.
- For Wi-Fi, check if the Wi-Fi adapter is enabled and connected to the correct network. Restart your router/modem.
- System zawiesza się/awariuje:
- Uruchom ponownie komputer Mini PC.
- Ensure the system is not overheating (check ventilation).
- Run a system diagnostic or check Windows Event Viewer for error messages.
Specyfikacje
| Model | AWOW BA7 Mini PC |
| Edytor | AMD Ryzen 5 7430U (6 rdzeni, 12 wątków, do 4.3 GHz) |
| Grafika | Zintegrowana karta graficzna AMD Radeon |
| BARAN | 16 GB DDR4 (z możliwością rozbudowy do 64 GB) |
| Składowanie | 512GB PCIe 3.0 M.2 SSD (Expandable up to 2TB) |
| System operacyjny | Windows 11 Pro |
| Wyjście wideo | DP1.2 (4K@60Hz), HDMI2.0 (4K@60Hz), USB-C (4K@60Hz) - Supports Triple Display |
| Łączność | WiFi 6, Bluetooth 5.2, 1000Mbps RJ45 LAN |
| Porty | 2x USB 3.2, 2x USB 2.0, 1x Type-C (Full Function), 1x DP1.2, 1x HDMI2.0, 1x RJ45 LAN, 1x 3.5mm Audio Jack, 1x DC IN |
| Wymiary | 126 mm x 112 mm x 42 mm (ok. 4.96 x 4.41 x 1.65 cala) |
| Waga | 398 g (tylko urządzenie) Image: The Mini PC with its dimensions (126mm x 112mm x 42mm) and weight (398g) labeled. |
Gwarancja i wsparcie
AWOW provides comprehensive support for its products.
- Gwarancja: This product includes a 12-month service period from the date of purchase, covering manufacturing defects.
- Wsparcie techniczne: Lifetime technical support is available for all AWOW products.
- Kontakt: For technical assistance, warranty claims, or any product-related inquiries, please visit the official AWOW webwitryny lub skontaktuj się z obsługą klienta.

Image: AWOW brand message emphasizing fulfillment, lifetime technical support, and 12-month service.