Wstęp
This manual provides detailed instructions for the setup, operation, and maintenance of your Razer Raiju V3 Pro Wireless e-sports Controller. Designed for competitive gaming on both PlayStation 5 and PC, this controller features advanced customization options and high-performance components.

Obraz: Przód view of the Razer Raiju V3 Pro Controller, showcasing its symmetrical stick layout and button configuration.
Organizować coś
1. Ładowanie kontrolera
Before initial use, fully charge the controller using the provided USB-C to USB-A cable. Connect the USB-C end to the controller and the USB-A end to a powered USB port on your PlayStation 5, PC, or a USB wall adapter.

Obraz: Tył view of the Razer Raiju V3 Pro Controller with the USB-C charging cable connected.
2. Connecting to PlayStation 5 (Wireless)
- Sprawdź, czy kontroler jest naładowany.
- Connect the Razer HyperSpeed Wireless USB dongle to an available USB port on your PlayStation 5 console.
- Press the PlayStation button on the controller to power it on. The controller should automatically pair with the dongle.
- If pairing does not occur automatically, press and hold the pairing button on the dongle and the pairing button on the controller simultaneously until the indicator lights show a successful connection.
3. Łączenie z komputerem (bezprzewodowo)
- Sprawdź, czy kontroler jest naładowany.
- Connect the Razer HyperSpeed Wireless USB dongle to an available USB port on your PC.
- Press the PlayStation button on the controller to power it on. The controller should automatically pair with the dongle.
- For advanced customization and driver installation, download and install Razer Synapse 4 from the official Razer webstrona.

Image: The Razer HyperSpeed Wireless USB dongle, used for low-latency wireless connection.
4. Wired Connection (PS5 & PC)
To use the controller in wired mode, connect the USB-C to USB-A cable directly from the controller to your PlayStation 5 console or PC. The controller will automatically switch to wired mode and charge simultaneously.
Instrukcja obsługi
1. Układ kontrolera
The Razer Raiju V3 Pro features a symmetrical analog stick layout, a standard D-pad, PlayStation action buttons (Triangle, Circle, Cross, Square), and additional customizable buttons.

Obraz: widok z góry view of the Razer Raiju V3 Pro Controller, showing the full button and stick layout.
2. Remappable Buttons
The controller includes 4 removable rear buttons and 2 top grip buttons, totaling 6 remappable buttons. These can be configured using the Razer mobile app or Razer Synapse 4 to assign various functions, enhancing gameplay control.

Obraz: Tył view of the Razer Raiju V3 Pro Controller, highlighting the four removable rear buttons and two top grip buttons.
3. TMR Analog Sticks with Interchangeable Caps
The controller features TMR (Tuned Magnetic Resistance) analog sticks designed for precise control. The stick caps are interchangeable, allowing users to customize the feel and height of the sticks to their preference.

Image: Close-up of the Razer Raiju V3 Pro's analog sticks, featuring green interchangeable caps.
4. Razer Pro HyperTriggers
The Razer Pro HyperTriggers offer instant response with ultra-fast mouse-click actuation. They can also be adjusted for full analog control for actions requiring variable input. Each trigger can be independently configured via a dedicated switch.
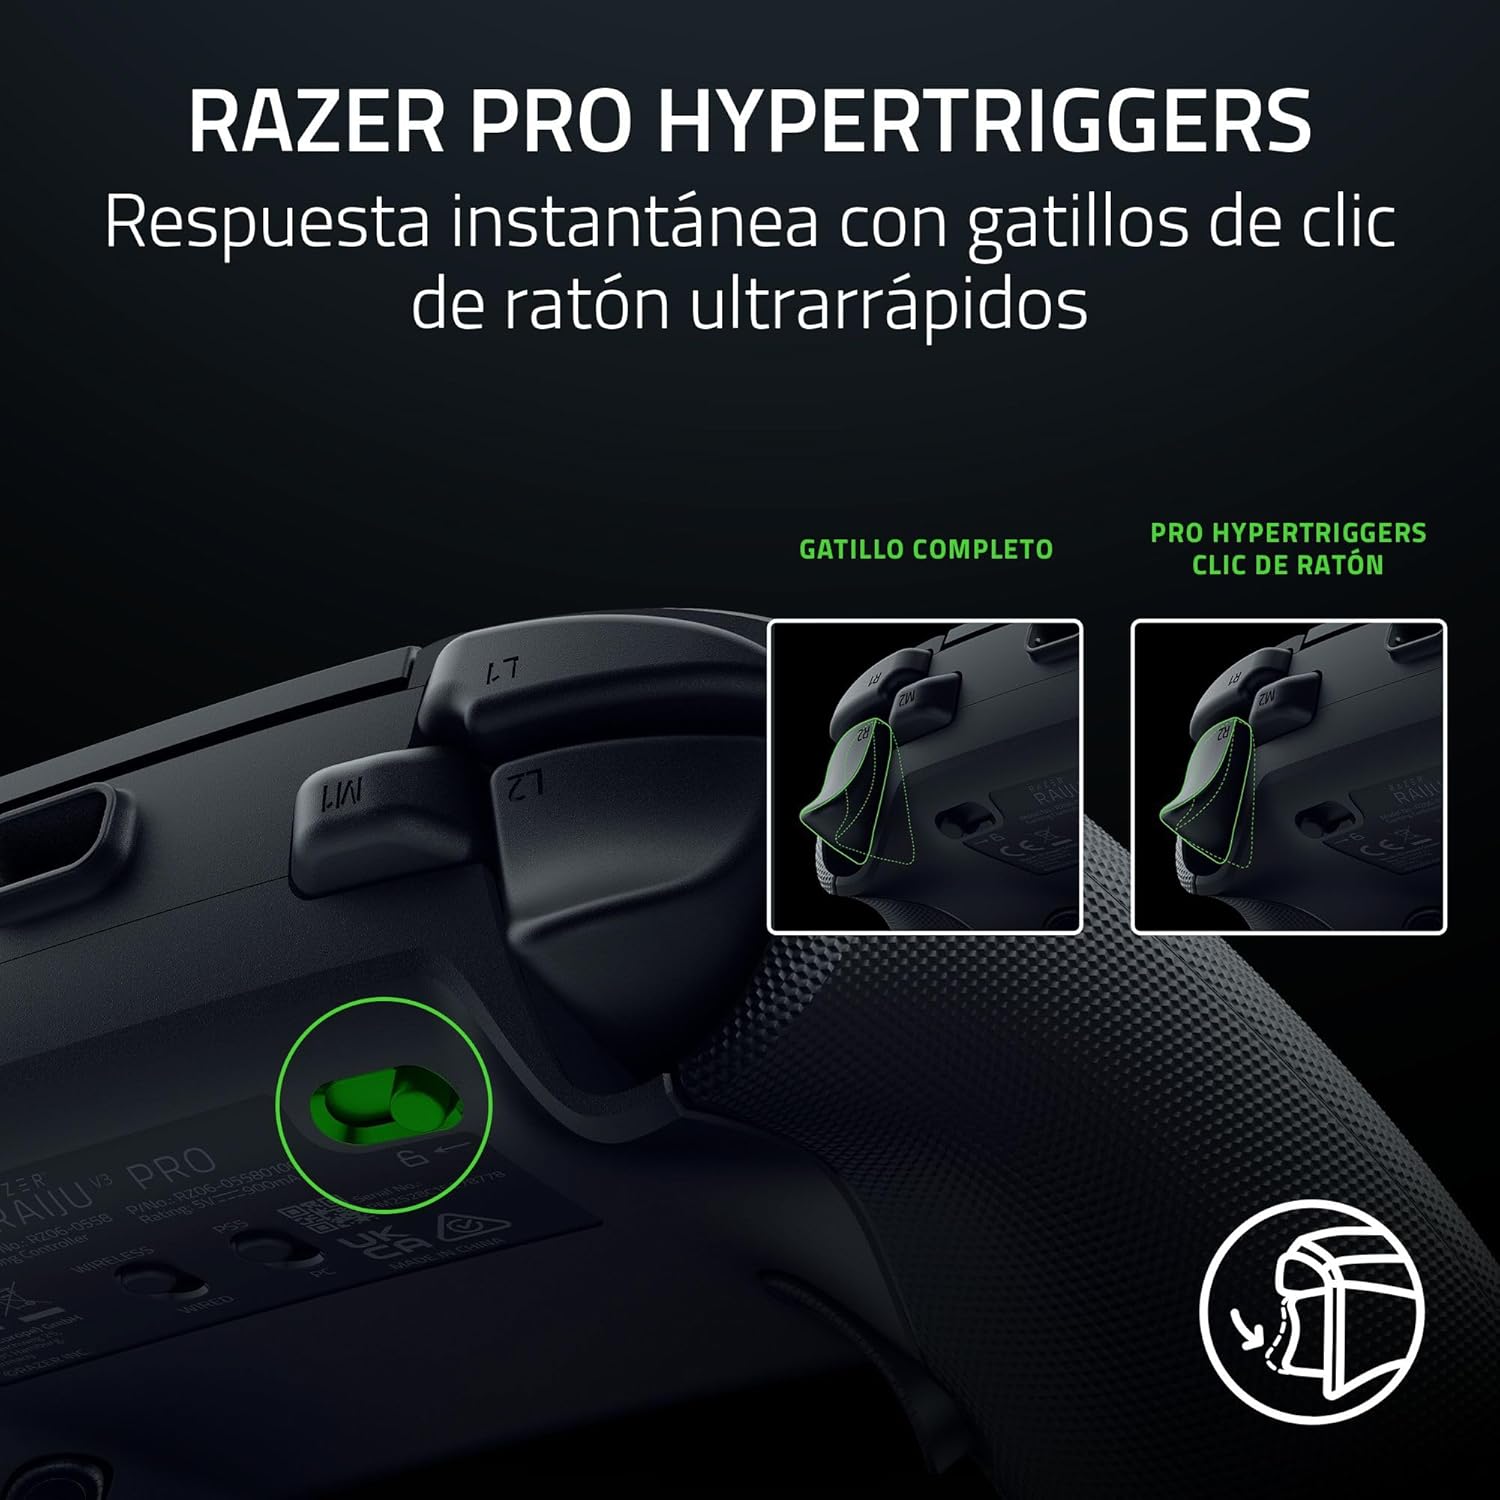
Obraz: Szczegółowy view of the Razer Pro HyperTrigger mechanism, illustrating the switch for adjusting trigger travel.
5. Razer Mecha-Tactile Action Buttons and 8-way D-Pad
The action buttons and 8-way floating D-pad utilize Razer Mecha-Tactile technology, combining the speed of mechanical switches with the cushioned feel of a membrane. This provides rapid actuation with tactile feedback.
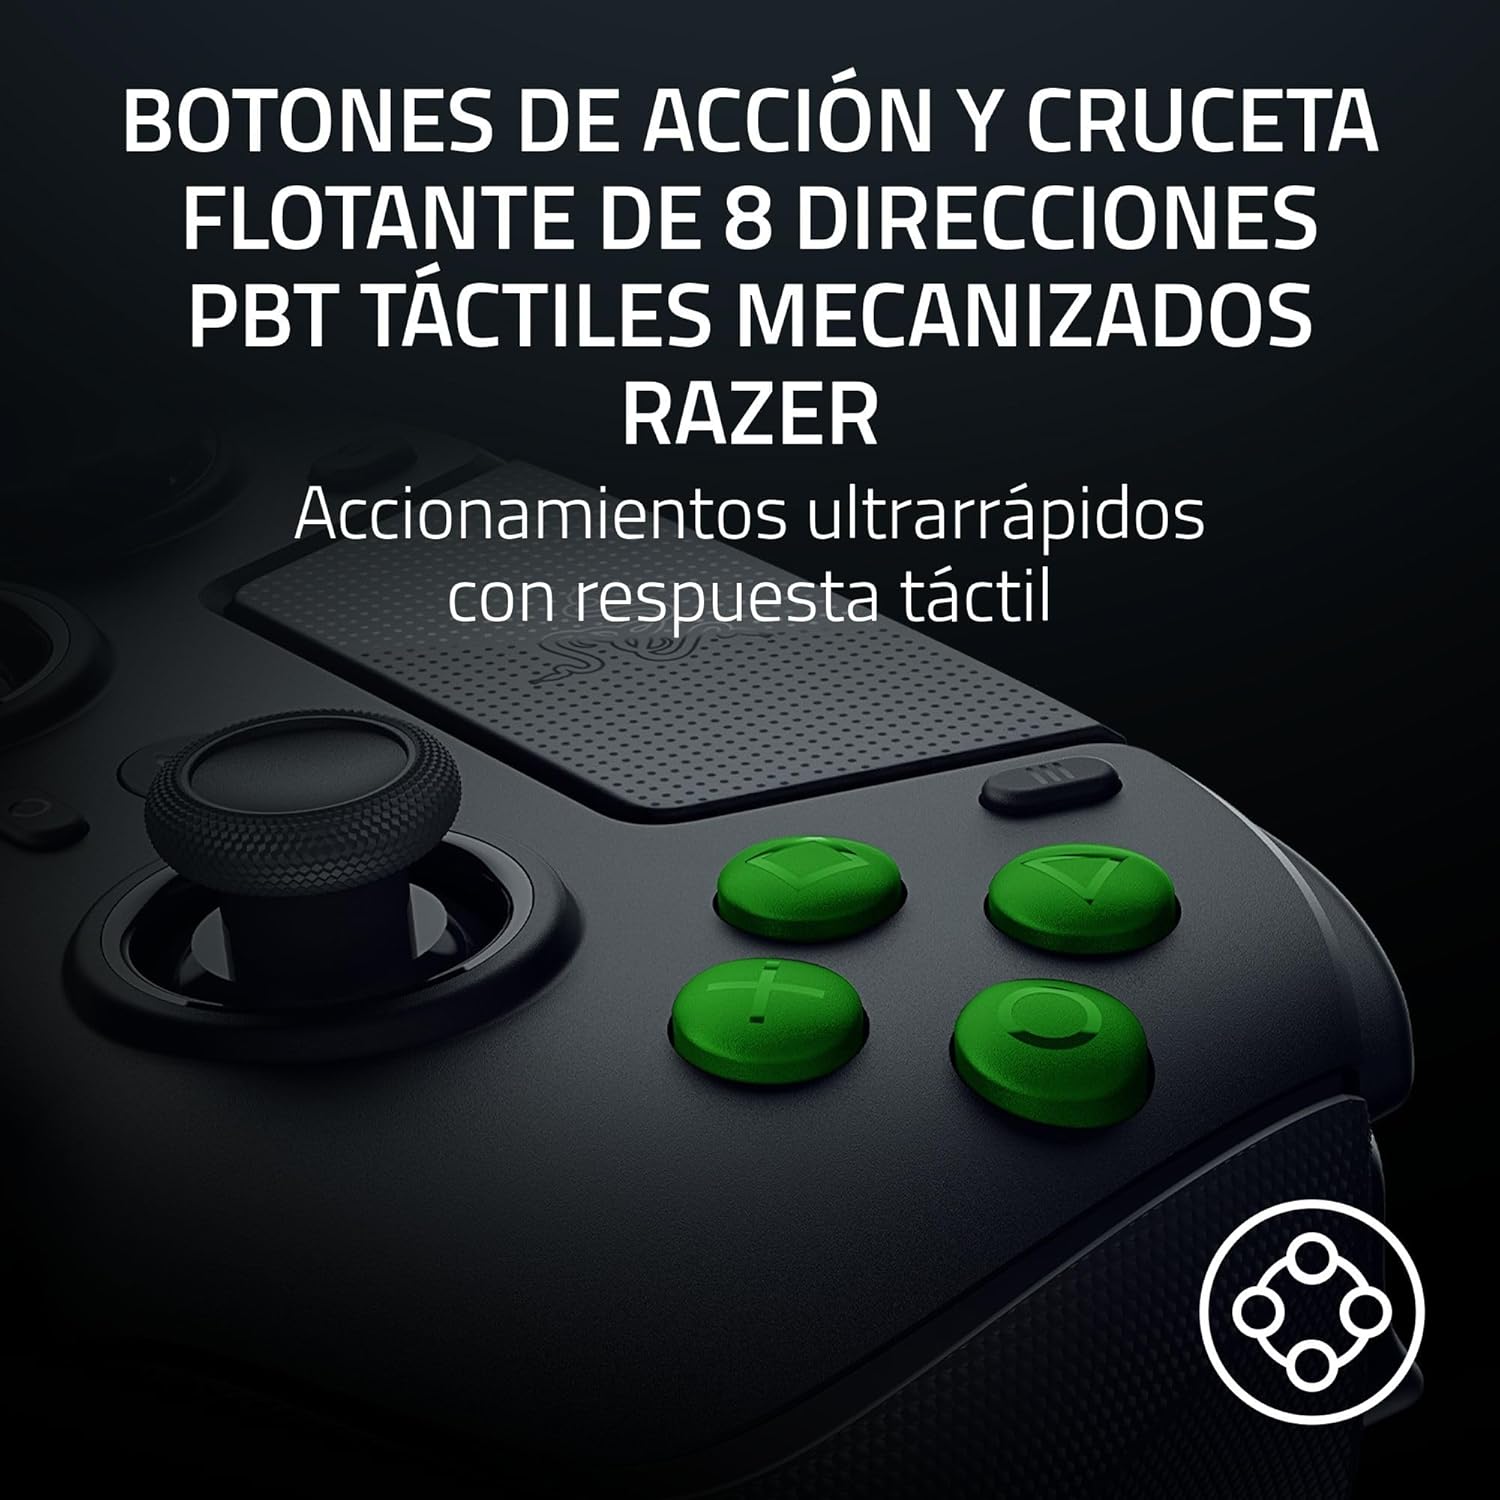
Image: Close-up of the Razer Raiju V3 Pro's Mecha-Tactile action buttons and 8-way D-pad.
6. Razer HyperSpeed Wireless
The controller uses Razer HyperSpeed Wireless technology, providing an ultra-low latency 2.4 GHz connection for reliable and fast performance, essential for competitive gaming.
7. Professional-Level Customization
Customize your controller settings using the Razer mobile app or Razer Synapse 4 software on PC. This includes adjusting analog stick sensitivity, saving up to 4 onboard profiles, and remapping the 6 programmable buttons.

Image: The Razer Raiju V3 Pro Controller alongside an icon representing the mobile customization application.
8. Optimized PC Compatibility
When used with a PC, the controller supports a 2000 Hz wired polling rate. It also allows for touchpad cursor control and the assignment of keyboard commands to the controller's 6 programmable buttons.
Konserwacja
1. Czyszczenie
Do czyszczenia kontrolera należy używać miękkiej, suchej ściereczki. W przypadku uporczywych zabrudzeń należy użyć delikatnej ściereczki.amp cloth with mild soap can be used, ensuring no liquid enters the controller's openings. Avoid abrasive cleaners or solvents.
2. Przechowywanie
When not in use, store the controller and its accessories in the provided carrying case to protect it from dust, scratches, and impacts. This is especially recommended for transport.

Image: The Razer Raiju V3 Pro Controller, interchangeable stick caps, and USB cable neatly stored within its protective carrying case.
3. Pielęgnacja baterii
To prolong battery life, avoid fully discharging the controller frequently. If storing for an extended period, charge the battery to approximately 50% and store in a cool, dry place.
Rozwiązywanie problemów
Kontroler nie łączy się/nie odpowiada
- Sprawdź baterię: Sprawdź, czy kontroler jest odpowiednio naładowany.
- Połączenie bezprzewodowe: Verify the HyperSpeed Wireless USB dongle is securely connected to the console/PC. Try re-pairing the controller by holding the pairing buttons on both the controller and dongle.
- Połączenie przewodowe: Upewnij się, że kabel USB-C jest prawidłowo podłączony do kontrolera i konsoli/komputera. Spróbuj użyć innego portu USB lub kabla.
- PC Drivers: For PC, ensure Razer Synapse 4 is installed and updated, and that the controller drivers are correctly recognized.
Buttons/Sticks Not Functioning Correctly
- Kalibrowanie: Use the Razer mobile app or Synapse 4 to recalibrate analog sticks and triggers if they exhibit drift or incorrect input.
- Przeszkoda fizyczna: Check for any debris or foreign objects obstructing button presses or stick movement.
- Aktualizacja firmware: Ensure the controller's firmware is up to date via Razer Synapse 4.
Resetowanie kontrolera
If the controller becomes unresponsive, locate the reset pinhole on the back of the controller. Use a small, pointed object (like a paperclip) to press and hold the reset button for a few seconds. This will perform a soft reset.
Specyfikacje
| Funkcja | Szczegół |
|---|---|
| Numer modelu | RZ06-05580100-R3G1 |
| Łączność | Razer HyperSpeed Wireless (2.4 GHz), USB-C Wired |
| Zgodność | PlayStation 5, komputer |
| Pikolak | Razer Mecha-Tactile Action Buttons, 8-way Floating D-Pad, 4 Removable Rear Buttons, 2 Top Grip Buttons |
| Drążki analogowe | TMR Analog Sticks with Interchangeable Caps |
| Wyzwalacze | Razer Pro HyperTriggers (Adjustable) |
| Typ baterii | 1 litowo-jonowy (w zestawie) |
| Wymiary (dł. x szer. x wys.) | Wymiary 16.85 x 11.34 x 6.51 cm |
| Waga | 258 gramów |
| Dołączone akcesoria | Carrying case, 2m braided USB-C cable, interchangeable stick caps, tool for rear button removal |
Gwarancja i wsparcie
For warranty information, technical support, or to access additional resources, please visit the official Razer support webZachowaj dowód zakupu na wypadek roszczeń gwarancyjnych.
Obsługa Razer Webstrona: www.razer.com/support