
xTool F2 Ultra
xTool F2 Ultra Dual Laser Engraver User Manual
Model: F2 Ultra
1. Wprowadzenie
This manual provides essential information for the safe and efficient operation of your xTool F2 Ultra Laser Engraver. Please read this manual thoroughly before using the device to ensure proper setup, operation, and maintenance. The xTool F2 Ultra is a versatile dual-laser system, combining a 60W MOPA fiber laser and a 40W diode laser for engraving and cutting a wide range of materials.
2. Informacje dotyczące bezpieczeństwa
The xTool F2 Ultra is a Class 4 laser engraver. Adherence to safety guidelines is crucial to prevent injury and damage. Always operate the machine in a well-ventilated area and wear appropriate personal protective equipment (PPE), including laser safety glasses. Never look directly into the laser beam. Ensure the machine's enclosure is closed during operation to prevent laser leakage.
- Ochrona oczu: Always wear certified laser safety glasses when the machine is operating.
- Wentylacja: Operate in a well-ventilated space to dissipate fumes and particles.
- Załącznik: Keep the machine's fully enclosed design closed during operation.
- Zgodność materiałów: Only engrave or cut materials approved for laser processing. Avoid highly reflective or flammable materials without proper precautions.
- Awaryjny postój: Zapoznaj się z lokalizacją przycisku zatrzymania awaryjnego.
3. Instalacja i montaż
This section outlines the steps for setting up your xTool F2 Ultra laser engraver. Ensure all components are present before beginning assembly.
3.1 Rozpakowanie
Carefully remove all components from the packaging. Verify that all items listed in the packing list are included. Retain packaging for future transport or storage.
3.2 Identyfikacja komponentów
Identify the main unit, power adapter, USB cable, and any included accessories such as the conveyor module (if applicable).
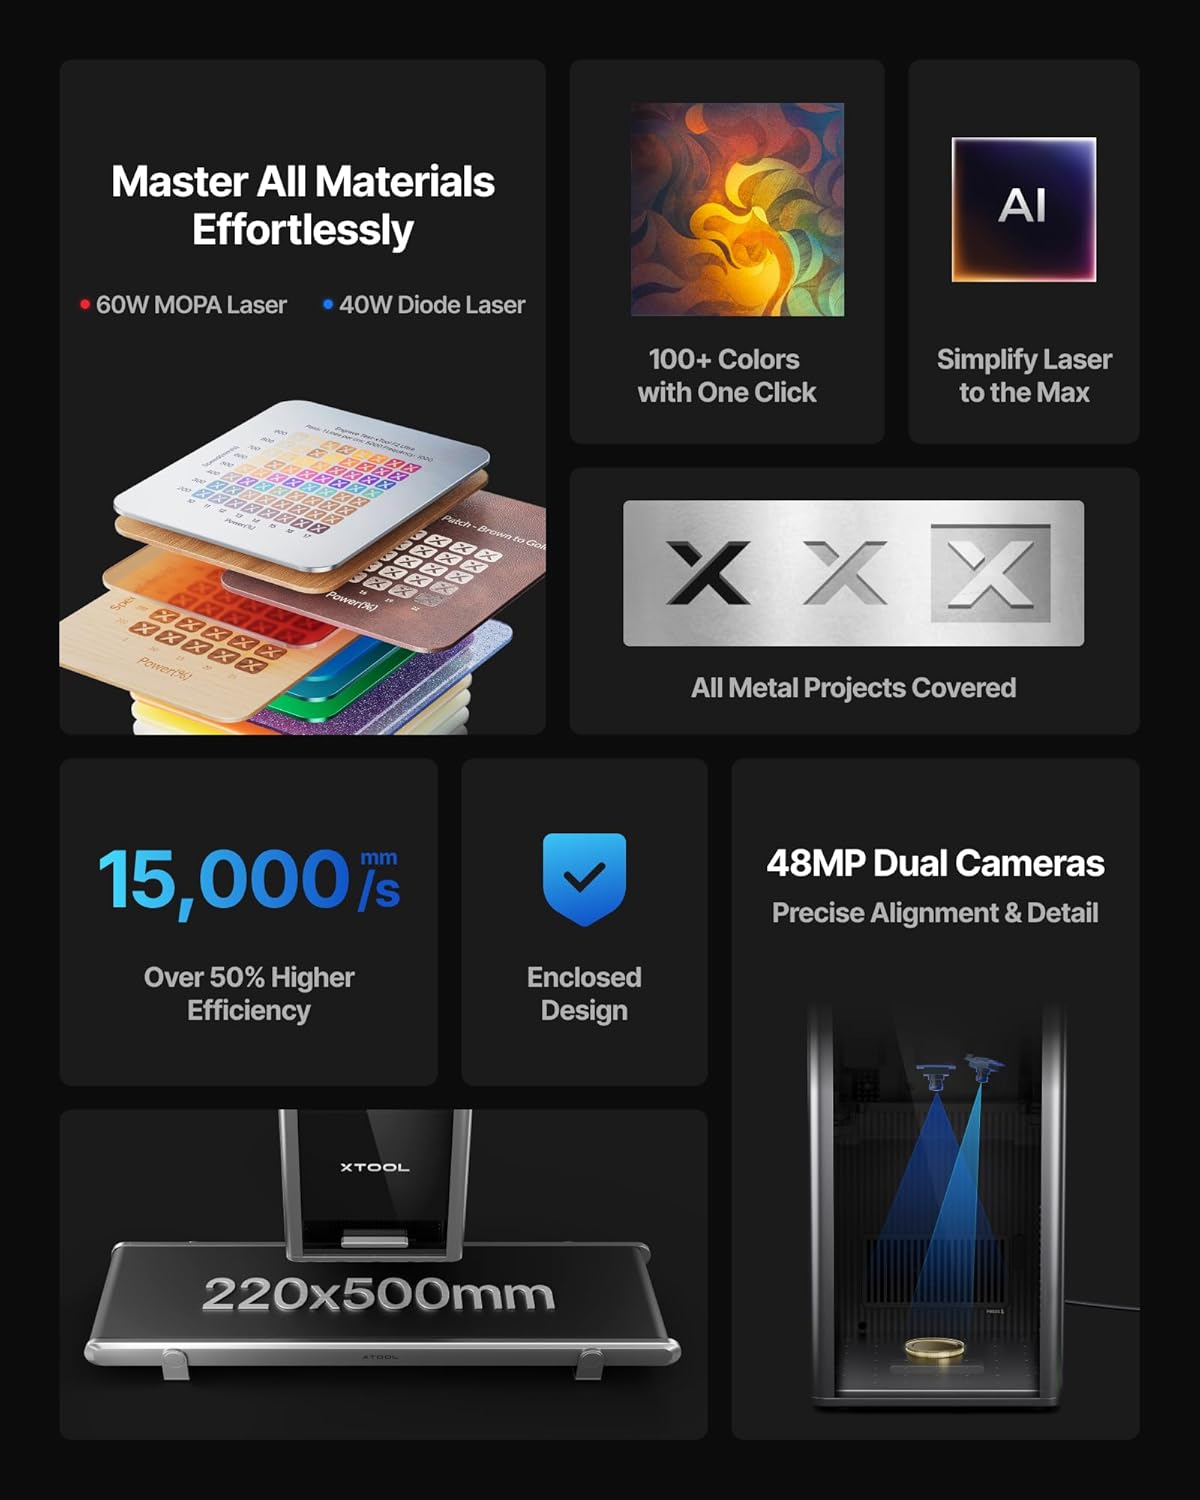
Image: xTool F2 Ultra main unit with various accessories. This image shows the compact design of the engraver and its accompanying parts.
3.3 Podłączanie zasilania i danych
- Podłącz zasilacz do grawerki, a następnie do odpowiedniego gniazdka elektrycznego.
- Podłącz grawerkę do komputera za pomocą dołączonego kabla USB.
3.4 Instalacja oprogramowania
Pobierz i zainstaluj najnowszą wersję oprogramowania xTool z oficjalnej strony xTool webwitrynę. Postępuj zgodnie z instrukcjami wyświetlanymi na ekranie, aby przeprowadzić instalację.
For software download and detailed instructions, visit: https://s.xtool.com/mt/985
4. Instrukcja obsługi
This section details the steps for operating your xTool F2 Ultra for engraving and cutting tasks.
4.1 Przygotowanie materiału
Place the material to be processed onto the working platform. Ensure it is flat and securely positioned. The dual 48MP AI cameras assist with precise positioning.

Image: Illustration of the xTool F2 Ultra's dual 48MP cameras providing precise alignment and detail for engraving.
4.2 Przepływ pracy oprogramowania
- Open the xTool software and import your design.
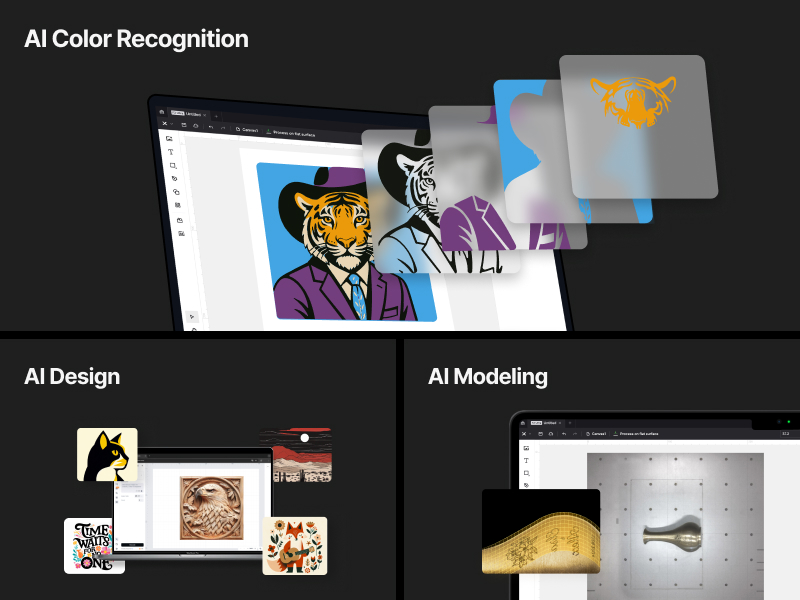
- The AI system can auto-detect materials and suggest optimal settings. Verify or adjust these settings as needed.
- Use the one-click focus and preview function to ensure accurate placement and desired outcome.
- Select the appropriate laser (60W MOPA for metals, 40W Diode for other materials) based on your project requirements.
- Initiate the engraving or cutting process. Monitor the operation closely.

Image: Screenshot of the xTool software interface demonstrating AI-powered material detection and suggested settings.
4.3 Using the Conveyor Module (Optional)
For automated batch processing and larger materials, attach the conveyor module. This expands the working area from 8.7"x 8.7" to 8.7" x 19.7".

Image: Comparison of the xTool F2 Ultra's working area, illustrating the standard 220x220mm area and the expanded 220x500mm area with the conveyor module.
4.4 Laser Capabilities
- Laser światłowodowy MOPA o mocy 60 W: Ideal for all metals, including 3D embossing, deep engraving, color engraving (100+ colors), and cutting up to 2mm metal. Also supports black marking on aluminum, laser cleaning, and thin metal welding.
- Laser diodowy 40W: Suitable for non-metal materials such as wood, acrylic (up to 20mm cut), leather, glass, rubber, and fabric (up to 23mm wood cut).
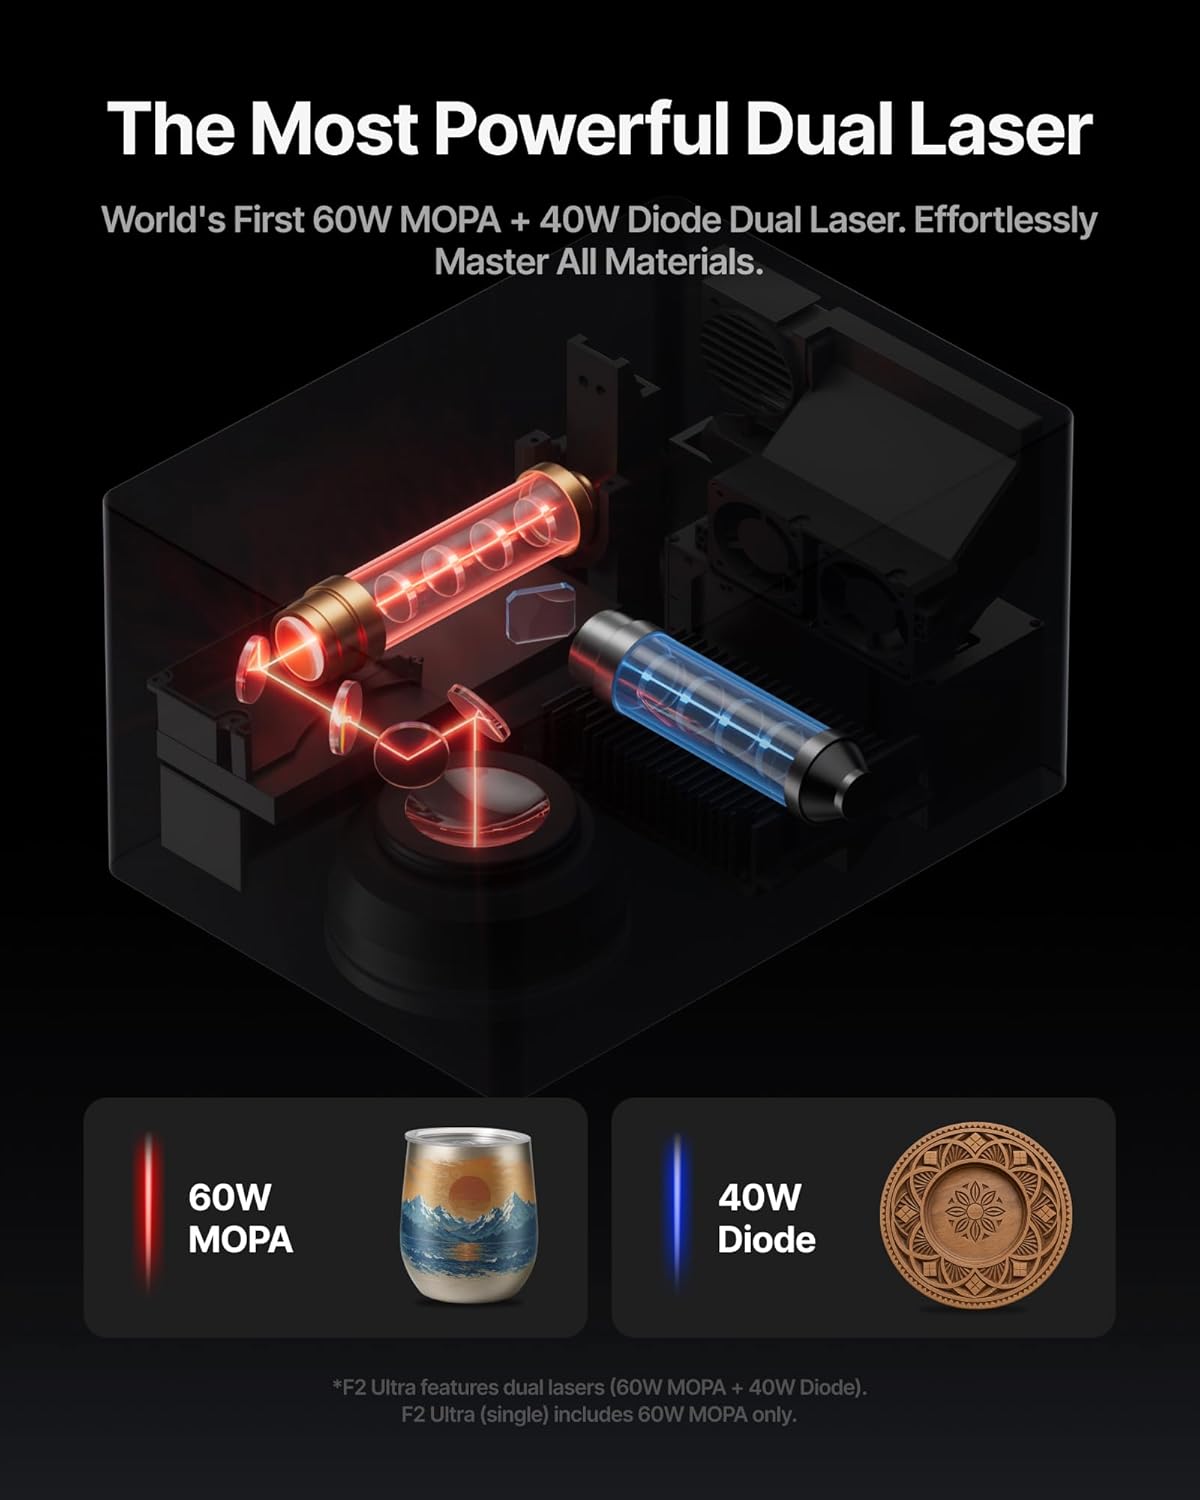
Image: An internal diagram illustrating the dual laser system of the xTool F2 Ultra, highlighting the 60W MOPA and 40W Diode lasers.
Obraz: Byłyamples of various metal engraving techniques possible with the MOPA laser, including color engraving, deep engraving, and embossing.
Video: A demonstration of the xTool F2 Ultra laser engraver in action, showing the engraving process on wood and cutting on leather, followed by a heat press application.
5. Konserwacja
Regular maintenance ensures the longevity and optimal performance of your xTool F2 Ultra.
- Czyszczenie obiektywu: Periodically clean the laser lens with a soft, lint-free cloth and lens cleaning solution to maintain laser precision.
- Usuwanie kurzu: Use a soft brush or compressed air to remove dust and debris from the interior and exterior of the machine.
- System wentylacji: Ensure the ventilation system is clear of obstructions to maintain proper airflow.
- Aktualizacje oprogramowania układowego: Regularly check for and install firmware updates for improved functionality and performance.
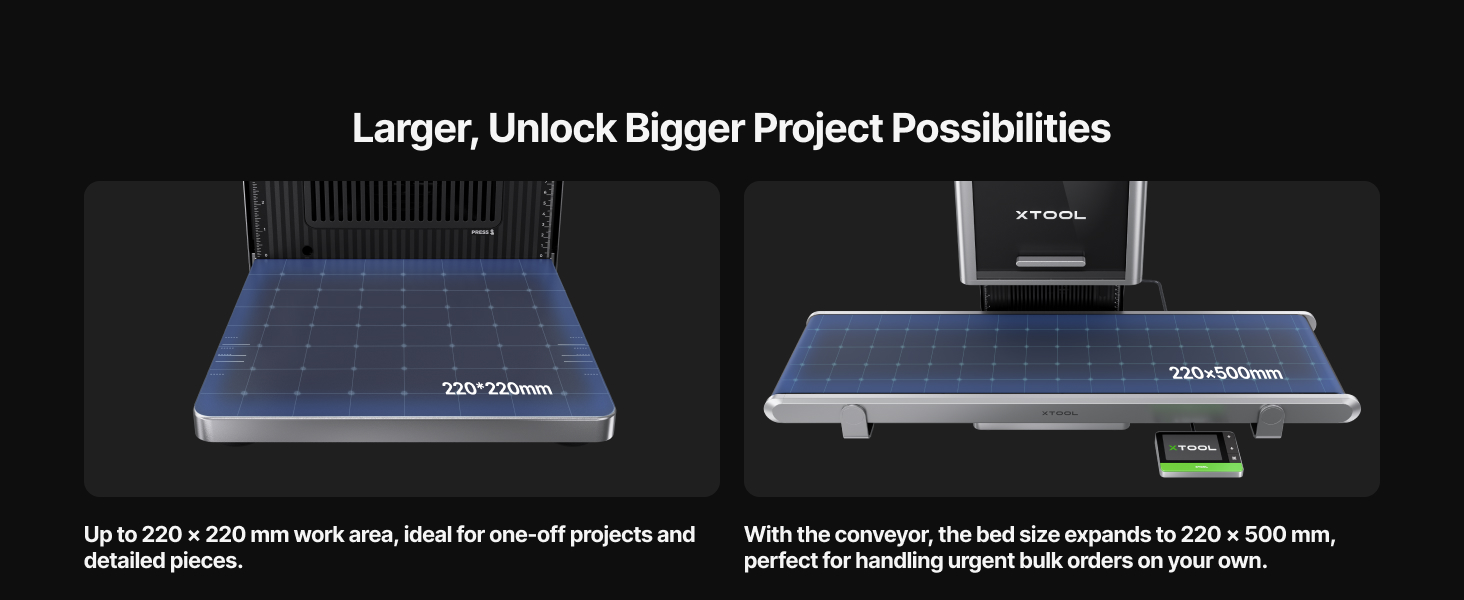
Image: Diagram highlighting the safety features and design elements of the xTool F2 Ultra, including its fully enclosed design and safety sensor.
6. Rozwiązywanie Problemów
W tej sekcji znajdziesz rozwiązania typowych problemów, na jakie możesz natrafić.
| Problem | Możliwa przyczyna | Rozwiązanie |
|---|---|---|
| Laser nie działa | Luźny kabel zasilający, włączony wyłącznik awaryjny, błąd oprogramowania. | Check power connections, disengage emergency stop, restart software and machine. |
| Słaba jakość grawerowania | Incorrect focus, dirty lens, unsuitable material settings. | Perform one-click focus, clean the laser lens, adjust material settings in software. |
| Maszyna nie łączy się z komputerem | Problem z kablem USB, sterownik nie został zainstalowany, konflikt oprogramowania. | Try a different USB port/cable, reinstall drivers, ensure no other software is interfering. |
7. Specyfikacje
| Funkcja | Szczegół |
|---|---|
| Typ lasera | 60W MOPA Fiber Laser & 40W Diode Laser |
| Prędkość grawerowania | Do 15,000 mm/s |
| Kamera | Podwójny aparat 48 MP AI |
| Dokładność pozycjonowania | 0.2mm |
| Working Area (Standard) | 8.7" x 8.7" (220 mm x 220 mm) |
| Working Area (with Conveyor) | 8.7" x 19.7" (220 mm x 500 mm) |
| Metal Cutting Capability | Up to 2mm metal (with 60W MOPA) |
| Acrylic Cutting Capability | Up to 20mm acrylic (with 40W Diode) |
| Wood Cutting Capability | Up to 23mm wood (with 40W Diode) |
| Klasa bezpieczeństwa | Produkt laserowy klasy 4 |
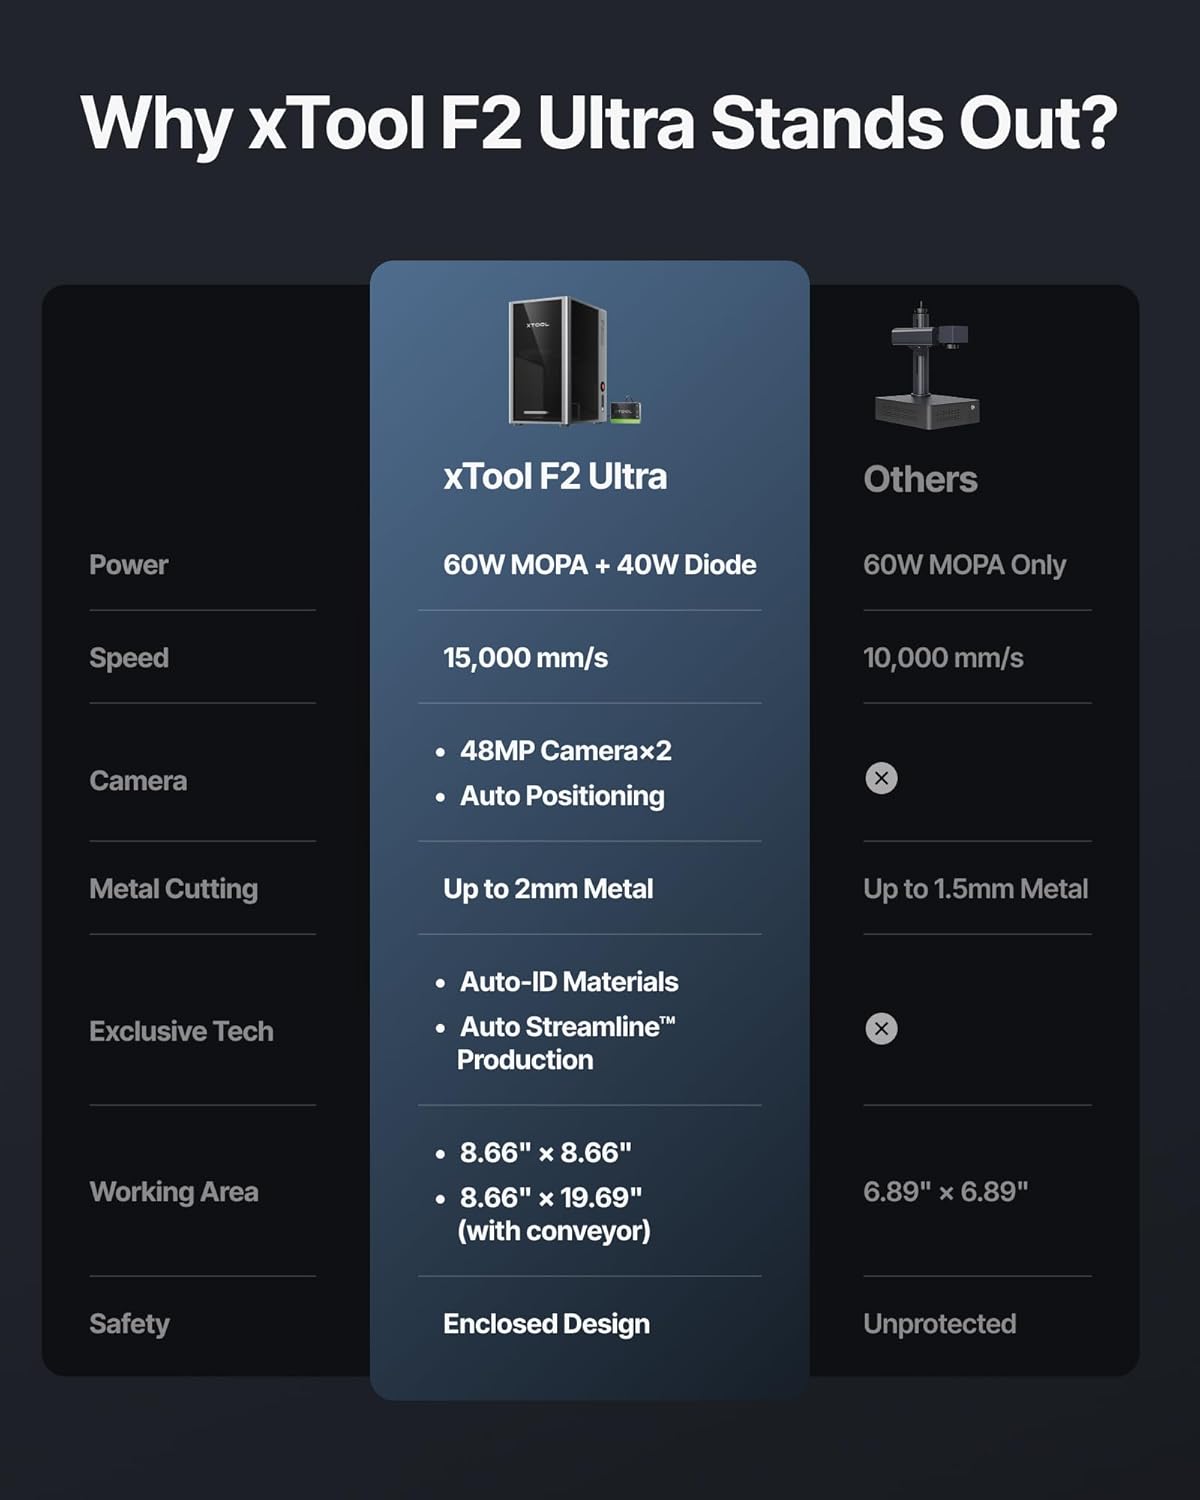
Image: A comparison table highlighting the key features and specifications of the xTool F2 Ultra against other laser engravers, detailing power, speed, camera, metal cutting, exclusive tech, working area, and safety.
8. Informacje o gwarancji
For detailed warranty information, please refer to the official xTool website or the warranty card included with your product. Typically, xTool products come with a limited warranty covering manufacturing defects for a specified period from the date of purchase. Keep your proof of purchase for warranty claims.
9. Obsługa klienta
If you require technical assistance, have questions about your xTool F2 Ultra, or need to report an issue, please contact xTool customer support through their official website. Provide your product model and serial number for faster service.
- Wsparcie online: Visit the xTool official website for FAQs, tutorials, and contact forms.
- Fora społecznościowe: Engage with other xTool users for tips and solutions.
Ask a question about this manual
Ask about setup, troubleshooting, compatibility, parts, safety, or missing instructions. Manuals+ will review the question and use this page’s manual context to help answer it.