
1. Wprowadzenie
This manual provides detailed instructions for the installation, operation, and maintenance of your UNITOPSCI Android 15 Car Stereo. Please read this manual thoroughly before using the product to ensure proper functionality and safety. This unit is specifically designed for Lexus ES models from 2001 to 2005 (ES250, ES300, ES330).

Image 1.1: UNITOPSCI Android 15 Car Stereo with main accessories.
2. Zawartość opakowania
Sprawdź, czy w przesyłce znajdują się wszystkie elementy wymienione poniżej:
- 1 x radio samochodowe
- 1 x kabel zasilający
- 1 x tył samochodu View Kamera
- 1 x zestaw narzędzi instalacyjnych
- 1 x antena GPS
- 1 x kabel wejściowy kamery tylnej
- Kabel 1 x RCA
- Kable 2 x USB
- 1 x Instrukcja obsługi
- 1 x Mikrofon

Image 2.1: Visual representation of the package contents and unit dimensions.
3. Zgodność i ważne uwagi
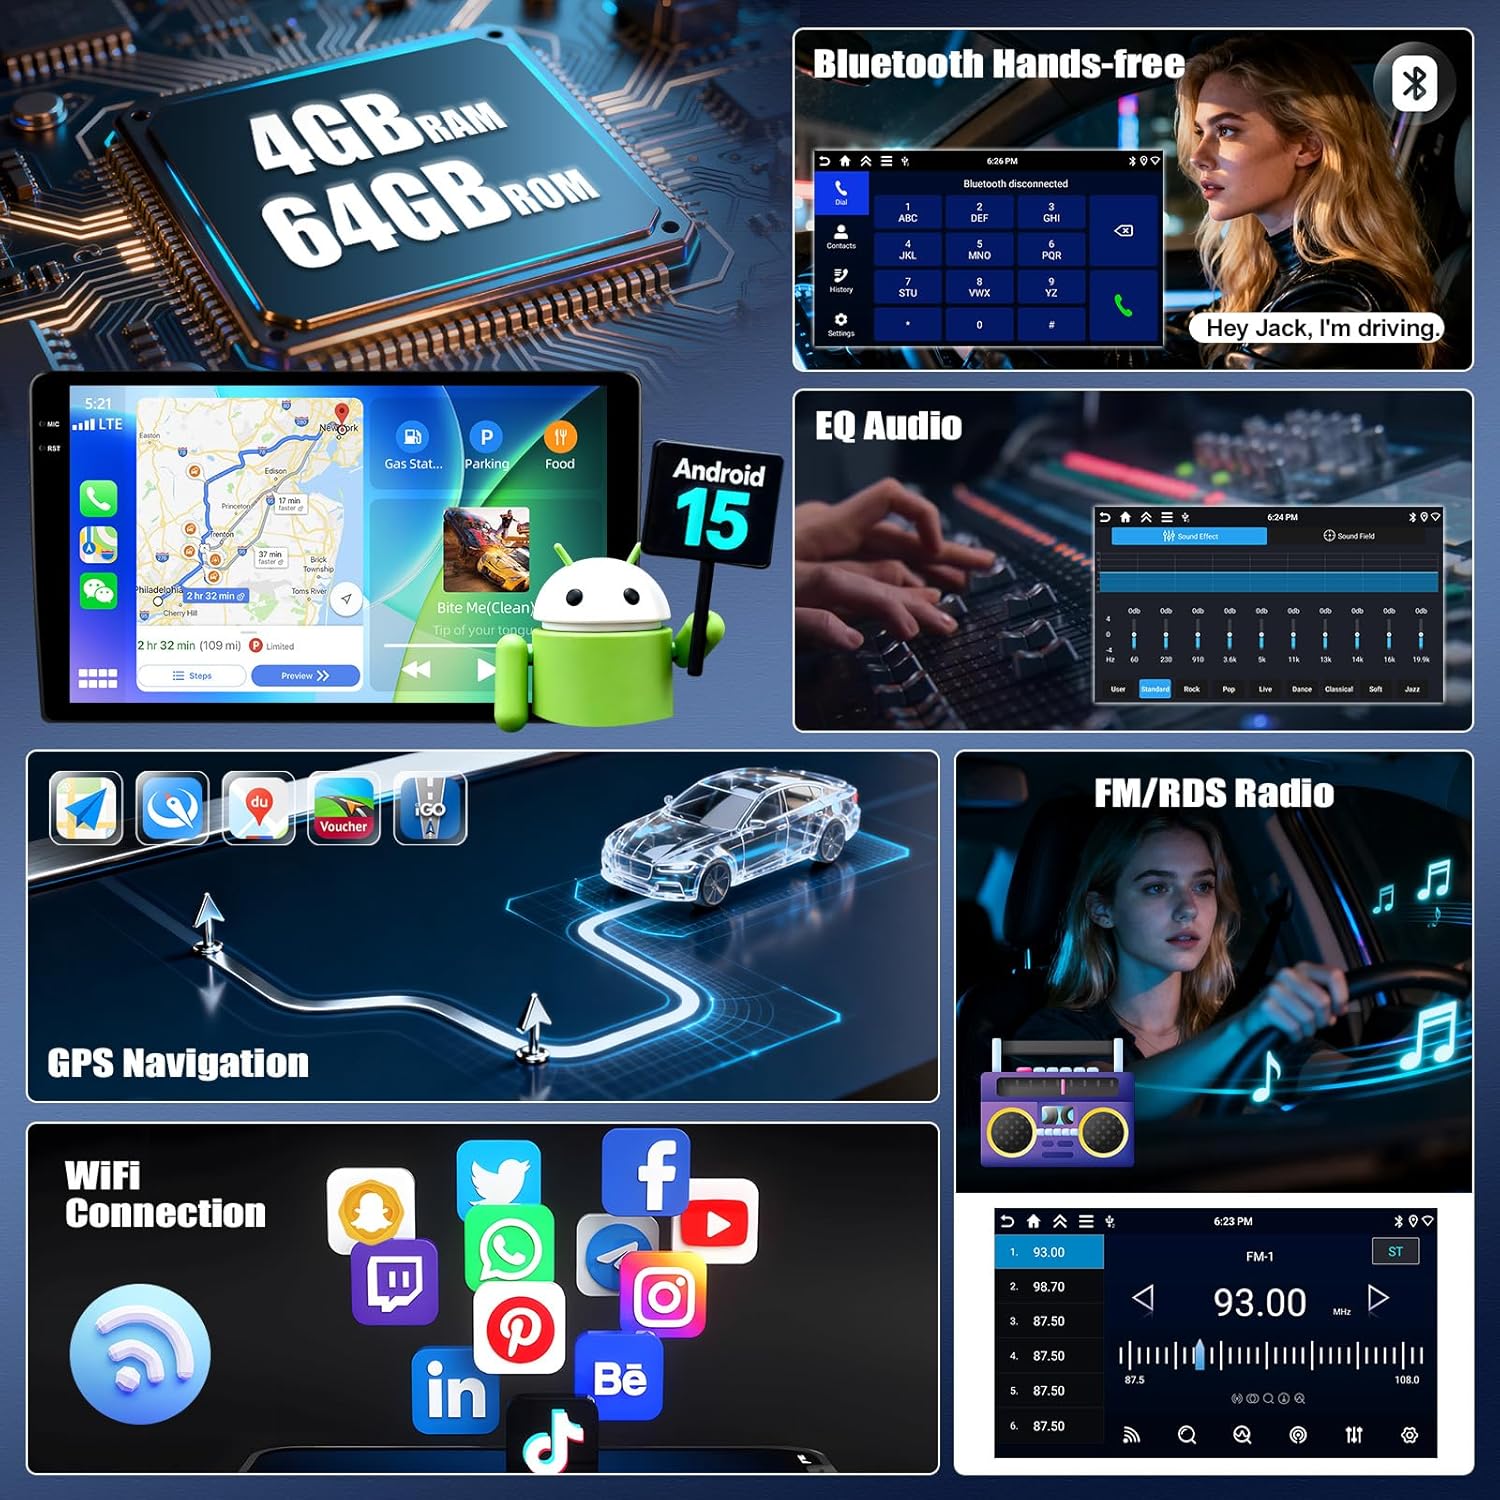
This car stereo is designed for Lexus ES 2001-2005 ES250/300/330 models. It features a 9-inch IPS touchscreen with 1280*720P resolution and runs on Android 15 with 4GB RAM and 64GB ROM.
3.1 Wiring Harness and CANBUS
Ważny: If your vehicle's original CD player has an incompatible back interface (as shown in Image 3.1, types B, C, or D), you may need to purchase an additional wiring harness and CANBUS decoder separately. The standard wiring harness included is for basic configurations (Type A). Please consult customer support if you are unsure about your vehicle's specific configuration.
Obraz 3.1: Examples of compatible (A) and incompatible (B, C, D) CD player back interfaces.
4. Konfiguracja i instalacja
Installation of this car stereo requires technical knowledge. It is recommended to seek professional installation to avoid damage to the unit or your vehicle. Ensure the vehicle's battery is disconnected before beginning installation.
4.1 General Installation Steps (Consult a professional or vehicle-specific guide for detailed steps):
- Remove the original car stereo unit from the dashboard.
- Connect the provided power cable, RCA cables, USB cables, GPS antenna, and rear camera input cable to the new head unit.
- If required, connect the additional wiring harness and CANBUS decoder.
- Carefully route all cables to their respective locations in the vehicle.
- Mount the new car stereo into the dashboard opening.
- Podłącz ponownie akumulator pojazdu i sprawdź wszystkie funkcje.
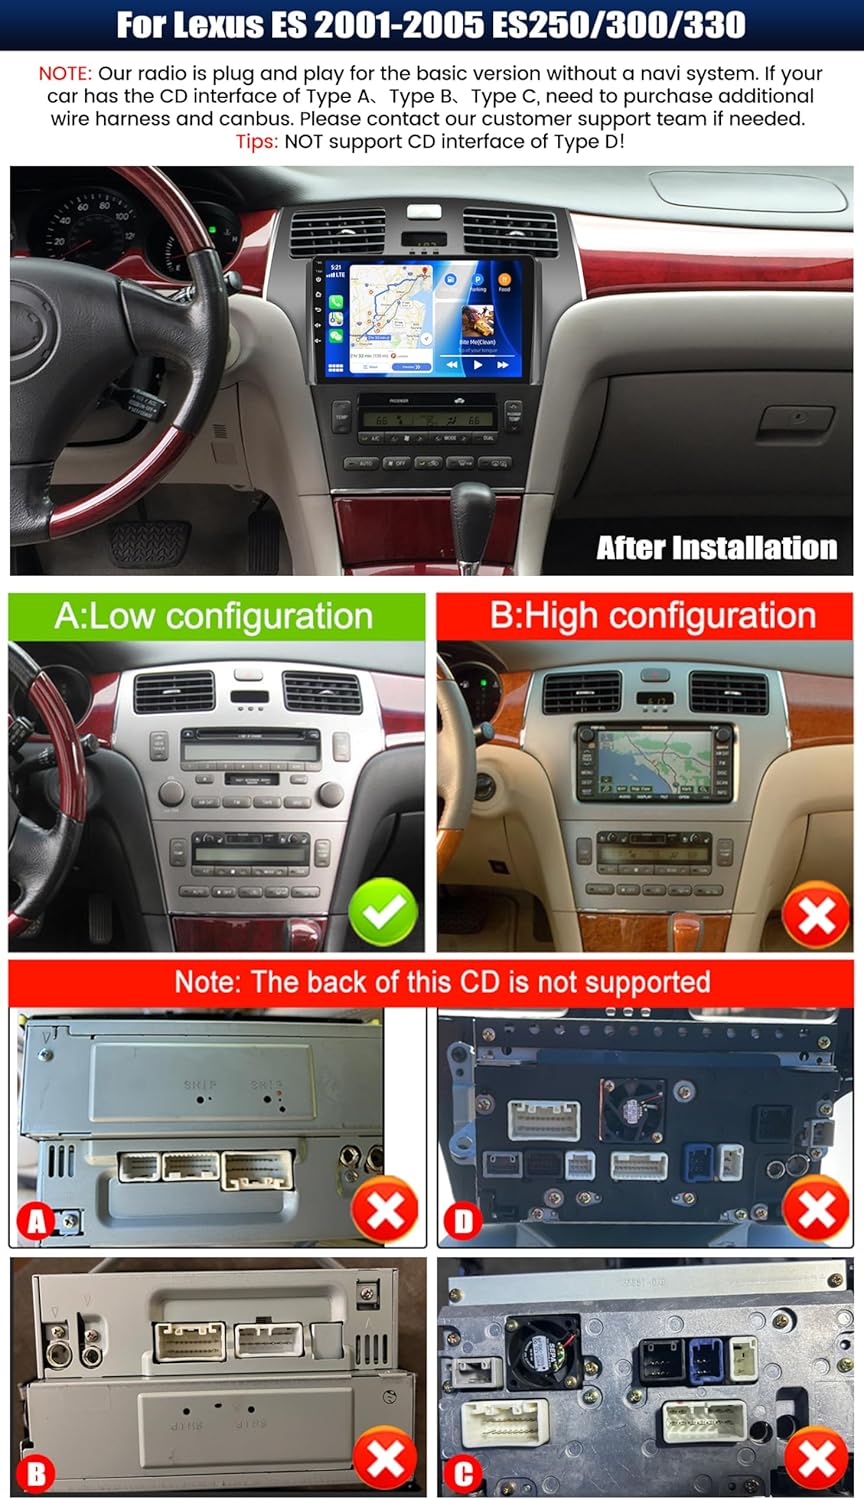
Obraz 4.1: Example of the car stereo installed in a Lexus ES dashboard.
5. Instrukcja obsługi
5.1 Bezprzewodowy CarPlay / Android Auto
The unit supports wireless CarPlay for iOS devices and wireless Android Auto for Android devices. This allows seamless integration of your smartphone's navigation, music, calls, and messaging functions directly on the car stereo display.
- Upewnij się, że w smartfonie są włączone Bluetooth i Wi-Fi.
- Na samochodowym radiu przejdź do aplikacji CarPlay lub Android Auto.
- Postępuj zgodnie z instrukcjami wyświetlanymi na ekranie, aby sparować urządzenie.
- Once connected, you can access compatible apps and use voice commands (Siri or Google Assistant).

Ilustracja 5.1: Funkcjonalność bezprzewodowego CarPlay i Android Auto.
5.2 Funkcja łącza lustrzanego
Mirror Link allows you to display your smartphone's screen on the car stereo. For Android devices, you can also control the phone directly from the stereo's touchscreen.
- Connect your smartphone to the car stereo via USB or Wi-Fi.
- Open the 'Mirror Link' application on the car stereo.
- Follow the instructions on the screen to establish the connection.
5.3 Nawigacja GPS
The unit features a built-in GPS module supporting both online and offline navigation. Pre-installed maps for North America and worldwide are available.
- To use online navigation, ensure the unit is connected to Wi-Fi.
- For offline navigation, download map data in advance.
- Access navigation through the dedicated 'GPS' or 'Maps' application.

Image 5.2: GPS Navigation and Wi-Fi connectivity.
5.4 Bluetooth 5.0
Podłącz swój smartfon przez Bluetooth, aby wykonywać połączenia w trybie głośnomówiącym i przesyłać strumieniowo muzykę.
- Włącz Bluetooth w swoim smartfonie i samochodowym radiu.
- Szukaj dostępne urządzenia w samochodowym radiu i wybierz swój telefon.
- Potwierdź kod parowania na obu urządzeniach.
- Po sparowaniu możesz bezprzewodowo wykonywać i odbierać połączenia oraz odtwarzać muzykę.
Radio 5.5 FM/RDS
The built-in FM/RDS tuner provides enhanced radio signal reception. You can store up to 18 preset stations.
- Uzyskaj dostęp do aplikacji „Radio”.
- Użyj funkcji skanowania, aby znaleźć dostępne stacje.
- Naciśnij i przytrzymaj przycisk zaprogramowanej stacji, aby zapisać bieżącą stację.
5.6 EQ Audio Settings
Adjust audio output with the integrated Equalizer (EQ) to customize your listening experience. Multiple preset sound effects are available.
- Navigate to 'Sound Settings' or 'EQ' in the main menu.
- Choose from various preset sound modes (e.g., Pop, Rock, Jazz) or manually adjust frequency bands.

Image 5.3: Bluetooth, FM/RDS Radio, and EQ Audio interfaces.
5.7 Sterowanie z kierownicy (SWC)
The unit supports steering wheel controls, allowing you to manage audio functions (volume, track skipping, call answering) without taking your hands off the wheel.
- Access the 'Steering Wheel Control' settings in the system menu.
- Follow the on-screen instructions to program each button on your steering wheel to the desired function.
5.8 Funkcjonalność podzielonego ekranu
The split-screen feature allows you to run two applications simultaneously on the display, such as navigation and music playback. You can adjust the size and position of each app.
- From a running application, swipe from the side or long-press the recent apps button (method may vary by UI theme) to activate split-screen mode.
- Select a second application to run alongside the first.

Image 5.4: Display features including IPS touchscreen, UI themes, and split screen.
6. Tył View Obsługa kamery
Dołączona kamera cofania AHD zapewnia wyraźny obraz view of the area behind your vehicle when reversing. It automatically activates when the vehicle is shifted into reverse gear.
- Ensure the rear camera is properly installed and connected to the 'Rear Camera Input' on the head unit.
- When the vehicle is in reverse, the display will automatically switch to the camera feed, showing parking assist lines.

Image 6.1: Steering Wheel Control interface and AHD Backup Camera view.
7. Specyfikacje
| Funkcja | Specyfikacja |
|---|---|
| System operacyjny | Android 15 |
| BARAN | 4 GB |
| ROM | 64 GB |
| Rozmiar wyświetlacza | 9 cali |
| Rozdzielczość ekranu | 1280 x 720P IPS |
| Wersja Bluetooth | 5.0 |
| Łączność | Bluetooth, Wi-Fi, USB |
| Cechy specjalne | Wireless CarPlay, Android Auto, Mirror Link, GPS Navigation, FM/RDS, EQ, Steering Wheel Control, AHD Backup Camera, Multiple UI Themes, Split Screen |
| Typ mapy | North America, Worldwide (offline/online) |
| Waga przedmiotu | 3.89 funta |
| Wymiary opakowania | 15.35 x 9.65 x 3.35 cala |
8. Rozwiązywanie Problemów
Jeśli masz problemy z radiem samochodowym, zapoznaj się z poniższymi typowymi procedurami rozwiązywania problemów:
- Brak zasilania: Sprawdź wszystkie połączenia zasilania i bezpieczniki. Upewnij się, że akumulator pojazdu jest prawidłowo podłączony.
- Brak dźwięku: Verify speaker connections. Check volume levels and EQ settings. Ensure the correct audio source is selected.
- Utrata sygnału GPS: Upewnij się, że antena GPS jest prawidłowo zainstalowana i ma zapewnioną przejrzystość. view nieba. Sprawdź ustawienia GPS w urządzeniu.
- Problemy z połączeniem Bluetooth: Ensure Bluetooth is enabled on both devices. Delete previous pairings and attempt to re-pair.
- Brak połączenia CarPlay/Android Auto: Ensure Wi-Fi and Bluetooth are active on your phone. Try restarting both the phone and the car stereo. Check for software updates for the car stereo.
- Kamera tylna nie jest wyświetlana: Check the camera's power and video input connections. Ensure the reverse gear signal wire is correctly connected.
- Brak reakcji ekranu dotykowego: Try restarting the unit. If the issue persists, a factory reset may be necessary (note: this will erase all user data).
W przypadku powtarzających się problemów prosimy o kontakt z obsługą klienta.
9. Konserwacja
Właściwa konserwacja zapewnia długowieczność i optymalną pracę radia samochodowego.
- Czyszczenie ekranu: Delikatnie przetrzyj ekran dotykowy miękką, niepozostawiającą włókien ściereczką. W przypadku uporczywych plam delikatnie przetrzyj.ampPrzetrzyj ściereczkę wodą lub środkiem do czyszczenia ekranów. Unikaj silnych środków chemicznych i materiałów ściernych.
- Aktualizacje oprogramowania: Regularnie sprawdzaj dostępność aktualizacji oprogramowania, aby zapewnić optymalną wydajność i dostęp do nowych funkcji. Postępuj zgodnie z instrukcjami dołączonymi do aktualizacji.
- Warunki środowiskowe: Unikaj wystawiania urządzenia na działanie ekstremalnych temperatur, długotrwałego bezpośredniego światła słonecznego i nadmiernej wilgoci.
- Połączenia kablowe: Periodically check that all cables are securely connected to prevent intermittent issues.
10. Gwarancja i wsparcie
UNITOPSCI offers comprehensive support for your product:
- Gwarancja: The product comes with a 12-month replacement service.
- Gwarancja zwrotu pieniędzy: Obowiązuje 30-dniowa gwarancja zwrotu pieniędzy.
- Zwroty: Enjoy 60-days no-worry returns.
- Wsparcie techniczne: Dedicated 24/7 professional after-sales team is available to assist with installation or usage inquiries. Lifetime after-sales consultation and technical support are provided.
Informacje kontaktowe:
For online support, please contact: UNITOPSCI@126.com

Image 10.1: UNITOPSCI customer support information.


