1. Wprowadzenie
Thank you for choosing the Vaczon 60" Farmhouse Ceiling Fan with Lights. This manual provides essential information for the safe installation, operation, and maintenance of your new ceiling fan. Please read these instructions thoroughly before beginning installation or use, and retain them for future reference.
This ceiling fan features a durable construction, a reversible DC motor for year-round comfort, 6-speed settings, and convenient control via both a remote and the "FanLamp Pro" mobile application. The dual-finish blades allow for customization to match your interior decor.

Obraz: Ponadview of the Vaczon 60" Farmhouse Ceiling Fan highlighting key features such as energy efficiency, quiet operation, and reversible motor.
2. Informacje dotyczące bezpieczeństwa
OSTRZEŻENIE: Aby zmniejszyć ryzyko pożaru, porażenia prądem elektrycznym lub obrażeń ciała, zawsze należy przestrzegać poniższych podstawowych środków ostrożności:
- Przed zainstalowaniem wentylatora należy przeczytać wszystkie instrukcje.
- Ensure the installation site is structurally sound and can support the fan's weight.
- Całe okablowanie musi być zgodne z krajowymi i lokalnymi przepisami elektrycznymi. W razie wątpliwości skonsultuj się z wykwalifikowanym elektrykiem.
- Przed rozpoczęciem instalacji lub wykonywaniem jakichkolwiek czynności konserwacyjnych należy odłączyć zasilanie przy wyłączniku automatycznym lub skrzynce bezpiecznikowej.
- Nie należy używać wentylatora, jeśli okablowanie jest uszkodzone lub brakuje jakichkolwiek części lub są one uszkodzone.
- Podczas pracy wentylatora należy trzymać ręce, odzież i inne przedmioty z dala od łopatek wentylatora.
3. Zawartość opakowania
Verify that all components listed below are included in your package. If any parts are missing or damaged, contact Vaczon customer support immediately.
- Obudowa silnika wentylatora sufitowego
- 5 Dual-Finish Fan Blades (Matte Black / Maple Wood Grain)
- Light Kit with 2 E12 Lamp Holders (bulbs not included)
- Zdalne sterowanie
- Receiver for Remote Control/APP
- Rury spustowe (wersje 6- i 10-calowe)
- Wspornik montażowy i osprzęt
- Instrukcja obsługi
4. Konfiguracja i instalacja
Ta sekcja zawiera ogólny opisview of the installation process. Refer to the detailed instruction manual included in your package for step-by-step guidance and safety warnings specific to your model.
4.1 Zagadnienia do rozważenia przed instalacją
- Wysokość sufitu: Choose the appropriate downrod (6-inch or 10-inch) based on your ceiling height to ensure proper blade clearance.
- Typ sufitu: The fan is suitable for both flat ceilings and sloped ceilings with an angle of up to 15 degrees.
- Dostawy prądu: Upewnij się, że skrzynka elektryczna jest solidnie zamontowana i może utrzymać ciężar wentylatora.
4.2 Kroki instalacji (powyżej)view)
- Wyłącz zasilanie na wyłączniku obwodu.
- Install the mounting bracket to the ceiling electrical box.
- Assemble the downrod and hang the fan motor assembly.
- Connect the electrical wiring, including the receiver for remote/APP control.
- Zamontuj łopatki wentylatora do obudowy silnika.
- Install the light kit and desired E12 bulbs (not included).
- Secure the canopy and test the fan's operation.

Image: Diagram illustrating the fan's dimensions, available downrod lengths, and suitable ceiling types (flat and sloped up to 15 degrees).
5. Instrukcja obsługi
Your Vaczon ceiling fan offers multiple control options for convenience and comfort.
5.1 Obsługa pilota zdalnego sterowania
The included remote control allows you to manage all fan functions from anywhere in the room. Ensure batteries are correctly inserted.

Obraz: Szczegółowy view of the remote control with labels for each button's function, including power, light, fan speed, direction, and timer.
- Włączanie/wyłączanie zasilania: Włącza lub wyłącza wentylator i światło.
- Światło WŁ./WYŁ.: Niezależne sterowanie światłem.
- Ustawienie prędkości wentylatora: Reguluje prędkość wentylatora od 1 (najniższa) do 6 (najwyższa).
- Forward/Reverse (F/R): Zmienia kierunek obrotu łopatek, zmieniając tryb na letni lub zimowy.
- Ustawienia timera (1H, 2H, 4H): Ustawia automatyczne wyłączenie wentylatora po 1, 2 lub 4 godzinach.
- Dźwięk WŁ./WYŁ.: Toggles audible feedback from the fan.
- Fan Stopped: Stops the fan blades.
5.2 "FanLamp Pro" APP Control
Download the "FanLamp Pro" application on your smartphone to control the fan. The app offers similar functionalities to the remote control, including fan speed adjustment, light control, and timer settings. The fan also features a memory function that recalls your last settings upon restart.
5.3 Reversible DC Motor (Summer/Winter Modes)
Odwracalny silnik prądu stałego pozwala zoptymalizować cyrkulację powietrza w różnych porach roku:
- Tryb letni (prąd zstępujący): Łopatki obracają się przeciwnie do ruchu wskazówek zegara, wypychając chłodne powietrze w dół i zapewniając orzeźwiający powiew.
- Tryb zimowy (prąd wstępujący): Blades rotate clockwise, drawing cool air up towards the ceiling and circulating warm air downwards, helping to distribute heat more evenly.
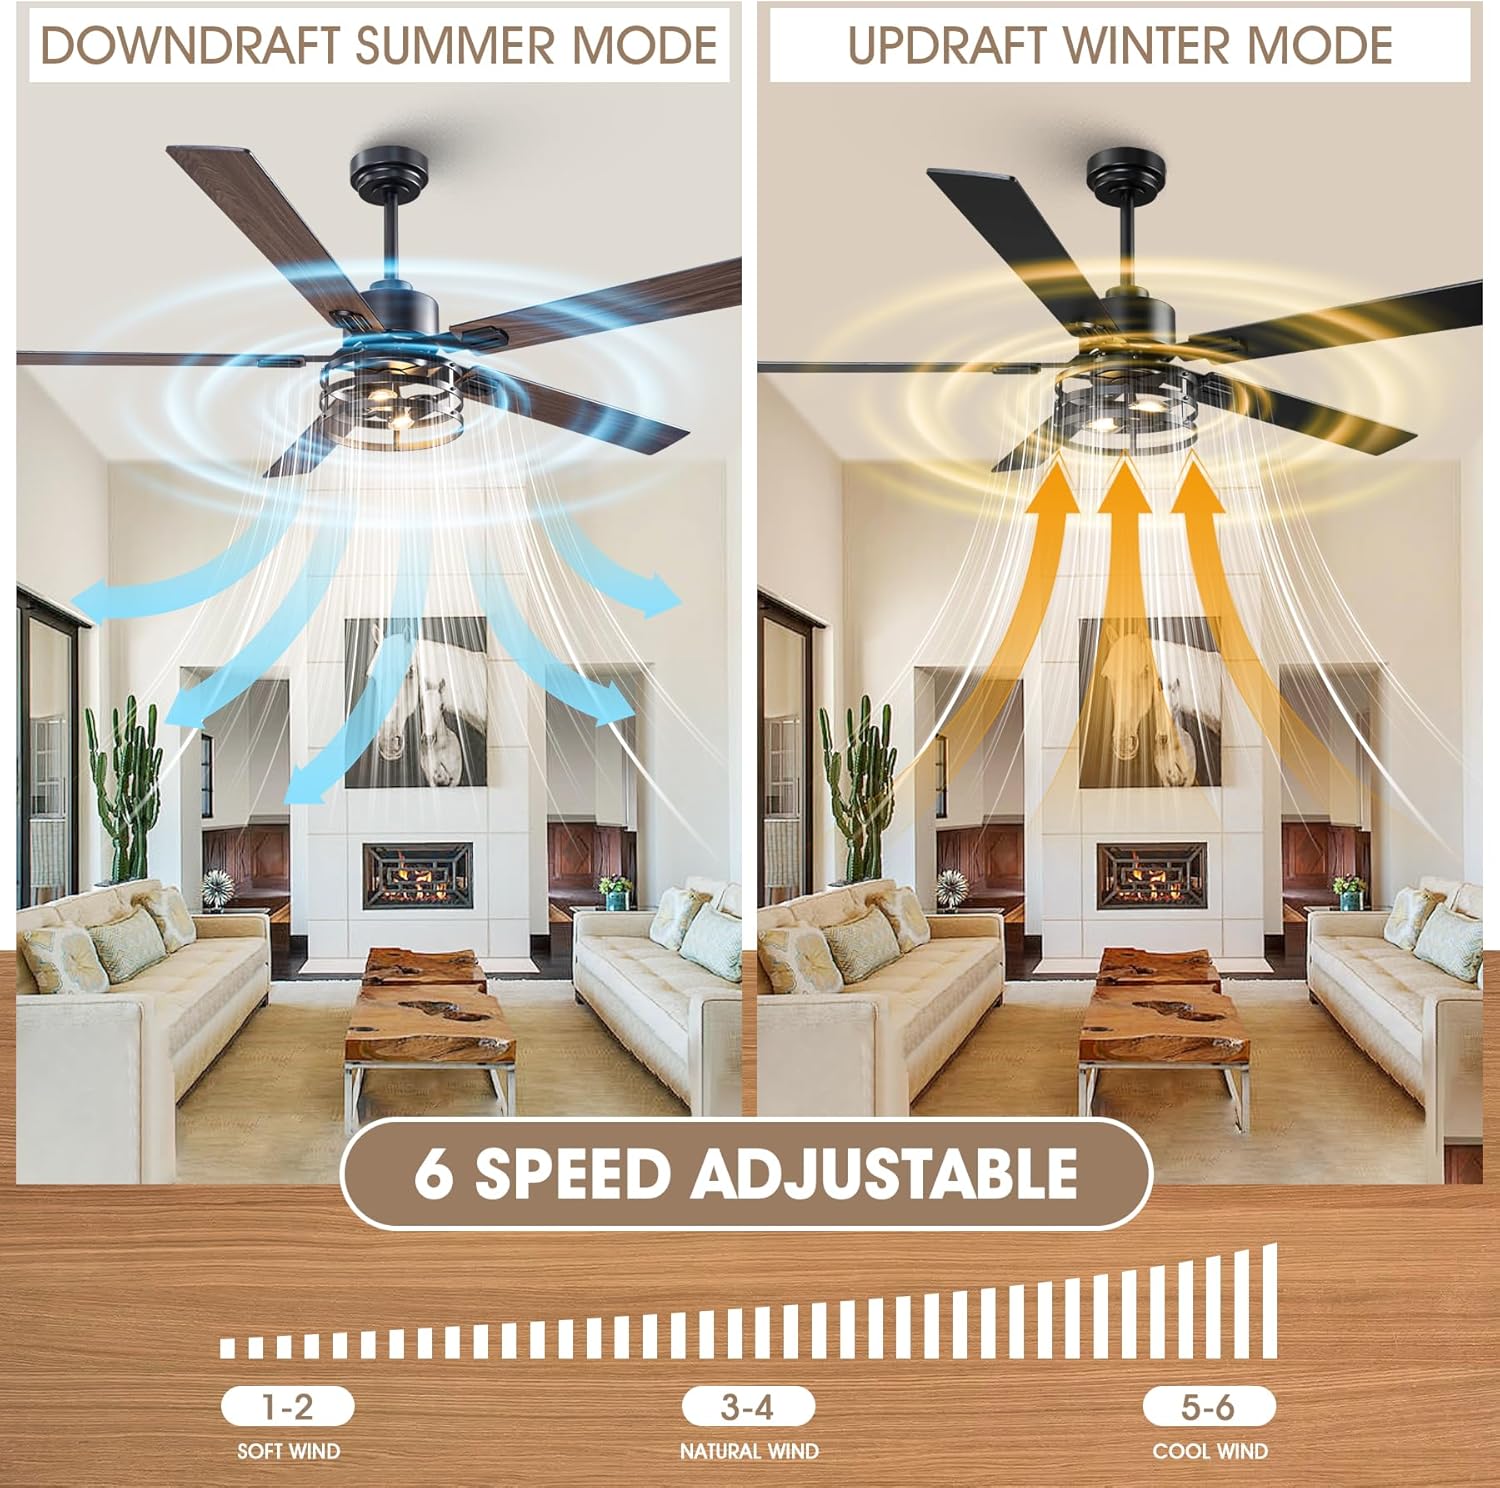
Image: Illustration of the fan's reversible motor function, demonstrating downdraft for summer cooling and updraft for winter heat circulation, along with the 6-speed adjustment scale.
5.4 Dual-Finish Blades
The fan comes with 5 dual-finish blades, featuring matte black on one side and maple wood grain on the other. You can choose the side that best complements your room's aesthetic during installation.

Obraz: Zbliżenie view of the dual-sided fan blades, showcasing the maple wood and matte black finishes.
6. Konserwacja
Regularna konserwacja zapewnia optymalną wydajność i wydłuża żywotność wentylatora sufitowego.
- Czyszczenie: Okresowo czyść łopatki wentylatora i obudowę silnika miękką,amp Ściereczką. Nie używaj środków czyszczących ani rozpuszczalników o działaniu ściernym. Przed czyszczeniem upewnij się, że zasilanie jest wyłączone.
- Dokręcanie elementów złącznych: Check all screws and fasteners annually to ensure they are secure. Loose connections can cause noise and wobble.
- Żarówki: Replace E12 bulbs as needed. Always turn off power before changing bulbs.
7. Rozwiązywanie Problemów
If you encounter issues with your fan, refer to the following common problems and solutions. For persistent issues, contact customer support.
| Problem | Możliwa przyczyna | Rozwiązanie |
|---|---|---|
| Wentylator się nie uruchamia | No power supply; Loose wiring; Remote control battery dead; Receiver not paired. | Check circuit breaker; Verify all wire connections; Replace remote battery; Re-pair remote/receiver (refer to detailed manual). |
| Wentylator się chwieje | Luźne ostrza lub elementy montażowe; Niewyważone ostrza. | Ensure all blade screws and mounting screws are tight; Use a blade balancing kit (if included or purchased separately). |
| Światło nie działa | Bulbs faulty or loose; Wiring issue; Light switch on remote/app off. | Check/replace bulbs; Verify light kit wiring; Ensure light is turned on via remote/app. |
| Pilot nie działa | Dead battery; Obstruction; Receiver issue. | Replace remote battery; Ensure clear line of sight to fan; Check receiver connections. |
8. Specyfikacje
| Marka | Waczon |
| Numer modelu | VCZ099BK |
| Wymiary produktu | 60" gł. x 60" szer. x 18.9" wys. |
| Kolor | Black/Maple |
| Tworzywo | Iron, Aluminum, Copper, MDF (Blades: Plastic) |
| Źródło zasilania | DC |
| Cotage | 21 watów |
| Liczba ostrzy | 5 |
| Liczba prędkości | 6 |
| Przepływ powietrza | 3726 stóp sześciennych na minutę |
| Metoda kontroli | Remote, App ("FanLamp Zawodowiec") |
| Typ światła | LED (E12 lamp holders, bulbs not included) |
| Zastosowanie wewnątrz/na zewnątrz | Wnętrz |
9. Gwarancja i wsparcie
For warranty information and customer support, please refer to the documentation included with your product or visit the official Vaczon webStrona. Zazwyczaj gwarancja obejmuje wady produkcyjne przez określony czas od daty zakupu.
If you require assistance with installation, operation, or troubleshooting that is not covered in this manual, please contact Vaczon customer service. Have your model number (VCZ099BK) and purchase date ready when contacting support.