1. Wprowadzenie
This manual provides detailed instructions for the proper use and maintenance of your Loewieta Wireless Microphone System, model X-G10B-Z. This system features a 500ft (150m) ultra-long range, 99 adjustable channels, and a 40-hour battery life, designed for clear audio transmission in various professional and recreational settings.
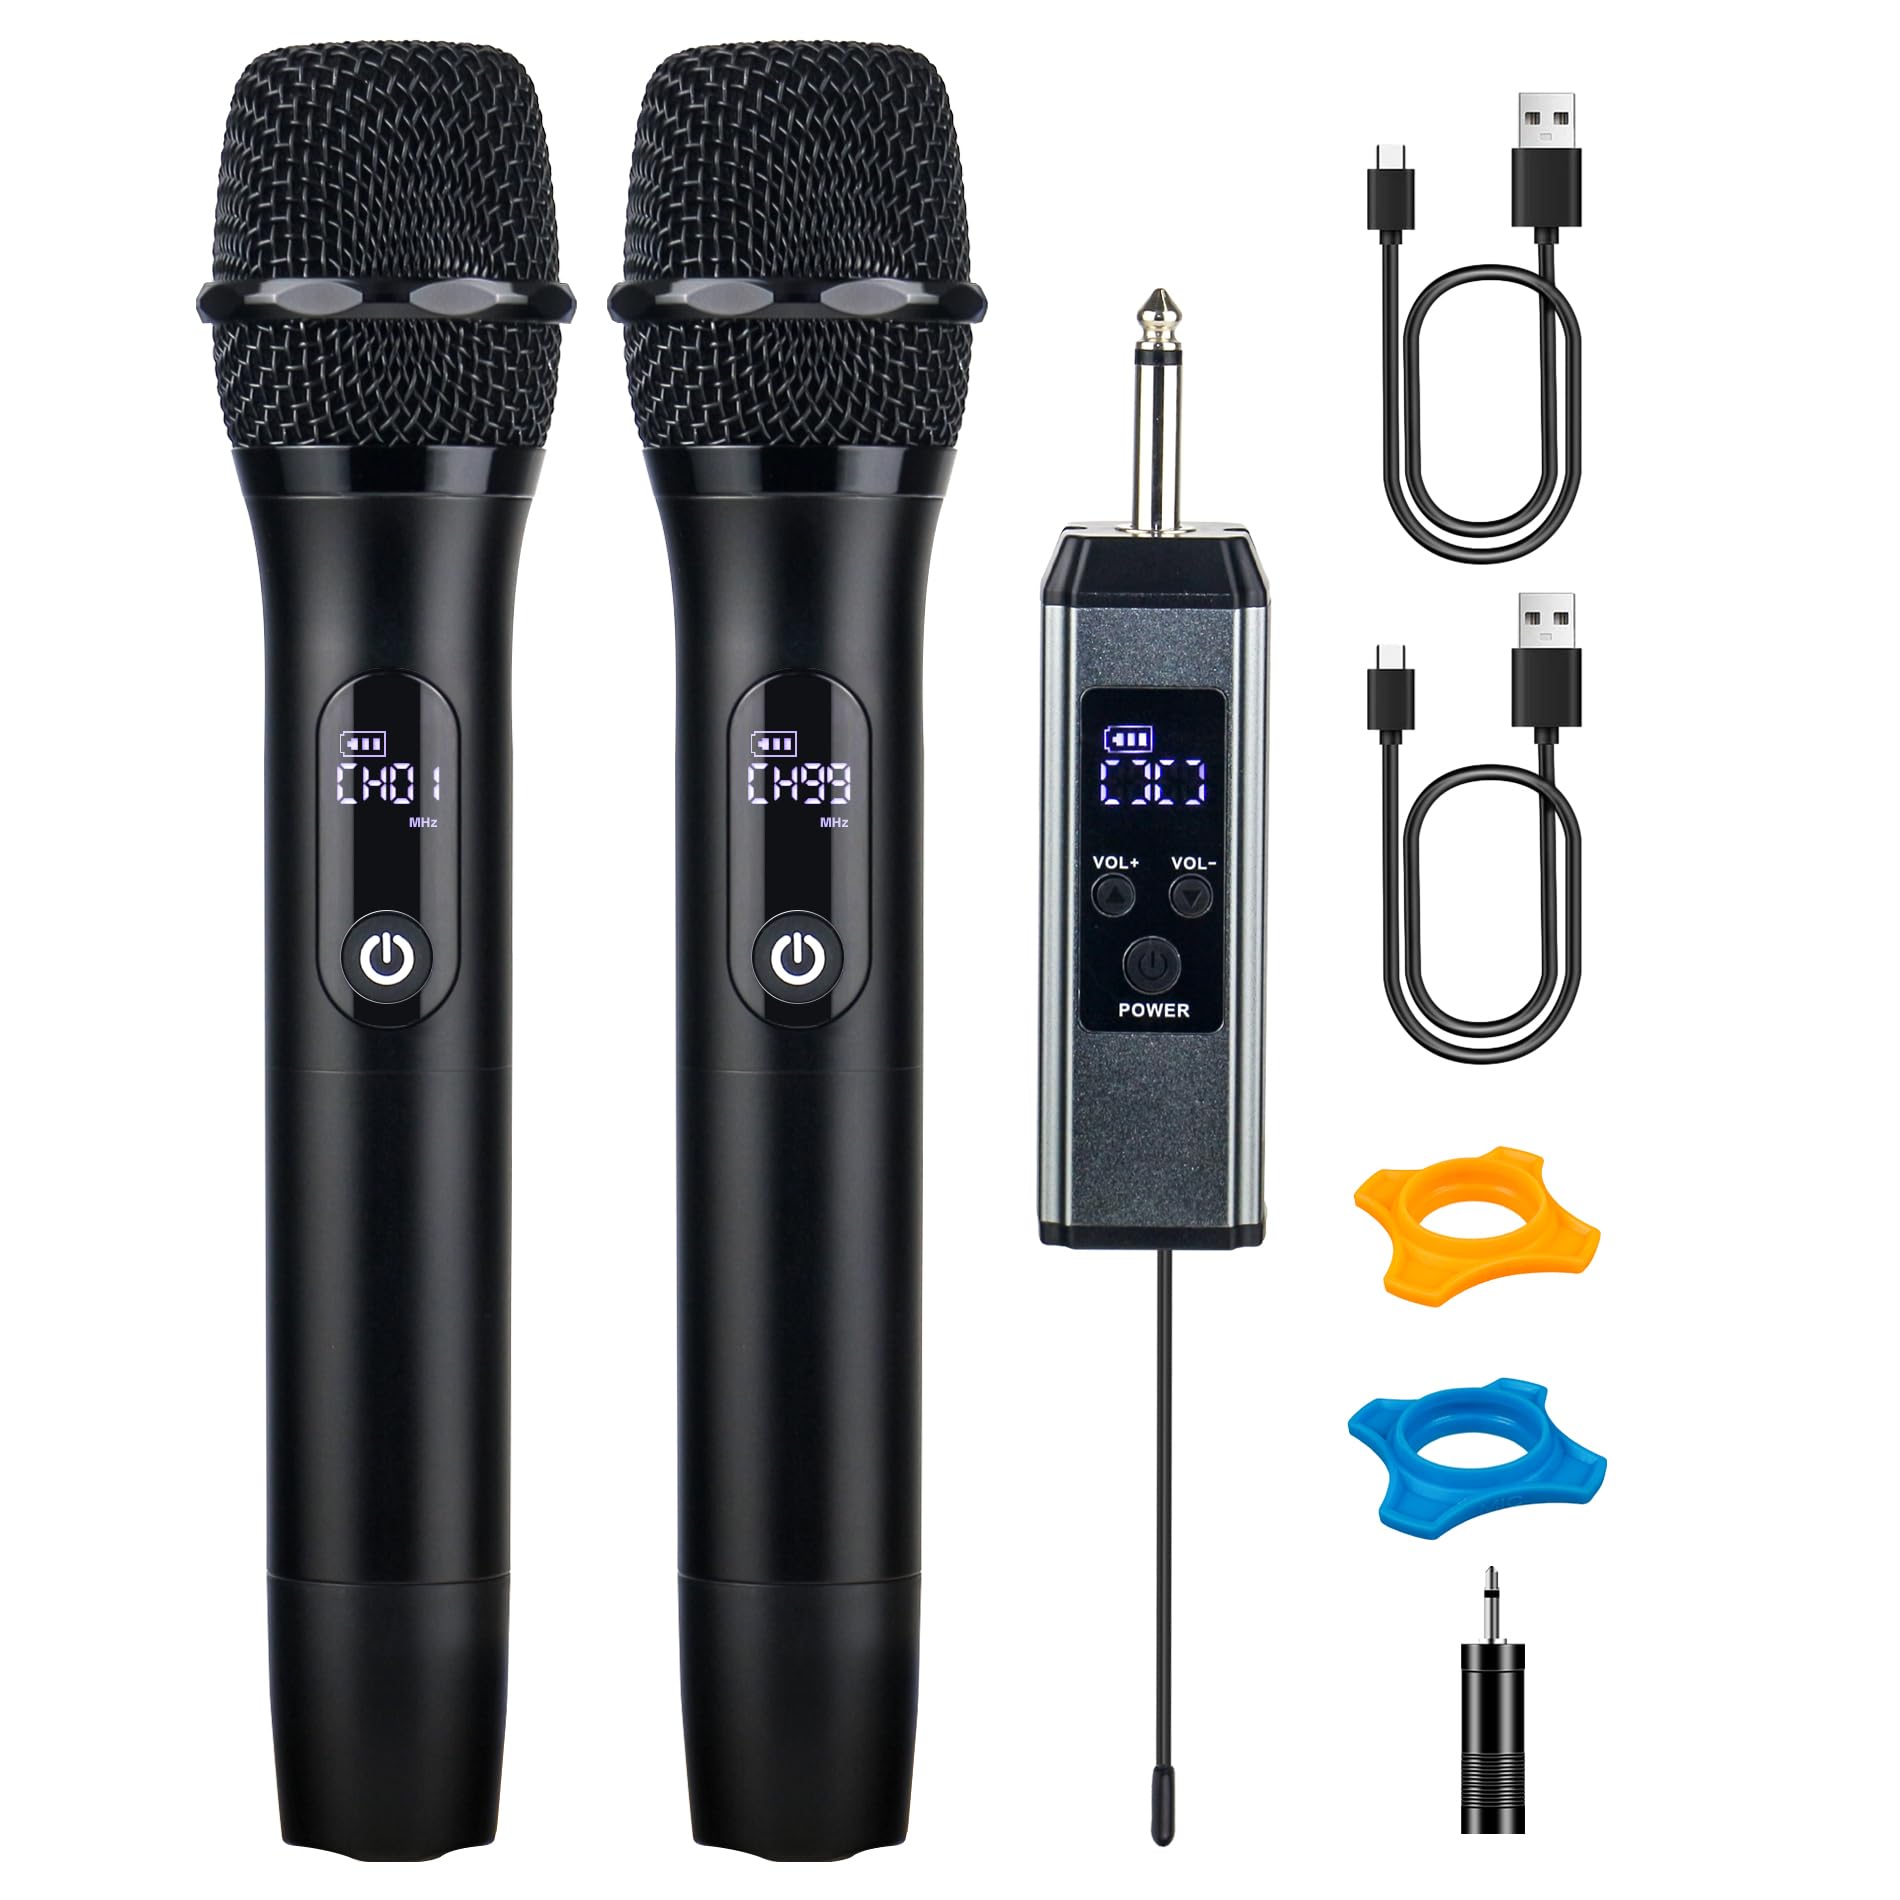
Figure 1: Loewieta Wireless Microphone System X-G10B-Z components.
2. Koniec produktuview
2.1 Główne cechy
- Ultra-długi zasięg: Stable signal up to 500ft (150m) with advanced 2.4G dual-chip technology.
- Regulowane kanały: 99 selectable channels to avoid interference.
- Dłuższa żywotność baterii: Do 40 godzin ciągłej pracy na jednym ładowaniu.
- Szybkie ładowanie: 3-hour Type-C fast charging.
- Jakość dźwięku Hi-Fi: High-sensitivity dynamic capsule and multi-layer airflow system for clear audio.
- Redukcja szumów: Effectively blocks background noise and howling.
- Podłącz i graj: Automatic connection for easy setup.
- Inteligentny wyświetlacz LCD: Real-time display of battery status, signal strength, and current channel.
- Trwała konstrukcja: Metal integrated body for premium feel and reduced handling noise.
2.2 Zawarte komponenty
- 2 x mikrofony bezprzewodowe
- 1 x Odbiornik bezprzewodowy
- 2 kable ładujące USB typu C
- Adapter 1 x 3.5mm
- 2 x Anti-roll Rings (color may vary)
- 1 x Instrukcja obsługi

Rysunek 2: Koniecview of microphone and receiver features.
3. Instrukcje konfiguracji
Follow these steps to set up your Loewieta Wireless Microphone System:
- Ładowanie urządzeń: Before first use, ensure both microphones and the receiver are fully charged using the provided Type-C charging cables. Refer to Section 5 for charging details.
- Podłącz odbiornik: Plug the wireless receiver into a 6.35mm (1/4 inch) MIC input jack on your PA system, amplifier, mixer, or karaoke machine. If your device has a 3.5mm input, use the included 3.5mm adapter.
- Włącz odbiornik: Press and hold the power button on the receiver until its LCD screen illuminates.
- Power On the Microphones: Press and hold the power button on each microphone until its LCD screen illuminates. The microphones and receiver will automatically pair. The LCD display on the microphone will show the channel and volume level.
- Połączenie testowe: Speak into the microphone to test the audio output from your connected sound system. Adjust the volume on your sound system and the microphone as needed.
Note: This system is not compatible with Bluetooth speakers that do not have a dedicated MIC input.
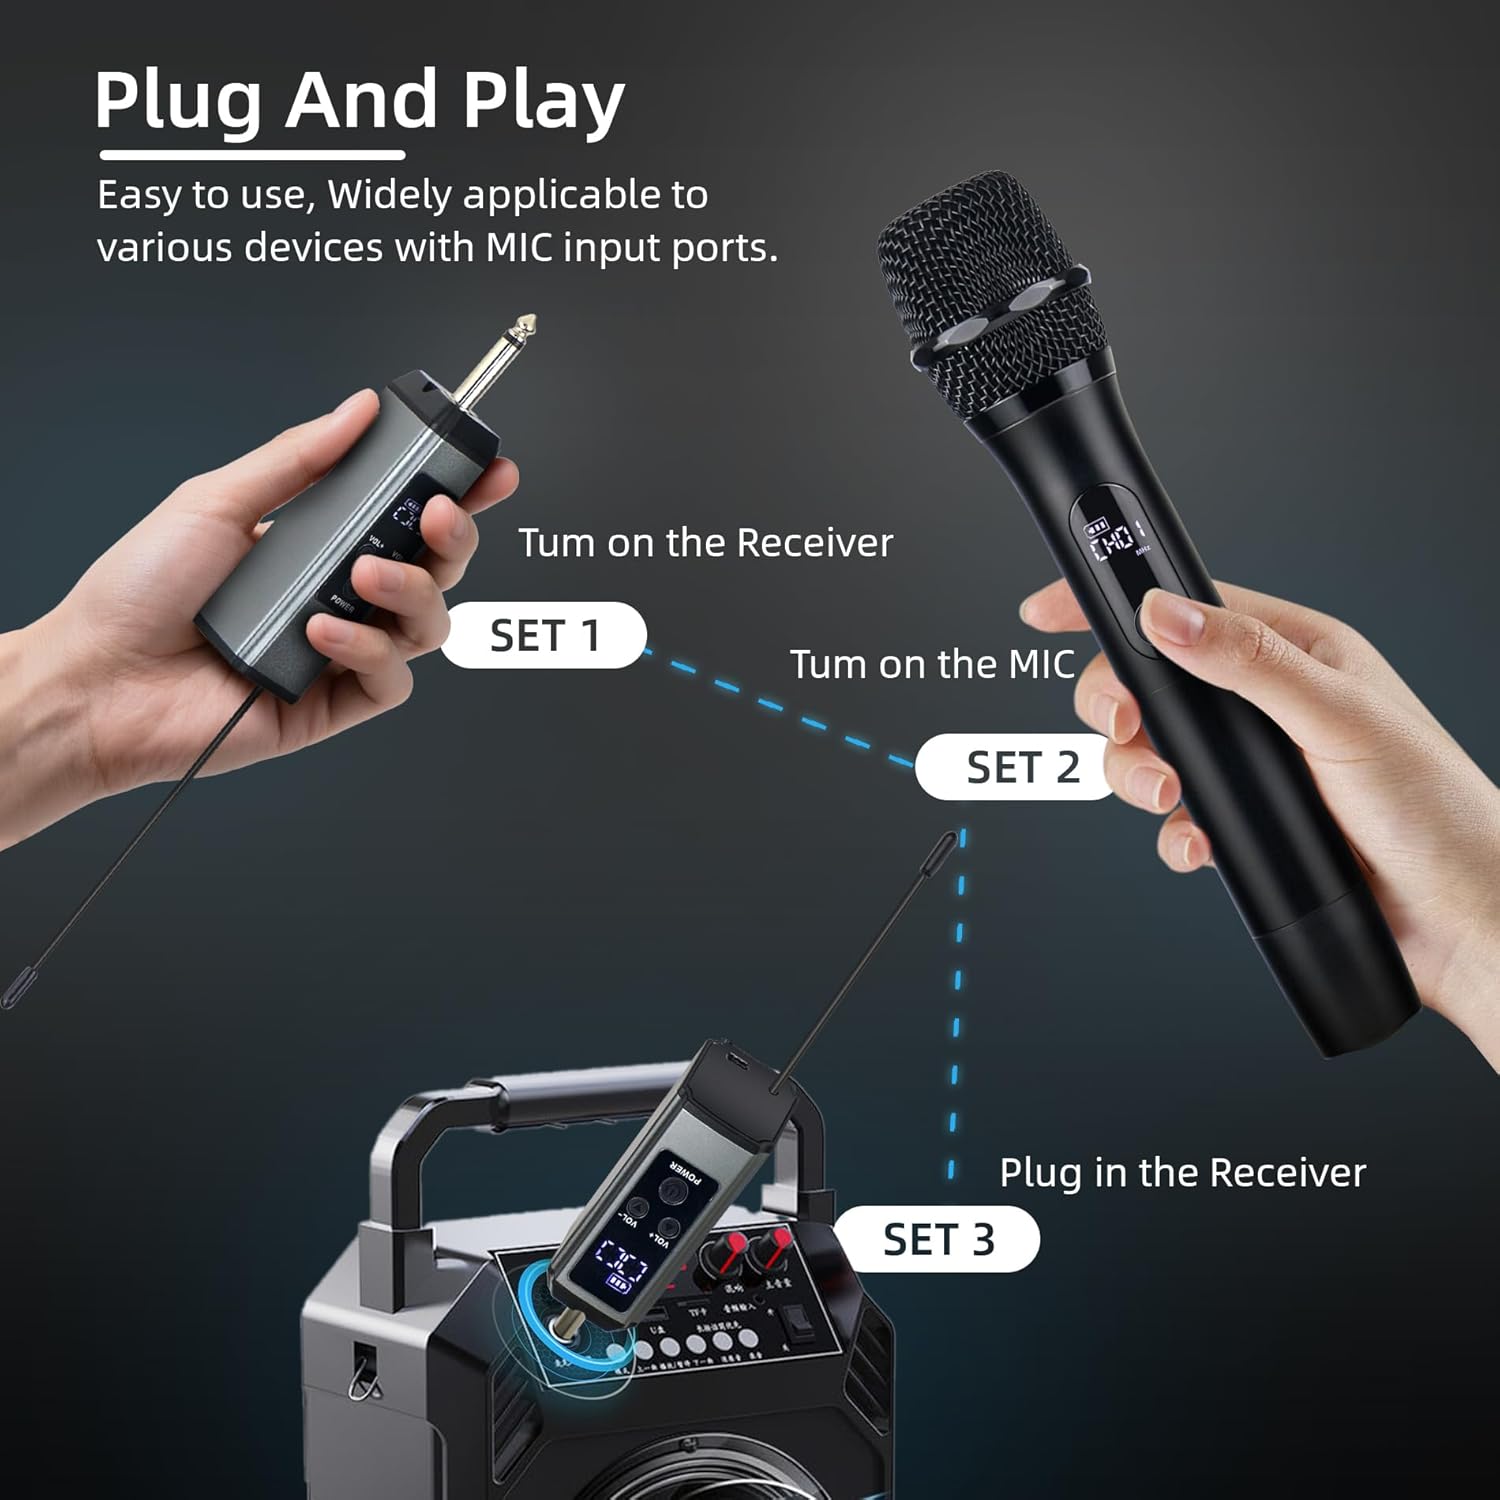
Figure 3: Plug and Play setup guide.
4. Instrukcja obsługi
4.1 Włączanie/wyłączanie zasilania
- Włączanie: Press and hold the power button on the microphone or receiver until the LCD screen lights up.
- Aby wyłączyć: Press and hold the power button on the microphone or receiver until the LCD screen turns off.
4.2 Channel Adjustment
The system offers 99 adjustable channels to prevent interference. If you experience signal drops or interference, you can change the channel:
- On the microphone, short press the power button to cycle through available channels. The LCD screen will display the current channel (e.g., CH01).
- The receiver will automatically synchronize with the microphone's channel.
4.3 Regulacja głośności
Each microphone has 26 levels of volume adjustment:
- Użyj Objętość + I TOM- buttons on the microphone to increase or decrease the microphone's output volume.
- The current volume level (e.g., U01) will be displayed on the microphone's LCD screen.
4.4 Informacje o wyświetlaczu LCD
The LCD screen on the microphone provides real-time information:
- Channel (CHxx): Indicates the currently selected operating channel.
- Volume (Uxx): Shows the microphone's current volume level.
- Status baterii: Wyświetla pozostały poziom naładowania baterii.
- Siła sygnału: Indicates the strength of the wireless connection.

Figure 4: Microphone DSP Audio Chip and LCD display details.

Figure 5: Demonstrating the 500ft wireless range.
5. Ładowanie i żywotność baterii
The Loewieta Wireless Microphone System is equipped with high-capacity rechargeable batteries for extended use.
- Ładowanie: Use the provided Type-C USB cables to charge both the microphones and the receiver. Connect the cables to a standard USB power adapter (not included).
- Czas ładowania: Pełne ładowanie trwa około 3 godzin.
- Czas działania: Do 40 godzin ciągłej pracy po pełnym naładowaniu.
- Wskaźnik baterii: The LCD screen on the microphone displays the battery status. Charge the device when the battery indicator is low.

Figure 6: Type-C fast charging for microphone and receiver.
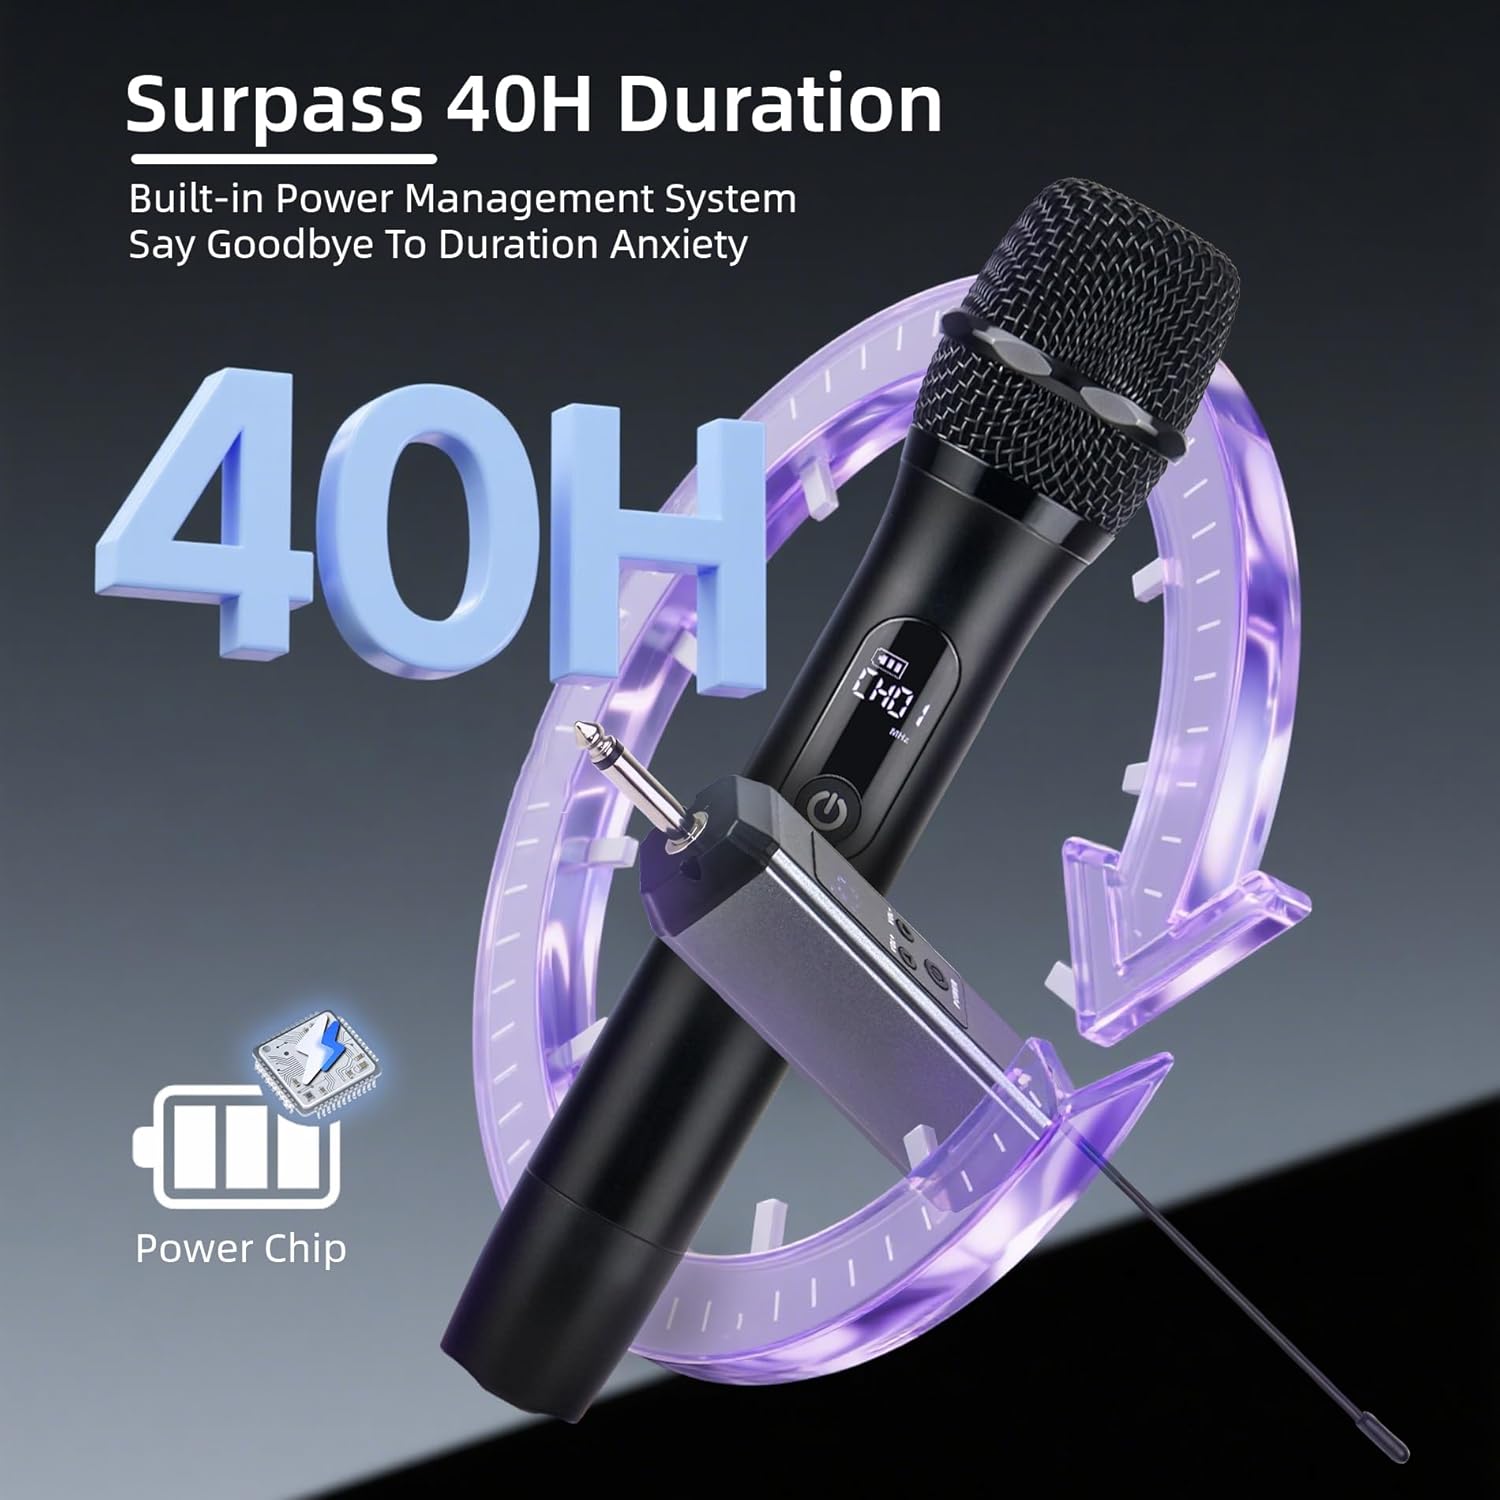
Figure 7: 40-hour battery duration.
6. Jakość dźwięku i redukcja szumów
The Loewieta Wireless Microphone System is engineered for superior audio performance:
- Hi-Fi Sound Pickup: Features a highly sensitive dynamic capsule that captures the true richness of your voice.
- Cardioid Directional Pickup: Designed to pick up sound primarily from the front, minimizing unwanted noise from the sides and rear.
- Multi-Layer Airflow System: Effectively blocks external background noise and prevents howling.
- Integrated Metal Body: The durable metal construction not only provides a premium feel but also reduces handling noise during use.

Figure 8: Cardioid directional pickup for clear sound.
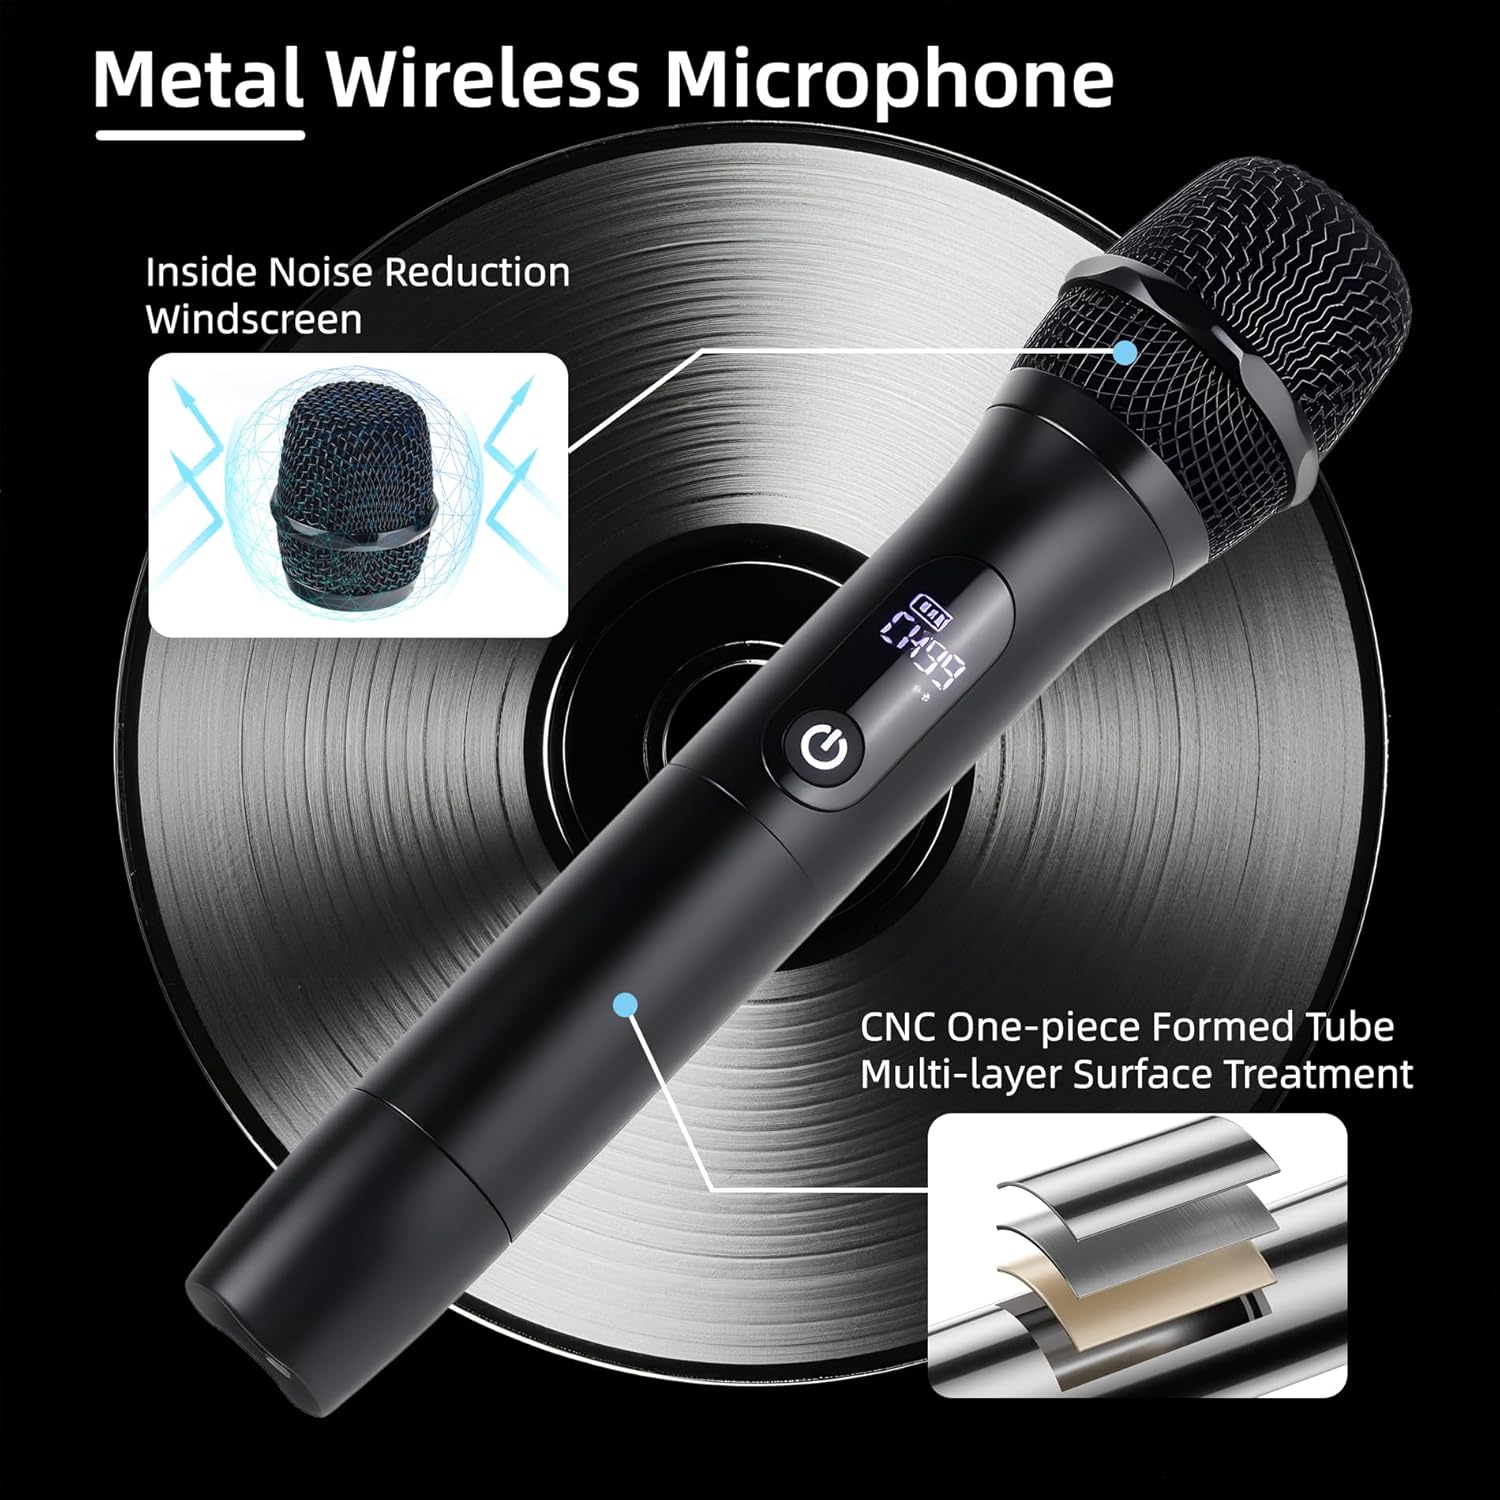
Figure 9: Metal microphone construction details.
7. Konserwacja
Proper maintenance ensures the longevity and optimal performance of your microphone system:
- Czyszczenie: Do czyszczenia zewnętrznej części mikrofonów i odbiornika używaj miękkiej, suchej ściereczki. Nie używaj płynnych środków czyszczących ani materiałów ściernych.
- Składowanie: Przechowuj system w chłodnym, suchym miejscu, z dala od bezpośredniego światła słonecznego i ekstremalnych temperatur.
- Pielęgnacja baterii: For long-term storage, charge the batteries to approximately 50% every three months to maintain battery health.
- Unikaj wilgoci: Keep the devices away from water and high humidity to prevent damage.
8. Rozwiązywanie Problemów
If you encounter issues with your Loewieta Wireless Microphone System, refer to the following troubleshooting guide:
| Problem | Możliwa przyczyna | Rozwiązanie |
|---|---|---|
| Brak dźwięku z mikrofonu | Microphone or receiver is off; Low battery; Receiver not connected; Volume too low; Incorrect channel. | Ensure both devices are powered on. Charge batteries. Verify receiver is securely plugged into MIC input. Increase microphone and sound system volume. Check and adjust microphone channel. |
| Zakłócenia lub szum statyczny | Other wireless devices nearby; Obstructions; Channel interference. | Move away from other electronic devices. Ensure clear line of sight between microphone and receiver. Change the microphone channel (refer to Section 4.2). |
| Krótki zasięg bezprzewodowy | Obstructions; Environmental factors; Low battery. | Ensure clear line of sight. Avoid using in areas with heavy metal structures or dense walls. Fully charge devices. |
| Mikrofon nie ładuje się | Faulty cable; Power adapter issue; Charging port damage. | Try a different Type-C cable and USB power adapter. Ensure the charging port is clean and free of debris. |
| Mikrofon nie łączy się | Receiver or microphone not powered on; Out of range. | Ensure both devices are powered on and within close proximity during initial pairing. Power cycle both devices. |
9. Specyfikacje
| Funkcja | Specyfikacja |
|---|---|
| Nazwa modelu | G10B-A (X-G10B-Z) |
| Marka | Loewieta |
| Współczynnik kształtu mikrofonu | Ręczny |
| Technologia łączności | 2.4G Wireless, Auxiliary |
| Typ złącza | Gniazdo 3.5 mm, Gniazdo 6.35 mm |
| Zasięg bezprzewodowej | Do 500 stóp (150 m) |
| Liczba kanałów | 99 |
| Typ baterii | Litowo-jonowy (ładowalny) |
| Czas działania | Do 40 godzin |
| Czas ładowania | Approx. 3 hours (Type-C Fast Charging) |
| Pozycja Wymiary (dł. x szer. x wys.) | 9.65 x 1.97 x 1.97 cala (24.5 x 5 x 5 cm) |
| Waga przedmiotu | 2.07 funtów (0.94 kg) |
| Kompatybilne urządzenia | PA systems, Amplifiers, Mixers, Karaoke Machines, Audio Mixer, Camera, Laptop, Tablet, Voice Recorder |
10. Obsługa klienta
For any technical assistance, questions, or concerns regarding your Loewieta Wireless Microphone System, please contact our customer support team. We are committed to user satisfaction and provide online technical support.

Figure 10: Loewieta Customer Care information.
10.1 Oficjalny film o produkcie
Watch this video for a visual guide on the features and operation of the Loewieta Wireless Microphone System.
Wideo 1: Ponadview of Loewieta Wireless Microphone System features and usage.