SMARTRO Alarm Clock-03
SMARTRO Digital Alarm Clock-03 User Manual
Model: Alarm Clock-03 | Brand: SMARTRO
1. Wprowadzenie
Thank you for choosing the SMARTRO Digital Alarm Clock-03. This manual provides detailed instructions for setting up, operating, and maintaining your new alarm clock. Please read this manual thoroughly before use to ensure optimal performance and longevity of your device.
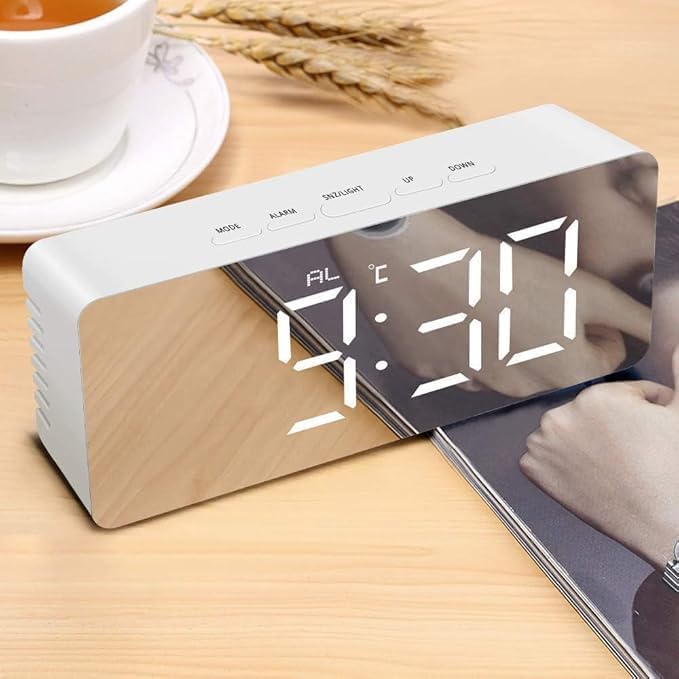
Image 1.1: The SMARTRO Digital Alarm Clock-03 showing the time 9:30 AM on its reflective display.
2. Zawartość opakowania
Sprawdź, czy w przesyłce znajdują się wszystkie elementy wymienione poniżej:
- 1 x SMARTRO Digital Alarm Clock Unit
- 1 x kabel do ładowania USB (typ C)
- 1 x Instrukcja obsługi (ten dokument)
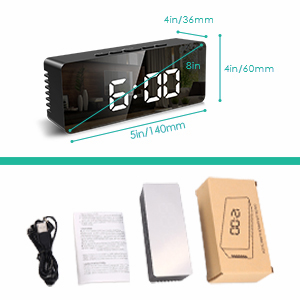
Image 2.1: Visual representation of the package contents, including the alarm clock, USB cable, and user manual.
3. Konfiguracja
3.1 Połączenie zasilania
Connect the provided USB Type-C cable to the clock's power input port and plug the other end into a USB power adapter (not included) or a powered USB port. The display will light up.
3.2 Battery Installation (Optional for Power Save Mode)
For power-saving mode and to retain settings during a power outage, install 3 AAA batteries (not included) into the battery compartment located on the back of the clock. Note that the display will only stay on continuously when powered via USB. In battery-only mode, the screen will turn off after 10 seconds of inactivity to conserve power.
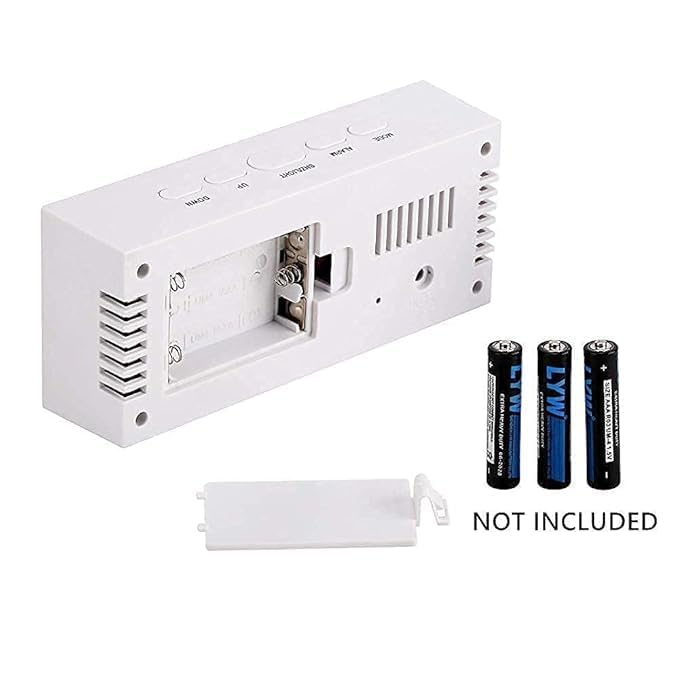
Obraz 3.1: Tył view of the alarm clock, illustrating the battery compartment for 3 AAA batteries (not included).
3.3 Początkowe ustawienie czasu i daty
- Naciśnij TRYB Naciśnij przycisk, aby wejść w tryb ustawiania czasu. Cyfry godzin zaczną migać.
- Użyj UP I W DÓŁ przyciski do regulacji godziny.
- Naciskać TRYB again to set the minutes, then repeat with UP I W DÓŁ.
- Kontynuuj naciskanie TRYB aby przejść i ustawić rok, miesiąc i dzień.
- Naciskać TRYB one more time to exit setting mode, or wait a few seconds for it to automatically save and exit.
- To switch between 12/24H format, press the UP przycisk w trybie wyświetlania normalnego czasu.
4. Instrukcja obsługi
4.1 Ustawianie alarmów
The clock supports two independent alarms. Follow these steps to set an alarm:
- Naciśnij ALARM button to enter Alarm 1 setting mode. The alarm hour digits will flash.
- Użyj UP I W DÓŁ przyciski do ustawienia godziny alarmu.
- Naciskać ALARM ponownie, aby ustawić minuty alarmu, a następnie dostosuj za pomocą UP I W DÓŁ.
- Naciskać ALARM a third time to select the alarm mode: PN-PT (1-5), MON-SAT (1-6), PON–NIEDZ (1-7), or SOB-NIEDZ. Używać UP I W DÓŁ aby wybrać.
- Naciskać ALARM again to set the alarm volume (3 levels).
- Repeat the process for Alarm 2 by pressing ALARM until 'AL2' appears.
- Aby aktywować/dezaktywować alarm, naciśnij przycisk ALARM button briefly while in normal time display mode to toggle between alarms. An alarm icon will appear on the display when active.
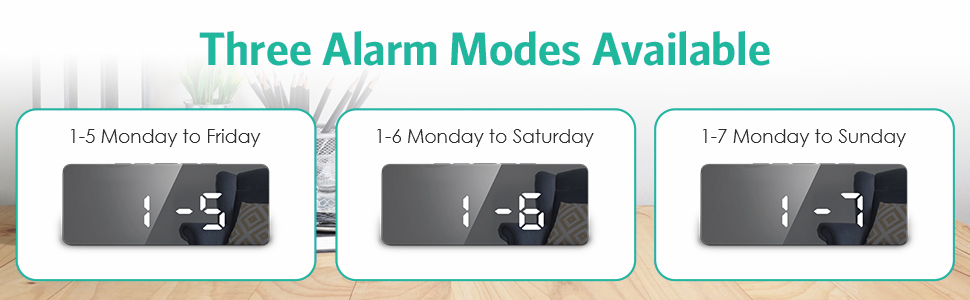
Image 4.1: Illustration of the three available alarm modes: Monday-Friday, Monday-Saturday, and Monday-Sunday.
4.2 Funkcja drzemki
Gdy zabrzmi alarm, naciśnij przycisk SNZ/ŚWIATŁO Naciśnij przycisk, aby włączyć funkcję drzemki. Alarm zostanie wstrzymany na 9 minut, a następnie ponownie włączy się.
4.3 Regulacja jasności wyświetlacza
The clock offers 5 levels of adjustable brightness (100%-60%-30%-3%-0%).
- W normalnym trybie wyświetlania czasu naciśnij przycisk SNZ/ŚWIATŁO Naciskaj przycisk wielokrotnie, aby przełączać poziomy jasności.
- The clock also features an automatic nighttime dimming mode.
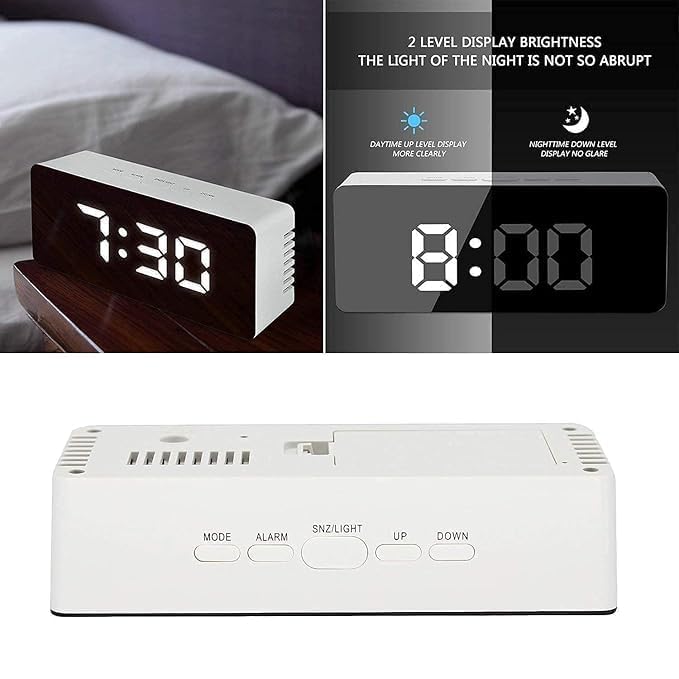
Image 4.2: Demonstrates the difference between daytime (brighter) and nighttime (dimmer) display levels for optimal visibility.
4.4 tryb nocny
To activate the automatic nighttime dimming mode, press and hold the SNZ/ŚWIATŁO button for 3 seconds. In this mode, the display brightness will automatically dim between 7:00 PM and 7:00 AM.
4.5 porty USB do ładowania
The clock includes a separate USB port that allows you to charge compatible external devices. Connect your device's charging cable to this port.
5. Konserwacja
- Clean the clock's surface with a soft, dry cloth. Avoid using abrasive cleaners or solvents, as they may damage the finish.
- If using batteries, replace them when the display becomes dim or functions become erratic. Ensure correct polarity when inserting new batteries.
- Trzymaj urządzenie z dala od ekstremalnych temperatur, bezpośredniego światła słonecznego i wysokiej wilgotności.
6. Rozwiązywanie Problemów
- Q: The display is not lighting up.
- A: Ensure the USB Type-C cable is securely connected to both the clock and a working power source. If using batteries, check if they are inserted correctly and have sufficient charge.
- P: Alarm nie dzwoni.
- A: Verify that the alarm is activated (alarm icon visible on display) and that the alarm volume is set to an audible level. Check the alarm time and day settings.
- Q: The time resets every time the power is disconnected.
- A: This clock requires continuous USB power for the display to remain on. For settings retention during power interruptions, ensure 3 fresh AAA batteries are installed in the battery compartment.
- Q: Buttons are unresponsive.
- A: Disconnect the power cable and remove batteries for a few minutes, then reconnect to perform a soft reset. If the issue persists, contact customer support.
7. Specyfikacje
| Funkcja | Szczegół |
|---|---|
| Model | Alarm Clock-03 |
| Typ wyświetlacza | Cyfrowa dioda LED |
| Wymiary (dł. X wys. X gł.) | 140 mm x 60 mm x 36 mm (ok. 5.5 x 2.4 x 1.4 cala) |
| Waga przedmiotu | 199 gram |
| Źródło zasilania | USB-C (mains power, adapter not included), 3x AAA Batteries (not included) for power-saving mode/memory backup |
| Tworzywo | Plastikowy |
| Cechy specjalne | Large Display, Dual Alarms, Snooze, Adjustable Brightness (5 levels), Automatic Night Mode, USB Charging Port, Date & Temperature Display, 12/24H Format, Daylight Saving Time mode |
Obraz 7.1: Wymiarowanieview budzika.
8. Gwarancja i wsparcie
For warranty information or technical support, please refer to the product packaging or contact SMARTRO customer service directly. You can often find contact details on the official SMARTRO webna stronie internetowej lub u sprzedawcy.
For general inquiries or to explore other SMARTRO products, visit the SMARTRO Brand Store on Amazon.
Ask a question about this manual
Ask about setup, troubleshooting, compatibility, parts, safety, or missing instructions. Manuals+ will review the question and use this page’s manual context to help answer it.