
1. Wprowadzenie
This manual provides comprehensive instructions for the safe and efficient operation of your TechniSat Viola under-cabinet kitchen radio. Please read this manual thoroughly before using the device and retain it for future reference. This device combines modern design with practical features for your kitchen or bedroom.
2. Informacje dotyczące bezpieczeństwa
Aby zmniejszyć ryzyko pożaru, porażenia prądem elektrycznym i obrażeń, należy zawsze przestrzegać podstawowych zasad bezpieczeństwa podczas korzystania z tego produktu.
- Nie wystawiaj urządzenia na deszcz lub wilgoć.
- Nie otwierać casing. Wszelkie prace serwisowe powierzaj wykwalifikowanemu personelowi.
- Upewnij się, że napięcie zasilaniatage odpowiada wymaganiom określonym na urządzeniu.
- Unikaj umieszczania urządzenia w pobliżu źródeł ciepła lub w miejscu bezpośrednio nasłonecznionym.
- Przechowywać w miejscu niedostępnym dla dzieci.
3. Zawartość opakowania
The TechniSat Viola kitchen radio package includes the following items:
- TechniSat Viola Kitchen Radio (Anthracite)
- Antena pętlowa
- Zasilacz
- Akcesoria montażowe
- Instrukcja obsługi
4. Koniec produktuview
Familiarize yourself with the components and controls of your TechniSat Viola radio.
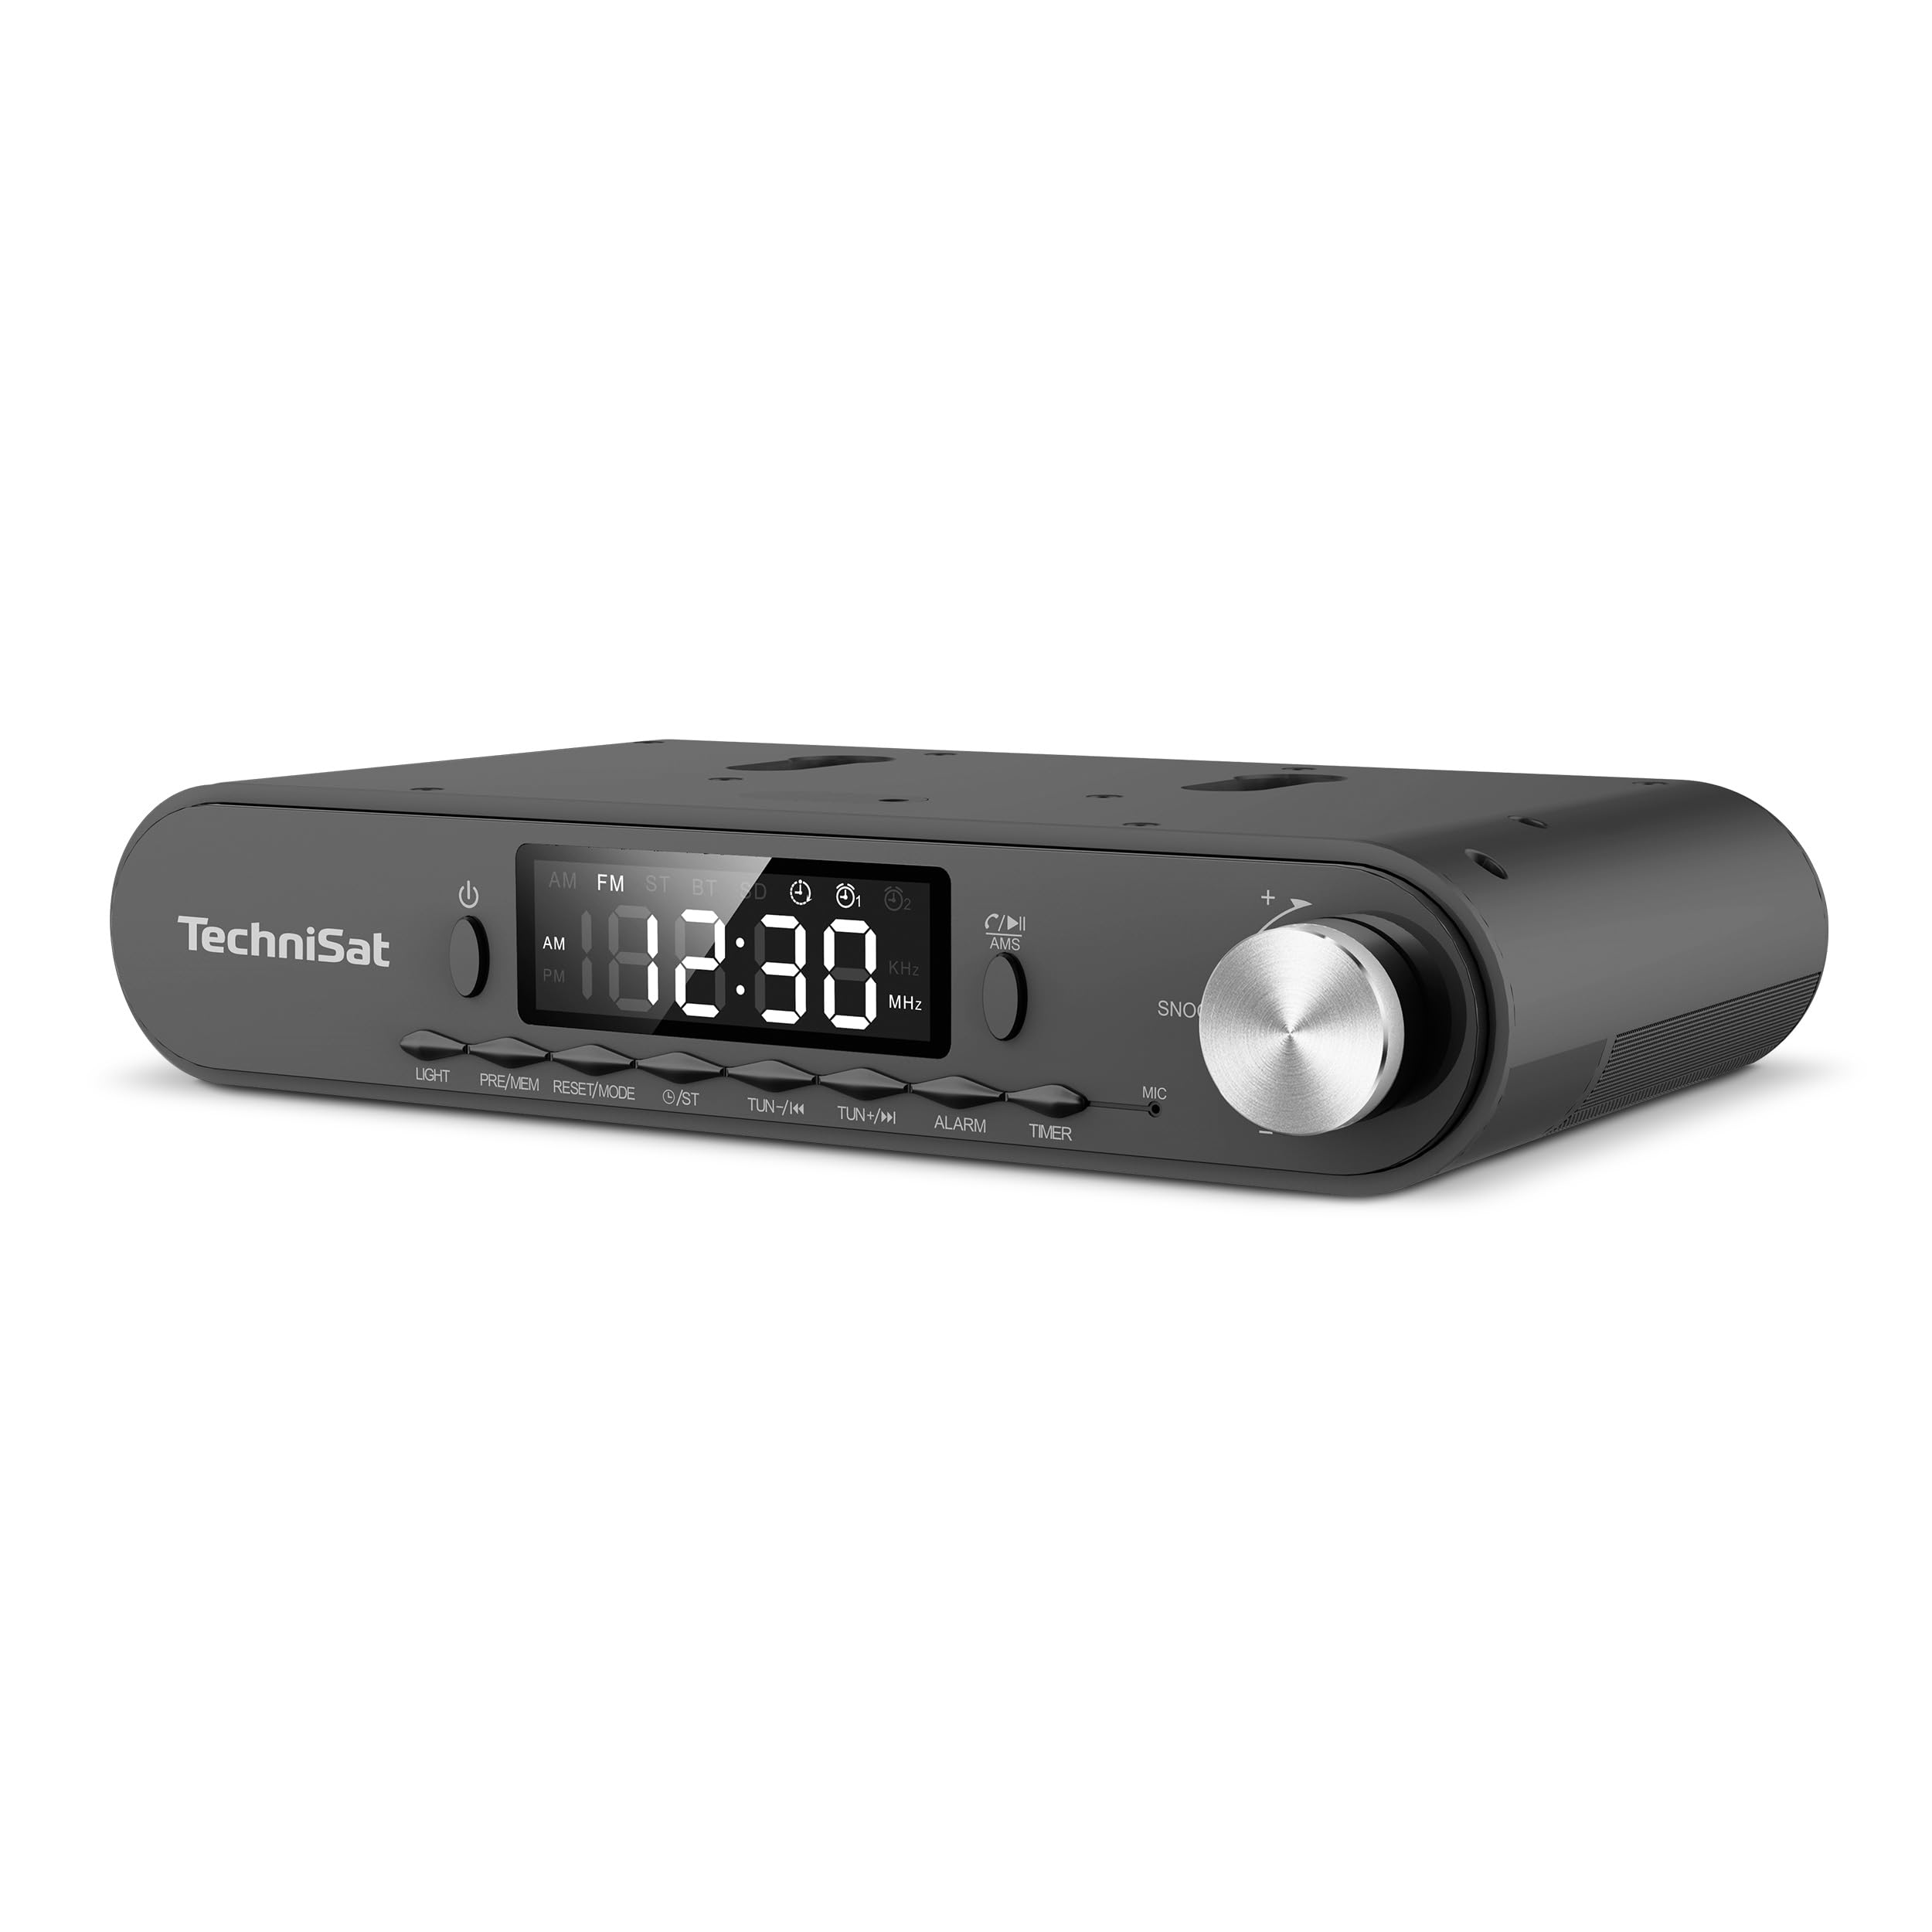
Rysunek 1: Front panel of the TechniSat Viola radio. This image displays the front panel of the TechniSat Viola radio, showing the LED display, control buttons (LIGHT, MODE/RESET, MEM/PRE, TUN-/K, TUN+/I, ALARM, TIMER), power button, and the volume/snooze knob. The TechniSat logo is visible on the left.
Układ panelu sterowania:
- Przycisk zasilania: Włącza lub wyłącza urządzenie.
- Wyświetlacz LED: Shows time, frequency, and mode information.
- Przycisk ŚWIATŁA: Activates the integrated LED work light.
- MODE/RESET Button: Switches between operating modes and resets settings.
- MEM/PRE Button: Zapisuje i przywołuje zaprogramowane stacje radiowe.
- TUN-/K and TUN+/I Buttons: Adjusts tuning frequency or navigates tracks.
- Przycisk alarmowy: Ustawia i zarządza funkcjami alarmowymi.
- Przycisk TIMERA: Accesses and controls the cooking timer.
- Volume/Snooze Knob: Adjusts volume; press for snooze function.
- MIKROFON: Microphone for hands-free function.
5. Konfiguracja
Follow these steps to set up your TechniSat Viola radio:
- Rozpakować: Ostrożnie wyjąć wszystkie elementy z opakowania.
- Połączenie antenowe: Connect the provided loop antenna to the external antenna port on the back of the radio. Position the antenna for optimal reception.
- Podłączenie zasilania: Connect the power adapter to the DC input port on the radio and then plug the adapter into a standard electrical outlet.
- Umiejscowienie/Montaż: Decide whether to use the radio as a standalone unit on a flat surface or mount it under a cabinet. Use the provided mounting accessories for under-cabinet installation, ensuring it is securely fastened.
- Pierwsze włączenie: Press the Power button to turn on the radio. The LED display will illuminate.
6. Instrukcja obsługi
6.1. Obsługa radia (FM)
- Wybierz tryb FM: Naciśnij TRYB/RESET Naciskaj przycisk, aż wyświetli się napis „FM”.
- Strojenie ręczne: Użyj TUN-/K or TUN+/I przyciski umożliwiające ręczną regulację częstotliwości.
- Automatic Scan (AMS): Naciśnij i przytrzymaj MEM/PRE button to automatically scan and store available FM stations. The radio supports up to 40 favorite memory slots.
- Przywołaj ustawienia wstępne: Naciśnij krótko MEM/PRE button to cycle through stored stations.
6.2. Funkcjonalność Bluetooth
The integrated Bluetooth receiver allows you to stream audio wirelessly from your smartphone or tablet.
- Wejdź w tryb Bluetooth: Naciśnij TRYB/RESET button until 'BT' is displayed. The radio will enter pairing mode, indicated by a flashing Bluetooth icon.
- Łączenie w pary: On your smartphone or tablet, enable Bluetooth and search for available devices. Select 'TechniSat Viola' from the list.
- Strumieniowe przesyłanie dźwięku: Once paired, you can play music from your device, and the audio will be streamed through the radio's speakers.
- Rozmowy bez użycia rąk: When a call comes in while connected via Bluetooth, you can answer it using the radio's controls and speak through the built-in microphone (MIC).
6.3. Funkcja timera
The radio features a convenient cooking timer.
- Ustaw minutnik: Naciśnij REGULATOR CZASOWY button to access the timer settings. Use the TUN-/K or TUN+/I przyciski umożliwiające dostosowanie żądanego czasu odliczania.
- Timer startu/zatrzymania: Naciśnij REGULATOR CZASOWY button again to start or pause the countdown.
6.4. Alarm i drzemka
Utilize the alarm functions for daily reminders or wake-up calls.
- Nastaw budzik: Naciśnij ALARM przycisk, aby wejść do ustawień alarmu. Użyj TUN-/K or TUN+/I buttons to set the alarm time and select the alarm source (e.g., radio or buzzer).
- Aktywuj/dezaktywuj alarm: Naciśnij ALARM button repeatedly to toggle the alarm on or off.
- Funkcja drzemki: Gdy zabrzmi alarm, naciśnij Volume/Snooze Knob to activate the snooze function, pausing the alarm for a short period.
6.5. LED Work/Night Light
The integrated LED lighting can serve as a work light or a subtle night light.
- Aktywuj światło: Naciśnij ŚWIATŁO przycisk włączający światło LED.
- Adjust/Deactivate Light: Naciśnij ŚWIATŁO button again to cycle through brightness levels or turn off the light.
7. Konserwacja
Proper care ensures the longevity of your TechniSat Viola radio.
- Czyszczenie: Clean the radio with a soft, dry cloth. Do not use abrasive cleaners, solvents, or chemical sprays, as these can damage the surface.
- Odłączenie zasilania: Always unplug the device from the power outlet before cleaning or if it will not be used for an extended period.
- Wentylacja: Aby zapobiec przegrzaniu, upewnij się, że otwory wentylacyjne nie są zablokowane.
8. Rozwiązywanie Problemów
Jeśli masz problemy z radiem, zapoznaj się z poniższymi typowymi problemami i ich rozwiązaniami:
| Problem | Możliwa przyczyna | Rozwiązanie |
|---|---|---|
| Brak zasilania / Urządzenie się nie włącza | Zasilacz nie jest podłączony lub gniazdko jest uszkodzone. | Check if the power adapter is securely plugged into the radio and a working electrical outlet. Try a different outlet. |
| Brak dźwięku | Volume too low; incorrect audio source selected. | Increase the volume using the knob. Ensure the correct mode (FM, Bluetooth) is selected. |
| Słaby odbiór radia | Antenna not properly positioned or connected; weak signal. | Adjust the position of the loop antenna. Ensure it is fully connected. Try moving the radio to a different location. |
| Bluetooth nie łączy się | Radio not in pairing mode; device too far; Bluetooth off on smartphone. | Ensure the radio is in Bluetooth pairing mode. Keep your smartphone within range. Check Bluetooth settings on your smartphone. |
9. Specyfikacje
Key technical specifications for the TechniSat Viola 0000/2932 radio:
| Funkcja | Szczegół |
|---|---|
| Marka | TechniSat |
| Numer modelu | 0000/2932 |
| Kolor | Antracyt |
| Technologia łączności | Bluetooth |
| Cechy specjalne | Timer control via direct selection button, External antenna connection, Under-cabinet or standalone use, Aluminum volume/selection control, Bluetooth audio streaming, Alarm, Sleep, Snooze, LED work/night light |
| Kompatybilne urządzenia | Smartfon |
| Źródło zasilania | Kabel elektryczny |
| Obsługiwane pasma radiowe | FM |
| Technologia strojenia | FM |
| Wymiary produktu (dł. x szer. x wys.) | Wymiary: 21.2 cm x 12.1 cm x 4.2 cm |
| Producent | TechniSat |
| Kraj pochodzenia | Chiny |
10. Gwarancja i wsparcie
For warranty information and technical support, please refer to the documentation provided with your purchase or contact TechniSat customer service directly. Specific details regarding spare parts availability and software updates are not provided in this manual.