
Wstęp
This manual provides essential information for the safe operation, assembly, and maintenance of your Geemax Electric Bike Model DDXDC001. Please read this manual thoroughly before your first ride to ensure proper use and to maximize the lifespan of your electric bicycle.
Informacje dotyczące bezpieczeństwa
Always wear a helmet when riding. Obey all local traffic laws and regulations. Perform a pre-ride inspection before each use, checking brakes, tire pressure, and battery level. Do not ride under the influence of alcohol or drugs. Avoid riding in extreme weather conditions. Ensure all components are securely fastened before riding.
Zawartość opakowania
Po rozpakowaniu należy sprawdzić, czy wszystkie elementy są obecne:
- Geemax Electric Bike (partially assembled)
- Akumulator i ładowarka
- Koło przednie
- Kierownice
- Pedały
- Zestaw narzędzi (do montażu)
- Instrukcja obsługi (ten dokument)
Konfiguracja i montaż
Your Geemax electric bike arrives approximately 90% assembled. The following steps detail the final assembly process. It is recommended to watch the official assembly video for visual guidance if available.
1. Rozpakowanie i wstępna kontrola
Carefully remove the bike and all components from the packaging. Inspect for any shipping damage. Report any damage immediately to customer service.

Image: The Geemax Electric Bike, showcasing its fat tires, frame, and integrated battery. This image provides an overview of the bike's design.
2. Montaż kierownicy
Attach the handlebars to the stem. Ensure they are centered and tightened securely. Adjust the angle for comfortable riding posture.
3. Montaż koła przedniego
Install the front wheel into the fork. Ensure the disc brake rotor is correctly seated within the caliper. Secure the wheel using the quick-release skewer or axle nuts as per the design.
4. Mocowanie pedału
Identify the left (L) and right (R) pedals. Thread the pedals into the crank arms. Remember that the left pedal threads counter-clockwise. Tighten firmly with a wrench.
5. Instalacja akumulatora i ładowanie początkowe
Insert the battery into its designated compartment on the frame. Ensure it clicks into place and is locked with the key for security. Fully charge the battery before the first use. The charging port is typically located on the battery itself or the frame near the battery.
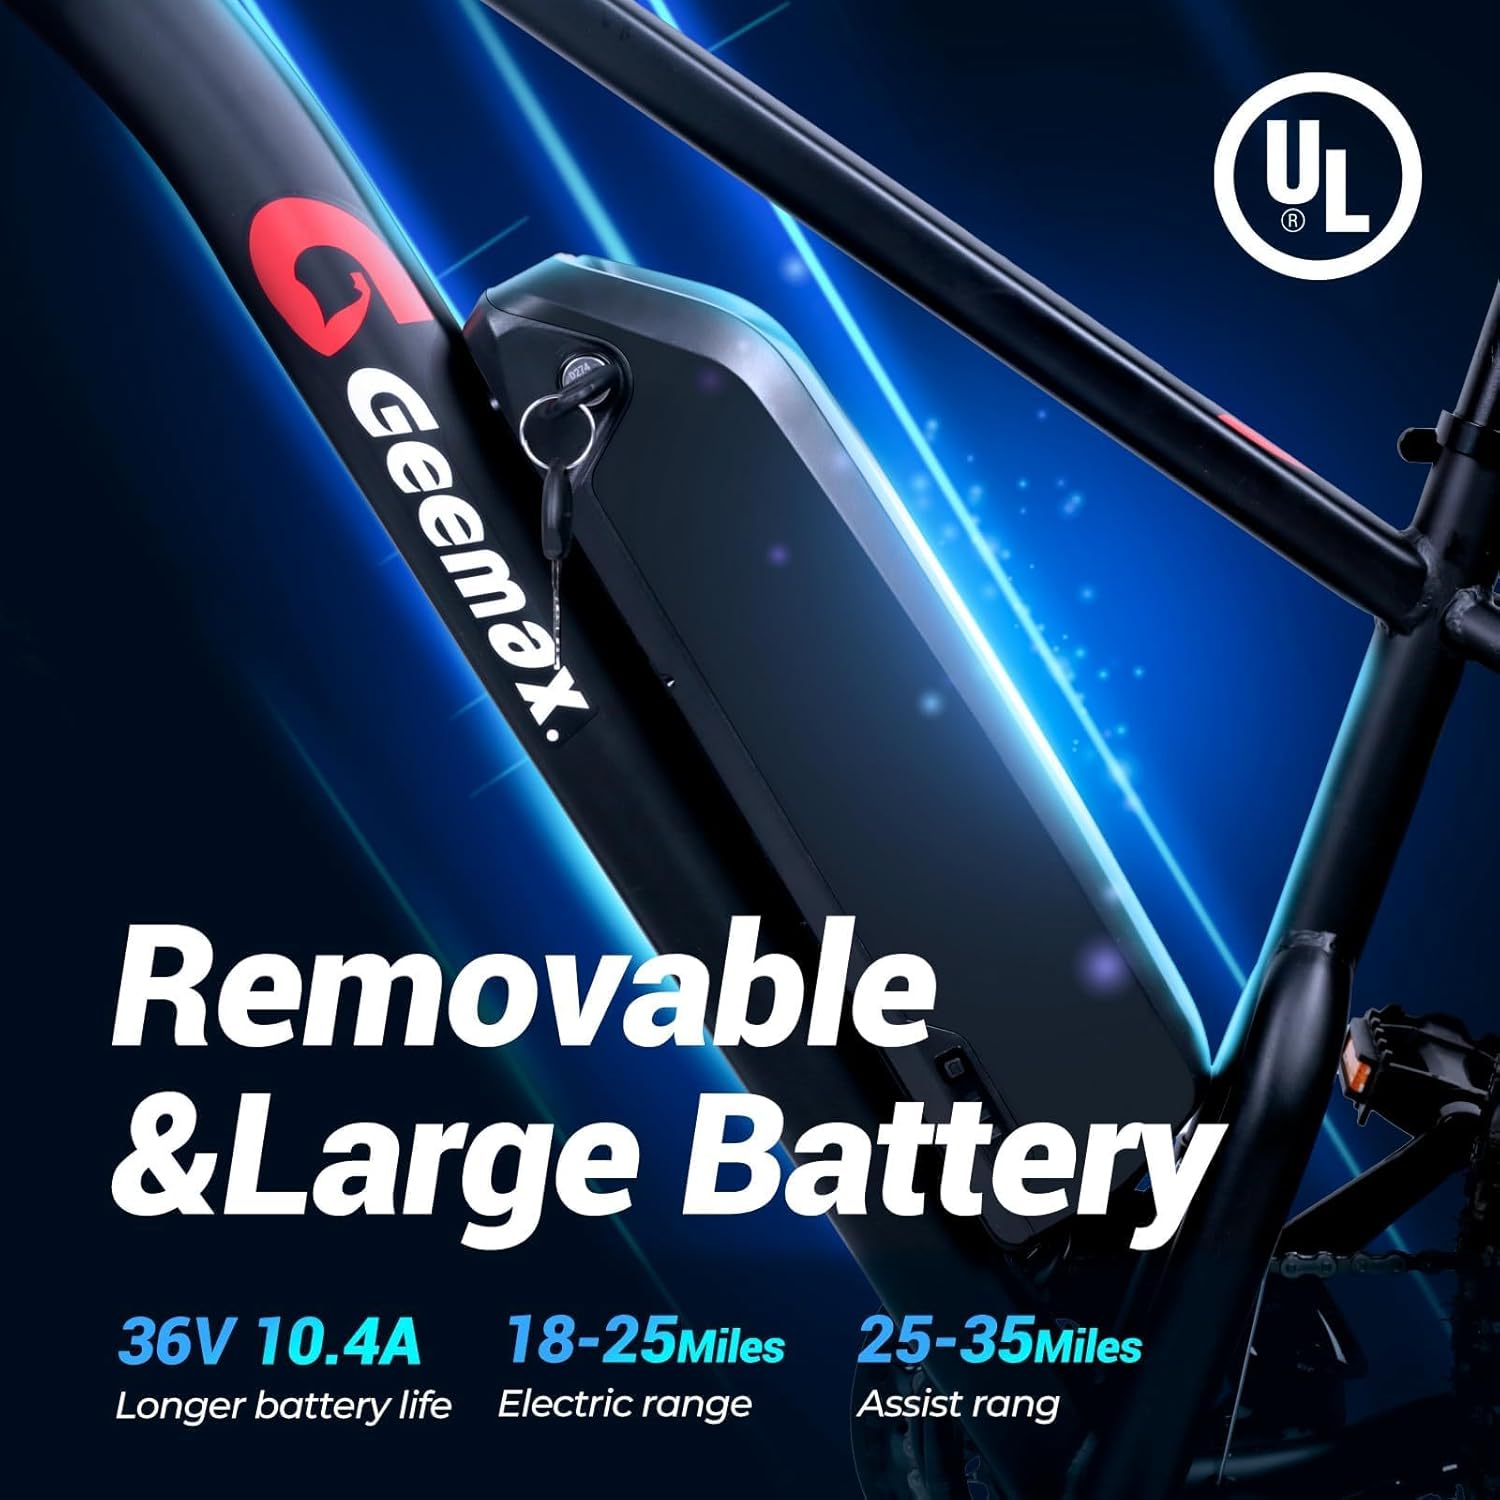
Image: Close-up of the removable 36V 10.4Ah lithium battery integrated into the bike frame, showing the keyhole for locking and removal.

Obraz: szczegółowy view of the Geemax electric bike's battery, highlighting its removable design and capacity.
6. Regulacja siedziska i kierownicy
Adjust the seat height and handlebar position to ensure a comfortable and ergonomic riding posture. Ensure quick-release levers are securely closed after adjustment.
7. Kontrole przed jazdą
Before your first ride, double-check all bolts and quick releases. Test the brakes, gears, and ensure the tires are inflated to the recommended pressure.
Instrukcja obsługi
The Geemax Electric Bike offers multiple riding modes for various preferences and terrains.
1. Powering On/Off and LCD Display
To power on the bike, press and hold the power button on the LCD display. The display will show speed, battery level, assist mode, and time. To power off, press and hold the power button again.

Image: The S866 multi-function LCD display mounted on the handlebars, showing speed, battery level, assist level, and time.

Image: A close-up of the handlebar-mounted LCD display, illustrating its controls and information display.
2. Tryby jazdy
- Tryb czysto elektryczny: Engages the motor without pedal input. Use the throttle for acceleration.
- Tryb wspomagania pedałowania: Silnik wspomaga pedałowanie. Dostosuj poziom wspomagania za pomocą przycisków „+” i „-” na wyświetlaczu.
- Tryb spaceru: Long press the '-' button on the LCD display to activate walk mode. This provides low-speed assistance, useful for pushing the bike while walking, especially with heavy loads.
- Klasyczny tryb rowerowy: Ride the bike without any motor assistance, relying solely on pedal power.
3. Obsługa reflektorów
To turn on the large bright LED headlight for night riding, long press the '+' button on the LCD display. Long press again to turn it off.

Image: A close-up of the bright LED headlight, designed for improved visibility during night riding.
4. Zmiana biegów
The bike features a 21-speed gear system. Use the shifters on the handlebars to change gears according to terrain and desired effort. Shift smoothly to avoid damage to the drivetrain.
5. Adapting to Terrain
The 26" x 4.0" fat tires provide excellent traction across various surfaces. The bike is designed for use on beach, snow, gravel, dirt, sand, and city roads. Adjust your speed and riding mode according to the terrain for optimal performance and safety.

Image: A rider on the Geemax electric bike navigating a snowy path, demonstrating the capability of the 26x4 inch fat tires on challenging terrain.

Image: Visual representation of the bike's adaptability to various terrains including snow, mountain, sand, and city roads, highlighting the versatility of the fat tires.
Konserwacja
Regularna konserwacja gwarantuje długowieczność i bezpieczną eksploatację roweru elektrycznego.
1. Pielęgnacja baterii
- Aby zachować sprawność akumulatora, należy go regularnie ładować, nawet jeśli nie jest używany.
- Unikaj całkowitego rozładowania baterii.
- Przechowuj akumulator w chłodnym i suchym miejscu, z dala od bezpośredniego światła słonecznego i ekstremalnych temperatur.
- Używaj wyłącznie dostarczonej ładowarki.
2. Konserwacja opon
Check tire pressure before each ride. The 26" x 4.0" fat tires are puncture-resistant, but regular inspection for wear and damage is recommended. Maintain appropriate pressure for your riding conditions.
3. Układ hamulcowy
Regularly inspect the disc brakes for wear on pads and rotors. Ensure brake levers are responsive and provide adequate stopping power. Adjust or replace components as needed.

Obraz: Zbliżenie view of the front disc brake system, illustrating the rotor and caliper for effective stopping power.
4. Układ napędowy
Keep the chain clean and lubricated. Inspect gears and derailleur for proper function and alignment. A well-maintained drivetrain ensures smooth shifting and efficient power transfer.

Obraz: szczegółowy view of the rear wheel, showing the motor hub and the 21-speed cassette, part of the bike's drivetrain.
5. Ogólne czyszczenie
Regularnie czyść rower za pomocąamp cloth. Avoid using high-pressure washers directly on electrical components. Ensure the bike is dry before storage.
6. Widelec amortyzowany
The bike is equipped with a lockable front suspension fork. Regularly check the fork for proper function and cleanliness. Ensure the lockout mechanism operates smoothly. Keep stanchions clean to prevent seal wear.

Image: A close-up of the front suspension fork, highlighting its design and components for absorbing shocks and providing a smoother ride.
Rozwiązywanie problemów
This section addresses common issues you might encounter with your Geemax Electric Bike.
| Problem | Możliwa przyczyna | Rozwiązanie |
|---|---|---|
| Rower nie włącza się | Akumulator nie jest naładowany lub jest nieprawidłowo włożony; przycisk zasilania nie został naciśnięty prawidłowo. | Ensure battery is fully charged and securely installed. Press and hold the power button on the LCD display. |
| Silnik nie wspomaga | Battery low; assist level set to zero; sensor issue. | Check battery level and charge if necessary. Increase assist level using the '+' button. Inspect pedal assist sensor for damage. |
| Hamulce są słabe | Zużyte klocki hamulcowe; luźna linka hamulcowa; powietrze w układzie hydraulicznym (jeśli dotyczy). | Inspect and replace brake pads if worn. Adjust brake cable tension. Consult a bike mechanic for hydraulic brake issues. |
| Zmiana biegów nie przebiega płynnie | Derailleur misalignment; dirty or unlubricated chain; bent hanger. | Clean and lubricate the chain. Adjust derailleur limits and cable tension. Consult a bike mechanic if issues persist. |
Specyfikacje
Detailed technical specifications for the Geemax Electric Bike Model DDXDC001.
| Funkcja | Szczegół |
|---|---|
| Nazwa modelu | DDXDC001 |
| Typ roweru | Rower elektryczny |
| Marka | Geemax |
| Silnik | 36V 500W (Peak 750W) Brushless Motor |
| Bateria | Akumulator litowy 36 V 10.4 Ah |
| Maksymalna prędkość | Do 25 mil na godzinę (40 km/h) |
| Range (Assist Mode) | Do 35 mil (56 km) |
| Range (Ebike Mode) | Do 20 mil (32 km) |
| Liczba prędkości | 21-biegowa |
| Rozmiar koła | 26 Inches x 4.0 Fat Tires |
| Materiał ramy | Aluminium |
| Typ zawieszenia | Front (Lockable Suspension Fork) |
| Styl hamulca | Hamulce tarczowe |
| Funkcja specjalna | LCD Display, LED Headlight |
| Nośność | Maks. 350 funta (158 kg) |
| Zalecany wzrost jeźdźca | 5'2" - 6'4" (157 cm - 193 cm) |
| Frame Dimensions (L x H) | 74 x 35.8 cala (188 x 91 cm) |
| Waga netto Waga brutto | 90 funtów (40.8 kg) / 100 funtów (45.3 kg) |
| UPC | 760762256779 |
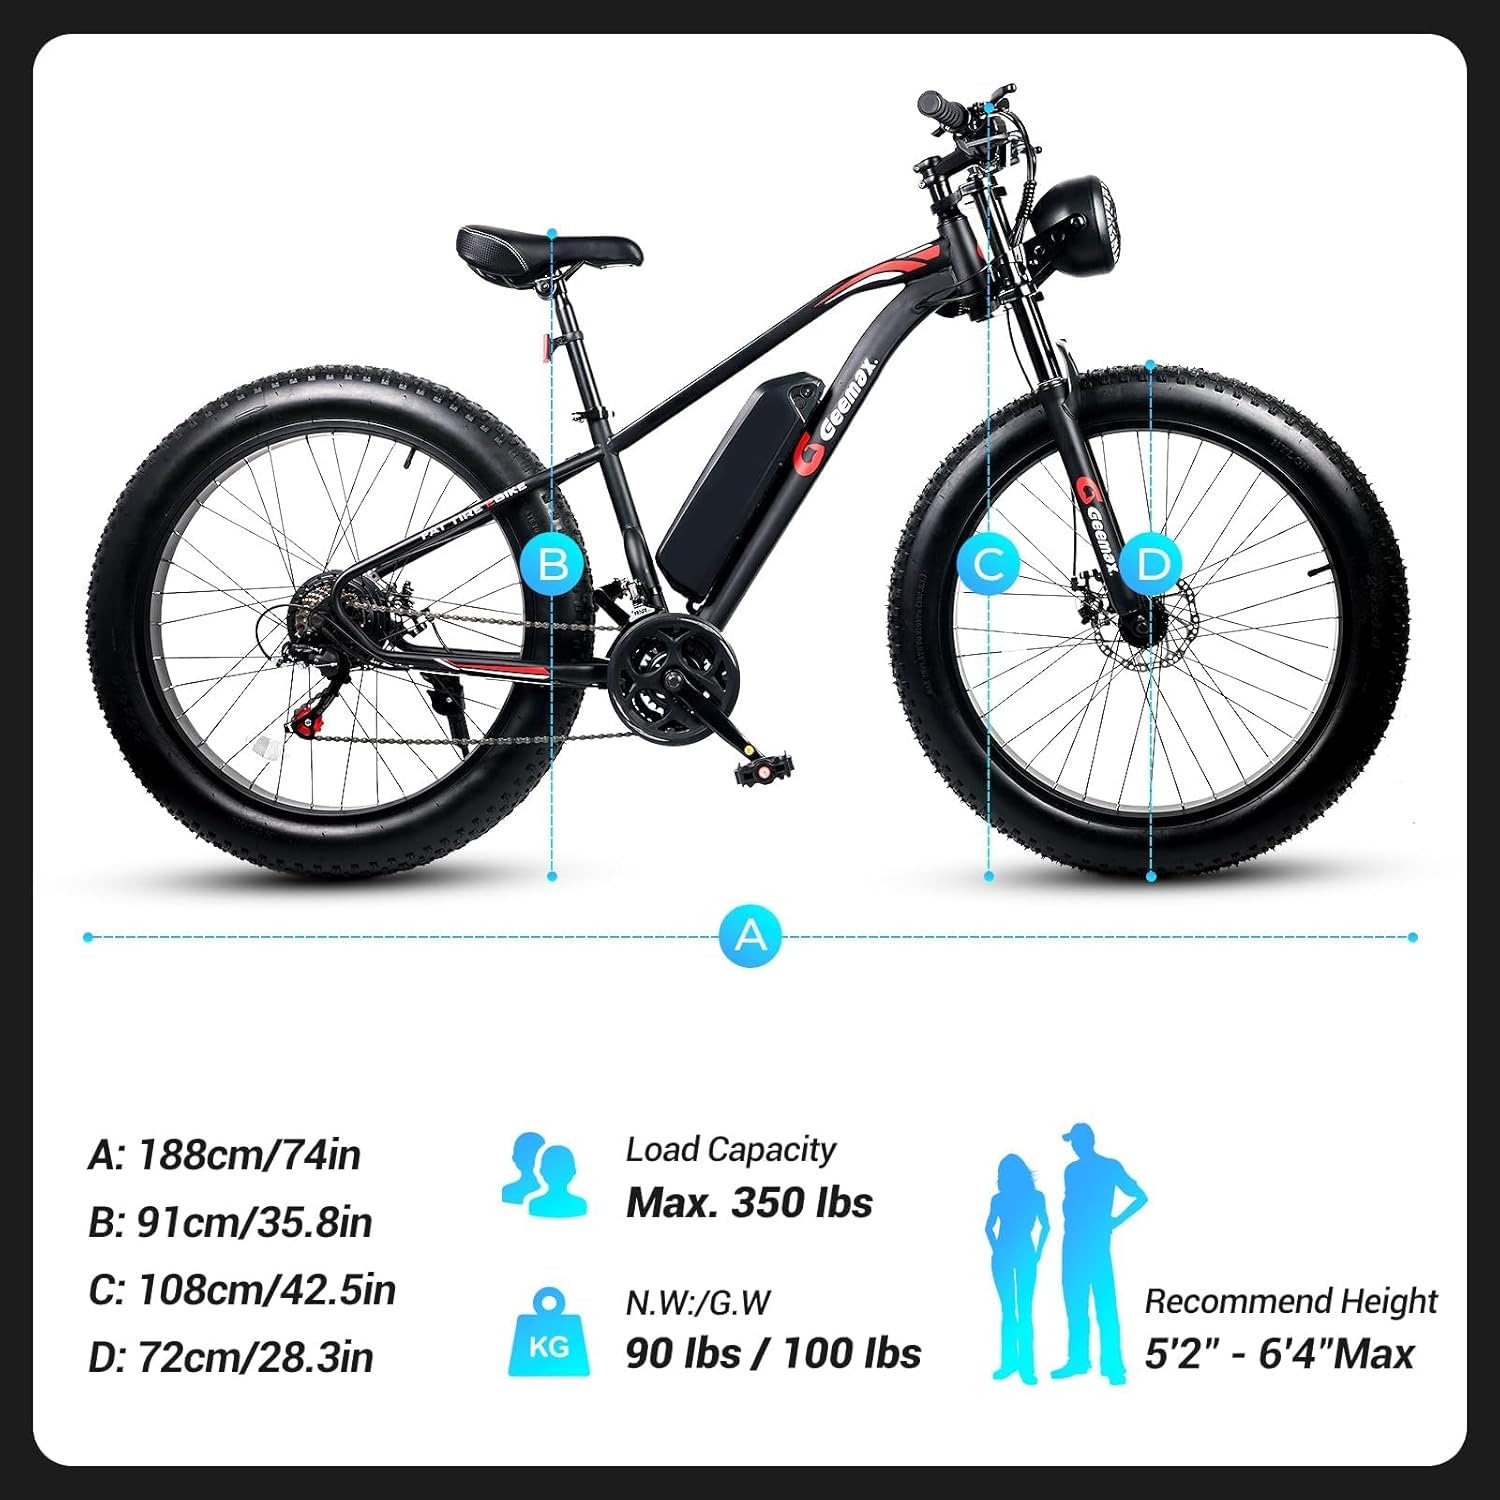
Image: Diagram illustrating the key dimensions (length, height, wheel diameter) of the Geemax electric bike, along with load capacity and recommended rider height.

Image: A comprehensive size guide for the Geemax electric bike, detailing frame measurements, load capacity, and recommended rider height range.
Gwarancja i wsparcie
Geemax provides a roczna gwarancja on the electric motor, battery, and charger from the date of purchase. This warranty covers manufacturing defects under normal use. For warranty claims or technical support, please contact Geemax customer service.
For assembly assistance, clear instructions and a video guide are available. Refer to the product packaging or manufacturer's webna tej stronie znajdziesz dane kontaktowe i dodatkowe zasoby wsparcia.
Oficjalne filmy produktowe
Chociaż w opisie produktu wskazano obecność filmów, URLs and metadata for embedding are not available in the provided data. If official seller videos become available, they would be embedded here to assist with assembly, operation, or maintenance.