1. Wprowadzenie
This manual provides detailed instructions for the setup, operation, and maintenance of your WallarGe Large Digital Wall Clock, Model CL8003. This electric clock features a clear LED display, temperature, date, and day indicators, automatic Daylight Saving Time (DST) adjustment, and adjustable brightness levels. Please read this manual thoroughly before use to ensure proper functionality and longevity of your device.
Wideo 1: Ponadview of the WallarGe Large LED Digital Wall Clock. This video demonstrates the clock's various features and display options.
2. Zawartość opakowania
Sprawdź, czy w przesyłce znajdują się wszystkie elementy:
- WallarGe Large Digital Wall Clock (CL8003)
- Zasilacz
- 5-stopowy przewód zasilający
- Akcesoria montażowe (śruby, kotwy ścienne)
- Instrukcja obsługi
- Memory Battery (pre-installed)

Image 1: Contents included with the WallarGe Large Digital Wall Clock.
3. Koniec produktuview
Familiarize yourself with the main components and display elements of your clock.
3.1 Wyświetlacz przedni

Image 2: Front display of the WallarGe digital clock, showing time, temperature, day, and date.
3.2 Panel tylny i elementy sterujące

Obraz 3: Tył view of the clock, indicating the location of control buttons, power input, wall mounting holes, the foldable stand, and the memory battery compartment.
- UP / 12/24HR Button: Adjusts values up during setting; toggles 12/24-hour format.
- Przycisk USTAWIANIA CZASU: Enters and confirms time/date setting mode.
- DOWN / °C/°F Button: Adjusts values down during setting; toggles temperature unit.
- ALARM SET / ON/OFF Button: Sets alarm; turns alarm on/off.
- Przycisk WŁ./WYŁ. DST: Włącza lub wyłącza czas letni.
- Przycisk ŚCIEMNIACZ: Reguluje jasność wyświetlacza.
- Port zasilania: Łączy się z zasilaczem.
- Wiszące otwory: Do montażu na ścianie.
- Składany stojak: Do umieszczenia na blacie.
- Memory Battery Compartment: Houses the backup battery.
4. Konfiguracja
4.1 Włączanie
Connect the provided power adapter to the clock's power port and plug it into a standard electrical outlet. The clock is designed for continuous plug-in operation. A pre-installed memory battery preserves your settings during power outages, eliminating the need for frequent resets.

Image 4: Explanation of the clock's power source and memory battery function.
4.2 Initial Settings (Time, Date, Year, Alarm)
Follow these steps to set the clock's time, date, and year. The day of the week will automatically synchronize based on the set year and date.
- Naciśnij i przytrzymaj USTAWIENIE CZASU button for 3 seconds to enter setting mode. The year display will flash.
- Użyj UP / 12/24HR or DÓŁ / °C/°F przyciski, aby ustawić rok. Naciśnij USTAWIENIE CZASU aby potwierdzić i przejść do następnego ustawienia.
- Repeat the process for setting the month, day, hour, and minute.
- Aby ustawić alarm, naciśnij i przytrzymaj ALARM SET / ON/OFF przycisk. Użyj UP or W DÓŁ Przyciski, aby ustawić żądaną godzinę alarmu. Naciśnij ZESTAW ALARMU aby potwierdzić.
Video 2: Detailed instructions on how to set up the WallarGe digital clock, including time, date, and alarm settings.
4.3 Czas letni (DST)
The clock features an automatic DST function. To enable or disable it:
- Naciśnij DST ON / OFF button to toggle the automatic DST feature. When enabled, the clock will automatically adjust for spring forward and fall back.

Image 5: Visual representation of the automatic Daylight Saving Time adjustment.
5. Instrukcja obsługi
5.1 Regulacja jasności
The clock offers 5 levels of adjustable brightness to suit various environments and preferences.
- Naciśnij OPORNIK button repeatedly to cycle through the 5 brightness levels (20%, 40%, 60%, 80%, 100%).

Image 6: Demonstration of the 5-level adjustable brightness feature.
5.2 Przełączanie trybów wyświetlania
Easily switch between 12/24-hour time format and Celsius/Fahrenheit temperature units.
- Naciśnij UP / 12/24HR przycisk umożliwiający przełączanie między formatem czasu 12-godzinnym i 24-godzinnym.
- Naciśnij DÓŁ / °C/°F przycisk umożliwiający przełączanie między jednostkami temperatury Celsjusza (°C) i Fahrenheita (°F).
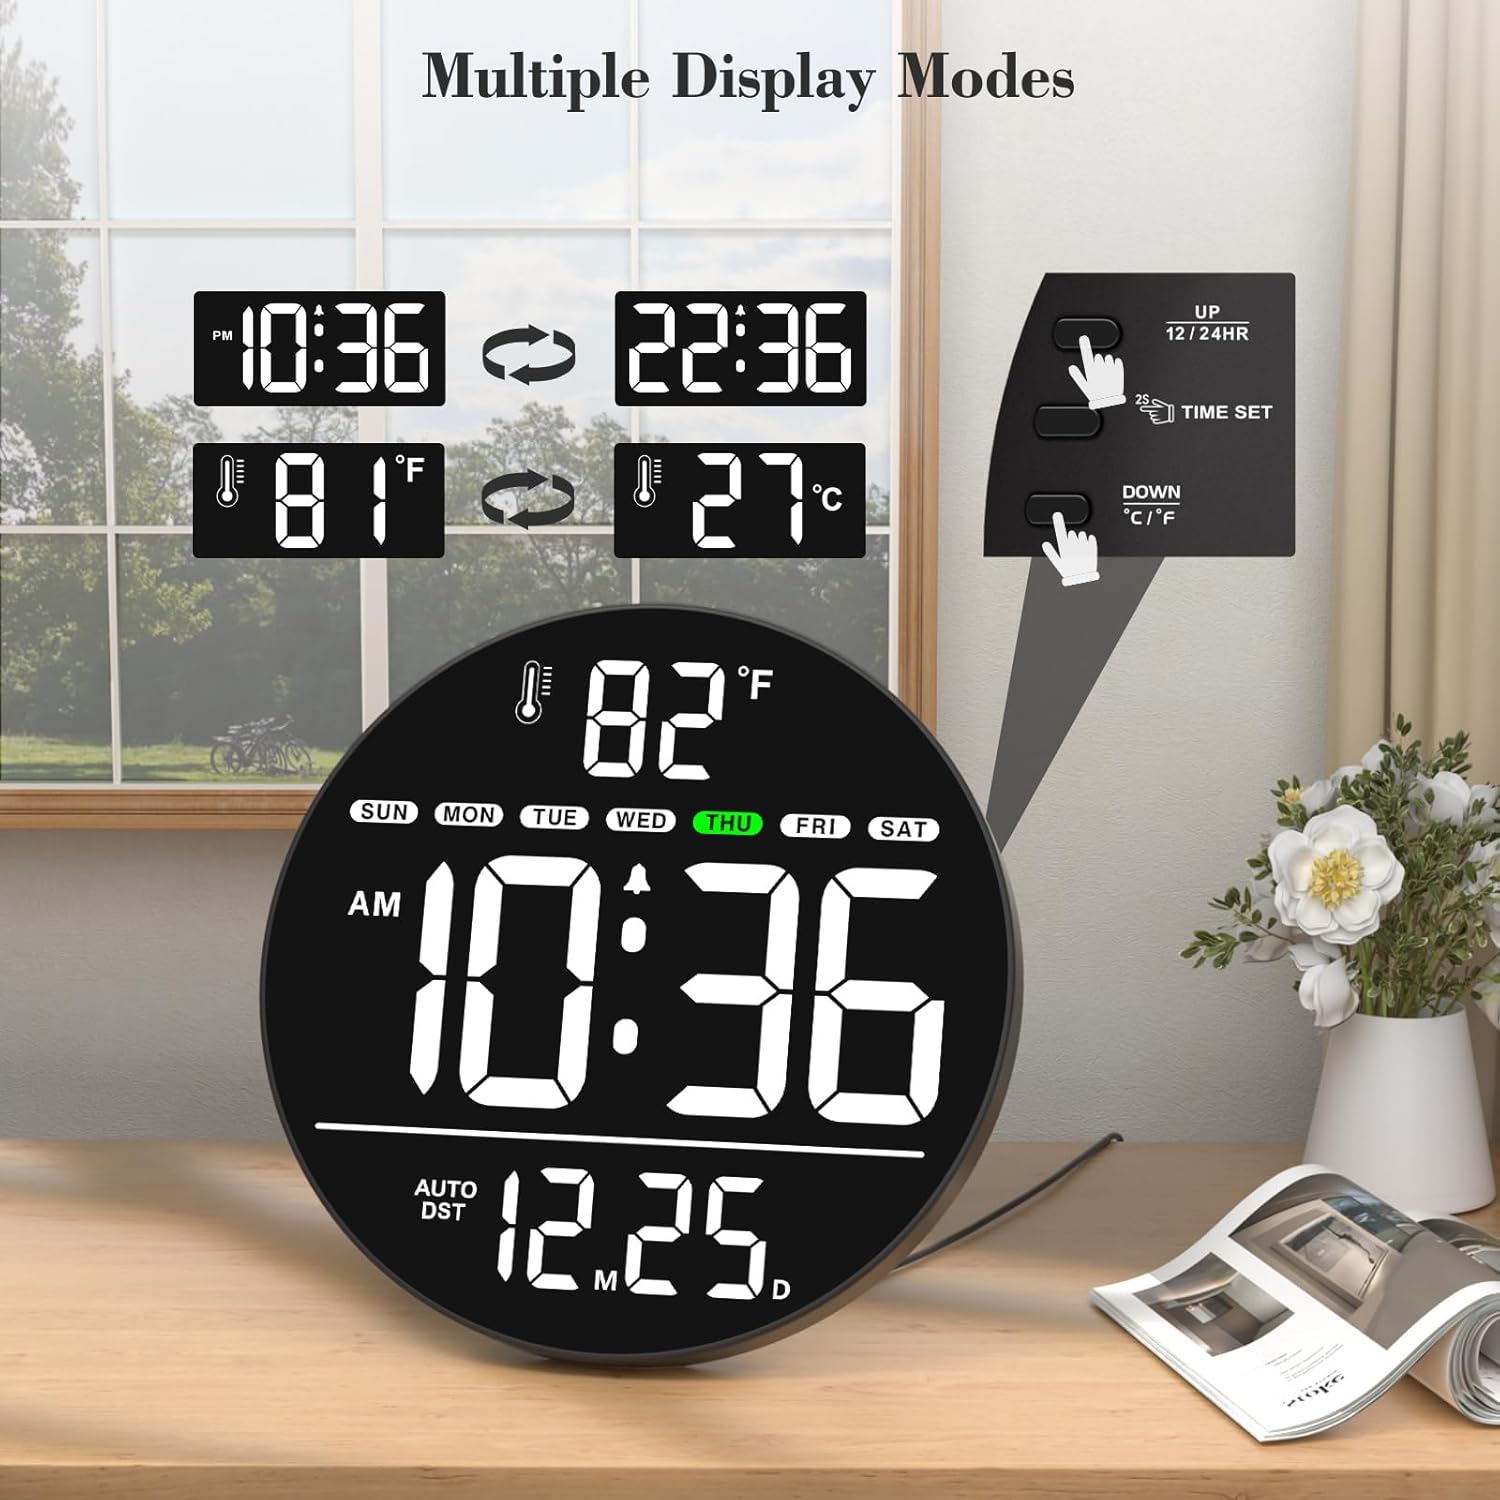
Image 7: Illustration of multiple display modes for time and temperature.
5.3 Opcje rozmieszczenia
The clock can be either wall-mounted or placed on a tabletop using its integrated foldable stand.
- Mocowanie ścienne: Use the hanging holes on the rear panel and the provided mounting accessories to secure the clock to a wall.
- Blat stołu: Extend the foldable stand on the rear panel to place the clock on any flat surface.
6. Konserwacja
To ensure optimal performance and appearance of your WallarGe Digital Wall Clock, follow these maintenance guidelines:
- Czyszczenie: Delikatnie przetrzyj wyświetlacz iasinPrzetrzyj miękką, suchą ściereczką. Unikaj stosowania środków czyszczących o działaniu ściernym, rozpuszczalników ani sprayów chemicznych, ponieważ mogą one uszkodzić powierzchnię.
- Zasilanie: Always use the original power adapter and cord provided with the clock. Ensure the power cord is not pinched or damaged.
- Bateria pamięci: The clock uses a memory battery to retain settings during power interruptions. If the clock consistently loses settings after a power outage, the memory battery may need replacement. Refer to the rear panel diagram for the battery compartment location.
- Środowisko: Place the clock in a dry environment, away from direct sunlight, extreme temperatures, and high humidity.
7. Rozwiązywanie Problemów
If you encounter any issues with your WallarGe Digital Wall Clock, please refer to the following common problems and solutions:
- No Display / Clock Not Turning On:
- Upewnij się, że zasilacz jest prawidłowo podłączony do zegara i do sprawnego gniazdka elektrycznego.
- Sprawdź, czy gniazdko elektryczne działa prawidłowo, podłączając do niego inne urządzenie.
- Nieprawidłowa godzina/data:
- Enter the setting mode by pressing and holding the USTAWIENIE CZASU button and re-adjust the year, month, day, hour, and minute as described in Section 4.2.
- If the clock loses settings after a power outage, the memory battery may be depleted and require replacement.
- Day of the Week is Incorrect:
- The day of the week is automatically calculated based on the set year and date. Ensure the year, month, and day are set correctly.
- Temperature Display is Incorrect:
- Ensure the clock is placed in an area with stable ambient temperature, away from direct heat sources or drafts.
- Brightness Not Adjusting:
- Naciśnij OPORNIK button repeatedly to cycle through all 5 brightness levels. If it remains unresponsive, contact customer support.
- Alarm nie brzmi:
- Ensure the alarm time is set correctly and the alarm function is turned ON using the ALARM SET / ON/OFF przycisk.
If these steps do not resolve the issue, please contact WallarGe customer support for further assistance.
8. Specyfikacje
| Funkcja | Szczegół |
|---|---|
| Marka | WallarGe |
| Numer modelu | Nr CL8003 |
| Typ wyświetlacza | Cyfrowa dioda LED |
| Kolor | White (LED display color may vary by variant) |
| Cechy specjalne | Time, Alarm, Indoor Temperature, Date, Day of the Week, LED, Auto DST, 5-Level Dimmer |
| Wymiary produktu | 0.7" szer. x 8" wys. |
| Źródło zasilania | Przewodowy elektryczny (adapter w zestawie) |
| Typ pokoju | Classroom, Bedroom, Living Room, Office, Warehouse, Study Room, Dining Room |
| Typ montażu | Montaż ścienny, blat |
| Materiał ramy | Plastikowy |
| Baterie w zestawie | 1 Nonstandard Battery (for memory function) |
| Waga przedmiotu | 15.2 uncji |
| Producent | ShenZhen litian technology Co.,Ltd |
9. Gwarancja i wsparcie
WallarGe products are manufactured with quality and customer satisfaction in mind. For any product-related inquiries, technical support, or warranty claims, please contact our customer service team.
- E-mail obsługi klienta: WallarGe@outlook.com
- Informacje o gwarancji: Please retain your proof of purchase for any warranty claims. Specific warranty terms and conditions may apply and are subject to the retailer's policy at the time of purchase.


