WallarGe CL8003
WallarGe Large Digital Wall Clock User Manual
Model: CL8003
Wstęp
This manual provides comprehensive instructions for the WallarGe Large Digital Wall Clock (Model CL8003). This electric wall clock features a clear LED display, temperature, automatic Daylight Saving Time (DST) adjustment, date, day of the week, and 5-level adjustable brightness. Please read this manual thoroughly before use to ensure proper setup and operation.
Zawartość opakowania
Sprawdź, czy w przesyłce znajdują się wszystkie elementy wymienione poniżej:
- WallarGe Large Digital Wall Clock (Model CL8003)
- Zasilacz
- USB Power Cord (5ft long)
- Akcesoria montażowe (śruby, kotwy ścienne)
- Instrukcja obsługi

Image: Contents of the WallarGe Large Digital Wall Clock package, including the clock, power adapter, USB power cord, mounting accessories, and user manual.
Organizować coś
1. Włączanie zegara
The WallarGe Digital Wall Clock is an electric, plug-in device. It requires continuous power to operate. Connect the provided USB power cord to the clock's power port and then plug the power adapter into a standard electrical outlet.
- Insert the small end of the USB power cord into the Port zasilania na odwrocie zegara.
- Plug the large end of the USB power cord into the provided power adapter.
- Podłącz zasilacz do sprawnego gniazdka ściennego.
2. Memory Battery Activation
The clock includes a pre-installed CR2032 button cell battery for memory function. This battery preserves time and settings during a power outage, preventing the need for re-setting the clock when power is restored. Before first use, locate the battery compartment on the back of the clock and remove the plastic pull tab to activate the battery.

Obraz: Tył view of the WallarGe Digital Wall Clock, highlighting the power port, control buttons, foldable stand, and the location of the memory battery compartment with a pull tab.
3. Opcje rozmieszczenia
Zegar można umieścić w dowolnym miejscu:
- Montaż na ścianie: Use the integrated hanging holes on the back of the clock and the provided mounting accessories (screws and anchors) to secure the clock to a wall. Ensure the power cord can reach an outlet.
- Umiejscowienie blatu: Extend the foldable stand located on the back of the clock to place it securely on a desk, shelf, or nightstand.

Image: The WallarGe Digital Wall Clock displayed in both wall-mounted and tabletop configurations, demonstrating its flexible placement options.
Instrukcja obsługi
The clock features intuitive controls located on the back. Refer to the image in the "Memory Battery Activation" section for button locations.
1. Ustawianie czasu i daty
- Naciśnij i przytrzymaj USTAWIENIE CZASU Naciskaj przycisk, aż wyświetlacz czasu zacznie migać.
- Użyj UP (12/24HR) I DOWN (°C/°F) Przyciski do ustawienia godziny. Naciśnij USTAWIENIE CZASU aby potwierdzić i przejść do protokołu.
- Adjust minutes using the UP I W DÓŁ guziki. Naciskać USTAWIENIE CZASU aby potwierdzić i przejść do roku.
- Kontynuuj ten proces, aby ustawić rok, miesiąc i dzień.
- Po ustawieniu dnia naciśnij USTAWIENIE CZASU aby wyjść z trybu ustawień.
2. Adjusting Brightness (5 Levels)
The clock offers 5 levels of brightness. Press the OPORNIK button repeatedly to cycle through the brightness levels (100%, 80%, 60%, 40%, 20%). Select the level that best suits your environment.

Image: The WallarGe Digital Wall Clock displaying various brightness levels, from 20% to 100%, illustrating the 5-level dimmer function.
3. 12/24-Hour Format and Temperature Unit (°F/°C)
- Aby przełączać się między formatem czasu 12-godzinnym i 24-godzinnym, naciśnij przycisk UP (12/24HR) przycisk.
- To switch between Fahrenheit (°F) and Celsius (°C) temperature units, press the DOWN (°C/°F) przycisk.
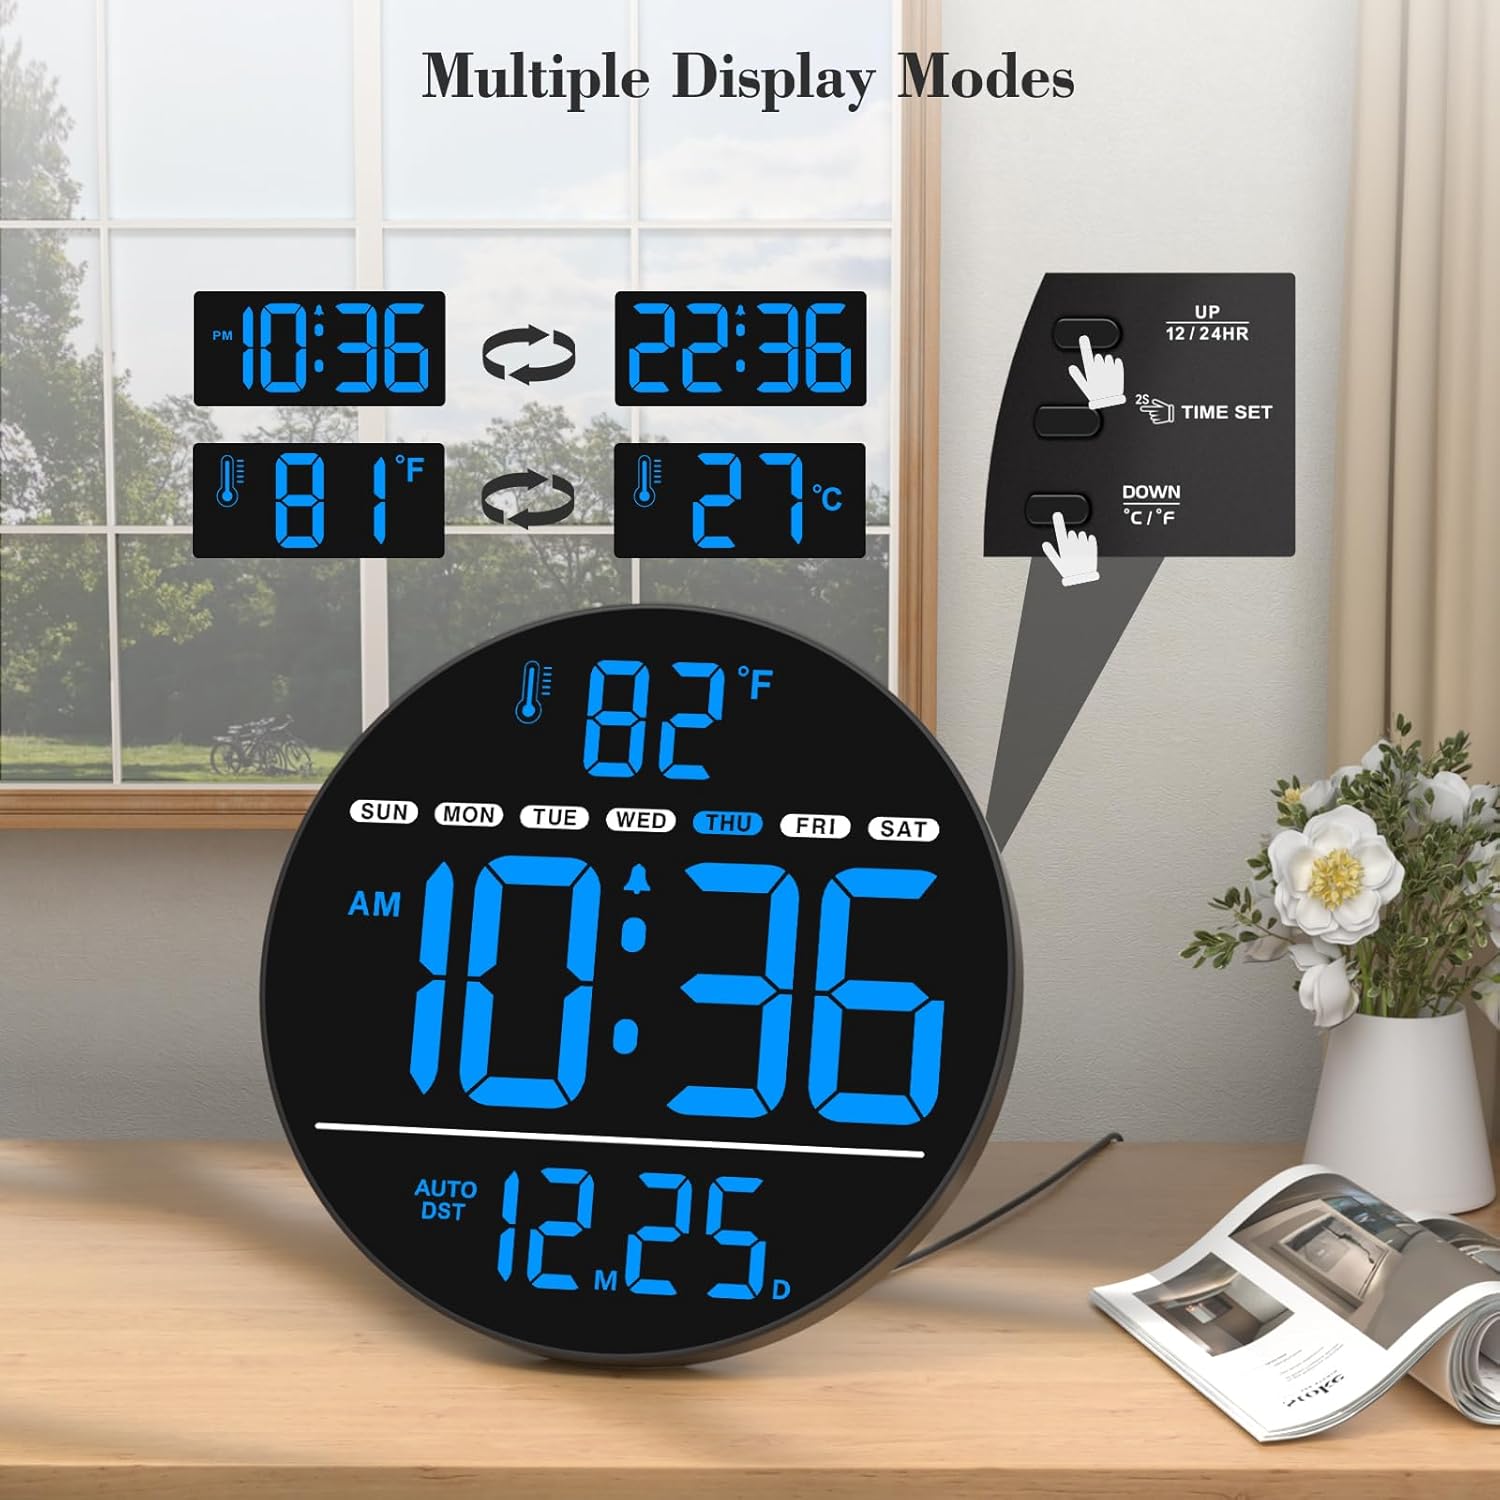
Image: The WallarGe Digital Wall Clock demonstrating the ability to switch between 12-hour and 24-hour time formats, and Fahrenheit and Celsius temperature units, with an inset showing the corresponding control buttons.
4. Automatic Daylight Saving Time (DST)
The clock features an automatic DST function. To enable or disable this feature, press the DST ON / OFF button on the back of the clock. When enabled, the clock will automatically adjust for spring forward and fall back time changes.

Image: The WallarGe Digital Wall Clock demonstrating the automatic adjustment for Daylight Saving Time, showing both "fall back" and "spring forward" scenarios.
5. Funkcja alarmu
The clock supports alarm settings. Refer to the specific instructions for setting and activating alarms using the dedicated alarm buttons on the back of the unit.
6. Cicha praca
This digital clock operates silently, without any ticking sounds, making it suitable for bedrooms, offices, and other quiet environments.
Konserwacja
- Czyszczenie: Przetrzyj powierzchnię zegara miękką, suchą ściereczką. Unikaj stosowania środków czyszczących o właściwościach ściernych lub rozpuszczalników, ponieważ mogą one uszkodzić wyświetlacz lub wyświetlacz.asing.
- Moc: Ensure the clock remains plugged into a stable power source for continuous operation.
- Wymiana baterii: The CR2032 memory battery typically lasts for several years. If the clock consistently loses settings after a power outage despite being activated, the memory battery may need replacement. Consult the manufacturer for guidance on battery replacement.
Rozwiązywanie problemów
| Problem | Możliwa przyczyna | Rozwiązanie |
|---|---|---|
| Wyświetlacz zegara jest pusty. | Brak zasilania. | Ensure the power adapter is securely plugged into a working outlet and the USB cord is connected to the clock. |
| Clock loses time/settings after power outage. | Memory battery not activated or depleted. | Remove the plastic pull tab from the CR2032 memory battery compartment. If already removed, the battery may need replacement. |
| Wyświetlacz jest zbyt ciemny lub zbyt jasny. | Wymagana jest regulacja poziomu jasności. | Naciśnij OPORNIK button on the back of the clock to cycle through the 5 brightness levels. |
| Time format or temperature unit is incorrect. | Incorrect display setting. | Naciśnij UP (12/24HR) button to change time format. Press the DOWN (°C/°F) button to change temperature unit. |
Specyfikacje
| Funkcja | Szczegół |
|---|---|
| Marka | WallarGe |
| Numer modelu | Nr CL8003 |
| Kolor | Niebieski |
| Typ wyświetlacza | Cyfrowa dioda LED |
| Cechy specjalne | Time, Alarm, Indoor Temperature, Date, Day of the Week, 5-Level Dimmer, Auto DST |
| Wymiary produktu | 0.7" szer. x 8" wys. |
| Źródło zasilania | Elektryczny przewodowy |
| Zastosowanie wewnątrz/na zewnątrz | Wnętrz |
| Typ montażu | Montaż ścienny, blat |
| Bateria pamięci | 1 Nonstandard Battery (CR2032, included) |
| Waga przedmiotu | 15.2 uncji |
Wsparcie
For further assistance or inquiries regarding your WallarGe Digital Wall Clock, please contact customer support:
E-mail: WallarGe@outlook.com
Please provide your model number (CL8003) when contacting support for faster service.