MEDALight F30
Instrukcja obsługi lampy błyskowej MEDALight F30 Mini
Model: F30 | Marka: MEDALight
1. Wprowadzenie
Dziękujemy za zakupasing the MEDALight F30 Mini Camera Flash. This compact and powerful manual hot shoe flash is designed to provide versatile lighting for your photography needs. With its GN15 guide number and 7 power levels, it offers precise control over light output. Please read this manual thoroughly before using the product to ensure proper operation and to maximize its performance.
2. Co znajduje się w pudełku
- MEDALight F30 Mini Camera Flash
- Pudełko prezentowe
3. Informacje dotyczące bezpieczeństwa
Aby zapobiec uszkodzeniu produktu lub obrażeniom ciała u siebie lub innych, należy przestrzegać następujących środków ostrożności:
- Nie rozmontowuj, nie naprawiaj ani nie modyfikuj lampy błyskowej.
- Przechowuj lampę błyskową w suchym miejscu. Nie wystawiaj jej na działanie deszczu, wilgoci ani wysokiej wilgotności powietrza.
- Do not touch the flash tube immediately after firing, as it can be very hot.
- Przechowywać w miejscu niedostępnym dla dzieci.
- Use only the specified battery type (9V battery). Ensure correct polarity when inserting batteries.
- Remove batteries if the flash will not be used for an extended period.
4. Identyfikacja części
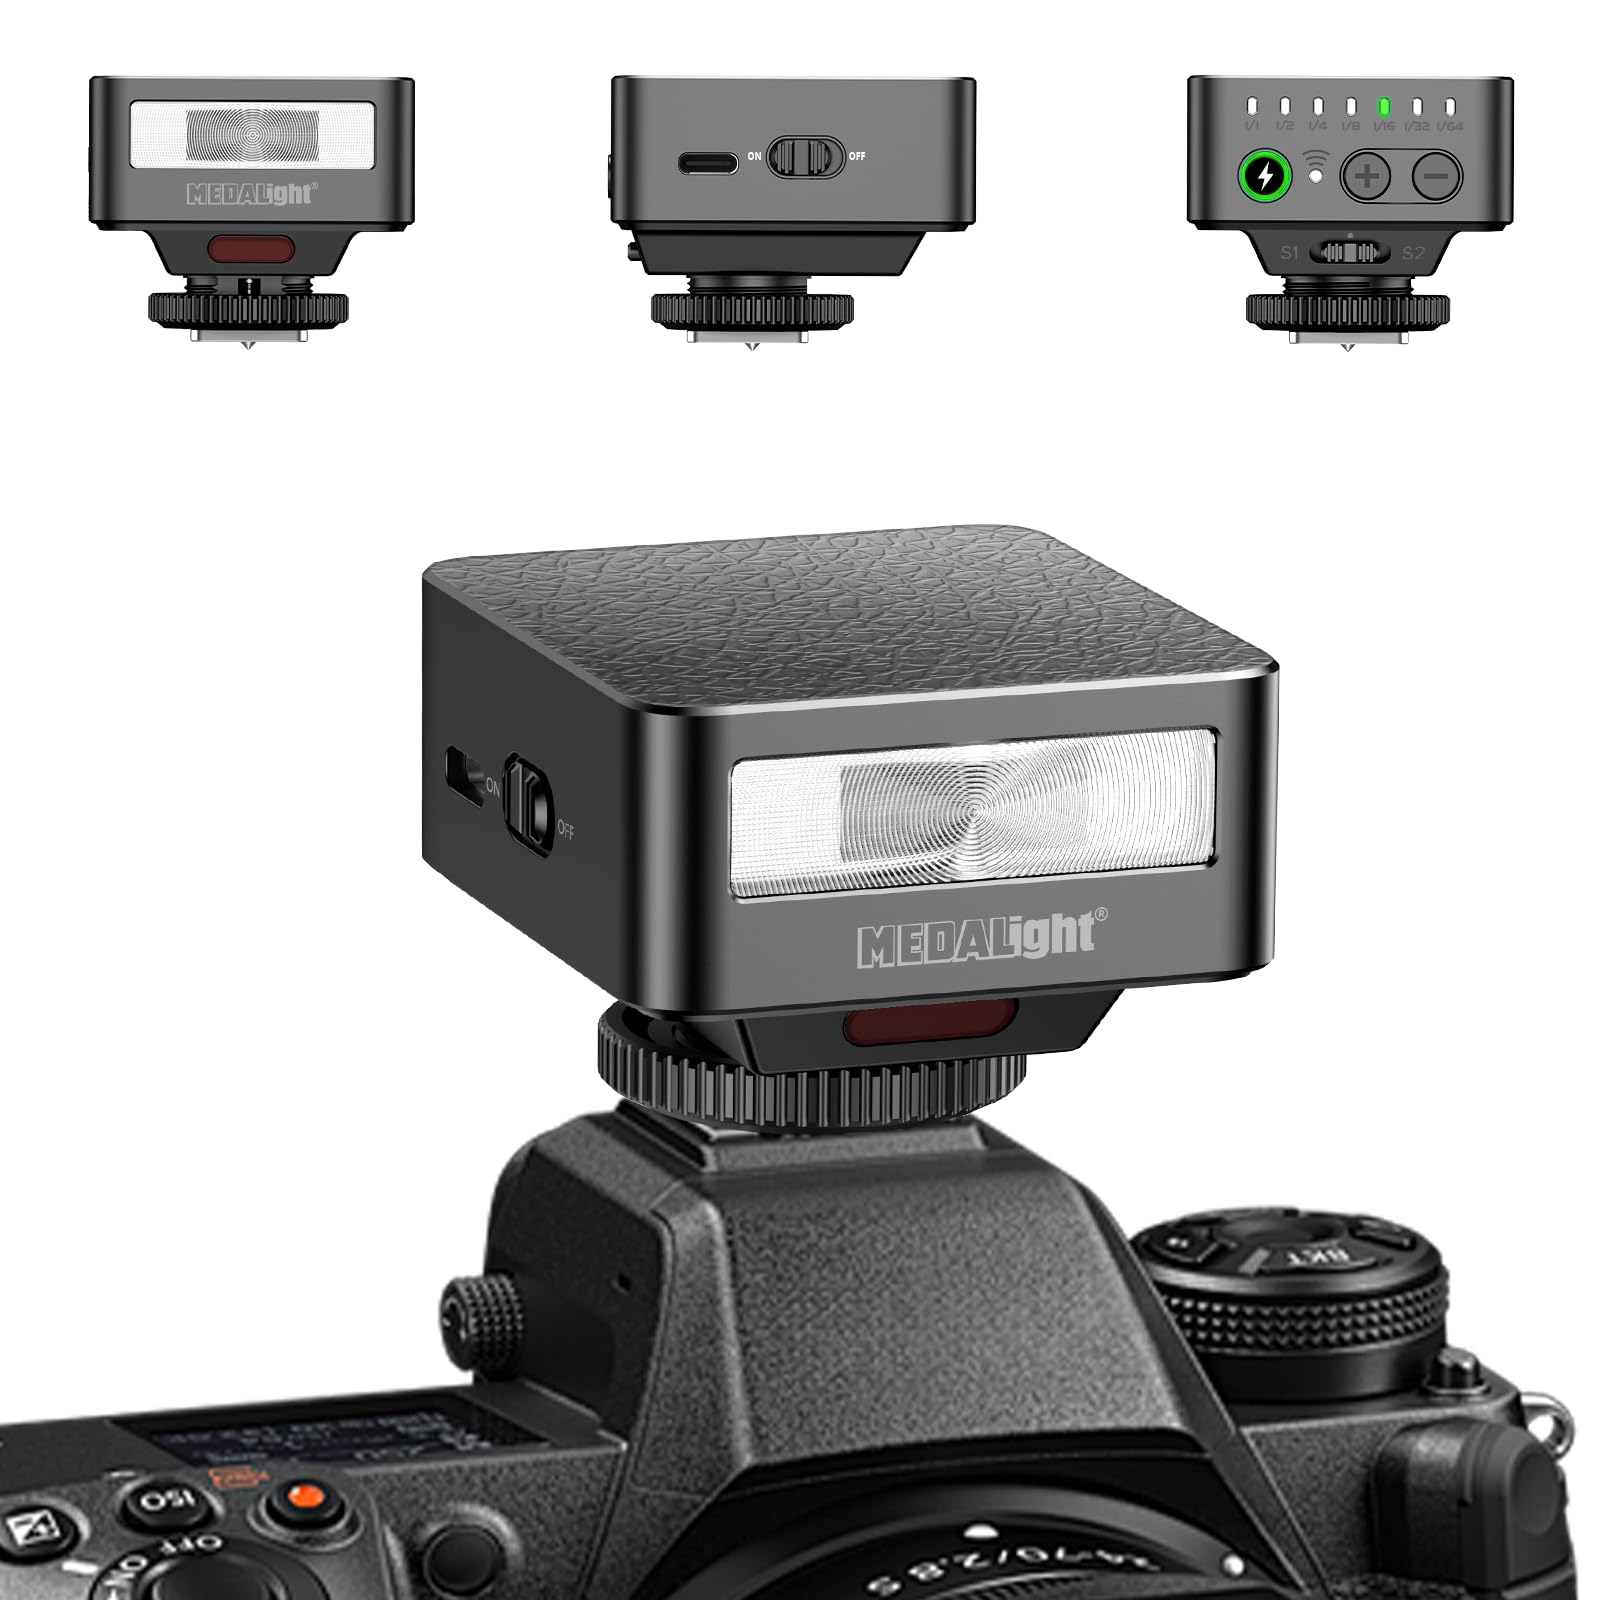
This image displays the MEDALight F30 Mini Camera Flash. The main view shows the flash unit attached to a camera's hot shoe. In the upper left, a front view of the flash highlights the flash tube and the 'MEDALight' logo. In the upper center, a side view reveals the 'ON/OFF' switch. In the upper right, a top view shows the power level indicators (1/1 to 1/64), a charge indicator, and '+' and '-' buttons for adjustment, along with S1 and S2 optical slave modes.
- Lampa błyskowa: Emits light for illumination.
- Przełącznik włącz / wyłącz: Powers the flash unit on or off.
- Wskaźniki poziomu mocy: LEDs indicating the current power output (1/1, 1/2, 1/4, 1/8, 1/16, 1/32, 1/64).
- Wskaźnik ładowania: LED that illuminates when the flash is ready to fire.
- Przycisk '+': Increases flash power output.
- '-' Przycisk: Decreases flash power output.
- Mocowanie stopki gorącej: Connects the flash to the camera's hot shoe.
- S1/S2 Optical Slave Sensors: Detect other flash bursts for off-camera triggering.
5. Konfiguracja
5.1 Instalacja baterii
- Znajdź pokrywę komory baterii na lampie błyskowej.
- Otwórz pokrywę.
- Insert one 9V battery (included) into the compartment, ensuring correct polarity (+/-).
- Dokładnie zamknij pokrywę komory baterii.
5.2 Montaż na kamerze
- Slide the hot shoe mount of the F30 flash into your camera's hot shoe slot.
- Dokręć pierścień blokujący na lampie błyskowej, aby pewnie zamocować ją do aparatu.
- Ensure the flash is properly seated and stable before use.
6. Instrukcja obsługi
6.1 Włączanie/wyłączanie
Przesuń WŁ./WYŁ. switch to the 'ON' position to power on the flash. Slide it to 'OFF' to power off.
6.2 Regulacja poziomów mocy
Once powered on, the flash will begin charging. The charge indicator LED will illuminate when the flash is ready to fire. Use the '+' I '-' buttons to adjust the flash power output. The power level indicators will show the current setting, ranging from 1/1 (full power) down to 1/64.
- Naciskać '+' to increase power (e.g., from 1/64 to 1/32).
- Naciskać '-' to decrease power (e.g., from 1/1 to 1/2).
6.3 Using Optical Slave Modes (S1/S2)
The F30 flash features S1 and S2 optical slave modes for off-camera triggering. These modes allow the F30 to fire in sync with another flash unit.
- Tryb S1: The flash will fire when it detects the first flash burst from a master flash. This is suitable for manual flash systems.
- Tryb S2: The flash will ignore the pre-flash (if any) from a master flash and fire on the second flash burst. This is suitable for TTL flash systems that emit a pre-flash.
To activate S1 or S2 mode, ensure the flash is powered on and then press the appropriate button (S1 or S2) on the top panel. The corresponding indicator will light up.
6.4 Uwaga dotycząca zgodności
This flash is compatible with Sony ZV1, ZV-E10, Ricoh GR3, Nikon, Canon, Fuji, Digital Film Cameras, and DSLR Cameras. It is NOT compatible with Sony ZV-1F.
7. Konserwacja
7.1 Czyszczenie
To clean the flash unit, use a soft, dry cloth. Do not use abrasive cleaners, solvents, or strong chemicals, as they may damage the surface or internal components.
7.2 Przechowywanie
When not in use for an extended period, store the flash unit in a cool, dry place. Remove the 9V battery to prevent leakage and potential damage to the flash.
8. Rozwiązywanie Problemów
| Problem | Możliwa przyczyna | Rozwiązanie |
|---|---|---|
| Lampa błyskowa się nie włącza. | Bateria jest rozładowana lub nieprawidłowo włożona. | Sprawdź biegunowość baterii lub wymień ją na nową baterię 9 V. |
| Lampa błyskowa się nie uruchamia. | Flash not fully charged; hot shoe connection loose; camera settings incorrect. | Wait for charge indicator to light up; ensure flash is securely mounted; check camera's flash settings. |
| Flash fires inconsistently in slave mode. | Incorrect slave mode (S1/S2) selected; sensor obstructed; ambient light interference. | Ensure correct S1/S2 mode for your master flash; clear any obstructions from the sensor; test in different lighting conditions. |
9. Specyfikacje
- Model: F30
- Numer przewodni (GN): 15
- Poziomy mocy: 7 (1/1, 1/2, 1/4, 1/8, 1/16, 1/32, 1/64)
- Prędkość synchronizacji lampy błyskowej: 1/500s
- Camera Flash Type: Gorący but
- Baterie: 1 x akumulator 9 V (w zestawie)
- Waga przedmiotu: 3.52 uncji (około 100 g)
- Wymiary opakowania: 3.94 x 3.94 x 0.79 cala (10 x 10 x 2 cm)
- Kompatybilne mocowania: Sony ZV1, ZV-E10, Ricoh GR3, Nikon, Canon, Fuji, Digital Film Cameras, DSLR Cameras (Not Compatible for Sony ZV-1F)
- Producent: Zhuhai jingjia technology co.,ltd
10. Gwarancja i pomoc techniczna
Aby uzyskać informacje dotyczące gwarancji lub wsparcia technicznego, zapoznaj się z dokumentacją dołączoną do produktu lub skontaktuj się bezpośrednio ze sprzedawcą/producentem. Zachowaj dowód zakupu na wypadek roszczeń gwarancyjnych.
Ask a question about this manual
Ask about setup, troubleshooting, compatibility, parts, safety, or missing instructions. Manuals+ will review the question and use this page’s manual context to help answer it.