1. Wprowadzenie
This instruction manual provides essential information for the safe and effective use of your MOKOHOA Rotary Tattoo Pen Kit. Please read this manual thoroughly before operating the device to ensure proper setup, operation, and maintenance. This kit is designed for practice and training purposes.
2. Informacje dotyczące bezpieczeństwa
Ważne środki ostrożności:
- This kit is intended for practice on synthetic skin only. Do not use on human skin without proper professional training, certification, and adherence to strict hygiene protocols.
- Always ensure a clean and sterile working environment.
- Podczas montażu i obsługi należy nosić odpowiedni sprzęt ochrony osobistej, w tym rękawice.
- Dispose of used needles and other contaminated materials in designated sharps containers.
- Przechowuj urządzenie i wszystkie akcesoria poza zasięgiem dzieci.
- Do not attempt to modify or disassemble the tattoo pen or power supply. Refer to qualified personnel for repairs.
- Ensure the power supply is connected to a compatible electrical outlet.
3. Zawartość opakowania
Your MOKOHOA Rotary Tattoo Pen Kit includes the following components:
- 1 x Rotary Tattoo Pen
- 1 x Wired Battery (Power Supply)
- 1 x Practice Skin
- 1 x Papier transferowy
- 1 x Bandage
- 1 Pair Tattoo Gloves
- 1 x Self-adhesive Tattoo Grip
- 2 x kable ładujące
- 3 x 5ml Tattoo Ink Bottles
- 6 x Tattoo Needles (Cartridge Needles)
- 20 x Ink Bottle Caps

Obraz 3.1: Koniecview of the complete MOKOHOA Rotary Tattoo Pen Kit contents.
4. Koniec produktuview
4.1 Rotary Tattoo Pen
The tattoo pen is constructed from high-quality aluminum alloy, providing a lightweight and ergonomic design. It operates within a voltage range of 6-11V and is compatible with various tattoo cartridge needles.
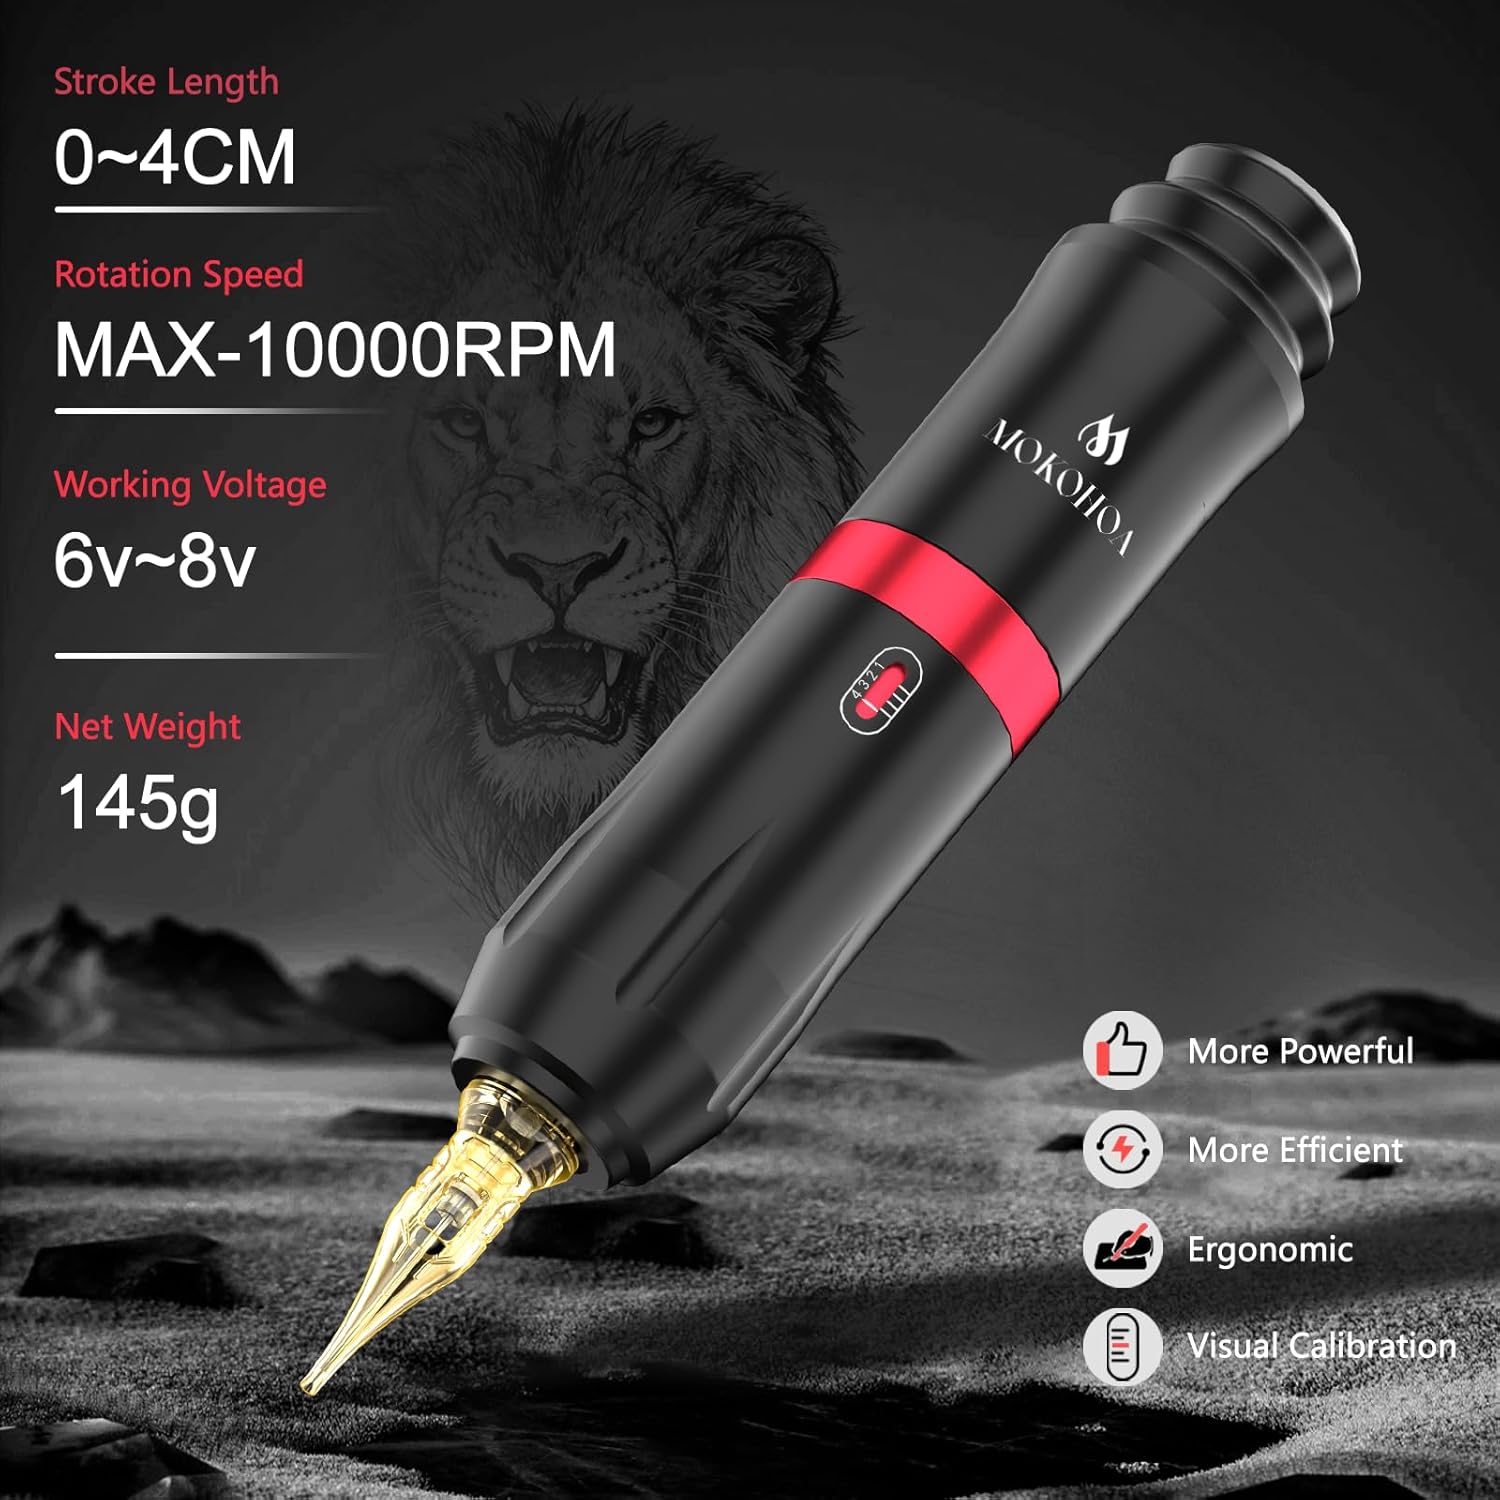
Rysunek 4.1: Szczegółowy view of the Rotary Tattoo Pen highlighting its specifications.

Image 4.2: Diagram showing the internal components of the Rotary Tattoo Pen, including the motor, non-slip handle, and transmission frame.
4.2 Pro Tattoo Cartridge Needles
The kit includes individually packaged cartridge needles designed for stable operation, efficient ink application, and smooth ink release. These needles are compatible with the MOKOHOA Rotary Tattoo Pen.

Image 4.3: Illustration of the high compatibility of the tattoo pen with various cartridge needles.
4.3 Jednostka zasilająca
The wired power supply ensures stable frequency and consistent power delivery to the tattoo pen. It features an input voltage range of 90V-265V and an adjustable output voltage od 0-18.0V.

Obraz 4.4: Przód view of the power supply unit, indicating input/output voltage and connection ports.
4.4 Tattoo Inks
The kit includes 5ml bottles of tattoo ink. These inks are suitable for practice on synthetic skin. For use on human skin, always consult and use professional-grade, sterile inks.

Obraz 4.5: Example of the included 5ml tattoo ink bottles.
5. Instrukcje konfiguracji
Follow these steps to set up your MOKOHOA Rotary Tattoo Pen Kit:
- Przygotuj swoje miejsce pracy: Ensure your workspace is clean and organized. Lay out all components.
- Podłącz przewód zasilający: Connect the power cord from the power supply unit to the RCA port on the top of the tattoo pen.
- Włóż igłę wkładu: Gently push a cartridge needle into the front opening of the tattoo pen until it clicks securely into place.
- Dostosuj długość igły: Rotate the grip of the tattoo pen clockwise or counter-clockwise to adjust the needle protrusion length to your desired setting.
- Podłącz zasilanie: Plug the power supply unit into a suitable electrical outlet. If using a foot pedal (not included in this specific kit but compatible), connect it to the designated port on the power supply.
- Przygotuj tusz: Pour a small amount of tattoo ink into an ink cap.
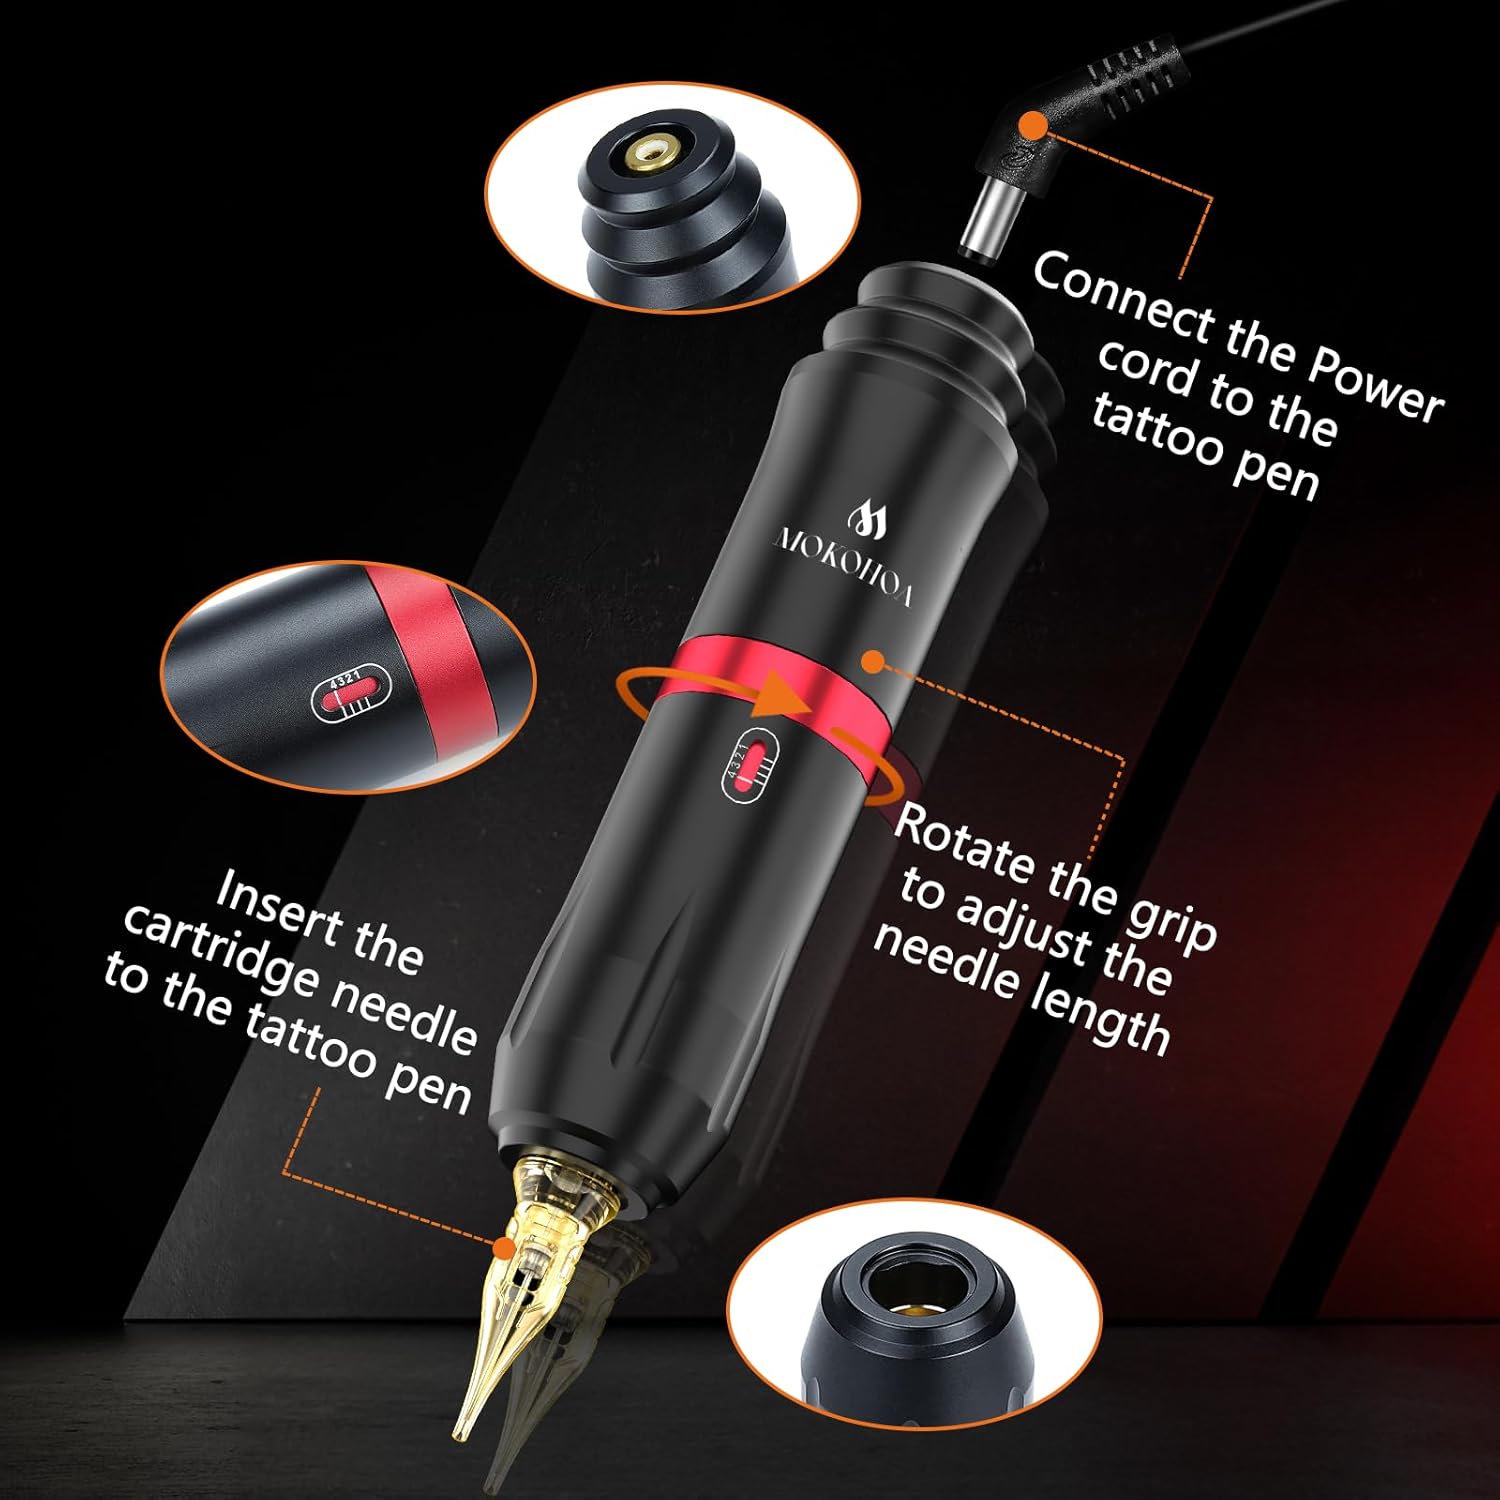
Image 5.1: Visual guide for connecting the power cord, inserting the needle, and adjusting needle length.
6. Instrukcja obsługi
Once the kit is set up, follow these steps for operation:
- Włączanie: Turn on the power supply unit. The indicator light will illuminate.
- Dostosuj głośnośćtage: Użyj objętościtage adjustment knob on the power supply to set the desired operating voltage. Zalecana objętość roboczatage for the tattoo pen is 6V-8V.
- Rozpocznij praktykę: Dip the needle into the ink cap to pick up ink. Begin practicing on the provided synthetic practice skin.
- Wyłączone: After use, turn off the power supply unit and disconnect it from the electrical outlet.
Notatka: Always practice on synthetic skin to develop your technique and understanding of the equipment before considering any application on human skin. Proper training and adherence to health and safety regulations are paramount for tattooing on human skin.
7. Konserwacja
Proper maintenance ensures the longevity and performance of your tattoo kit:
- Czyszczenie pióra: After each use, carefully wipe down the exterior of the tattoo pen with a clean, damp cloth. Do not immerse the pen in liquid. Ensure no moisture enters the motor or electrical components.
- Utylizacja igieł: Always dispose of used cartridge needles in a certified sharps container immediately after use. Never reuse needles.
- Składowanie: Store the tattoo pen and power supply in a clean, dry place away from direct sunlight and extreme temperatures. Keep all components in their original packaging or a protective case when not in use.
- Pielęgnacja zasilacza: Keep the power supply unit clean and free from dust. Do not expose it to liquids.
8. Rozwiązywanie Problemów
If you encounter issues with your MOKOHOA Rotary Tattoo Pen Kit, refer to the following common problems and solutions:
| Problem | Możliwa przyczyna | Rozwiązanie |
|---|---|---|
| Długopis do tatuażu się nie włącza. | Power supply not connected, power outlet issue, loose cable connection. | Ensure all cables are securely connected. Check if the power supply is plugged into a working outlet. Verify the power supply is switched on. |
| Inconsistent pen operation or weak power. | Niska objętośćtage setting, faulty cable, power supply issue. | Zwiększ objętośćtage setting on the power supply. Check for any damage to the power cables. |
| Needle not moving or stuck. | Improperly inserted cartridge needle, debris in the pen mechanism. | Remove and re-insert the cartridge needle, ensuring it clicks into place. Inspect the pen for any visible obstructions. |
If the problem persists after attempting these solutions, please contact MOKOHOA customer support for further assistance.
9. Specyfikacje
| Część | Funkcja | Wartość |
|---|---|---|
| Rotary Tattoo Pen | Tworzywo | Wysokiej jakości stop aluminium |
| Objętość operacyjnatage | 6V - 11V (Recommended 6V-8V) | |
| Prędkość obrotowa | Maksymalnie 10000 obr./min. | |
| Długość skoku | 0 - 4 cm | |
| Masa netto | 145g | |
| Jednostka Zasilająca | Wejście Voltage | 90 V - 265 V |
| Objętość wyjściatage | 0 - 18.0 V | |
| Ogólny | Wymiary opakowania | 8.66 x 4.25 x 2.24 cala |
| Waga paczki | 1.26 funtów | |
| Numer modelu | JPCT003 |
10. Gwarancja i wsparcie
MOKOHOA is committed to providing quality products. For any questions, concerns, or issues regarding your Rotary Tattoo Pen Kit, please contact MOKOHOA customer support. Refer to your purchase documentation for specific warranty details and contact information.
Informacje kontaktowe: Please refer to the seller's information on the platform where the product was purchased or visit the official MOKOHOA brand store for support details.