1. Wprowadzenie
Thank you for choosing the HUTACT Portable Digital Microscope. This device is designed to introduce young explorers to the fascinating microscopic world with its 100-1000X magnification, 2.0-inch IPS screen, and versatile 2-in-1 handheld and desktop functionality. This manual provides essential information for safe and effective use, setup, operation, maintenance, and troubleshooting.
Przed użyciem produktu należy dokładnie przeczytać instrukcję i zachować ją do wykorzystania w przyszłości.
2. Ważne informacje dotyczące bezpieczeństwa
- Nadzór osoby dorosłej: This product is recommended for children aged 5 and above and should always be used under adult supervision.
- Bezpieczeństwo baterii: The device contains a rechargeable lithium-polymer battery. Do not attempt to replace the battery. Do not expose the device to extreme temperatures, direct sunlight, or fire.
- Ładowanie: Use only the provided Type-C charging cable. Ensure the charging port is dry before connecting.
- Czyszczenie: Clean the lens and screen with a soft, dry cloth. Avoid using abrasive cleaners or solvents.
- Obsługiwanie: Handle the microscope with care. Avoid dropping or subjecting it to strong impacts.
- Małe części: The kit contains small parts that may pose a choking hazard for young children. Keep out of reach of children under 3 years old.
3. Zawartość opakowania
Sprawdź, czy w przesyłce znajdują się wszystkie wymienione poniżej elementy:
- Portable Digital Microscope with integrated screen
- Microscope Holder (for desktop use)
- Kabel do ładowania USB typu C.
- Falrep
- 5 Prepared Specimen Slides
- 5 pustych slajdów
- Collection Bottles (2)
- Collection Boxes (2)
- Blenders (2)
- Mieszadło plastikowe
- Pinceta
- Instrukcja obsługi
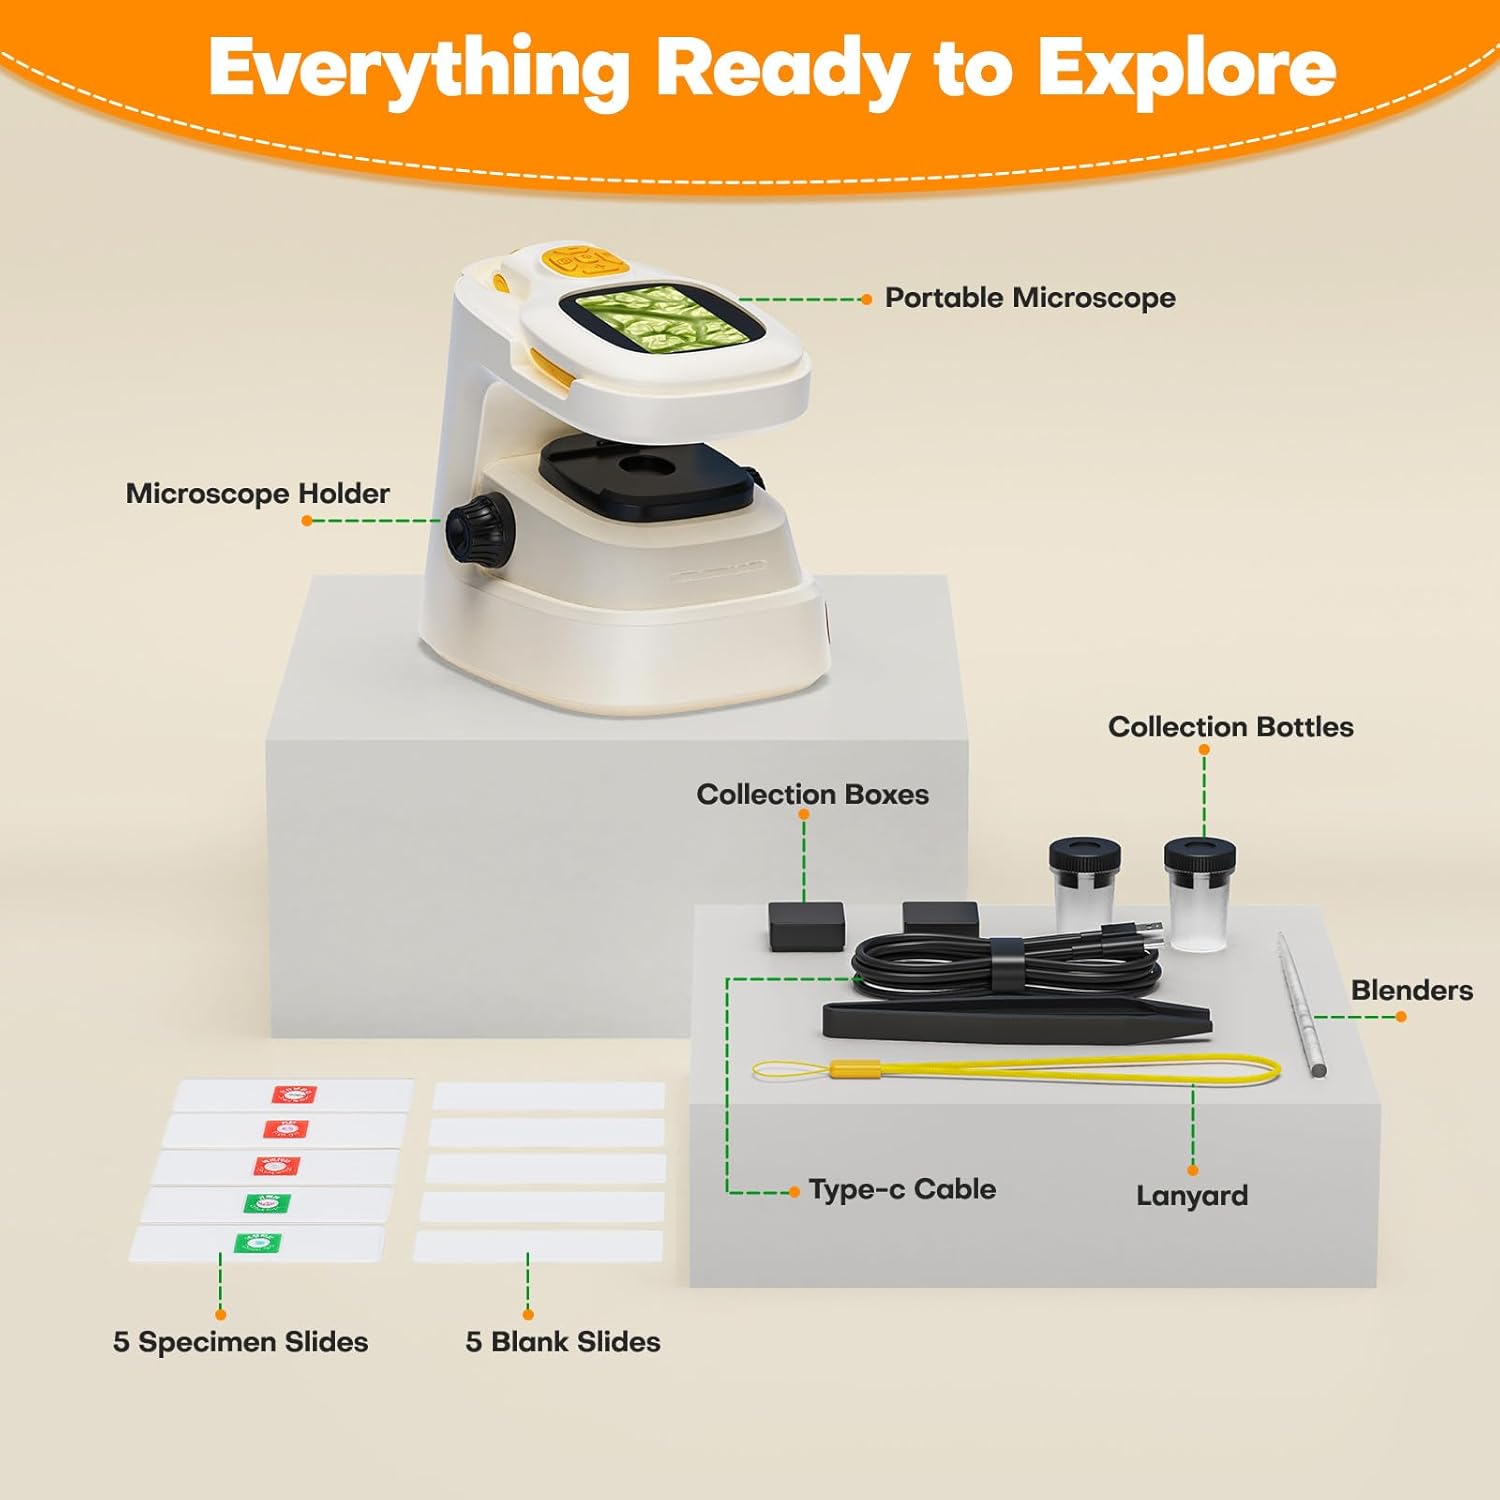
Rysunek 3.1: All components included in the HUTACT Portable Digital Microscope kit, neatly arranged. This image displays the portable microscope unit, the desktop stand, various tools like tweezers and stirrers, collection bottles, a Type-C cable, a lanyard, and both prepared and blank specimen slides.
4. Koniec produktuview
The HUTACT Digital Microscope offers a versatile design for both handheld and desktop observation. Familiarize yourself with its main components:
- Ekran IPS 2.0": Displays real-time magnified images and videos.
- Pokrętło ostrości: Reguluje klarowność obrazu.
- Przyciski powiększenia: Cycles through 10 levels of digital zoom (100X-1000X).
- Przycisk przechwytywania: Robi zdjęcia lub rozpoczyna/zatrzymuje nagrywanie wideo.
- Oświetlenie LED: Provides light for observing specimens.
- Port typu C: Do ładowania i podłączania do komputera.
- Gniazdo karty TF: For optional external storage (TF card not included).

Rysunek 4.1: The HUTACT Digital Microscope demonstrating its 2-in-1 functionality. The image shows the main microscope unit being used in handheld mode by a child, and also placed into its stable desktop stand for more detailed observation. This highlights the flexibility of the device for various exploration scenarios.

Rysunek 4.2: Zbliżenie view of the HUTACT Digital Microscope's screen and focus knob, illustrating the 10 levels of adjustable magnification. The image displays examples of a ladybug at 100X, a leaf vein at 500X, and a detailed cellular structure at 1000X, demonstrating the clarity and range of magnification.
5. Konfiguracja
5.1 Ładowanie urządzenia
- Connect the provided Type-C USB cable to the microscope's charging port.
- Podłącz drugi koniec kabla do standardowego zasilacza USB (nie ma go w zestawie) lub do portu USB komputera.
- The charging indicator light will illuminate. A full charge takes approximately 1.5 hours and provides up to 1.5 hours of continuous use.
5.2 Assembling the Microscope (Desktop Mode)
- Take the portable microscope unit and the microscope holder.
- Gently slide the portable microscope into the designated slot on the holder until it is securely seated.
- Ensure the microscope is stable on a flat surface before use.
5.3 Wkładanie karty TF (opcjonalnie)
The microscope has 16 internal storage slots for photos. For extended storage of photos and videos, a TF (MicroSD) card (up to 64GB, not included) can be inserted.
- Locate the TF card slot on the side of the microscope.
- Insert the TF card with the metal contacts facing down until it clicks into place.
- Aby wyjąć kartę, delikatnie wciśnij ją ponownie, aż wysunie się.
6. Instrukcja obsługi
6.1 Włączanie/wyłączanie zasilania
- Włączanie: Naciśnij i przytrzymaj przycisk zasilania przez kilka sekund, aż ekran się podświetli.
- Wyłączone: Naciśnij i przytrzymaj przycisk zasilania, aż ekran się wyłączy.
6.2 Regulacja powiększenia
The microscope offers 10 levels of digital magnification, ranging from 100X to 1000X.
- Use the magnification buttons (usually marked with '+' and '-') to cycle through the different zoom levels.
- Observe the change in magnification on the 2.0" IPS screen.
6.3 Ustawianie ostrości
Aby uzyskać wyraźny obraz:
- Place your specimen directly under the microscope lens.
- Slowly rotate the focus knob until the image on the screen becomes sharp and clear.
6.4 Tryb ręczny
For outdoor exploration or examining larger objects:
- Remove the microscope unit from its desktop holder.
- Hold the microscope firmly and position the lens over the object you wish to observe.
- Adjust the focus knob for clarity.
6.5 Tryb pulpitu
For detailed observation of slides or stationary objects:
- Ensure the microscope unit is securely placed in its holder.
- Place a specimen slide or object on the stage directly under the lens.
- Adjust the focus knob and magnification as needed.
6.6 Robienie zdjęć i nagrywanie filmów
The microscope features a 100W pixel camera for documenting your discoveries.
- Aby zrobić zdjęcie: Press the Capture button once. The image will be saved to internal memory or the TF card if inserted.
- Aby nagrać film: Press and hold the Capture button to start recording. Press and hold again to stop. Videos require a TF card for storage.

Rysunek 6.1: The microscope's screen displaying both photo and video recording functions. The top image shows a still capture of red cup fungi, while the bottom image shows a video recording in progress of an insect, indicating the device's capability to document observations.
6.7 Podłączanie do komputera
For larger screen viewing or sharing, connect the microscope to a Windows or Mac computer:
- Sprawdź, czy mikroskop jest włączony.
- Connect the microscope to your computer using the Type-C USB cable.
- Mikroskop należy uznać za webcam or storage device. You may need to select the appropriate mode on the microscope's menu or use a standard webcam application on your computer.
6.8 Using Specimen Slides
The kit includes both prepared and blank slides for diverse experiments.
- Przygotowane slajdy: Place a prepared slide directly onto the microscope stage for immediate observation.
- Blank Slides: Use the provided laboratory gadgets (tweezers, stirrers, collection bottles) to collect and prepare your own specimens on the blank slides.

Rysunek 6.2: Two children, wearing safety glasses, engaged in scientific exploration using the HUTACT Digital Microscope. One child uses the microscope in desktop mode to examine a slide, while the other holds a blank slide, demonstrating the process of preparing and observing specimens.
7. Konserwacja
- Czyszczenie: Use a soft, lint-free cloth to clean the microscope body. For the lens and screen, use a specialized lens cleaning cloth. Do not use liquid cleaners directly on the device.
- Składowanie: Store the microscope and its accessories in a cool, dry place, away from direct sunlight and extreme temperatures. Keep it in its original packaging or a protective case when not in use.
- Pielęgnacja baterii: Aby przedłużyć żywotność baterii, unikaj częstego całkowitego rozładowywania baterii. Regularnie ładuj urządzenie, nawet jeśli nie jest używane przez dłuższy czas.
8. Rozwiązywanie Problemów
Jeśli napotkasz jakiekolwiek problemy, zapoznaj się z poniższą tabelą zawierającą typowe problemy i ich rozwiązania:
| Problem | Możliwa przyczyna | Rozwiązanie |
|---|---|---|
| Mikroskop nie włącza się. | Niski poziom baterii lub urządzenie jest wyłączone. | Charge the microscope fully. Press and hold the Power button for a few seconds. |
| Obraz jest rozmazany. | Out of focus or lens is dirty. | Rotate the focus knob until the image is clear. Clean the lens with a soft cloth. |
| Nie można nagrywać filmów. | Nie włożono karty TF lub karta TF jest pełna. | Insert a TF card. Ensure the TF card has sufficient free space. |
| Nie można połączyć się z komputerem. | Incorrect cable, port, or software. | Ensure you are using the correct Type-C cable. Try a different USB port on your computer. Check computer settings for webcam or storage device recognition. |
9. Specyfikacje
| Funkcja | Szczegół |
|---|---|
| Marka | HUTAK |
| Model | NHKJ-TV3-927 |
| Powiększenie | 100X - 1000X |
| Rozmiar ekranu | 2.0 cale IPS |
| Rozdzielczość kamery | 100W pixels (for photos/videos) |
| Pamięć wewnętrzna | 16 photo slots |
| Pamięć zewnętrzna | Karta TF (do 64 GB, nie jest dołączona) |
| Bateria | 450mAh litowo-polimerowy (w zestawie) |
| Żywotność baterii | Około 1.5 godzin |
| Port ładowania | USB Typ C |
| Łączność | USB to Windows/Mac PC |
| Tworzywo | ABS |
| Waga przedmiotu | 290 gram |
| Wymiary produktu (dł. x szer. x wys.) | Wymiary 12.5 x 11 x 9 cm |
10. Gwarancja i wsparcie
HUTACT is committed to providing quality products. For any questions, concerns, or technical support regarding your Portable Digital Microscope, please contact our customer service. Please refer to your purchase documentation for specific warranty details and contact information.
We encourage you to register your product on our official webwitryna, aby otrzymywać aktualizacje i wsparcie.