
Acegeek AG-KNIGHT-V1-BK
Acegeek Knight-V1 Gaming Chair User Manual
Model: AG-KNIGHT-V1-BK
Wstęp
This manual provides comprehensive instructions for the assembly, safe operation, and proper maintenance of your Acegeek Knight-V1 Gaming Chair. Please read this manual thoroughly before assembly and use to ensure optimal performance and longevity of your product. Keep this manual for future reference.
Informacje dotyczące bezpieczeństwa
Ważne środki ostrożności:
- Nie przekraczać maksymalnego limitu wagi 110 kg (242 funta)Przekroczenie tego limitu może spowodować uszkodzenie krzesła i potencjalne obrażenia.
- Use all adjustable mechanisms (recline, height, armrests) only as instructed in this manual. Improper use can lead to instability or damage.
- Przed użyciem należy upewnić się, że wszystkie śruby i nakrętki są mocno dokręcone i okresowo sprawdzać, czy nie ma luzów.
- Podczas regulacji trzymaj dłonie i palce z dala od ruchomych części.
- Nie stawaj na krześle.
- Podczas montażu należy trzymać dzieci i zwierzęta z dala od krzesła.
- Ustaw krzesło na płaskiej i stabilnej powierzchni.
Zawartość opakowania
Before beginning assembly, verify that all components are present and undamaged. If any parts are missing or damaged, please contact Acegeek customer support.
- Oparcie
- Podstawa siedzenia
- Podłokietniki (2)
- Gwiezdna baza
- Kółka (5)
- Siłownik gazowy
- Pokrywa windy gazowej
- Płytka mechanizmu
- Poduszka lędźwiowa
- Poduszka zagłówka
- Zestaw narzędzi (śruby, podkładki, klucz imbusowy)
- Instrukcja obsługi (ten dokument)
Konfiguracja i montaż
Follow these steps carefully to assemble your Acegeek Knight-V1 Gaming Chair. It is recommended to have two people for assembly.
Krok 1: Przymocuj kółka do podstawy gwiaździstej
Włóż każde z pięciu kółek w otwory na końcu każdej nogi podstawy w kształcie gwiazdy. Dociśnij mocno, aż zatrzasną się na swoim miejscu.

Image: The chair's star base with casters being inserted into the leg openings.
Krok 2: Montaż siłownika podnośnika gazowego
Place the gas lift cylinder into the center hole of the assembled star base. Then, slide the gas lift cover over the cylinder.
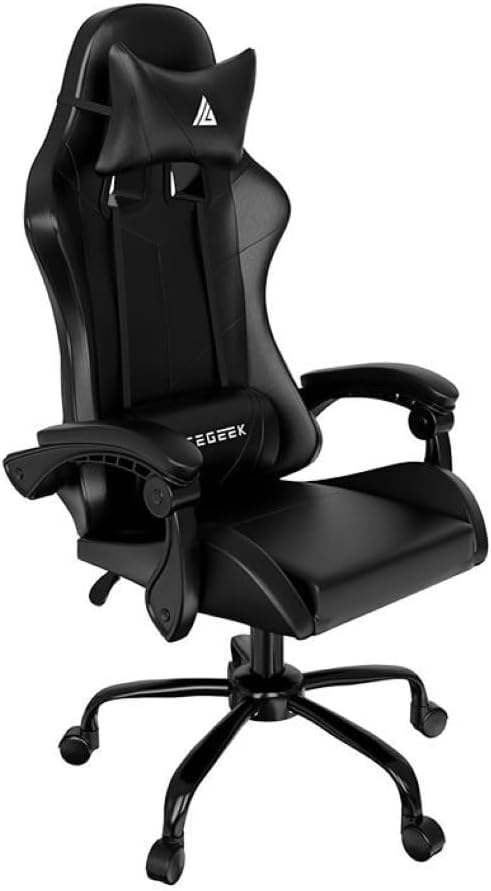
Image: The gas lift cylinder being placed into the center of the five-star base.
Krok 3: Zamocuj płytę mechanizmu do podstawy siedziska
Align the mechanism plate with the pre-drilled holes on the underside of the seat base. Secure it using the provided screws and Allen key. Ensure the front of the mechanism plate faces the front of the seat.

Image: The underside of the seat base with the mechanism plate attached, showing screw points.
Step 4: Attach Armrests to Seat Base
Attach the armrests to the sides of the seat base using the designated screws. Pay attention to the "L" (left) and "R" (right) markings on the armrests.

Image: The seat base with one armrest partially attached, showing the screw holes.
Step 5: Attach Backrest to Seat Base
Align the backrest with the mounting brackets on the seat base and armrests. Secure it with the remaining screws. It may be helpful to have another person hold the backrest in place during this step.

Image: The backrest being attached to the seat base, showing the connection points.
Krok 6: Podłącz zespół siedziska do podnośnika gazowego
Ostrożnie umieść zmontowane siedzisko i oparcie na siłowniku podnośnika gazowego, upewniając się, że środkowy otwór w płycie mechanizmu pokrywa się z górną częścią podnośnika gazowego. Dociśnij mocno, aby zabezpieczyć.

Image: The fully assembled chair, viewed from the side, showing its overall structure.
Step 7: Attach Cushions
Attach the headrest cushion to the top of the backrest using its elastic straps. Position the lumbar cushion on the lower backrest, adjusting its height for personal comfort.
Instrukcja obsługi
Regulacja wysokości
To adjust the chair's height, pull the lever located on the right side of the seat upwards. To raise the chair, lift the lever while standing. To lower the chair, lift the lever while seated.
Regulacja pochylenia
The backrest can be reclined between 90 and 120 degrees. Pull the recline lever, typically located on the left side of the seat, to adjust the angle. Release the lever to lock the backrest in your desired position.
Regulacja podłokietnika
The armrests are adjustable. Locate the adjustment buttons or levers on the armrests to change their height or angle, if applicable to your model. Adjust to support your arms and shoulders comfortably.
Lumbar and Headrest Cushion Adjustment
The lumbar and headrest cushions are adjustable. Slide them up or down along the backrest straps to find the most comfortable and supportive position for your neck and lower back.
Konserwacja i pielęgnacja
Właściwa konserwacja gwarantuje długowieczność i wygląd Twojego fotela do gier.
- Czyszczenie: Wytrzyj krzesło reklamąamp cloth. Avoid using abrasive cleaners, harsh chemicals, or solvents, as these can damage the PU and PVC material.
- Kontrola: Okresowo sprawdzaj wszystkie śruby i nakrętki, aby upewnić się, że są dobrze dokręcone. W razie potrzeby dokręć je, aby zapobiec chwianiu się lub niestabilności.
- Kółka: Keep the casters clean and free of debris (hair, dust) to ensure smooth movement.
- Unikaj bezpośredniego światła słonecznego: Długotrwałe narażenie na bezpośrednie działanie promieni słonecznych może spowodować blaknięcie lub pękanie materiału.
- Limit wagowy: Always adhere to the maximum weight recommendation of 110 kg.
Rozwiązywanie problemów
If you encounter issues with your Acegeek Knight-V1 Gaming Chair, refer to the following common problems and solutions:
| Problem | Możliwa przyczyna | Rozwiązanie |
|---|---|---|
| Krzesło chwieje się lub wydaje się niestabilne. | Loose screws or bolts. Uneven floor. | Sprawdź i dokręć wszystkie śruby montażowe. Upewnij się, że krzesło stoi na płaskiej powierzchni. |
| Podnośnik gazowy nie reguluje wysokości. | Gas lift cylinder malfunction. Lever not engaged. | Upewnij się, że dźwignia regulacji wysokości jest całkowicie wyciągnięta. Jeśli problem nadal występuje, podnośnik gazowy może wymagać wymiany. Skontaktuj się z pomocą techniczną. |
| Kółka nie obracają się płynnie. | Debris caught in casters. Damaged casters. | Usuń włosy i zanieczyszczenia z kółek. W przypadku uszkodzenia kółek, mogą one wymagać wymiany. |
| Oparcie nie odchyla się ani nie blokuje. | Mechanizm odchylania jest zacięty lub uszkodzony. | Ensure the recline lever is fully engaged. Check for any obstructions. If the mechanism is damaged, contact support. |
Specyfikacje
| Marka | Acegeek |
| Model | AG-KNIGHT-V1-BK |
| Kolor | Czarny |
| Materiał (rama) | Metal + Plate |
| Materiał (okładka) | PU + PVC |
| Materiał (wypełnienie) | Normal Foam |
| Klasa podnośnika gazowego | Klasa 3 |
| Kąt odchylenia | 90-120 stopni |
| Typ bazowy | 320 mm Metal Base |
| Rozmiar kółka | 50 mm Nylon |
| Maksymalna nośność | 110 kg (242 funta) |
| Wymiary produktu (Gł. x Szer. x Wys.) | Wymiary: 81 cm x 26 cm x 62 cm |
| Wymagany montaż | Tak |
| Cechy specjalne | Adjustable headrest and lumbar cushions, adjustable armrests, high backrest with integrated headrest. |
Informacje o gwarancji
Specific warranty details for the Acegeek Knight-V1 Gaming Chair are typically provided at the point of purchase or on the official Acegeek website. Please retain your proof of purchase for any warranty claims. The warranty generally covers manufacturing defects under normal use. It does not cover damage resulting from misuse, accidents, unauthorized modifications, or exceeding the weight limit.
Obsługa klienta
For technical assistance, missing parts, or warranty inquiries, please contact Acegeek customer support through their official website or the retailer where the product was purchased. Have your model number (AG-KNIGHT-V1-BK) and proof of purchase ready when contacting support.
Wsparcie online: Visit the official Acegeek webStrona z odpowiedziami na często zadawane pytania i informacjami kontaktowymi.
Wsparcie e-mailowe: Refer to your purchase documentation for the appropriate email address.
Ask a question about this manual
Ask about setup, troubleshooting, compatibility, parts, safety, or missing instructions. Manuals+ will review the question and use this page’s manual context to help answer it.