
1. Koniec produktuview
The GIGABYTE B840M Eagle WIFI6 is a Micro-ATX motherboard designed for AMD Socket AM5 processors, supporting AMD Ryzen 9000, 8000, and 7000 series. It features DDR5 memory support, dual M.2 slots, PCIe 4.0 connectivity, USB 3.2 Gen 1, WIFI6, and 2.5GbE LAN. This motherboard is engineered to provide a stable and high-performance foundation for your personal computer system.


2. Główne cechy
- Gniazdo AMD AM5: Obsługuje procesory AMD Ryzen serii 9000 / Ryzen 8000 / Ryzen 7000.
- Kompatybilność z DDR5: Posiada 2 gniazda DIMM dla pamięci DDR5.
- Projekt zasilania: Solidna konstrukcja fazy zasilania 5+2+2 zapewniająca stabilną pracę.
- Termiczne: Wyposażony w VRM i osłony termiczne M.2 zapewniające efektywne odprowadzanie ciepła.
- Łączność: Includes PCIe 4.0, 2x M.2 Slots, and USB-C ports.
- Przyjazne dla majsterkowiczów: Features M.2 EZ-Latch, PCIe EZ-Latch, and Wi-Fi EZ-Plug for simplified installation.
- Sieciowanie: Integrated WIFI6 and 2.5GbE LAN for high-speed network connectivity, plus BT 5.3.
3. Przewodnik konfiguracji
This section provides a general guide for installing your GIGABYTE B840M Eagle WIFI6 motherboard. Always refer to the detailed instructions provided with your CPU, RAM, and other components for specific installation procedures.
3.1. Przygotowanie
- Zadbaj o to, aby Twoje miejsce pracy było czyste i dobrze oświetlone.
- Przed dotknięciem podzespołów należy rozładować ładunki elektrostatyczne, dotykając uziemionego przedmiotu metalowego.
- Gather all necessary components: CPU, CPU cooler, RAM, M.2 SSDs, graphics card, power supply, and PC case.
3.2. Instalacja procesora
- Locate the AMD Socket AM5 on the motherboard.
- Otwórz dźwignię mocującą gniazdo procesora.
- Starannie dopasuj procesor do gniazda, upewniając się, że złoty trójkąt na procesorze pokrywa się z trójkątem na gnieździe. Nie wciskaj procesora na siłę.
- Zamknij dźwignię mocującą, aby zabezpieczyć procesor.
3.3. Montaż chłodnicy procesora
Install your chosen CPU cooler according to its manufacturer's instructions. Ensure proper thermal paste application for optimal cooling.
3.4. Instalacja pamięci RAM
- Otwórz klipsy na obu końcach gniazd DDR5 DIMM.
- Dopasuj moduł pamięci RAM do gniazda, upewniając się, że wycięcie na module pokrywa się z wypustką w gnieździe.
- Naciśnij mocno oba końce modułu RAM, aż klipsy zatrzasną się na swoim miejscu.
3.5. Instalacja dysku SSD M.2
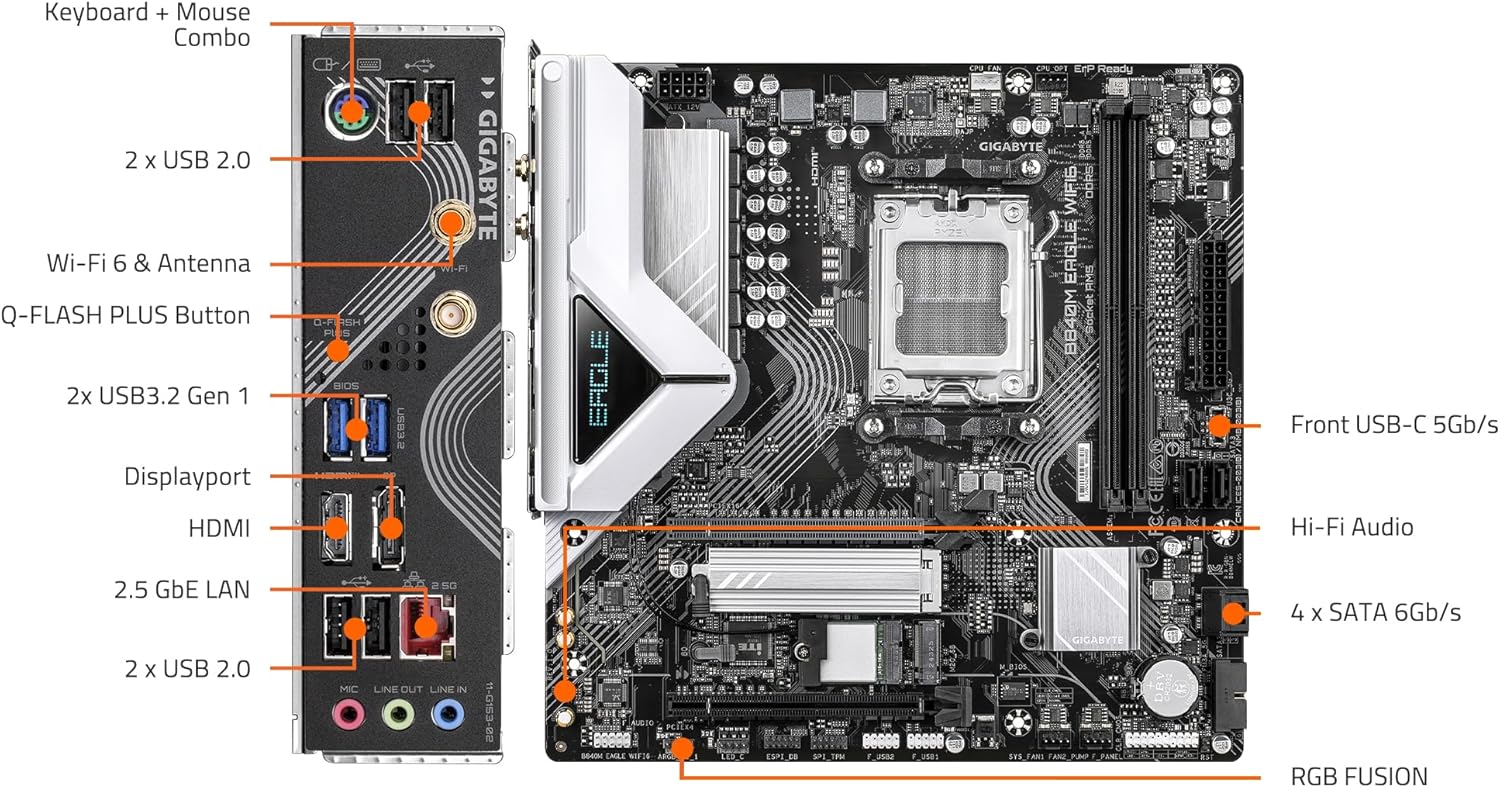
The motherboard features 2 M.2 slots with EZ-Latch. Refer to the motherboard diagram for their locations.
- Locate an M.2 slot and remove the M.2 Thermal Guard if present.
- Włóż dysk SSD M.2 do gniazda pod kątem.
- Gently push down the SSD and secure it using the M.2 EZ-Latch mechanism.
- Reinstall the M.2 Thermal Guard.
3.6. Montaż płyty głównej
- Install the I/O shield into your PC case (if not pre-attached).
- Dopasuj płytę główną do dystansów w obudowie komputera.
- Secure the motherboard with screws, ensuring not to overtighten.
3.7. Połączenia zasilania
- Podłącz 24-pinowe złącze zasilania ATX zasilacza do płyty głównej.
- Connect the 8-pin (or 4+4-pin) ATX 12V CPU power connector.
3.8. Panel przedni i połączenia urządzeń peryferyjnych
Connect the front panel headers (power button, reset button, USB ports, audio jacks) and other peripherals (SATA drives, case fans) to the appropriate headers on the motherboard. Refer to the labeled diagram below for assistance.

3.9. Instalacja karty graficznej
- Open the PCIe EZ-Latch on the primary PCIe x16 slot.
- Insert your graphics card firmly into the slot until it clicks into place.
- Przymocuj kartę graficzną do obudowy komputera za pomocą śrub.
- Podłącz wszystkie niezbędne kable zasilające PCIe do zasilacza i karty graficznej.
4. Instrukcja obsługi
4.1. Pierwsze uruchomienie i konfiguracja BIOS-u/UEFI
- After connecting all components and peripherals, power on your system.
- Naciśnij wyznaczony klawisz (zwykle USUNĄĆ or F2) podczas uruchamiania, aby wejść do narzędzia konfiguracji BIOS/UEFI.
- Configure boot order, system time, and other essential settings as needed. Save changes and exit.
4.2. Instalacja systemu operacyjnego
Włóż nośnik instalacyjny systemu operacyjnego (dysk USB lub płytę DVD) i postępuj zgodnie z instrukcjami wyświetlanymi na ekranie, aby zainstalować preferowany system operacyjny.
4.3. Instalacja sterownika
After OS installation, install the latest drivers for your motherboard, graphics card, and other components. You can find the latest drivers on the GIGABYTE official website for your B840M Eagle WIFI6 motherboard.
4.4. Łączność sieciowa
- Przewodowa sieć LAN: Connect an Ethernet cable to the 2.5GbE LAN port on the rear I/O panel.
- Wireless (WIFI6): Attach the included Wi-Fi antennas to the connectors on the rear I/O panel. Ensure Wi-Fi drivers are installed for wireless connectivity.
5. Konserwacja
Regularna konserwacja pomaga zapewnić długowieczność i optymalną wydajność płyty głównej i komputera.
- Czyszczenie kurzu: Periodically clean dust from inside your PC case, especially from fans, heatsinks, and motherboard components, using compressed air. Ensure the system is powered off and unplugged before cleaning.
- Aktualizacje BIOS-u/UEFI: Sprawdź GIGABYTE website for the latest BIOS/UEFI updates. Updates can improve compatibility, stability, and performance. Follow GIGABYTE's instructions carefully when updating the BIOS.
- Aktualizacje sterowników: Keep your system drivers updated to ensure compatibility and optimal performance with new software and hardware.
- Sprawdzanie komponentów: Occasionally check all cable connections (power, data, front panel) to ensure they are secure.
6. Rozwiązywanie Problemów
This section addresses common issues you might encounter. For more complex problems, refer to the GIGABYTE support webodwiedź witrynę lub skontaktuj się z pomocą techniczną.
6.1. Brak zasilania / Brak testu POST (autotest po włączeniu zasilania)
- Ensure all power cables (24-pin ATX, 8-pin CPU, PCIe power) are securely connected.
- Verify the power supply is switched on and functioning correctly.
- Check front panel connections, especially the power button header.
- Reseat RAM modules and the graphics card.
- Try booting with minimal components (CPU, one RAM stick, graphics card) to isolate the issue.
- Clear CMOS by removing the CMOS battery for a few minutes or using the clear CMOS jumper (refer to motherboard manual for exact location).
6.2. Niestabilność systemu / awarie
- Upewnij się, że wszystkie sterowniki są aktualne.
- Sprawdź temperaturę procesora i procesora graficznego, aby wykluczyć przegrzanie.
- Uruchom narzędzia diagnostyczne pamięci RAM, aby sprawdzić, czy nie ma w niej uszkodzonej pamięci.
- Sprawdź moc zasilaczatage jest wystarczające dla wszystkich komponentów.
6.3. Problemy z łącznością sieciową
- wired: Check Ethernet cable connection and router/modem status. Ensure LAN drivers are installed.
- Bezprzewodowy: Ensure Wi-Fi antennas are properly attached and Wi-Fi drivers are installed. Check Wi-Fi network settings in your operating system.
6.4. Peripheral Not Detected
- Sprawdź, czy urządzenie peryferyjne jest prawidłowo podłączone do odpowiedniego portu.
- Install the latest drivers for the peripheral.
- Test the peripheral on another port or another system if possible.
7. Specyfikacje techniczne
| Funkcja | Specyfikacja |
|---|---|
| Gniazdo procesora | Gniazdo AMD AM5 |
| Kompatybilne procesory | AMD Ryzen 9000 / Ryzen 8000 / Seria Ryzen 7000 |
| Zestaw układów scalonych | Procesor AMD B840 |
| Technologia pamięci RAM | DDR5 |
| Gniazda pamięci | 2x DIMMs |
| Prędkość zegara pamięci | Do 5200 MHz (i więcej poprzez OC) |
| Składowanie | 2x M.2 Slots, 4x SATA 6Gb/s |
| Sloty PCIe | PCIe4.0 |
| Porty USB | USB 3.2 Gen 1, USB-C |
| Sieciowanie | WIFI6, 2.5GbE LAN, BT 5.3 |
| Współczynnik kształtu | Micro-ATX |
| Wymiary (dł. x szer. x wys.) | 8.82 x 8.82 x 1 cala |
| Waga przedmiotu | 4.4 funta |
| Wsparcie systemu operacyjnego | Windows 11 |
8. Gwarancja i wsparcie
For detailed warranty information, technical support, driver downloads, and BIOS updates, please visit the official GIGABYTE website. You can find product-specific support by navigating to the support section and searching for your model, B840M Eagle WIFI6.
Oficjalny GIGABYTE Webstrona: https://www.gigabyte.com/
Zawsze upewnij się, że pobierasz oprogramowanie i sterowniki od oficjalnego producenta website to prevent security risks.