Wstęp
Thank you for choosing the Amazon Basics Single Outlet Hose Watering Timer. This device is designed to simplify your garden irrigation by providing flexible and automated watering schedules. Please read this manual carefully before installation and use to ensure proper operation and longevity of your product.
Cechy produktu
- Smart Watering Timer: Program flexible watering schedules from 1 minute to 3 hours 59 minutes for hassle-free garden irrigation.
- Intuicyjne sterowanie: Activate manual watering with customizable duration when needed. The program can be paused for 24, 48, or 72 hours.
- Angled Screen Design: The 45% adjustable tilted screen ensures optimal visibility from any angle, displaying time, program, and battery status.
- Leak-Free Connection: Rubber gaskets ensure a tight seal and prevent water waste. Standard 1.9cm BSP thread. Operates on 2 AA alkaline batteries (not included).

Rycina 1: Przód view of the Amazon Basics Single Outlet Hose Watering Timer, showing the digital display and control buttons.
Zawartość opakowania
Twoja paczka powinna zawierać następujące elementy:
- 1 x Amazon Basics Single Outlet Hose Watering Timer
- 1 x Instrukcja obsługi
- Rubber gaskets (pre-installed or included for leak-free connection)
Note: 2 AA alkaline batteries are required and are NOT included in the package.
Organizować coś
1. Instalacja baterii
- Znajdź komorę baterii z tyłu timera.
- Otwórz pokrywę komory baterii.
- Włóż 2 nowe baterie alkaliczne AA, zwracając uwagę na prawidłową biegunowość (+/-).
- Aby zachować wodoodporność, dokładnie zamknij pokrywę komory baterii.

Figure 2: Top connection of the timer, showing the filter and threaded inlet. Ensure rubber gaskets are in place for a leak-free seal.
2. Connecting to the Faucet
- Upewnij się, że kran jest czysty i wolny od zanieczyszczeń.
- Check that the rubber gasket is properly seated inside the timer's inlet connector.
- Screw the timer onto your standard 1.9cm (3/4 inch) outdoor faucet by hand until it is snug. Do not overtighten.
- Connect your garden hose to the outlet of the timer.
- Slowly turn on the faucet. Check for any leaks. If leaks occur, tighten the connections slightly or adjust the rubber gaskets.
Instrukcja obsługi
1. Ustawianie aktualnego czasu
Refer to the angled screen for clear visibility of settings.
- Naciśnij przycisk „SET”, aby wejść w tryb ustawiania czasu.
- Use the "+" and "-" buttons to adjust the hour. Press "SET" to confirm.
- Use the "+" and "-" buttons to adjust the minute. Press "SET" to confirm.
2. Programming a Watering Schedule
The timer allows flexible schedules from 1 minute to 3 hours 59 minutes.
- Press the "PROG" button to enter program setting mode.
- Set the START TIME: Use "+" and "-" to adjust the hour and minute, pressing "PROG" to confirm each.
- Set the WATERING DURATION: Use "+" and "-" to adjust the duration (minutes/hours), pressing "PROG" to confirm.
- Set the WATERING FREQUENCY: Use "+" and "-" to select how often the timer should water (e.g., every 12 hours, every 24 hours, specific days). Press "PROG" to confirm.
- Once all settings are confirmed, the timer will display the next scheduled watering time.
3. Podlewanie ręczne
To water manually outside of the programmed schedule:
- Naciśnij przycisk „MANUAL”.
- Use "+" and "-" buttons to set the desired manual watering duration.
- Press "MANUAL" again to start manual watering. The timer will automatically stop after the set duration.
4. Pause Function (Rain Delay)
If it rains or you don't need to water for a few days, you can pause the program:
- Naciśnij przycisk „OPÓŹNIJ”.
- Use "+" and "-" buttons to select the pause duration (24, 48, or 72 hours).
- Press "DELAY" again to confirm. The timer will resume its programmed schedule after the delay period.

Figure 3: Visual representation of the timer's main features, including flexible schedules, manual watering, and secure sealing.
Konserwacja
- Wymiana baterii: Wymień baterie, gdy na ekranie pojawi się wskaźnik niskiego poziomu naładowania baterii, aby zapewnić ciągłą pracę urządzenia.
- Czyszczenie filtra: Periodically check and clean the filter located in the inlet connector to prevent blockages and maintain water flow.
- Przechowywanie w zimie: During freezing temperatures, remove the timer from the faucet, drain any remaining water, and store it indoors to prevent damage.
- Ogólne sprzątanie: Przetrzyj timer miękką, damp ściereczka. Nie należy używać środków czyszczących o właściwościach ściernych ani rozpuszczalników.
Rozwiązywanie problemów
| Problem | Możliwa przyczyna | Rozwiązanie |
|---|---|---|
| Timer nie podlewa. | Low batteries, incorrect program, faucet off, water pressure too low. | Check battery status and replace if needed. Verify program settings. Ensure faucet is fully open. Check water supply. |
| Wyciek wody z przyłączy. | Loose connection, damaged gasket, missing gasket. | Tighten connections. Check and replace rubber gaskets if damaged or missing. |
| Wyświetlacz jest pusty lub przyciemniony. | Wyczerpane lub słabe baterie. | Wymień baterie na nowe baterie alkaliczne AA. |
Specyfikacje
- Numer modelu: AMZ622617EU
- Wymiary: 8.2 cm x 13.7 cm x 18.5 cm (długość x szerokość x wysokość)
- Waga: 383.4 gramów
- Typ wątku: Standard 1.9cm (3/4 inch) BSP
- Źródło zasilania: 2 baterie alkaliczne AA (brak w zestawie)
- Czas podlewania: 1 minut do 3 godzin 59 minut
- Funkcja pauzy: 24, 48 lub 72 godzin
- Kolor: Grey, Black, Blue
- Kraj pochodzenia: Chiny
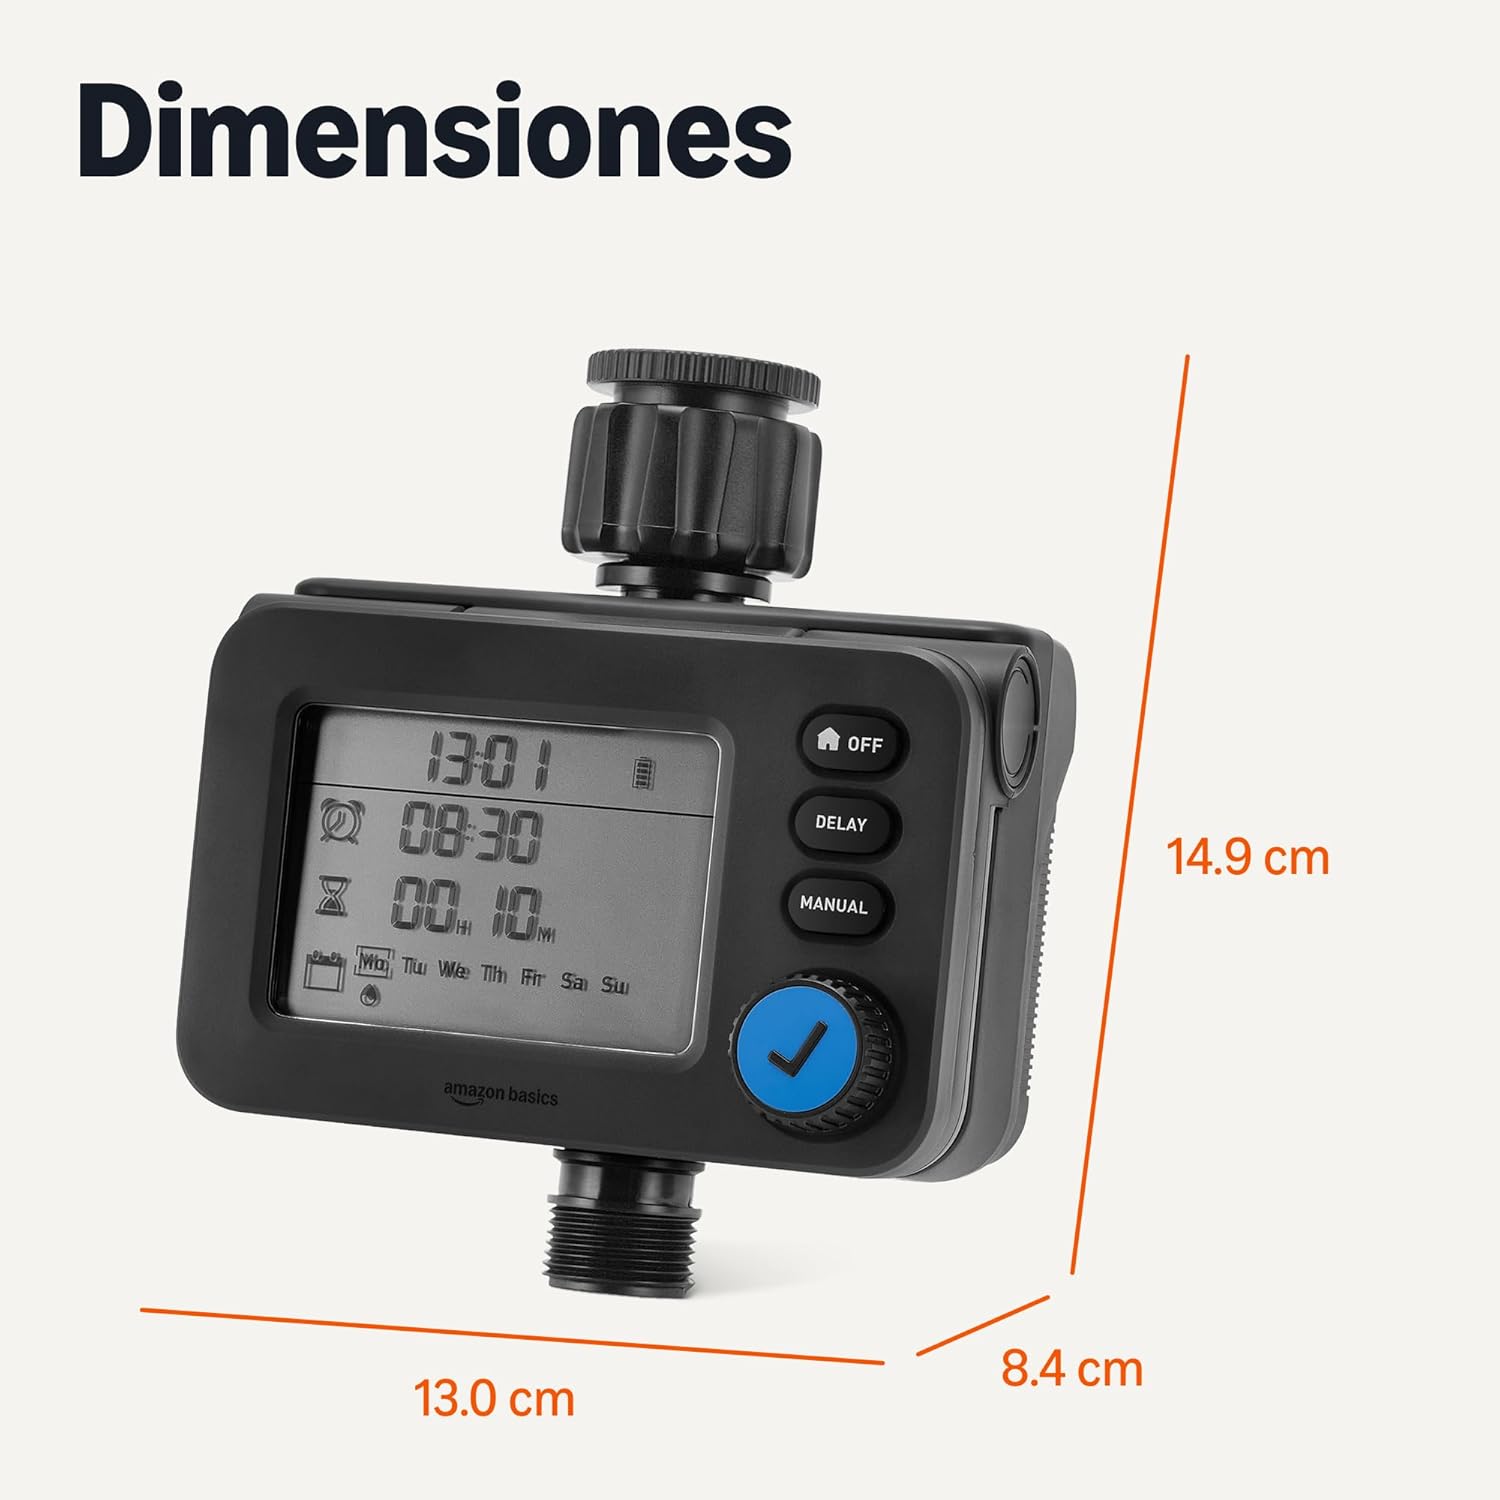
Rysunek 4: Wymiary produktu do planowania instalacji.
Gwarancja i wsparcie
For warranty information and customer support, please refer to the documentation included with your purchase or visit the official Amazon Basics webstrona.