1. Wprowadzenie
This manual provides essential information for the installation, maintenance, and troubleshooting of your new carburetor replacement. This aftermarket part is designed to fit various Briggs & Stratton engines and Toro lawn mower models, ensuring optimal fuel-air mixture for efficient engine operation.
Proper installation and regular maintenance are crucial for the longevity and performance of your engine. Please read this manual thoroughly before attempting any installation or maintenance procedures.
2. Zgodność
This carburetor replacement is compatible with a range of Briggs & Stratton engine models and specific Toro lawn mower models. Please verify your engine or equipment model number against the lists below to ensure proper fitment.
2.1. Compatible Briggs & Stratton Engine Models:
- 126M02-0111-B1 (126M0200) Engine
- 124L02-0115-F1 Engine, 124L02-0119-F1 Engine, 124L02-0120-F1 Engine, 124L02-0121-F1 Engine, 124L02-0124-F1 Engine, 124L02-0126-F1 Engine, 124L02-0127-F1 Engine, 124L02-0130-F1 Engine, 124L02-0134-F1 Engine, 124L02-0135-F1 Engine, 124L02-0136-F1 Engine, 124L02-0154-F1 Engine, 124L02-0165-F1 Engine, 124L02-0166-F1 Engine, 124L02-0167-F1 Engine, 124L02-0212-F1 Engine, 124L02-0530-F1 Engine, 124L02-0645-F2 Engine, 124L02-0650-F3 Engine, 124L02-1307-F1 Engine, 124L02-4115-F1 Engine, 124L02-4650-F3 Engine
- 124L05-0128-F1 Engine, 124L05-0947-F2 Engine, 124L05-0975-F1 Engine, 124L05-1103-F1 Engine, 124L05-1306-F1 Engine, 124L05-4947-F2 Engine, 124L05-5128-F1 Engine
- 124L07-0112-F1 Engine, 124L07-0153-F1 Engine, 124L07-5153-F1 Engine
- 124T02-0004-H1 Engine, 124T02-0006-H1 Engine, 124T02-0101-B1 Engine, 124T02-0105-B1 Engine, 124T02-0111-B1 Engine, 124T02-0112-B1 Engine, 124T02-0112-E1 Engine, 124T02-0115-B1 Engine, 124T02-0116-B1 Engine, 124T02-0116-E1 Engine, 124T02-0128-B1 Engine, 124T02-0128-E1 Engine, 124T02-0129-B1 Engine, 124T02-0129-B2 Engine, 124T02-0129-E1 Engine, 124T02-0134-B1 Engine, 124T02-0134-E1 Engine, 124T02-0135-B1 Engine, 124T02-0135-E1 Engine, 124T02-0137-B1 Engine, 124T02-0140-B1 Engine, 124T02-0140-E1 Engine, 124T02-0141-B1 Engin, 124T02-0141-E1 Engine, 124T02-0142-B1 Engine, 124T02-0157-B1 Engine, 124T02-0158-B1 Engine, 124T02-0159-B1 Engine, 124T02-0161-B1 Engine, 124T02-0171-B1 Engine, 124T02-0172-B1 Engine, 124T02-0174-B1 Engine, 124T02-0176-B1 Engine, 124T02-0177-01 Engine, 124T02-0179-B1 Engine, 124T02-0183-B1 Engine, 124T02-0186-B1 Engine, 124T02-0188-B1 Engine, 124T02-0192-B1 Engine, 124T02-0199-B1 Engine, 124T02-0200-B1 Engine, 124T02-0201-B1 Engine, 124T02-0203-B1 Engine, 124T02-0204-B1 Engine, 124T02-0205-B1 Engine, 124T02-0206-B1 Engine, 124T02-0208-B1 Engine, 124T02-0212-B1 Engine, 124T02-0215-B1 Engine, 124T02-0220-B1 Engine, 124T02-0222-B1 Engine, 124T02-0224-B1 Engine, 124T02-0226-B1 Engine, 124T02-0227-B1 Engine, 124T02-0228-B1 Engine, 124T02-0231-B1 Engine, 124T02-0233-B1 Engine, 124T02-0236-B1 Engine, 124T02-0239-B1 Engine, 124T02-0241-B1 Engine, 124T02-0243-B1 Engine, 124T02-0246-B1 Engine, 124T02-0248-B1 Engine, 124T02-0249-B1 Engine, 124T02-0251-H1 Engine, 124T02-0252-B1 Engine, 124T02-0252-H1 Engine, 124T02-0255-H1 Engine, 124T02-0256-H1 Engine, 124T02-0257-H1 Engine, 124T02-0258-H1 Engine, 124T02-0301-B1 Engine, 124T02-0303-B1 Engine, 124T02-0304-B1 Engine, 124T02-0305-B1 Engine, 124T02-0306-B1 Engine, 124T02-0307-B1 Engine
2.2. Compatible Toro Lawn Mower Models:
- 20066 (280000001-280999999)(2008) Lawn Mower
- 20067 (280000001-280999999)(2008) Lawn Mower
- 20068 (280000001-280999999)(2008) Lawn Mower
- 20090 (280000001-280999999)(2008) Lawn Mower, 20090 (290000001-290999999)(2009) Lawn Mower
- 20090C (280000001-280999999)(2008) Lawn Mower, 20090C (290000001-290999999)(2009) Lawn Mower
- 20091 (280000001-280999999)(2008) Lawn Mower
- 20091C (280000001-280999999)(2008) Lawn Mower
- 20092 (280000001-280999999)(2008) Lawn Mower, 20092C (280000001-280999999)(2008) Lawn Mower
- 20093 (280000001-280999999)(2008) Lawn Mower, 20093C (280000001-280999999)(2008) Lawn Mower, 20093C (290000001-290999999)(2009) Lawn Mower
- 20095 (280000001-280999999)(2008) Lawn Mower, 20095C (280000001-280999999)(2008) Lawn Mower
- 20112 (280000001-280999999)(2008) Lawn Mower
- 20113 (280000001-280999999)(2008) Lawn Mower, 20113 (290000001-290999999)(2009) Lawn Mower
- 20330 (290000001-290999999)(2009) Lawn Mower, 20330C (290000001-290999999)(2009) Lawn Mower
- 20331 (290000001-290999999)(2009) Lawn Mower, 20331C (290000001-290999999)(2009) Lawn Mower
- 20332 (290000001-290999999)(2009) Lawn Mower, 20332C (290000001-290999999)(2009) Lawn Mower
- 20333 (290000001-290999999)(2009) Lawn Mower
- 20334 (290000001-290999999)(2009) Lawn Mower, 20334C (290000001-290999999)(2009) Lawn Mower
- 20350 (290000001-290999999)(2009) Lawn Mower
- 20351 (290000001-290999999)(2009) Lawn Mower
- 20352 (290000001-290999999)(2009) Lawn Mower
- 20655 (280000001-280999999)(2008) Lawn Mower
- 20656 (280000001-280999999)(2008) Lawn Mower
- 20658 (280000001-280999999)(2008) Lawn Mower, 20658 (290000001-290999999)(2009) Lawn Mower
- 20792 (280000001-280999999)(2008) Lawn Mower
- 20793 (280000001-280999999)(2008) Lawn Mower
- 20795 (280000001-280999999)(2008) Lawn Mower
- 20817 (280000001-280999999)(2008) Lawn Mower, 20817 (290000001-290999999)(2009) Lawn Mower
3. Zawartość opakowania
Upon opening the package, please verify that all components are present and undamaged. The package should contain the following items:
- 1x Zespół gaźnika
- 1x uszczelka
- 1x pierścień uszczelniający

Figure 3.1: Complete package contents including the carburetor, gasket, and o-ring.

Rysunek 3.2: Szczegółowy view of the included gasket and o-ring, essential for a proper seal during installation.
4. Konfiguracja i instalacja
Bezpieczeństwo przede wszystkim: Before beginning any work, ensure the engine is cool, the spark plug wire is disconnected to prevent accidental starting, and the fuel tank is drained or fuel line is clamped to prevent spills. Wear appropriate personal protective equipment (PPE) such as gloves and eye protection.
Notatka: Carburetor replacement can be complex. If you are not comfortable performing this procedure, it is recommended to seek assistance from a qualified small engine mechanic.
4.1. Ogólne kroki instalacji:
- Przygotuj silnik: Disconnect the spark plug wire. Locate the carburetor on your engine.
- Wyjmij zespół filtra powietrza: Carefully remove the air filter housing and air filter to gain access to the carburetor.
- Odłącz przewód paliwowy: Clamp or pinch the fuel line to prevent fuel leakage, then disconnect it from the carburetor. Have a small container ready to catch any residual fuel.
- Połączenia rozłączające: Carefully note and disconnect any throttle or choke linkages attached to the carburetor. Taking photos before removal can be helpful.
- Wyjmij śruby mocujące: Unscrew the bolts or nuts that secure the carburetor to the engine manifold.
- Demontaż starego gaźnika: Gently pull the old carburetor away from the engine. Be mindful of any gaskets that may be stuck.
- Wyczyść powierzchnię montażową: Ensure the engine's mounting surface is clean and free of old gasket material.
- Install New Gasket and Carburetor: Place the new gasket (and o-ring if applicable) onto the engine manifold, then carefully position the new carburetor. Ensure all holes align.
- Zabezpiecz gaźnik: Reinstall the mounting bolts/nuts and tighten them evenly to secure the carburetor. Do not overtighten.
- Ponowne podłączenie połączeń i przewodu paliwowego: Reattach all throttle and choke linkages. Reconnect the fuel line, ensuring it is securely fastened and free of kinks. Remove any clamps.
- Ponowna instalacja zespołu filtra powietrza: Reassemble the air filter and its housing.
- Ponowne podłączenie świecy zapłonowej: Podłącz ponownie przewód świecy zapłonowej.

Rycina 4.1: Przód view of the carburetor, showing key dimensions for fitment verification.
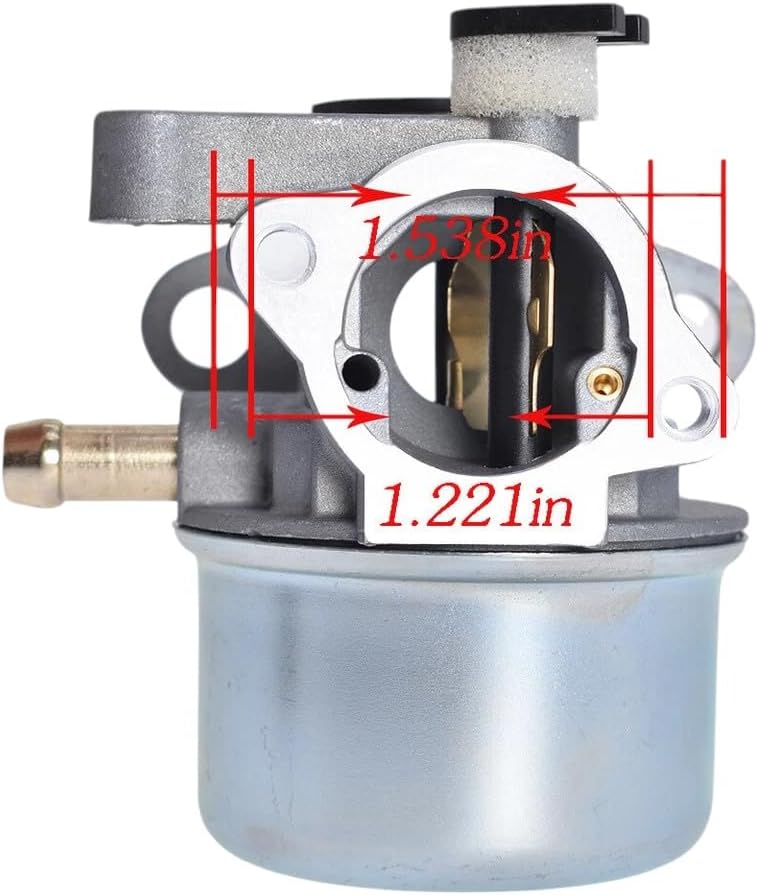
Rysunek 4.2: Strona view of the carburetor, illustrating additional dimensions important for proper installation.
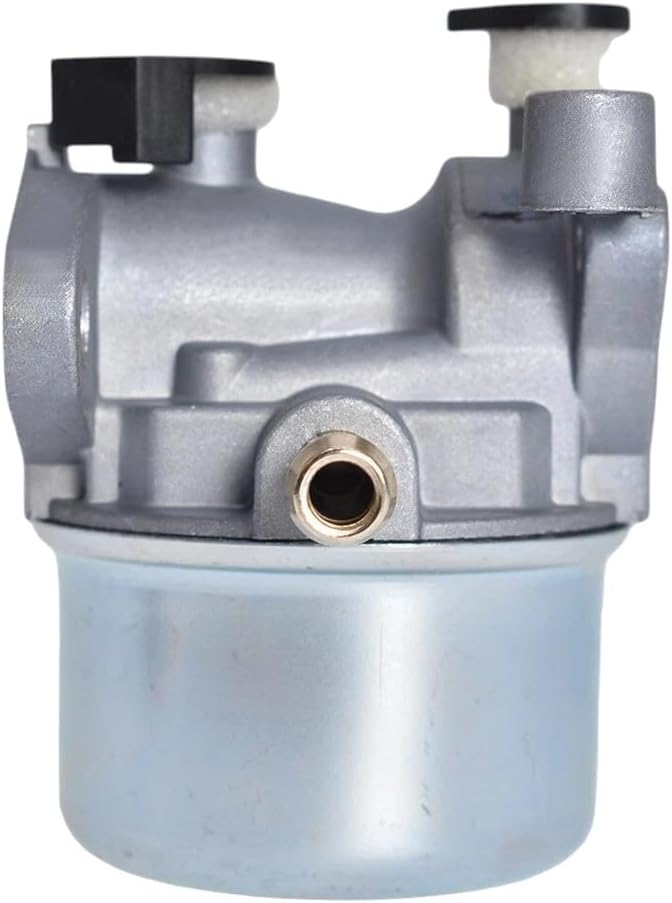
Rysunek 4.3: Profesjonalizm bocznyfile of the carburetor, showing the fuel inlet and mounting points.

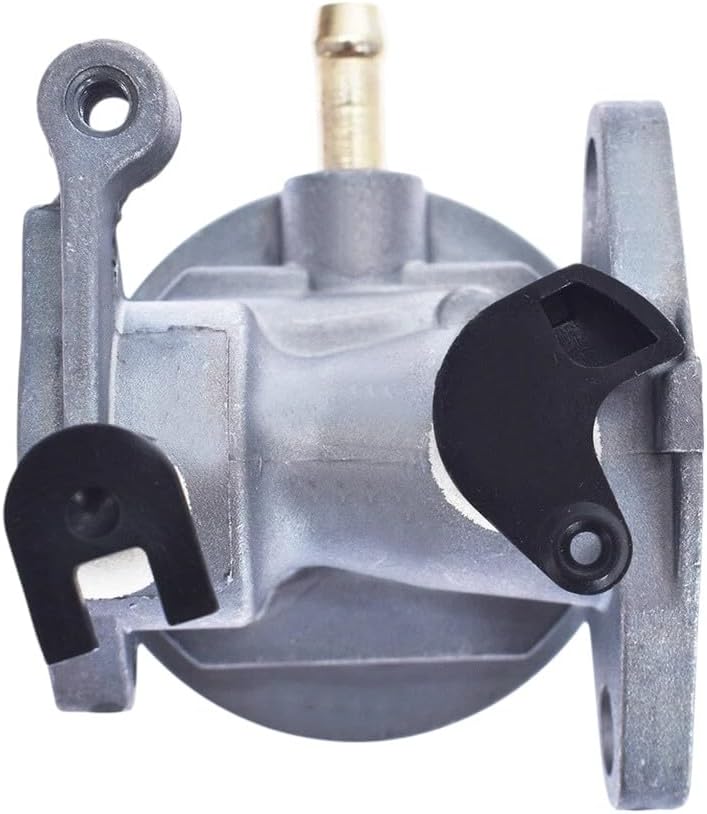
Rysunek 4.4: Tył view of the carburetor, highlighting the linkage attachment points.

Rysunek 4.5: Góra view of the carburetor, showing the choke and throttle mechanisms.
Rysunek 4.6: Dół view of the carburetor, showing the fuel bowl and drain plug.
5. Zagadnienia operacyjne
Once the new carburetor is installed, the engine should start and run smoothly. The carburetor's primary function is to mix air and fuel in the correct ratio for combustion. A properly installed new carburetor should restore engine performance.
After installation, fill the fuel tank with fresh, clean fuel. Prime the engine if it has a primer bulb, and then attempt to start it according to your equipment's manufacturer instructions. Allow the engine to run for a few minutes to ensure proper fuel flow and operation.
6. Konserwacja
Regular maintenance of your engine and its components, including the carburetor, will extend its lifespan and ensure reliable operation.
- Jakość paliwa: Always use fresh, clean fuel. Stale or contaminated fuel is a common cause of carburetor issues. Consider using a fuel stabilizer, especially during storage.
- Filtr paliwa: Check and replace the fuel filter regularly according to your engine manufacturer's recommendations. A clogged fuel filter can restrict fuel flow to the carburetor.
- Filtr powietrza: Ensure the air filter is clean and free of debris. A dirty air filter can restrict airflow, leading to a rich fuel mixture and poor engine performance.
- Gaskets and Seals: Periodically inspect the carburetor's gaskets and seals for signs of wear, cracking, or leakage. Replace them if necessary to maintain a proper seal.
- Składowanie: Before long-term storage, it is advisable to run the engine until it runs out of fuel, or drain the fuel system, to prevent fuel from gumming up the carburetor.
7. Rozwiązywanie Problemów
Jeżeli po zamontowaniu nowego gaźnika wystąpią problemy, należy zastosować się do poniższych typowych procedur rozwiązywania problemów:
| Problem | Możliwa przyczyna | Rozwiązanie |
|---|---|---|
| Silnik nie chce się uruchomić | No fuel, incorrect installation, spark plug issue, air filter clogged. | Check fuel level and quality. Verify all connections (fuel line, linkages) are secure. Ensure spark plug is clean and connected. Check air filter. |
| Silnik pracuje nierówno lub gaśnie | Improper fuel-air mixture, vacuum leak, fuel contamination. | Ensure carburetor is seated correctly with new gaskets. Check for cracks in fuel lines or manifold. Use fresh fuel. |
| Wycieki paliwa z gaźnika | Improperly seated gasket/o-ring, loose fuel line connection, damaged fuel bowl. | Recheck gasket and o-ring installation. Tighten fuel line connections. Inspect carburetor body for damage. |
| Utrata mocy | Restricted fuel flow, dirty air filter, engine issues unrelated to carburetor. | Check fuel filter and fuel lines. Clean or replace air filter. Consult engine manual for other potential causes. |
If these steps do not resolve the issue, it is advisable to consult a professional small engine mechanic.
8. Specyfikacje
| Atrybut | Szczegół |
|---|---|
| Typ produktu | Carburetor Replacement |
| Marka | Ogólny |
| Producent | TDH |
| Kompatybilne modele silników | Briggs & Stratton 124T02, 124L02, 126M02, 124L05, 124L07 series engines |
| Numer modelu przedmiotu | 255914444688 |
| Numer części producenta | 124T02 124L02 126M02 124L05 124L07 |
| Kraj pochodzenia | USA |
| Zawartość pakietu | 1x Carburetor, 1x Gasket, 1x O-ring |
9. Gwarancja i wsparcie
As this is an aftermarket part, specific warranty details may vary. Please refer to the seller or retailer from whom you purchased this product for information regarding warranty coverage and return policies.
For technical support or further assistance with this carburetor, please contact the seller directly. They can provide guidance specific to your purchase and any issues you may encounter.

