1. Wprowadzenie i informacje dotyczące bezpieczeństwa
This manual provides essential instructions for the safe and efficient operation, maintenance, and troubleshooting of your KATOOL ME-T500 Tire Changer and ME-B600 Wheel Balancer Combo. Please read this manual thoroughly before operating the equipment.
1.1 Ogólne wytyczne dotyczące bezpieczeństwa
- Zawsze należy nosić odpowiedni sprzęt ochrony osobistej (PPE), obejmujący okulary ochronne, rękawice i buty ze stalowymi noskami.
- Ensure the equipment is installed on a level, stable surface and securely anchored to prevent movement during operation.
- Utrzymuj miejsce pracy w czystości i zapewnij dobre oświetlenie.
- Nie uruchamiaj maszyny, jeśli jakakolwiek jej część jest uszkodzona lub jej brakuje.
- Przed przystąpieniem do prac konserwacyjnych lub regulacyjnych należy odłączyć zasilanie.
- Never exceed the maximum pressure ratings for tires or the machine.
- Trzymaj ręce i ubranie z dala od ruchomych części.
2. Koniec komponentówview
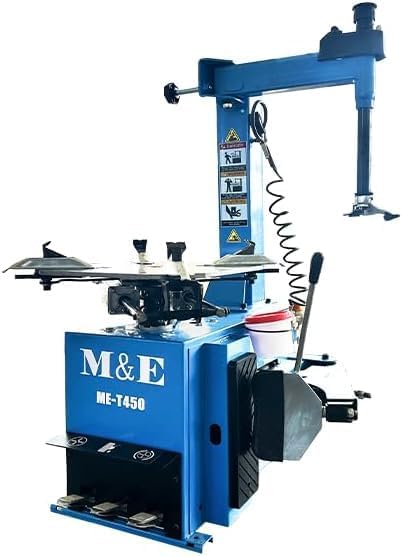
The KATOOL ME-T500/ME-B600 Combo includes the following main components and accessories:

Rysunek 2.1: KATOOL ME-T500 Tire Changer and ME-B600 Wheel Balancer Combo with included accessories.
Rysunek 2.2: Strona view of the KATOOL ME-T500 Tire Changer, highlighting its robust construction.

Rysunek 2.3: KATOOL ME-B600 Wheel Balancer, showing the control panel and various balancing accessories.
2.1 Tire Changer (ME-T500)
- Jednostka główna: Heavy-duty frame with integrated air cylinder.
- Obrotnica: Four-jaw clamping system for securing wheels.
- Mounting Head (Bird Head): Stainless steel construction for durability and scratch resistance.
- Ramię obrotowe: Fast swing arm design for quick positioning.
- Łamacz koralików: Side-mounted, pneumatic bead breaker.
- Pedały: Simple foot-pedal controls for various operations.
- 40mm Hex Bar: Heavy-duty hex bar for mounting/demounting, resisting flexing.
2.2 Wheel Balancer (ME-B600)
- Jednostka główna: Sturdy base with integrated balancing shaft.
- Panel sterowania: Digital display and buttons for program selection and data input.
- Wheel Mounting Cone: For securing wheels onto the balancing shaft.
- Akcesoria: Wheel weights, caliper, and other balancing tools.
2.3 Dołączone akcesoria
- Tire lever/Mounting bar
- Bead breaker covers (plastic)
- Mounting paste and brush
- Inflation hose with pressure gauge
- Wheel weights (various types)
- Wheel caliper
3. Konfiguracja i instalacja
Proper setup is crucial for the safe and effective operation of your KATOOL combo machine.
3.1 Rozpakowanie i kontrola
- Ostrożnie rozpakuj wszystkie elementy i sprawdź je na liście przewozowym.
- Sprawdź, czy nie doszło do uszkodzeń transportowych. W przypadku jakichkolwiek uszkodzeń natychmiast zgłoś je przewoźnikowi i dostawcy.
3.2 Location and Anchoring
Choose a location with sufficient space around the machine for safe operation and tire handling. The machine must be anchored to a concrete floor to prevent movement during use. Ensure the floor is level.
3.3 Podłączenie zasilania powietrzem
Connect the machine to a clean, dry compressed air supply capable of providing the required working pressure (0.8 MPa). Ensure all air connections are secure and leak-free.
3.4 Podłączenie elektryczne
Connect the machine to an appropriate electrical outlet (110V/220V/380V, 50/60HZ, depending on your model). Ensure the power supply matches the machine's requirements.
4. Operating the Tire Changer (ME-T500)
Follow these steps for safe and effective tire changing operations.

Rysunek 4.1: Regulowany clamps on the turntable, adapting to various tire sizes.
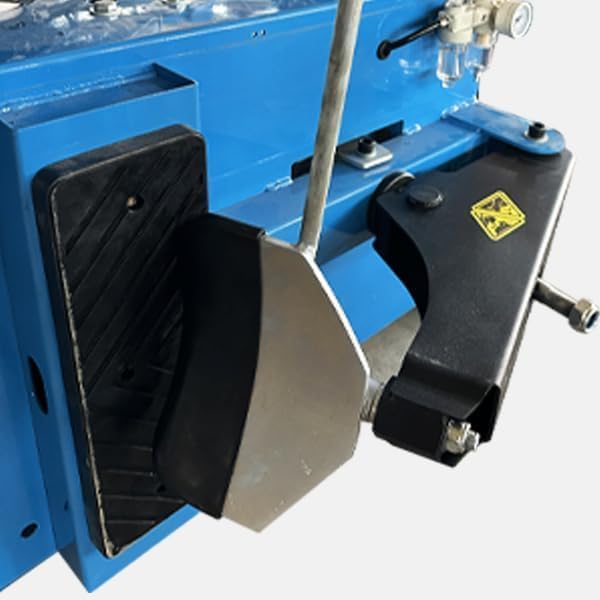
Rysunek 4.2: Simple foot-pedal controls for intuitive operation of the tire changer.
4.1 Bead Breaking
- Position the wheel on the side-mounted bead breaker. Ensure the tire is flush against the machine to prevent movement.
- Apply the bead breaker paddle to the tire sidewall, close to the rim but avoiding the tire pressure sensor (TPMS) valve.
- Slowly actuate the bead breaker pedal to push the bead off the rim. The bead breaker provides up to 5500 LBS of force.
- Powtórz czynność po obu stronach opony.
4.2 klampw kole
- Place the wheel onto the turntable. The machine supports outside clamping (10"-19") i wewnątrz clamping (12"-21").
- Use the foot pedal to actuate the four clamping jaws, securing the wheel firmly. Ensure the jaws are properly engaged to prevent slippage.
4.3 Demounting the Tire
- Lubricate both tire beads with mounting paste.
- Position the stainless steel mounting head (bird head) just above the rim edge.
- Use the tire lever to pry the top bead over the mounting head.
- Obróć gramofon za pomocą pedału nożnego, aby całkowicie zdemontować górny koralik.
- Powtórz tę samą czynność dla dolnego koralika.
4.4 Mounting the Tire
- Lubricate both tire beads and the rim edges with mounting paste.
- Place the bottom bead of the new tire onto the rim, ensuring it sits in the drop center.
- Position the mounting head and use the foot pedal to rotate the turntable, guiding the bottom bead onto the rim.
- For the top bead, ensure the tire is pushed down into the notch of the rim. Use the tire lever to guide the top bead over the mounting head while rotating the turntable.
4.5 Inflacja
- Remove the wheel from the machine before inflating. Never inflate a tire while it is clamped na maszynie.
- Connect the inflation hose with pressure gauge to the tire valve.
- Inflate the tire to the manufacturer's recommended pressure. Listen for the beads to seat with an audible 'pop'.
4.6 Operational Tips for Rim Protection
To prevent scratching alloy rims, especially during bead breaking and mounting/demounting:
- Use plastic bead breaker covers on the bead breaker paddle.
- Ensure the tire is flush against the bead breaker pad to minimize movement.
- When demounting/mounting, ensure the stainless steel bird head is properly adjusted to clear the rim. A slight gap (e.g., 1/4 inch) between the head and the rim is ideal to account for tire deflection.
- Zawsze używaj ample tire mounting paste on both beads and rim edges.
- Consider using additional plastic protectors on the clamping jaws if working with delicate rims.
Video: Tire Changer Operation Tips (External Resource)
This video demonstrates practical tips for using a tire changer, including techniques to avoid scratching rims and proper bead breaking. (Source: XK988)
Video: BILT HARD 2.0HP 110V Swing Arm Tire Changer Overview
Ten film przedstawia szybki przeglądview of the BILT HARD 2.0HP 110V Swing Arm Tire Changer, showcasing its key features and operation. (Source: Weize)
5. Operating the Wheel Balancer (ME-B600)
Proper wheel balancing is essential for vehicle safety and tire longevity.

Rysunek 5.1: KATOOL ME-B600 Wheel Balancer with key dimensions indicated.
5.1 Montaż koła
- Select the appropriate mounting cone for the wheel's center bore.
- Mount the wheel securely onto the balancer's shaft. Ensure it is centered and tightened with the quick-release nut.
5.2 Wprowadzanie danych koła
- Using the caliper, measure the wheel's diameter, width, and distance from the machine.
- Input these measurements into the balancer's control panel.
- Select the desired balancing program (e.g., static, dynamic, alloy).
5.3 Balancing Procedure
- Close the wheel guard (if applicable) and press the START button. The machine will spin the wheel and calculate the required weight and location.
- The display will indicate the amount of weight needed for both the inner and outer planes, and where to place them.
- Apply the correct weights to the indicated positions on the rim.
- Spin the wheel again to verify the balance. Repeat the process if necessary until the display shows '0' or an acceptable tolerance.
Video: Wheel Balancer Operation Tips (External Resource)
This video demonstrates practical tips for using a wheel balancer, including techniques for accurate weight placement. (Source: XK988)
6. Konserwacja
Regular maintenance ensures the longevity and optimal performance of your equipment.
6.1 Codzienna konserwacja
- Clean the machine surfaces, turntable, and mounting head after each use.
- Check air lines and connections for leaks.
- Inspect bead breaker paddle and mounting head for wear or damage.
6.2 Konserwacja tygodniowa
- Lubricate moving parts, such as the swing arm pivot points and air cylinder rods, with a light oil (e.g., WD-40).
- Check and clean the air filter/regulator.
6.3 Konserwacja miesięczna
- Sprawdź, czy wszystkie śruby i elementy mocujące są dobrze dokręcone.
- Check the condition of electrical cables and connections.
- Verify the accuracy of the pressure gauge.
7. Rozwiązywanie Problemów
W tej sekcji znajdziesz rozwiązania typowych problemów, na jakie możesz natrafić.
| Problem | Możliwa przyczyna | Rozwiązanie |
|---|---|---|
| Maszyna się nie włącza | No power supply; tripped breaker | Check power connection; reset breaker |
| Tire changer not clampwłączanie/wyłączanieampwchodzenie | Insufficient air pressure; air leak; jammed jaws | Check air supply; inspect for leaks; clear obstructions |
| Bead breaker not working effectively | Low air pressure; improper tire positioning | Verify air pressure; reposition tire flush against pad |
| Wheel balancer giving inconsistent readings | Improper wheel mounting; incorrect data input; machine not calibrated | Remount wheel securely; re-enter data; perform calibration (refer to specific balancer manual) |
| Tire difficult to mount/demount | Insufficient lubrication; improper technique; stiff tire | Apply more mounting paste; review operating steps; use helper arm if available |
8. Specyfikacje
Technical specifications for the KATOOL ME-T500 Tire Changer and ME-B600 Wheel Balancer Combo.

Rysunek 8.1: Key specifications for the KATOOL Tire Changer, including max tire diameter and width.

Rysunek 8.2: Detailed specifications table for the KATOOL Tire Changer.
8.1 KATOOL ME-T500 Tire Changer
- Obręcz klamping (Na zewnątrz): 10"-19"
- Obręcz klamping (Wewnątrz): 12"-21"
- Maksymalna średnica opony: 960 mm (38 cale)
- Maksymalna szerokość opony: 410 mm (17 cale)
- Prędkość obrotowa blatu stołu: 6 obr./min.
- Siła zrywacza koralików: 5500 funtów
- Ciśnienie robocze: 0.8 MPa
- Moc silnika: 0.75KW - 1.1KW
- Waga wysyłkowa: 510 funtów (230 kg)
- Hałas roboczy: <70dB
- Silnik skrzyni biegów: 110V/220V/380V, 50/60HZ
- Wymiary: 39" x 33" x 37"
8.2 KATOOL ME-B600 Wheel Balancer
Specific technical specifications for the ME-B600 Wheel Balancer are typically found in its dedicated manual. General features include:
- Computerized balancing system.
- Digital display for precise readings.
- Multiple balancing modes (static, dynamic, alloy).
9. Gwarancja i wsparcie
KATOOL offers various protection plans for your equipment, including 2-Year and 3-Year Protection Plans, as well as a Complete Protect monthly plan. For detailed warranty information, service, or technical support, please refer to your purchase documentation or contact KATOOL customer service directly. Always provide your model number (ME-T500 / ME-B600) and serial number when seeking support.