
1. Wprowadzenie
This manual provides detailed instructions for the installation, operation, and maintenance of your UNITOPSCI A4196H1MI2 Android Car Stereo. Please read this manual thoroughly before using the product to ensure proper functionality and to prevent damage. This unit is designed for Chevrolet Cruze J300 models manufactured between 2009 and 2015.
2. Informacje dotyczące bezpieczeństwa
- Zawsze korzystaj z urządzenia odpowiedzialnie i zgodnie z lokalnymi przepisami ruchu drogowego. Rozproszenie uwagi podczas jazdy może prowadzić do wypadków.
- Do not attempt to install or repair the unit if you are not qualified. Improper installation can cause damage to the vehicle's electrical system or the unit itself.
- Aby zapobiec zwarciom, należy upewnić się, że wszystkie przewody są prawidłowo podłączone i zaizolowane.
- Trzymaj urządzenie z dala od wody i nadmiernej wilgoci.
- Unikaj wystawiania urządzenia na działanie ekstremalnych temperatur lub bezpośredniego światła słonecznego przez dłuższy czas.
- Clean the screen with a soft, dry cloth. Do not use abrasive cleaners.
3. Zawartość opakowania
Sprawdź, czy w przesyłce znajdują się wszystkie elementy wymienione poniżej:
- Jednostka stereo samochodowego z systemem Android
- Kamera cofania
- Kabel zasilający
- Mały róg
- Kabel RCA
- Kabel wejściowy kamery tylnej
- Radio Antenna
- Mikrofon
- Pudełko Canbusa
- Antena GPS
- 4/6 Pin USB Cable
- Instrukcja obsługi (ten dokument)
- Kabel adaptera USB
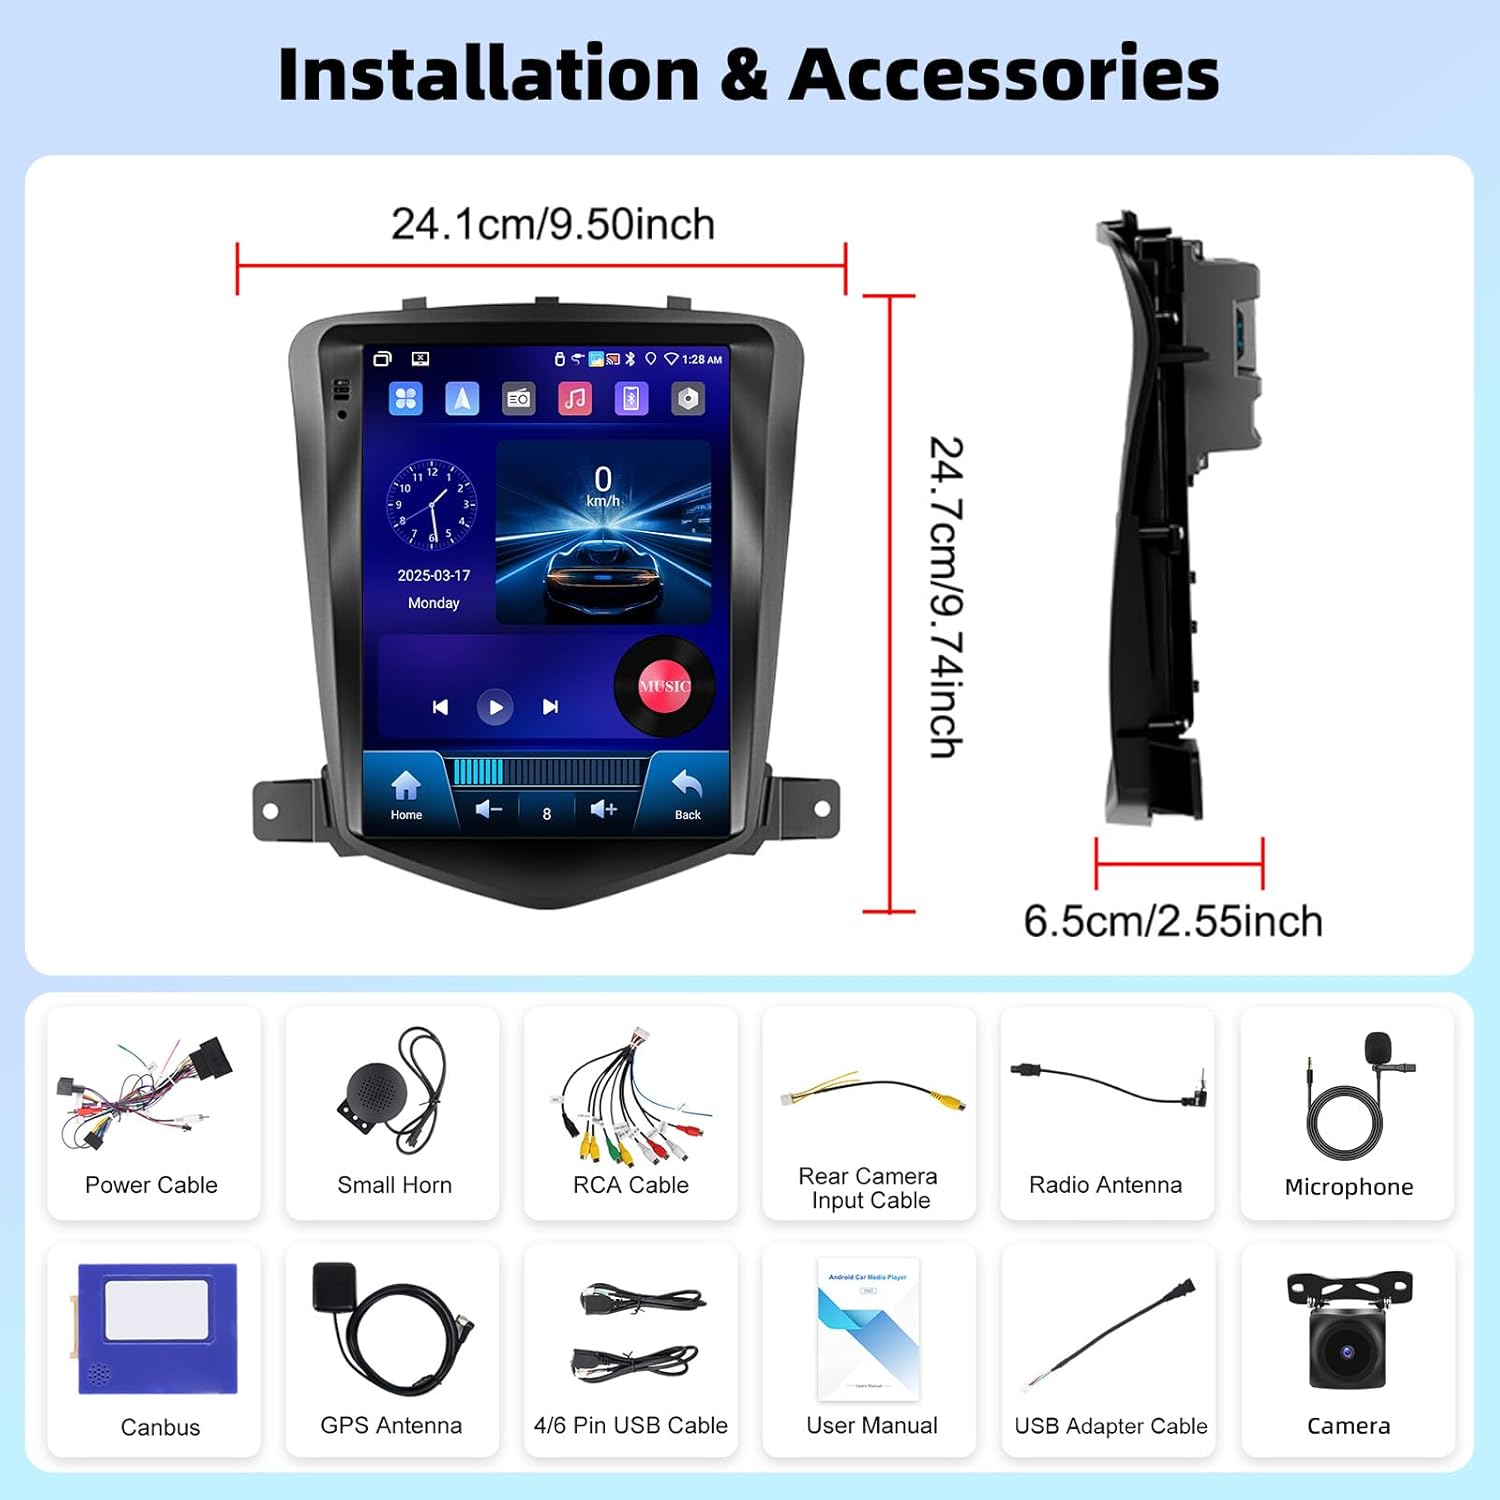
Obraz 3.1: Koniecview of the UNITOPSCI A4196H1MI2 car stereo dimensions and included accessories, such as power cables, antennas, and the backup camera.
4. Instalacja
4.1. Kontrole przed instalacją
- Ensure your vehicle is a Chevrolet Cruze J300 model (2009-2015).
- Przed rozpoczęciem jakichkolwiek prac elektrycznych należy odłączyć akumulator pojazdu.
- Sprawdź, czy wszystkie elementy wymienione w Sekcji 3 są obecne.
4.2. Removing the Original Radio
Ostrożnie zdejmij panele ozdobne i śruby mocujące fabryczne radio. Szczegółowe instrukcje dotyczące demontażu deski rozdzielczej znajdziesz w instrukcji serwisowej pojazdu.
4.3. Połączenia okablowania
- Przewód zasilający: Connect the provided power harness to the vehicle's wiring. Ensure correct polarity.
- Kable RCA: Podłącz do wyjścia audio (np. zewnętrznego) amplifier) if applicable.
- Antena GPS: Zamontuj antenę GPS w miejscu z wolnym dostępem view nieba, zazwyczaj na desce rozdzielczej lub pod przednią szybą.
- Antena radiowa: Podłącz antenę radiową pojazdu do urządzenia.
- Mikrofon: Connect the external microphone for improved call quality. Position it near the driver.
- Kamera cofania: Connect the rear camera input cable to the unit and route the camera cable to the rear of the vehicle. Connect the camera's power to the reverse light circuit for automatic activation.
- Kable USB: Connect the USB extension cables for external storage or wired CarPlay/Android Auto.
- Skrzynka Canbus: Connect the Canbus box as instructed to ensure proper communication with the vehicle's systems, including steering wheel controls.
4.4. Montaż urządzenia
Secure the UNITOPSCI A4196H1MI2 unit into the dashboard opening using the provided brackets and screws. Reassemble the dashboard trim panels.

Image 4.1: Visual comparison of the Chevrolet Cruze J300 dashboard, illustrating the appearance before and after the UNITOPSCI A4196H1MI2 Android car stereo is installed.
5. Instrukcja obsługi
5.1. Włączanie/wyłączanie zasilania
To power on the unit, start your vehicle. The unit will typically power on automatically. To power off, turn off your vehicle's ignition. The unit may have a soft power-off feature that allows it to resume quickly.
5.2. Interfejs dotykowy
The unit features a 9.7-inch HD touchscreen with a resolution of 1024*600. Navigate through menus and applications by tapping, swiping, and pinching gestures, similar to a smartphone or tablet.
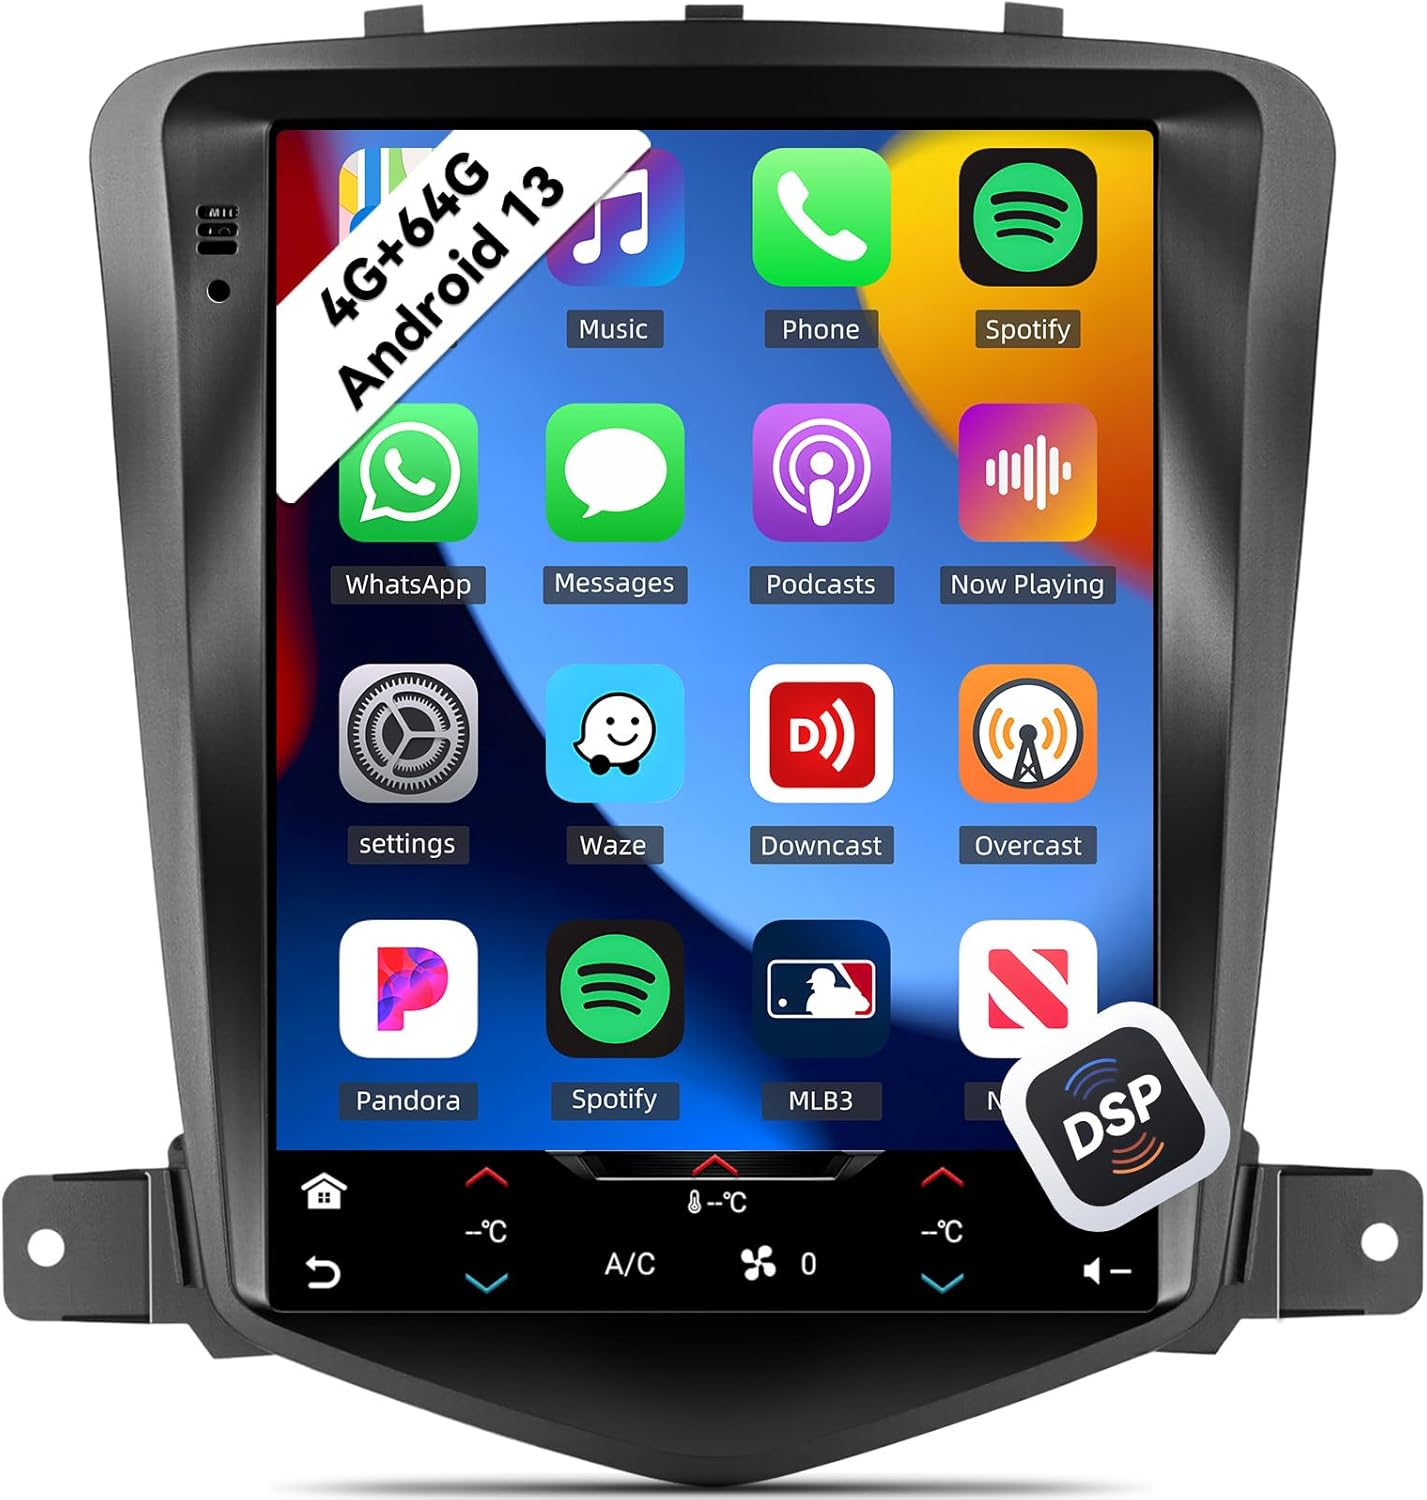
Image 5.1: The main interface of the UNITOPSCI A4196H1MI2 unit, displaying a grid of application icons for music, phone, Spotify, messages, and other functions.
5.3. System Android 13
The stereo operates on the Android 13 operating system, featuring a quad-core processor, 4GB RAM, and 64GB ROM. This configuration provides a responsive user experience and ampmiejsce do przechowywania aplikacji i multimediów.

Image 5.2: A visual representation of the Android 13 system's core components, highlighting the 4-core CPU, 4GB RAM, and 64GB ROM for enhanced performance.
5.4. Bezprzewodowy CarPlay i Android Auto
The unit supports both wireless Apple CarPlay and Android Auto. Connect your compatible smartphone wirelessly to access navigation, music, calls, and messages directly on the stereo's display.
- W przypadku CarPlay: Ensure Wi-Fi and Bluetooth are enabled on your iPhone. Follow the on-screen prompts to pair.
- Dla Android Auto: Ensure Wi-Fi and Bluetooth are enabled on your Android phone. Open the Android Auto app on your phone and follow the pairing instructions.
5.5. Łącze lustrzane
Mirror Link allows you to display your smartphone's screen directly onto the car stereo. This feature is compatible with most Android and iOS phones, excluding some Samsung models.
- Access the Mirror Link application on the stereo.
- Postępuj zgodnie z instrukcjami, aby podłączyć telefon przez USB lub Wi-Fi.

Image 5.3: The car stereo display demonstrating the integration of CarPlay, Android Auto, and Mirror Link functionalities, allowing seamless smartphone connectivity.
5.6.Bluetooth 5.0
The built-in Bluetooth 5.0 module enables hands-free calling and wireless audio streaming. An external microphone is included for clear voice transmission.
- Łączenie w pary: Przejdź do ustawień Bluetooth w zestawie stereo i telefonie. Szukaj available devices and select the stereo's name to pair.
- Rozmowy w trybie głośnomówiącym: Once paired, you can make and receive calls directly from the stereo interface. The phonebook can be automatically downloaded.
- Strumieniowe przesyłanie dźwięku: Play music from your phone through the car's speakers wirelessly.

Image 5.4: The stereo's display showing the Bluetooth 5.0 interface for hands-free calling and music playback, along with the Digital DSP processor's 32-band equalizer.
5.7. Radio FM/RDS
Access local radio stations with the integrated FM/RDS tuner. You can save up to 18 preset stations.
- Navigate to the Radio application.
- Użyj funkcji skanowania, aby znaleźć stacje lub ręcznie dostrój się do częstotliwości.
- Naciśnij i przytrzymaj przycisk zaprogramowanej stacji, aby zapisać bieżącą stację.
5.8. Nawigacja GPS i Wi-Fi
The unit supports GPS, GLONASS, and Beidou navigation systems. You can use pre-installed offline maps or connect to Wi-Fi/hotspot for online navigation apps like Google Maps or Waze.
- Mapy offline: Access the navigation app and select your desired region.
- Mapy online: Connect the unit to a Wi-Fi network or your phone's hotspot via the Wi-Fi settings. Then, open your preferred online navigation application.

Image 5.5: The stereo's capabilities for built-in Wi-Fi, allowing access to various online applications, and GPS navigation, supporting both online and offline maps.
5.9. DSP 32-Band EQ
Customize your audio experience with the Digital Sound Processor (DSP) and its 32-band equalizer. This allows for precise tuning of sound frequencies, time correction, and speed-compensated volume.
- Access the EQ settings from the main menu or audio settings.
- Adjust individual frequency bands to match your audio preferences.
- Przeglądaj wstępnie ustawione tryby korektora lub twórz własne tryby korektorafiles.
5.10. Funkcjonalność podzielonego ekranu
Funkcja dzielenia ekranu umożliwia jednoczesne korzystanie z dwóch aplikacji na 9.7-calowym wyświetlaczu, np. nawigacji i odtwarzania muzyki.
- Otwórz pierwszą aplikację.
- Long-press the recent apps button or swipe from the bottom (depending on Android version) to activate split-screen mode.
- Wybierz drugą aplikację, która będzie wyświetlana obok pierwszej.

Image 5.6: The 9.7-inch HD screen showcasing its wide viewing angle and the split-screen feature, allowing two applications to be viewwyd. jednocześnie.
5.11. Sterowanie z kierownicy (SWC)
The unit supports steering wheel controls, allowing you to manage volume, tracks, and calls without taking your hands off the wheel. This functionality is enabled via the Canbus box.
- Access the Steering Wheel Control settings in the unit's menu.
- Follow the on-screen instructions to program each button on your steering wheel to the desired function.
5.12. Kamera cofania
Dołączona kamera cofania AHD zapewnia wyraźny obraz view of the area behind your vehicle when reversing. The display automatically switches to the camera feed when the reverse gear is engaged.
- Ensure the backup camera is correctly installed and wired to the reverse light circuit.
- When shifting into reverse, the camera feed will appear on the screen.

Image 5.7: The AHD backup camera module and its clear display on the car stereo screen, alongside an illustration of the steering wheel control interface for programming functions.
6. Konserwacja
- Czyszczenie ekranu: Delikatnie przetrzyj ekran dotykowy miękką, niepozostawiającą włókien ściereczką. W przypadku uporczywych plam delikatnie przetrzyj.ampPrzetrzyj ściereczkę wodą lub środkiem do czyszczenia ekranów. Unikaj silnych środków chemicznych.
- Aktualizacje oprogramowania: Okresowo sprawdzaj dostępność aktualizacji oprogramowania od producenta, aby zapewnić optymalną wydajność i dostęp do nowych funkcji.
- Opieka ogólna: Utrzymuj urządzenie w czystości, bez kurzu i zanieczyszczeń. Zapewnij odpowiednią wentylację wokół urządzenia, aby zapobiec przegrzaniu.
7. Rozwiązywanie Problemów
7.1. Brak zasilania
- Sprawdź bezpieczniki: Sprawdź skrzynkę bezpieczników pojazdu i bezpieczniki liniowe urządzenia pod kątem przepalonych bezpieczników.
- Okablowanie: Ensure the power cable is securely connected and has proper voltage.
- Zapłon: Sprawdź, czy zapłon pojazdu jest włączony.
7.2. Brak dźwięku
- Tom: Sprawdź, czy głośność jest zwiększona i nie wyciszona.
- Połączenia głośnikowe: Ensure all speaker wires are correctly connected to the unit and not shorted.
- Źródło dźwięku: Sprawdź, czy wybrano prawidłowe źródło dźwięku (np. FM, Bluetooth, CarPlay).
7.3. GPS nie działa
- Antena: Upewnij się, że antena GPS jest prawidłowo podłączona i zamontowana w miejscu z wolnym dostępem. view nieba.
- sygnał: Allow time for the unit to acquire a GPS signal, especially after initial installation or in areas with poor reception.
- Mapy: Verify that maps are installed or that the unit is connected to Wi-Fi for online navigation.
7.4. Problemy z połączeniem CarPlay/Android Auto
- Bluetooth/Wi-Fi: Upewnij się, że Bluetooth i Wi-Fi są włączone zarówno w zestawie stereo, jak i na Twoim smartfonie.
- Zgodność: Confirm your phone model and operating system version are compatible.
- Kabel USB: If using wired connection, try a different, high-quality USB cable.
7.5. Backup Camera Not Displaying
- Okablowanie: Check the camera's power and video signal connections. Ensure the trigger wire is correctly connected to the reverse light circuit.
- Ustawienia: Verify that the camera input is enabled in the stereo's settings.
8. Specyfikacje
| Funkcja | Specyfikacja |
|---|---|
| Numer modelu | A4196H1MI2 |
| System operacyjny | Android 13 |
| Pamięć (RAM) | 4 GB |
| Pamięć masowa (ROM) | 64 GB |
| Rozmiar wyświetlacza | 9.7 cali |
| Rozdzielczość ekranu | 1024*600 |
| Łączność | Bluetooth 5.0, Wi-Fi |
| Nawigacja | GPS/GLONASS/Beidou (North America, Worldwide maps) |
| Funkcje audio | DSP 32-Band EQ, Stereo Output |
| Cechy specjalne | Wireless Apple CarPlay, Android Auto, Mirror Link, Split Screen, Backup Camera Input, Steering Wheel Control |
| Wymiary produktu | 2.55" dł. x 9.5" szer. x 9.74" wys. |
| Waga przedmiotu | 3.3 funta |
9. Gwarancja i wsparcie
9.1. Gwarancja producenta
This UNITOPSCI A4196H1MI2 car stereo comes with a Roczna gwarancja producenta od daty zakupu. Niniejsza gwarancja obejmuje wady materiałowe i wykonawcze wynikające z normalnego użytkowania. Prosimy zachować dowód zakupu na wypadek roszczeń gwarancyjnych.
9.2. Obsługa klienta
For technical assistance, troubleshooting, or warranty inquiries, please contact UNITOPSCI customer support. You can reach them via email at UNITOPSCI@126.com. Please provide your model number (A4196H1MI2) and a detailed description of your issue for efficient service.
Additional protection plans may be available for purchase from your retailer, offering extended coverage beyond the manufacturer's warranty.